
AWS Elastic Beanstalk is a PaaS offering for web-based applications in AWS that includes Auto Scaling. In this regard, it is comparable to Microsoft Azure App Service, which you will see in a later section of this chapter.
AWS Elastic Beanstalk removes the need to manage infrastructure and, instead, you only need to be concerned about building and hosting your applications. For a full DevOps approach, it is advised that you use this PaaS service if you want to work with AWS.
The following instructions illustrate step by step how to deploy the Tic-Tac-Toe application in AWS Elastic Beanstalk.
Let's start with the creation of the AWS Beanstalk application, as follows:
- Sign in to AWS and go to the AWS Management Console, enter Beanstalk in the AWS services textbox, and click on the displayed link; you will be redirected to the Beanstalk welcome page, as follows:

- On the Beanstalk welcome page, click on the Get started button, as shown in the following screenshot:

This will take you to the page displayed in the following screenshot. Select .NET (Windows/IIS) as a platform, then click on the Create application button, as follows:

- Wait until the Beanstalk application has been created (depending on your internet connection and AWS, this may take a while), as follows:

The technical environment needs to be prepared in the next steps, before being able to deploy the Tic-Tac-Toe application and then run it in the end.
As you may have seen in the preceding chapters, the application requires a database to persist user and application data. For this purpose, we will make provision for a SQL Server PaaS service called the Amazon Relational Database Service (Amazon RDS) in AWS, as in the following example:
- Return to the AWS Management Console and click on Elastic Beanstalk within the Recently visited services section, as shown in the following screenshot:

- On the Beanstalk All Applications page, select the desired environment and then click on Default-Environment, and you will see the following resulting screen:

- On the specific Beanstalk application page, click on Configuration in the left-hand menu, as shown in the following screenshot:

- Scroll down, and click on the Modify database link, as shown in the following screenshot:

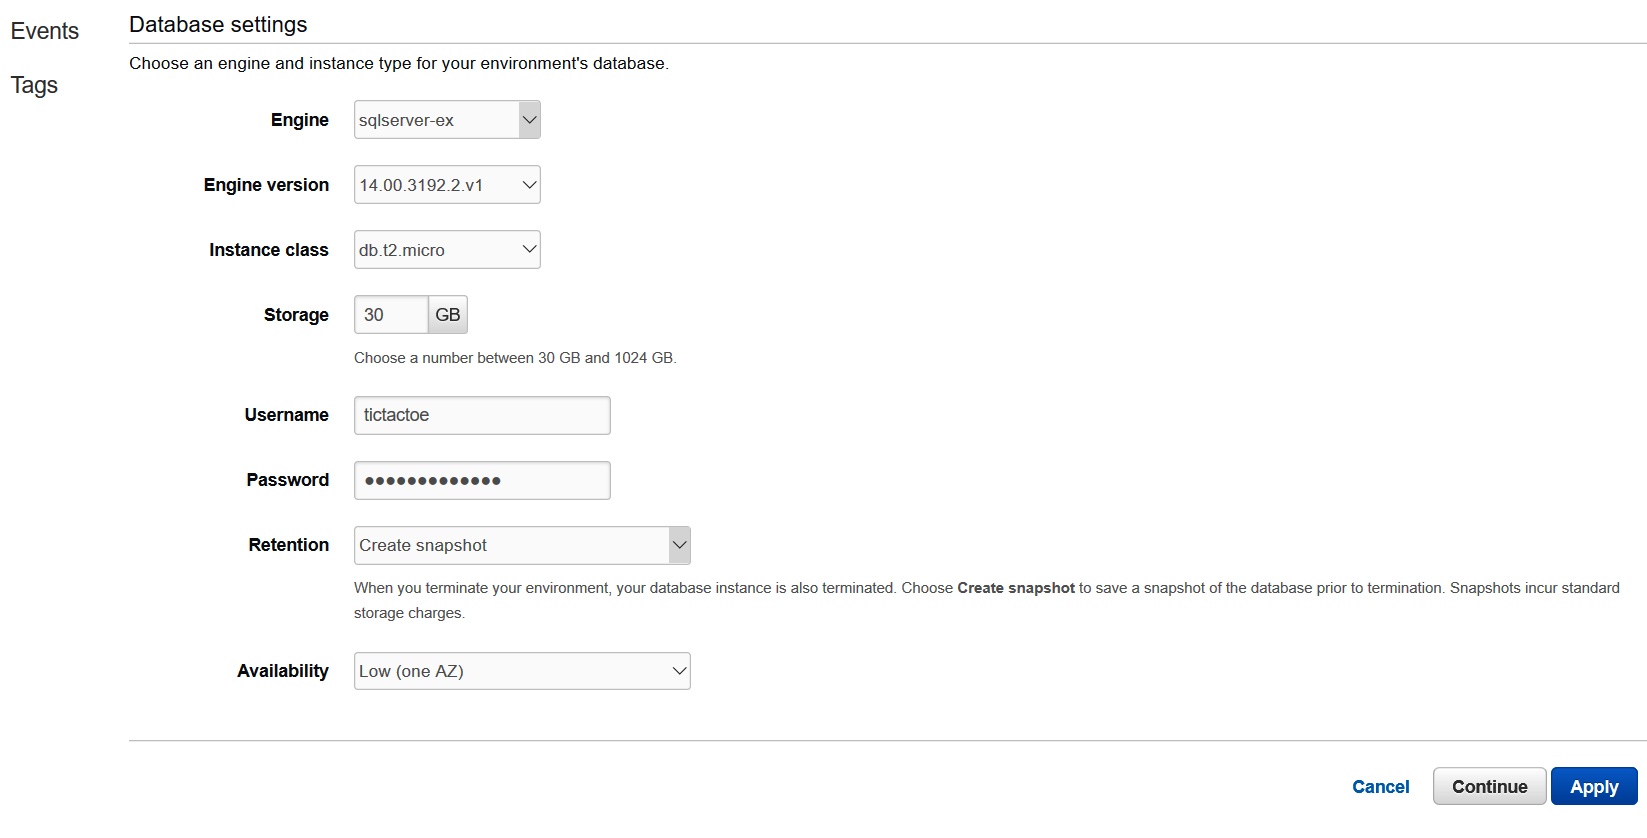
- Select as DB Engine SQL Server Express (sqlserver-ex) and enter a master username and password; leave the rest of the fields at their default values, click on the Apply button at the bottom of the page, and wait for the database creation to be finished, as shown in the following screenshot:
- Go to the AWS Management Console, enter RDS in the AWS services textbox, and click on the displayed link. You will be redirected to the Amazon RDS page; click on DB Instances in the Resources menu, as shown in the following screenshot:

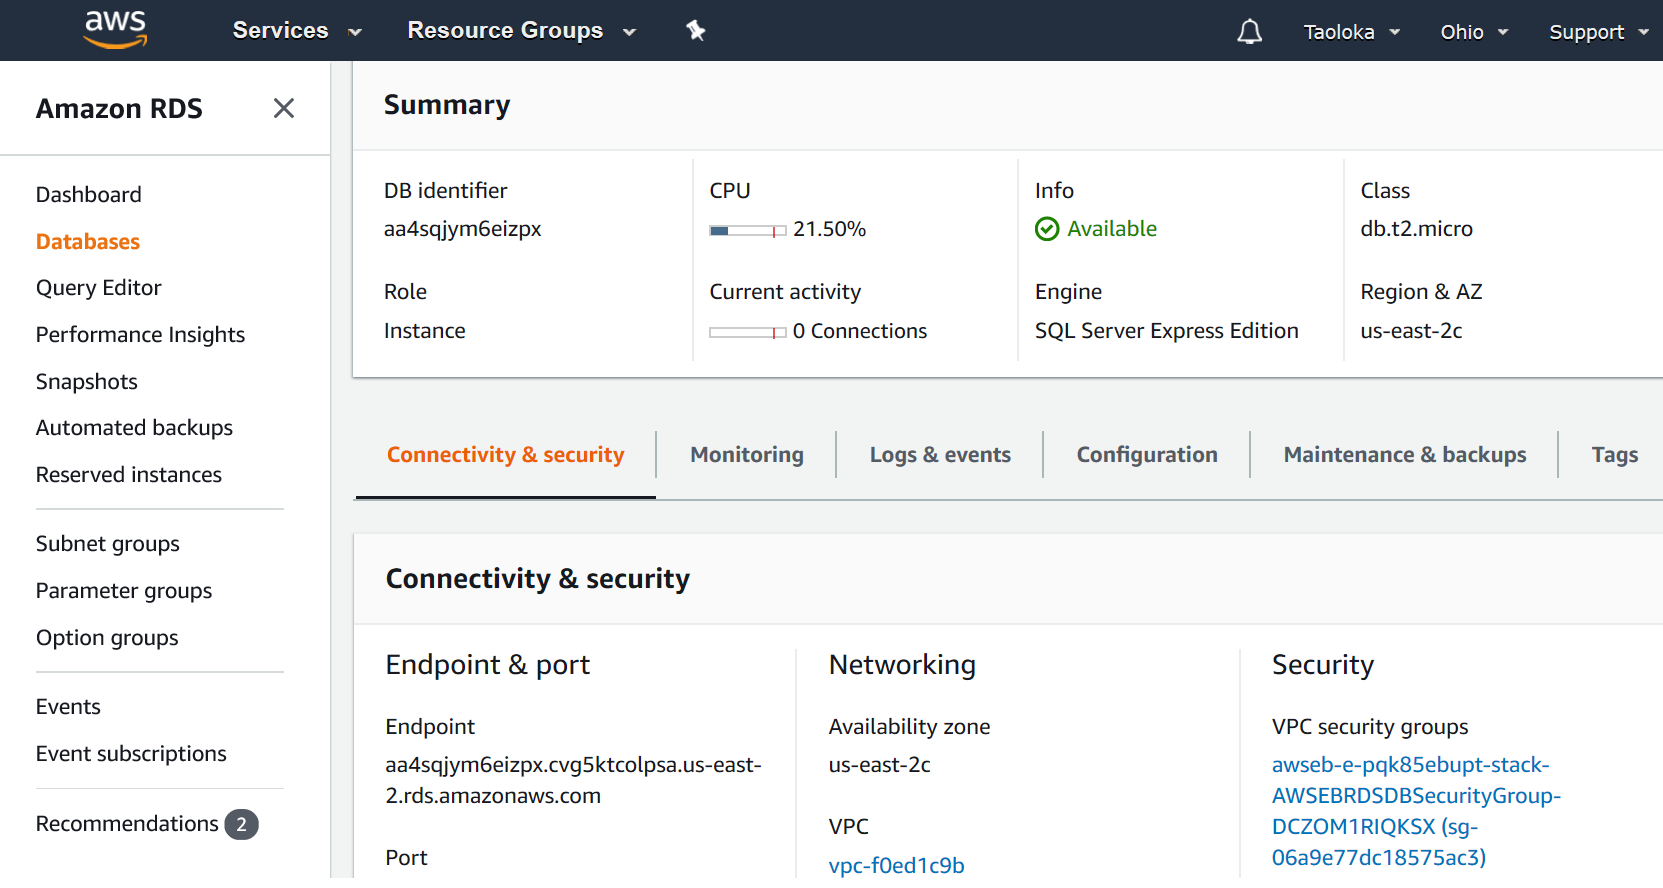
- Click on your instance, and the instance dashboard will be displayed. Scroll down to retrieve the endpoint address, which will be used to update the application connection string before deployment, as shown in the following screenshot:
- Further to the right, in the Connectivity & security tab on the Amazon RDS Instance page, click on the VPC security groups link, as shown in the preceding screenshot.
- On the Security Group page, click on Inbound tab in the menu at the bottom of the page, then click on Edit, to be able to update the inbound rules for the security group of the database you have just created, as shown in the following screenshot:

- Click on the Add Rule button, choose MS SQL as the Type, Custom as the Source, and enter a default security group, then click on the Save button, as shown in the following screenshot:

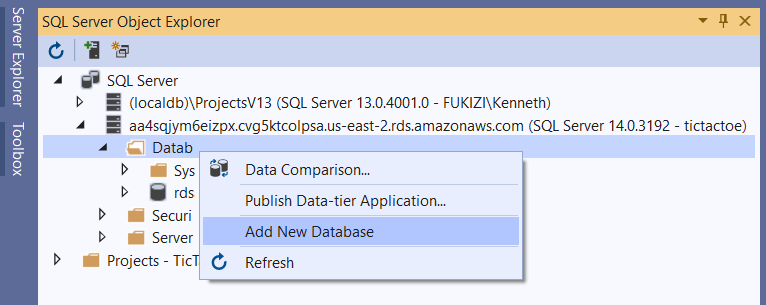
- You have an option to use SQL Server Management Studio (SSMS), SQL Server Object Explorer in Visual Studio 2019, or Azure Data Studio, described in a following note, to work on databases in the cloud. Let's use SQL Server Object Explorer in Visual Studio 2019. Open it and right-click on SQL Server and then Add SQL Server, and sign in using the endpoint address, username, and password from before, as shown in the following screenshot:

- Create a new database called TicTacToe, as follows:
- Update DatabaseConnectionString in the appsettings.json file, and replace the parameters with the following corresponding values. You might recall that in Step 7, we mentioned the retrieved endpoint that was going to be used to update the application connection string before deployment. This is where we need to update it:
        "Server=<YourEndPoint>;Database=TicTacToe;
          MultipleActiveResultSets=true;
          User id=<YourUser>;pwd=<YourPassword>"
You have successfully configured the technical environment, which means that you are now able to publish the database schema, as well as deploy the web application.
Are you eagerly waiting to run the application in the cloud? Just stay focused and continue a little bit further, and you will see your application running in AWS very soon.
You have three choices when it comes to publishing the database schema, as follows:
- Generate a SQL script to create the database from within Visual Studio 2019 via EF Migrations.
- Change the default connection string in DataGameDbContextFactory.cs and execute the Update-Database instruction within the Package Manager Console.
- Run the application to create the database.
The most appropriate solution depends on the type and size of your application and its database. As a rule of thumb, it is better to generate a script and then create the database for larger applications, while for smaller applications, it is acceptable to create the database automatically when the application is running for the first time.