
The philosophy behind feature branches is that the first thing you have to do each time you begin working on a new Azure DevOps feature (or even, Azure DevOps product backlog item) is to create a new so-called feature branch.
You then work on this branch in complete isolation until you are ready to push your tested and validated modifications to your master branch (or, in more sophisticated environments, your development branch). Until it is pushed, it will not interfere with your other features, neither will it cause bugs or lower the overall quality.
If a project deadline approaches and you have not finished all of the planned features in time, you do not need to stress anymore! Why? Because you can integrate only the features that are ready for release. You will have a product with fewer features, but you can be confident that those features are going to work as expected, without any risks.
Let's look at how to create a feature branch, using Visual Studio 2019 and Git:
- Open Visual Studio 2019, go to the Team Explorer - Home tab, and click on the Branches button:

- In Team Explorer - Branches, click on the New Branch link:

- Enter a new feature branch name (use the FEA- prefix), and then click on the Create Branch button:
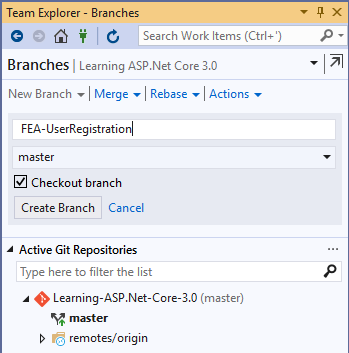
It must be noted that we're using the FEA- prefix just as good practice, to enable other members of the team to identify that this is a feature branch. It is not mandatory to put the FEA- prefix. Different teams agree on different naming conventions for branches.