
So far, you've learned how to create reusable components by using partial views, which can be called from any view pages within your applications, and applied this concept to the top menu of the Tic-Tac-Toe application. But sometimes, even this feature is not enough.
Sometimes, you need something more powerful – something more flexible – that you can use throughout your whole web application and maybe even for multiple web applications. That is where View Components come into play.
View Components are used for complex use cases that require some code running on the server (for example, login panel, tag cloud, and shopping cart), where partial views are too limited to be used, and where you need to be able to test functionalities extensively.
We are going to add a View Component for managing game sessions in the following example. You will see that it is very similar to a standard controller implementation:
- Add a new model called TurnModel to the Models folder:
public class TurnModel
    {
        public Guid Id { get; set; }
        public Guid UserId { get; set; }
        public UserModel User { get; set; }
        public int X { get; set; }
        public int Y { get; set; }
    }
- Add a new model called GameSessionModel to the Models folder:
public class GameSessionModel
    {
        public Guid Id { get; set; }
        public Guid UserId1 { get; set; }
        public Guid UserId2 { get; set; }
        public UserModel User1 { get; set; }
        public UserModel User2 { get; set; }
        public IEnumerable<TurnModel> Turns { get; set; }
        public UserModel Winner { get; set; }
        public UserModel ActiveUser { get; set; }
        public Guid WinnerId { get; set; }
        public Guid ActiveUserId { get; set; }
        public bool TurnFinished { get; set; }
    }
- Add a new service called GameSessionService to the Services folder, implement it, and extract the IGameSessionService interface:
public class GameSessionService : IGameSessionService
    {
        private static ConcurrentBag<GameSessionModel> _sessions;
        static GameSessionService()
        {
            _sessions = new ConcurrentBag<GameSessionModel>();
        }
        public Task<GameSessionModel> GetGameSession(Guid
         gameSessionId)
        {
            return Task.Run(() => _sessions.FirstOrDefault(
            x => x.Id == gameSessionId));
        }
    }
- Register GameSessionService within the Startup class, like you did with all the other services:
services.AddSingleton<IGameSessionService, GameSessionService>();
- Go to the Solution Explorer, create a new folder called Components, and add a new class called GameSessionViewComponent.cs to it:
[ViewComponent(Name = "GameSession")]
    public class GameSessionViewComponent : ViewComponent
    {
        IGameSessionService _gameSessionService;
        public GameSessionViewComponent(IGameSessionService
         gameSessionService)
        {
            _gameSessionService = gameSessionService;
        }
        public async Task<IViewComponentResult> InvokeAsync(Guid
         gameSessionId)
        {
            var session = await _gameSessionService.
             GetGameSession(gameSessionId);
            return View(session);
        }
    }
- Go to the Solution Explorer and create a new folder called Components within the Views/Shared folder. Within this folder, create a new folder called GameSession for GameSessionViewComponent. Then, manually add a new view called default.cshtml:
@model TicTacToe.Models.GameSessionModel
@{ var email = Context.Session.GetString("email"); }
@if (Model.ActiveUser?.Email == email)
{<table>
@for (int rows = 0; rows < 3; rows++) {<tr style="height:150px;">
@for (int columns = 0; columns < 3; columns++)
{<td style="width:150px; border:1px solid #808080">
@{var position = Model.Turns?.FirstOrDefault(turn => turn.X ==
columns && turn.Y == rows);
if (position != null) { if (position.User?.Email == "Player1")
{<i class="glyphicon glyphicon-unchecked"
style="width:100%;height:100%"></i> }
else{<i class="glyphicon glyphicon-remove-circle"
style="width:100%;height:100%"></i> }
} else{ <a asp-action="SetPosition"
asp-controller="GameSession"
asp-route-id="@Model.Id" asp-route-email="@email"
class="btn btn-default" style="width:150px;
min-height:150px;">
</a> } } </td> } </tr> }
</table>
}else{
<div class="alert">
<i class="glyphicon glyphicon-alert">Please wait until the other user has finished his turn.</i> </div> }
This is the view that will tell you to wait for your turn if you're not the active user; otherwise, it will give you a table where you can play the TicTacToe game.
ViewsSharedComponents<ViewComponentName><ViewName>.
- Update the _ViewImports.cshtml file to use the View Component by using the @addTagHelper *, TicTacToe command.
- Create a new folder called GameSession within the Views folder. Then, add a new view called Index for the Desktop section, as follows:
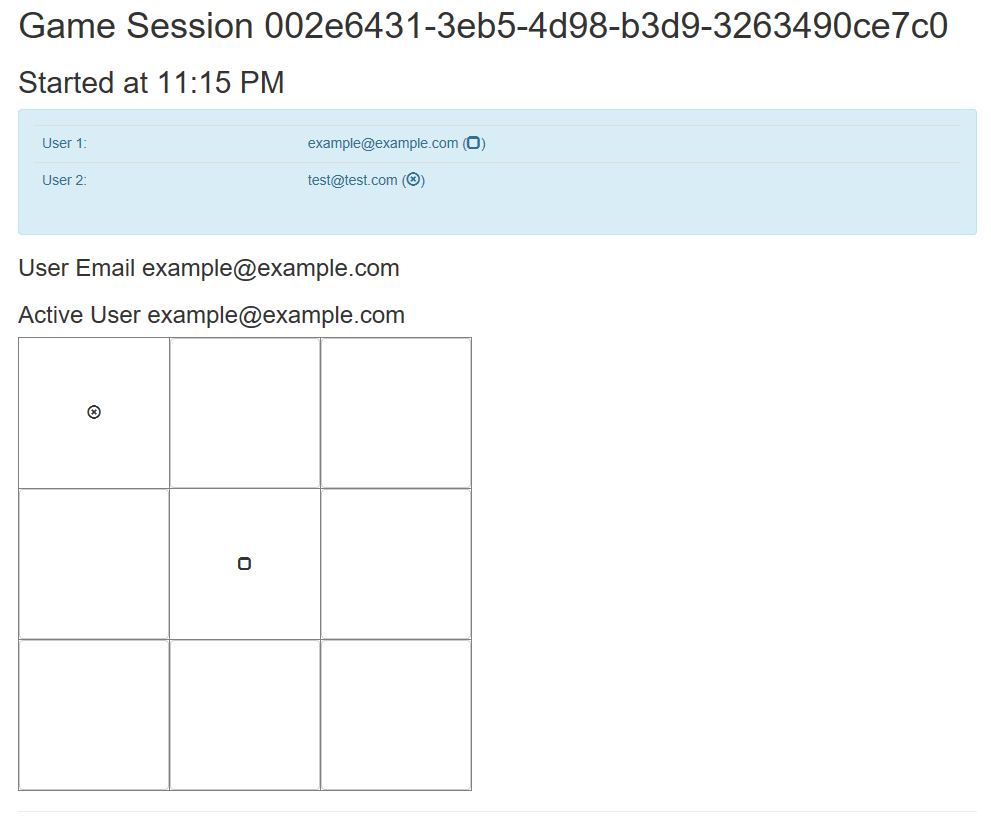
@model TicTacToe.Models.GameSessionModel
@section Desktop
{<h1>Game Session @Model.Id</h1>
    <h2>Started at @(DateTime.Now.ToShortTimeString())</h2>
    <div class="alert alert-info">
        <table class="table">
         <tr>
           <td>User 1:</td>
           <td>@Model.User1?.Email (<i class="glyphicon
             glyphicon-unchecked"></i>) </td>
          </tr>
          <tr>
            <td>User 2:</td>
            <td>@Model.User2?.Email (<i class=" glyphicon
             glyphicon-remove-circle"></i></td>
        </tr>
    </table>
</div>}
Now, do the same for the Mobile section, as follows:
@section Mobile{
    <h1>Game Session @Model.Id</h1>
    <h2>Started at @(DateTime.Now.ToShortTimeString())</h2>
    User 1: @Model.User1?.Email <i class="glyphicon glyphicon-
        unchecked"></i><br />
    User 2: @Model.User2?.Email (<i class="glyphicon glyphicon-
        remove-circle"></i>)
}
<vc:game-session game-session-id="@Model.Id"></vc:game-session>
- Add a public constructor to GameSessionService so that you can get an instance of the user service:
        private IUserService _UserService;
        public GameSessionService(IUserService userService)
        {
            _UserService = userService;
        }
- Add a method to GameSessionService for creating game sessions and update the game session service interface:
public async Task<GameSessionModel> CreateGameSession( Guid invitationId, string invitedByEmail, string invitedPlayerEmail)
        {
            var invitedBy =
            await _UserService.GetUserByEmail(invitedByEmail);
            var invitedPlayer =
            await _UserService.GetUserByEmail(invitedPlayerEmail);
            GameSessionModel session = new GameSessionModel
            {
                User1 = invitedBy,
                User2 = invitedPlayer,
                Id = invitationId,
                ActiveUser = invitedBy
            };
            _sessions.Add(session);
            return session;
        }
- Add a new controller called GameSessionController within the Controllers folder and implement a new Index method:
        private IGameSessionService _gameSessionService;
        public GameSessionController(IGameSessionService
        gameSessionService)
        {  _gameSessionService = gameSessionService;  }
        public async Task<IActionResult> Index(Guid id)
        {
            var session = await _gameSessionService.
                GetGameSession(id);
            if (session == null)
            {
                var gameInvitationService =
                Request.HttpContext.
                RequestServices.GetService
                <IGameInvitationService>();
                var invitation = await gameInvitationService.
                  Get(id);
                session = await _gameSessionService.
                CreateGameSession(
                            invitation.Id, invitation.InvitedBy,
                             invitation.EmailTo);
            }
            return View(session);
        }
- Start the application, register a new user, and invite another user to play a game. Wait for the new game session page to be displayed, as follows:
In this section, we've learned how to implement an advanced feature called View Components. In the next section, we will take a look at another advanced and exciting feature called Tag Helpers. Stay focused.