
Tag Helpers are a relatively new feature since ASP.NET Core 2+ and allow server-side code to be used when creating and rendering HTML elements. They can be compared to the well-known HTML helpers for rendering HTML content.
ASP.NET Core 3 provides many built-in Tag Helpers, such as ImageTagHelper and LabelTagHelper, that you can use within your applications. When creating your own Tag Helpers, you can target HTML elements based on an element name, an attribute name or a parent tag. Then, you can use standard HTML tags in your views while presentation logic written in C# is applied on the web server.
Additionally, you can even create custom tags. You can use these within the Tic-Tac-Toe demo application. Let's learn how to create custom tags:
- Open the Solution Explorer and create a new folder called TagHelpers. Then, add a new class called GravatarTagHelper.cs that implements the TagHelper base class.
- Implement the GravatarTagHelper.cs class; it will be used to connect to the Gravatar online service for retrieving account photos for users. Let's start with the plumbing for the class:
[HtmlTargetElement("Gravatar")]
    public class GravatarTagHelper : TagHelper
    {
        private ILogger<GravatarTagHelper> _logger;
        public GravatarTagHelper(ILogger<GravatarTagHelper> logger)
        {
            _logger = logger;
        }
        public string Email { get; set; }
...
}
Now, we can implement the Process method, as follows:
public override void Process(TagHelperContext context, TagHelperOutput output)
        {
            byte[] photo = null;
            if (CheckIsConnected())
            {
                photo = GetPhoto(Email);
            }
            else
            {
                photo = File.ReadAllBytes(Path.Combine(
                Directory.GetCurrentDirectory(),
                "wwwroot", "images", "no-photo.jpg"));
            }
            string base64String = Convert.ToBase64String(photo);
            output.TagName = "img";
            output.Attributes.SetAttribute("src",
            $"data:image/jpeg;base64,{base64String}");
        }
The Process method will require a method to check for a connection, called CheckIsConnected, which can be implemented as follows:
        private bool CheckIsConnected()
        {
            try
            {
                using (var httpClient = new HttpClient())
                {
                    var gravatarResponse = httpClient.GetAsync(
                    "http://www.gravatar.com/avatar/").Result;
                    return (gravatarResponse.IsSuccessStatusCode);
                }
            }
            catch (Exception ex)
            {
                _logger?.LogError($"Cannot check the gravatar
                  service status: { ex} ");
                return false;
            }
        }
We will also need a GetPhoto method, as follows:
private byte[] GetPhoto(string email)
        {
            var httpClient = new HttpClient();
            return httpClient.GetByteArrayAsync(
            new Uri($"http://www.gravatar.com/avatar/ {
              HashEmailForGravatar(email) }")).Result;
        }
Finally, we need a HashEmailForGravatar method, as follows:
 private static string HashEmailForGravatar(string email)
        {
            var md5Hasher = MD5.Create();
            byte[] data = md5Hasher.ComputeHash(
            Encoding.ASCII.GetBytes(email.ToLower()));
            var stringBuilder = new StringBuilder();
            for (int i = 0; i < data.Length; i++)
            {
                stringBuilder.Append(data[i].ToString("x2"));
            }
            return stringBuilder.ToString();
        }
- Open the Views/_ViewImports.cshtml file and verify that the addTagHelper instruction exists. If it doesn't add it to the file by using the @addTagHelper *, TicTacToe command.
- Update the Index method in the GameInvitationController, store the user's email, and display their name (first name and last name) in a session variable:
        [HttpGet]
        public async Task<IActionResult> Index(string email)
        {
            var gameInvitationModel = new GameInvitationModel
            {
                InvitedBy = email,
                Id = Guid.NewGuid()
            };
            Request.HttpContext.Session.SetString("email", email);
            var user = await _userService.GetUserByEmail(email);
            Request.HttpContext.Session.SetString("displayName",
            $"{user.FirstName} {user.LastName}");
            return View(gameInvitationModel);
        }
- Add a new model called AccountModel to the Models folder:
   public class AccountModel
    {
        public string Email { get; set; }
        public string DisplayName { get; set; }
    }
- Add a new partial view called _Account.cshtml to the Views/Shared folder:
@model TicTacToe.Models.AccountModel
<li class="dropdown">
    <a href="#" class="dropdown-toggle" data-toggle="dropdown">
        <span class="glyphicon glyphicon-user"></span>
        <strong>@Model.DisplayName</strong>
        <span class="glyphicon glyphicon-chevron-down"></span>
    </a>
    <ul class="dropdown-menu" id="connected-dp">
        <li>
            <div class="navbar-login">
                <div class="row">
                    <div class="col-lg-4">
                        <p class="text-center">
                            <Gravatar email="@Model.Email">
                            </Gravatar>
                        </p>
                    </div>
                    <div class="col-lg-8">
                        <p class="text-left"><strong>@Model.
                         DisplayName</strong></p>
                        <p class="text-left small">
                            <a asp-action="Index" asp-
                            controller="Account">
                            @Model.Email</a>
                        </p>
                    </div>
                </div>
            </div>
        </li>
        <li class="divider"></li>
        <li>
            <div class="navbar-login navbar-login-session">
                <div class="row">
                    <div class="col-lg-12">
                        <p>
                            <a href="#" class="btn btn-danger btn-
                              block">Log off</a>
                        </p>
                    </div>
                </div>
            </div>
        </li>
    </ul>
</li>
- Add a new CSS class to the wwwroot/css/site.css file:
#connected-dp {
             min-width: 350px;
             }
- Update the menu partial view and retrieve the user display name and email at the top of the page:
@using Microsoft.AspNetCore.Http;
@{
    var email = Context.Session.GetString("email");
    var displayName = Context.Session.GetString("displayName");
}
- Update the menu partial view and add the new account partial view that we created previously. This can be found after the privacy element in the menu:
        <li>
            @if (!string.IsNullOrEmpty(email))
            {
                Html.RenderPartial("_Account",
                new TicTacToe.Models.AccountModel
                {
                    Email = email,
                    DisplayName = displayName
                });
            }
        </li>
- Create an account on Gravatar with your email and upload a photo. Start the Tic-Tac-Toe application and register with the same email. You should now see a new dropdown with a photo and display name in the top menu:
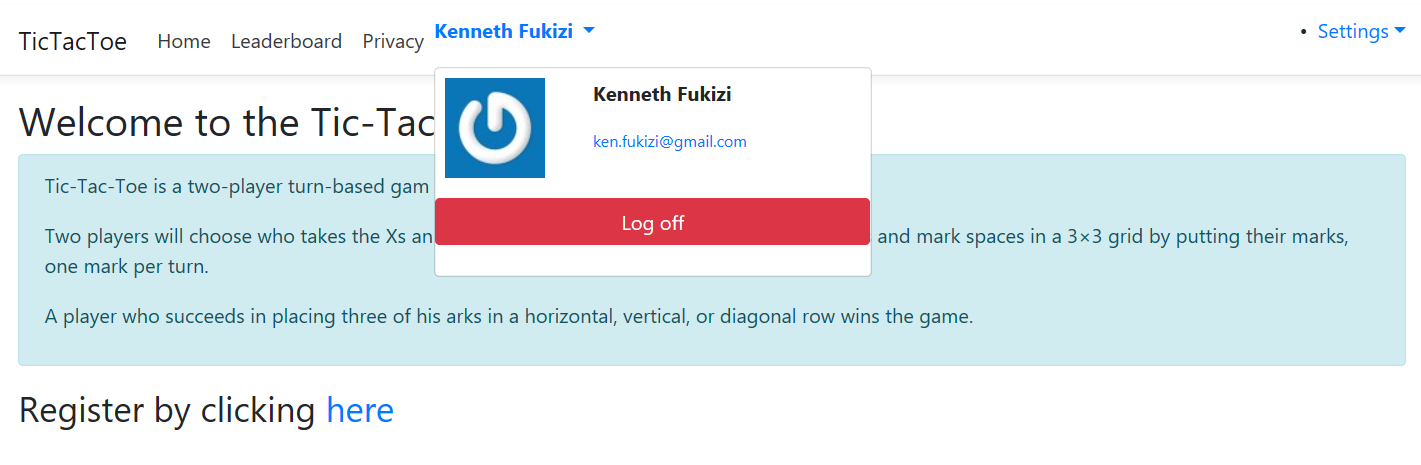
Note that you have to be online for this to work. If you want to test your code offline, you should put a photo in the wwwroot/images folder called no-photo.jpg; otherwise, you will get an error since no offline photo can be found.
This should be easy to understand and easy to use, but when should we use View Components and when should we use Tag Helpers? The following simple rules should help you decide when to use either:
- View Components are used whenever we need templates for views, when we need to render a group of elements, and when we need to associate server code with it.
- Tag Helpers are used to append behavior to a single HTML element instead of a group of elements.
Our application is growing. For larger applications, it can become a nightmare to logically follow the application, especially if you are a new developer that's been placed on an existing project – it might take you some time to get used to the code base. Luckily, ASP.NET Core 3 allows us to compartmentalize similar functionality. We'll look at how to do this in the next section.