
In this chapter, we are going to cover a variety of topics ranging from preparing your card to installing your operating system. We will also cover installing Android and configuring your installation.
As mentioned in the previous chapter, there are many different choices when it comes to your operating system. The most common choices are Android for Media PCs and Bananian or Raspbian, which are both based on Debian Linux. There are several different ways to accomplish preparing your SD card for use on different operating systems and we will cover each of them.
Regardless of the operating system on your computer, you need to have access to an SD card writer. Most laptops have them; depending on your desktop, you may or may not have a reader but, if you don't, these items are inexpensive and will be necessary for working with your Banana Pi and any other single-board computer that uses SD cards and microSD cards.
If you bought a brand-new SD card (Class 10 preferred) that has been preformatted with FAT32 then you are good to go; in fact some kits come with an operating system preinstalled on the SD card that will let you skip this whole section. If that is the case, keep this section as information in your back pocket if you choose to switch operating systems eventually or want to reinstall later.
The quickest and easiest way to actually get your card wiped and ready to go, is to use a piece of software called SD Formatter. This tool is distributed by http://sdcard.org and is the official tool for working with SD cards. You have only a few options when working with the software, as seen in the following screenshot:
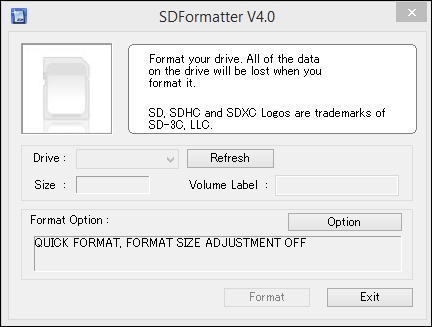
Once the software is installed and launched, you will be presented with a small window that has a few options. You are asked to choose the drive, which is a drop-down list of the removable devices attached to the computer. You are shown the Size, Volume Label, and Format Option options. You can change these options under the Option button where you can choose the format type and format size adjustment as seen in the following screenshot:
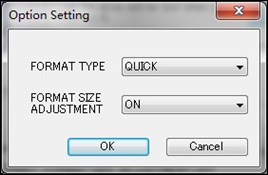
The official Banana Pi website tells you to set your format type to Quick and to leave the size adjustment to On. I have found that personally, I have a lot more success working with the cards when I set the format type to Full (Erase), which is likely due to the fact that we are installing an operating system. I find that Quick is generally fine for drives you intend to just store files on. A full format checks the disk for bad sectors, which takes longer but will result in a much better write. Once this is all set and you have selected your drive from the drop-down, you can click on Format and begin the process. When this is done, you will have a clean card to start working with. Unfortunately if you have already installed Android using Phoenix, you will need to format the disk using fdisk or GParted on Linux.
Since we are going to be working with Linux later on, it makes sense that you can prepare your card from the same OS you will be installing on. I personally prefer working on Linux but that is my preference, I can live on any OS as long as I have a terminal.
There is more than one way to prepare your SD card on Linux and some people tend to lean towards the command line side of things. This is a quick and efficient way to get things done. This is also good practice for later since a lot of working with the Banana Pi is command-line-oriented.
To get started, you are going to need to identify your drive. You may need to be running as root or as a user with root privileges. So, for the sake of this book, we will run our commands with sudo. You can run the fdisk command to check all of the attached drives:
sudo fdisk -l
It should be noted that mixing up the device path might lead to severe data loss!
This output will supply you with a list of the drives attached to the computer; you will need to note which one is your SD card. Once you have done this, you will need to run fdisk on that particular drive.
sudo fdisk /dev/sdx
The x character in sdx will be replaced by the drive number for your drive. The most common path for the SD card is /dev/mmcblk0. Once you have run the command, you will have several options. You will need to select d to delete all the partitions on the drive. You will select n to create a new partition and finally w to write the changes. Now you are able to create a filesystem on the empty partition. This is accomplished by running the following command:
sudo mkfs.vfat /dev/sdxx
On some fresh installs of Linux you may need to install the dosfstools package. The xx character will be replaced according to your drive as seen in the previous case. Once this is finished, you will have an SD card with a clean FAT32 filesystem ready to have an OS installed on it.
If you do a lot of drive maintenance under Linux, you may be familiar with GParted. If not, then this is going to be one of your favorite tools. GParted is a utility for formatting, deleting, and creating drives and partitions. GParted can also be used to create a live CD/USB that you can boot to and accomplish the same task; this also doubles as a valuable tool to have kicking around whenever you need to work with drives. This tool is far more robust than SD Formatter for Windows as you can see in the screenshot.
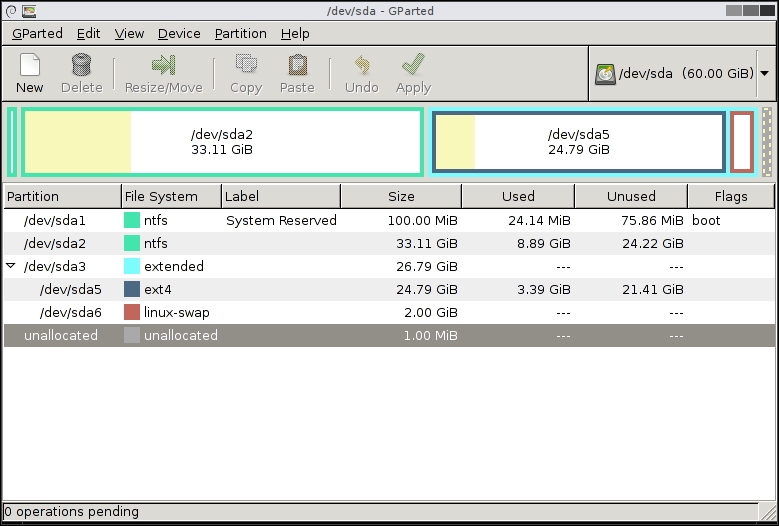
Some of the features in GParted include creating, deleting, resizing, and moving partitions. GParted is also great for working with filesystems such as FAT12/FAT32, ext2, ext3, and ext4, NTFS, and more. This tool will allow you to delete and create your new partitions.
To actually prepare your card in GParted and get things rolling, all you have to do is select the drive in the top-right corner and unmount any partitions that may be on the drive already. You can accomplish this by right-clicking on them in the list on the graph and selecting unmount. Once this is done you will be able to right-click and select delete from the context menu and create your new partition. Once the drive is done you can click on the green Apply button on the top bar and everything will be written. At this point, you are ready to install your operating system.
The Mac OS is actually based on Unix, which means that you have a very similar command-line interface as Linux; that being said, many Mac users are going to be more comfortable using the disk utility to prepare the card. This can be reached by opening the setting page either by searching or by opening it from the overview feature. The utility is a relatively simple looking tool that has a similar functionality to GParted. You can see the UI in the following screenshot:
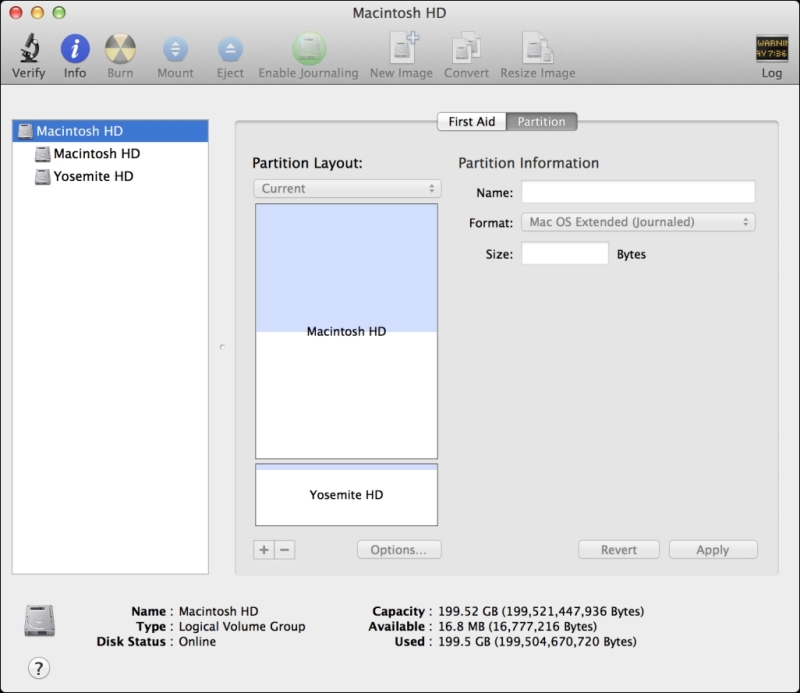
Once you have launched the Disk Utility you will be presented with a list of attached storage devices on the left-hand side. This list will include your main drive, external drives, and your removable media such as USB thumb sticks and SD cards. You will need to select your drive and erase the partition. This will create a fresh partition and get you going onto the next step.