
The Banana Pi has a built-in IR receiver. This is a sensor that listens for an IR signal that is sent from a device such as a remote, as shown in the following image:

This allows you to turn your Banana Pi into something like an HTPC for your TV. In order to get this to work, though, you will need some software. We will install LIRC, which will read the signal and allow us to perform different actions. If you don't install this and set the receiver as a keyboard input, you can actually write a bunch of gibberish just by using a remote.
To get started, we are going to install LIRC. We will do this via the command line, as follows:
sudo apt-get install lirc
Now, you can check out the hardware configuration file in /etc/lirc/hardware.conf. This file will have all the configurations for the remote, kernel support, and several other options. There are a couple of other configuration files, but they will be empty by default. We won't worry about them for now. We will now add the kernel modules to /etc/modules. We will add one of the following lines to the file:
modprobe sun4i_ir
modprobe sunxi_ir
We will need to check whether we have the correct device by running the checks for the devices that are present under input. We will accomplish this task by using the following command:
cat /proc/bus/input/devices
It will likely be event1. The thing about the IR remote is that it isn't a one-size-fits-all device. Some remotes work and some don't. I've seen people try out many different remotes only to have a couple that will work. There is a way to test, though. First, we will need to install evtest, as follows:
sudo apt-get install evtest
We will run evtest by passing in the receiver. If yours is event1, this will work. If not, just change the command, as follows:
evtest /dev/input/event1
Once you see the output coming from a remote, you have found out the one that works with your Pi. Once we have a working remote, we can configure /etc/lirc/hardware.conf that we mentioned previously. The configuration will look like this:
# Arguments which will be used when launching lircd
LIRCD_ARGS=""

#Don't start lircmd even if there seems to be a good config file
#START_LIRCMD=false

#Don't start irexec, even if a good config file seems to exist.
#START_IREXEC=false

#Try to load appropriate kernel modules
# if LOAD_MODULES=false , modules must be preloaded, i.e. during boot (/etc/modules)
LOAD_MODULES=true
MODULES="sun4i_ir"
# newer kernel
#MODULES="sunxi_ir"

# Run "lircd --driver=help" for a list of supported drivers.
DRIVER="devinput"

# usually /dev/lirc0 is the correct setting for systems using udev
DEVICE="/dev/input/event1"

# Default configuration files for your hardware if any
LIRCD_CONF=""
LIRCMD_CONF=""
You may need to change the device to correctly reflect your input device, as follows:
DEVICE="/dev/input/event1"
We can configure the remote now. We will need to set up a configuration file for the remote. We will create the file, as follows:
nano ~/REMOTE.conf
We will set up the generic configuration in the following way:
begin remote
  name  REMOTE
  bits           16
  flags SPACE_ENC|CONST_LENGTH
  eps            30
  aeps          100
  header        9000 4500
  one           563  1687
  zero          563   562
  ptrail        563
  pre_data_bits 16
  gap          108000
  frequency    38000
  duty_cycle   33
      begin codes
      end codes
end remote
We will then run the irrecord command and supply the .conf file once it is configured to your remote, as follows:
irrecord –H devinput –d /dev/input/event1 REMOTE.conf
This will be your opportunity to configure the keys. Press the buttons on the remote. You may need to press the keys more than once or hold them down for more than a couple of seconds. When you are done, there will be a new configuration file saved that has the keys that you created defined in it. We will edit this file, change the name, and remove any doubled keys (the Hex code is repeated on the same line). Lastly, we will copy the new configuration file over to lirc.conf, as follows:
mv REMOTE.conf.conf /etc/lirc/lirc.conf
We can start LIRC by running the following quick command:
/etc/lirc/lirc.conf start
We should now have a working remote. This part is finicky because there are so many different remotes and configuration options available. Actually, I have had the most success with a remote that comes with an IR receiver, such as the one shown in the following image:
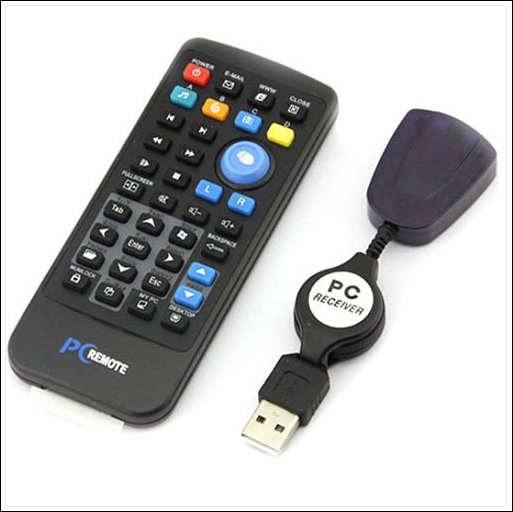
This has been my choice simply because they were made to go together, although this does use up one of your USB ports. We will write some more code to actually use an IR receiver in a project in the next chapter.