
ownCloud is a DropBox alternative. It allows you to create your own service, such as DropBox, but you get to own the hardware. The image at the beginning of this chapter of my Banana Pi server is actually my ownCloud server. We need to do a couple of things to get this working. If we are setting up a cloud service, we will likely want more storage than we will get from our SD card. Luckily for us, we have access to a SATA port on the board.
So, we have a SATA drive and we want to mount it to a spot where we can access and store data to the drive. For this purpose, we will assume that the drive has already been formatted, and we will start mounting the drive. In order to connect a drive to the Banana Pi and power it, you need a fancy cable like the one shown here:

You need a cable because on the Banana Pi, there is a power connector that can power a hard drive. You can use an external power source, but this one will power the drive while the Banana Pi is powered on. You will connect the power adapter to the pins on the board and then connect the SATA connector to the board. The other end of the cable is one large connector to connect directly to the board.
Once the drive is connected and the Banana Pi is powered on, the drive will come to life. The devices connected to the device can be found by running a quick command:
fdisk -l
You will be presented with output that identifies all the disks attached to the device. My disk was /dev/sda1/. We can mount this folder to a directory. We will create a directory in /media/. This directory will hold our data:
mkdir /media/data/
Now we will mount the SATA drive to our new directory:
mount /sev/sdb1/ /media/data
When we look in that directory now, it will be an empty folder. We can now use this folder to hold the files added by ownCloud.
We have a Banana Pi with a web server and a SATA drive connected and mounted. We can now install ownCloud. Since we are installing the ownCloud server onto our nginx server, we need to set up SSL so that our user session isn't hijacked. We will run a few commands:
mkdir /etc/ssl
mkdir /etc/ssl/nginx
cd /etc/ssl/nginx
openssl genrsa -out privkey.pem 2048
openssl req -new -x509 -key privkey.pem -out cacert.pem -days 1095
We are creating directories to hold the SSL certificates and generating our keys in order to decrypt our traffic. Now we need to set up our database connection. We need to log in to MySQL:
mysql -u root -p
You will be prompted for your root password you set up earlier (I hope you remember it). We need to create a user and a database for the ownCloud installation:
CREATE USER 'cloud'@'localhost' IDENTIFIED BY 'your_password';
CREATE DATABASE IF NOT EXISTS owncloud;
GRANT ALL PRIVILEGES ON owncloud.* TO 'cloud'@'localhost' IDENTIFIED BY 'your_password';
FLUSH PRIVILEGES;
We can now log in as the user cloud and whatever password you set will be used to connect to it.
You can now quit MySQL easily:
quit
We now need to install a few extra packages that will be needed for ownCloud:
apt-get install php5-gd php5-json php5-curl php5-intl php5-mcrypt php-xml-parser
These packages basically extend the functionality of PHP. We will also need to install bzip:
apt-get install bzip2
We are now ready to install ownCloud:
wget https://download.owncloud.org/community/owncloud-7.0.3.tar.bz2
tar -jxvf ownCloud 7.0.3.tar.bz2
cp –rf  ./ownCloud/ /var/www
We need to change the owner of the files we just moved to the /var/www directory so that our web server can use them:
chown –R www-data:www-data /var/www
We have all the files we need to get going. Now we need to edit some configuration files. We will start by editing the php.ini file again, this time adjusting the file size limitations so that we can sync larger files:
sudo nano /etc/php5/fpm/php.ini
We will need to edit the following lines, which are not exactly together in the file. You need to find them:
upload_max_filesize = 1024M
post_max_size = 1024M
Now, we will configure nginx again, this time to make sure that the secure ownCloud install will be available over HTTPS:
sudo nano /etc/nginx/sites-available/ssl-default
We can use this configuration to get it running:
upstream php-handler {
    # server 127.0.0.1:9000;
    server unix:/var/run/php5-fpm.sock;
}
server {
  listen 443;
  ssl on;
  ssl_certificate /etc/ssl/nginx/cacert.pem;
  ssl_certificate_key /etc/ssl/nginx/privkey.pem;
  root /var/www;
  client_max_body_size 1G;
  fastcgi_buffers 64 4K;
  rewrite ^/caldav(.*)$ /remote.php/caldav$1 redirect;
  rewrite ^/carddav(.*)$ /remote.php/carddav$1 redirect;
  rewrite ^/webdav(.*)$ /remote.php/webdav$1 redirect;
  index index.php;
  error_page 403 /core/templates/403.php;
  error_page 404 /core/templates/404.php;
  location = /robots.txt {
    allow all;
    log_not_found off;
    access_log off;
  }
    location ~ ^/(data|config|.ht|db_structure.xml|README) {
      deny all;
    }
    location / {
    # The following 2 rules are only needed with webfinger
    rewrite ^/.well-known/host-meta /public.php?service=host-meta last;
    rewrite ^/.well-known/host-meta.json /public.php?service=host-meta-json last;
    rewrite ^/.well-known/carddav /remote.php/carddav/ redirect;
    rewrite ^/.well-known/caldav /remote.php/caldav/ redirect;
    rewrite ^(/core/doc/[^/]+/)$ $1/index.html;
    try_files $uri $uri/ index.php;
    }
    location ~ ^(.+?.php)(/.*)?$ {
        try_files $1 =404;
        include fastcgi_params;
        fastcgi_param SCRIPT_FILENAME $document_root$1;
        fastcgi_param PATH_INFO $2;
        fastcgi_param HTTPS on;
        fastcgi_pass php-handler;
    }
}
If you have deviated from the instructions, you will need to make sure you adjust this configuration accordingly. We will create a symlink to sites-enabled:
ln -s /etc/nginx/sites-available/ssl-default /etc/nginx/sites-enabled
Now we can restart our server:
/etc/init.d/php5-fpm restart
/etc/init.d/nginx restart
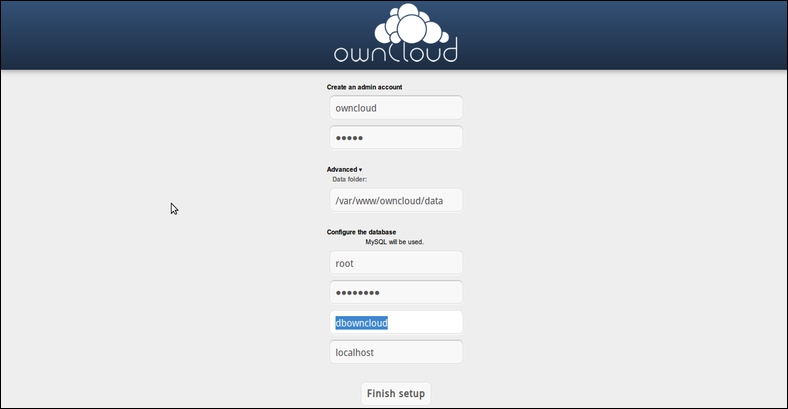
You will be able to access the ownCloud setup page from the browser. If you connect to your IP and navigate to ownCloud, you will see the page. On the initial install page, you will be asked to connect to the database you created earlier and tell it to put the data in the /media/data directory we created when we mounted the SATA drive.
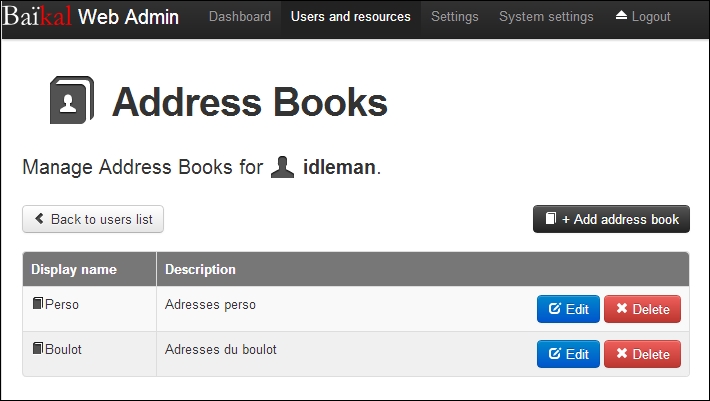
Baikal is a way for you to sync your calendar and contacts without submitting to a third-party solution such as Google. Of course, ownCloud offers the same solution. It is a lot lighter since it is not doing the file syncing. The interface looks like this:
We already have nginx and PHP installed. However, this time around, we will use SQLite as opposed to MySQL.
We will install the packages needed. They include SQLite and the libraries needed for PHP to interact with it:
sudo apt-get install sqlite php5 php5-fpm php5-sqlite
We will also generate an SSL certificate (if you did this for ownCloud, you're still good):
sudo mkdir /etc/nginx/ssl
cd /etc/nginx/ssl
openssl genrsa -out privkey.pem 2048
openssl req -new -x509 -key privkey.pem -out cacert.pem -days 1095
Now we need to create a virtual host for nginx to route our requests to:
nano /etc/nginx/sites-available/ssl
Then we need to edit this file. You can use the following configuration for it to work properly:
server {
  listen 443;

  ssl on;
  ssl_certificate /etc/nginx/ssl/cacert.pem;# path to your cacert.pem
  ssl_certificate_key /etc/nginx/ssl/privkey.pem;# path to your privkey.pem

  root /var/www/;
  index index.html index.htm index.php;

  server_name localhost;
  location / {
    try_files $uri $uri/ /index.html;
  }
  location ~ ^(.+.php)(.*) {
    try_files $fastcgi_script_name =404;
    fastcgi_split_path_info ^(.+.php)(.*)$;

    fastcgi_pass unix:/var/run/php5-fpm.sock;
    fastcgi_param  SCRIPT_FILENAME  $document_root$fastcgi_script_name;
    fastcgi_param  PATH_INFO        $fastcgi_path_info;
    fastcgi_index index.php;
    include fastcgi_params;
  }

      charset utf-8;

  location ~ /(.ht|Core|Specific) {
    deny all;
      return 404;
  }
}
We will activate the host file now by creating the symbolic link to the sites-enabled file:
ln -s /etc/nginx/sites-available/ssl /etc/nginx/sites-enabled
Now that our server is prepped and ready, we can download the Baikal files and install the service. We will need to run a few commands to complete this task:
cd /var/www
wget http://baikal-server.com/get/baikal-flat-0.2.7.zip
unzip baikal-flat-0.2.7.zip
mv baikal-flat/ baikal/
chown -R www-data:www-data baikal/
We are good to go. We can now enable the installation by creating the empty file ENABLE_INSTALL, which, in my opinion, is the worst way ever to accomplish this task.
touch /var/www/baikal/Specific/ENABLE_INSTALL
Now you can go through the installation and create the administrator account and users. Once the users are created, you will be able access the contact book and calendar for those users. You can subscribe to these services through your clients, just like you would subscribe to any other calendar or contact service.
Swap memory is very common in Linux. It acts as memory that is used when the physical RAM on the device is used up. This is not as necessary on newer computers using Linux because, for example, the laptop I am writing this on is running Ubuntu, and I have 16 GB of RAM.
Our Banana Pis have 1 GB of RAM. This is more than enough to perform simple tasks or run simple servers. However, once we are running PHP and it gets more complex, we need some extra memory. It is recommended that you do not create a swap file on the SD card, because it will be a slower medium. Also, it isn't worth using the file as memory and will shorten the life span of your card.
We will create a swap file on the drive we have connected to over SATA. This is going to be much faster. We will create a 2 GB swap file, which will give us 1 GB of RAM and 2 GB of extra swap memory.
We will start by running the swapon command:
sudo swapon -s
This command will give you output that looks like this:
Filename Type Size Used Priority
You will notice that there are no swap files. This means you currently only have the device memory, which means you may run out and notice some lag. We will fix this. We can also verify the absence of a swap file by running the free command:
free -m
The output will look something like this, showing that there is no swap memory available:
             total       used       free     shared    buffers     cached
Mem:          3953        154       3799          0          8         83
-/+ buffers/cache:         62       3890
Swap:            0          0          0
Now we will create a swap file on the drive we mounted to /media/data. Assuming that you have not gone through the ownCloud section yet, it might make sense to put this file in another directory on that drive from the data mount point. You may create an /ownCloud directory inside data and keep the swap file at the root:
dd if=/dev/zero of=/media/data/swapfile bs=1k count=2048k
We now have a 2-GB file called swapfile in /media/data/. We can now make this file active using swapon:
chmod 600 /media/data/swapfile
chown root:root /media/data/swapfile
sudo mkswap /media/data/swapfile
sudo swapon /media/data/swapfile
Our swap file is now activated. We can check it out by running our swapon command again:
sudo swapon -s
Now our output looks like this:
Filename                Type        Size    Used    Priority
/media/data/swapfile               file        4194300 0       -1
We have a working swap file, which is awesome, except that we want it to be permanent. We will edit the fstab file (which sounds dangerous, but isn't):
sudo nano /etc/fstab
At the very bottom of the file, we will add the following command:
/media/data/swapfile none swap sw 0 0
Now, we can save and close the swap file, and this file will be working even if you reboot. One thing to note is that if you are going to remove the SATA drive, you should remove this swap file. Otherwise, it will be looking for a drive that isn't there, and as you may imagine, this is less than optimal.
The swap file we just added will help in the event we run out of memory. Processes such as MySQL can use more memory, which means their queries will be much faster, and the device will become a little more usable. We now have a nice little server for our home.