
Once your SD card is prepped and ready to go, you can start to install the operating system. Depending on the OS you are looking at installing, the instructions may be slightly different but we will be covering installing Android and Raspbian/Bananian, which are the most popular choices for the Banana Pi M1 and M2 units.
Android is one of the main reasons people come looking for the Banana Pi. With the beefed up stats and the ability to run one of the most popular operating systems for media consumption, it makes perfect sense to look at this option for something like a media PC or something else along those lines. Currently, Android can only be set up for the Banana Pi using Windows. This is due to the fact that the SD card needs to be set up in a certain way to operate, which is slightly different than installing Linux. You cannot use the dd command like you can for installing operating systems. You will need to get the PhoenixCard software shown in the following screenshot:
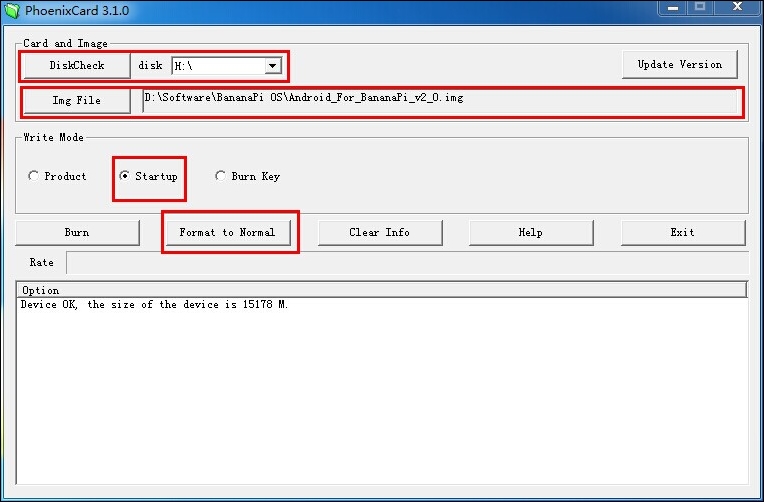
This software is admittedly somewhat difficult to use. Some of the UI is not translated into English and it doesn't always work on the first try. Once the software is launched you will see the UI and you'll notice this:
- The first thing on the very top is the DiskCheck button. You will use this to check the disk you plan to write to, once it is selected from the drop-down.
- The Img File button is used to locate the
.imgfile of the OS you downloaded from the Banana Pi website. - It is important to change the write mode to startup so that the SD card is written so it can be booted from.
- You will then need to click on Format to Normal, which will start the process of making the SD card bootable.
Once this is complete a pop-up dialog will announce Success! and you will know it is good to burn the Android image. To do this you will need to:
- Click on the Burn button, which will cause all kinds of output to spew into the small output window.
- Once you see magic complete (in my opinion, the least descriptive thing ever but also my favorite output from any piece of software I have ever used), you are good to go.
- When this is done, you can pop the SD card into your Banana Pi and plug it in. You will see a boot animation that may take longer than you are expecting to complete. This is normal and if you wait around for a minute or so you will see Android in all its glory running on your tiny computer.

You are able to install just about any .apk file you can think of. I have installed emulators, Netflix, XBMC, and more and they all seem to work. If you install the Android 4.2 version, you will have access to the Google Play Store, if you grabbed the Android 4.4 KitKat download you will be out of luck for now, but you can install Amazon Market to get going.
Most projects aside from media PCs (and even some that are media PCs) will require you to install Linux on the board. The install process is slightly different depending on the OS that you have on your computer right now, similar to preparing your SD card. Regardless of the operating system on your computer, the end result will be the same: a full Linux installation that is ready for you to start hacking on.
Installing the OS through Windows is quick and painless. Downloading the extremely common utility Win32 Disk Imager will solve this for you. Now, follow these steps:
- The interface is simple; you have an input field at the top where you can choose an image file from the Image File drop-down, you can choose the drive and buttons for starting the process here.

- Once you have the drive and image file selected, it is just a matter of clicking on the Write button and waiting patiently. Once the write is complete, you are good to go. Insert the SD card into the Pi and boot it up.
Both Mac OS users and Linux users can follow the same instructions. This process involves using the command line but doesn't require too much of you aside from knowing the drive info and having the image downloaded.
- The first thing you are going to need to do is get a list of the drives on the system:
sudo fdisk -l - Once you know which drive you are working with, you can check the hash key of the ZIP file to make sure it is the same as the download page. This step is optional but it will ensure you are installing the correct image.
sha1sum [path]/[imagename] - You will need to unmount the drive so you can write to it.
unmount /dev/mmcblkxx - Writing the image to the drive is done using the
ddcommand. This is a powerful command that is used to convert and copy files. The following command will write an.imgfile to a drive using 4M block sizes:sudo dd bs=4M if=[path]/[imgname] of=/dev/mmcblkxx - If the 4M block size does not work (it generally should) you can try again using 1M blocks. The smaller blocks will make the process take longer but it shouldn't take long to write.