1. Working with Different Networks, NFC, and Contactless Payments
In this chapter, you discover the connectivity capabilities of your Galaxy Note 5, including Bluetooth, Wi-Fi, VPN, and NFC. Topics include the following:
![]() Pairing with Bluetooth devices
Pairing with Bluetooth devices
![]() Connecting to Wi-Fi networks
Connecting to Wi-Fi networks
![]() Using Near Field Communications (NFC) and beaming
Using Near Field Communications (NFC) and beaming
![]() Working with cellular networks
Working with cellular networks
![]() Working with virtual private networks (VPNs)
Working with virtual private networks (VPNs)
![]() Using your Galaxy Note 5 as a Wi-Fi hotspot
Using your Galaxy Note 5 as a Wi-Fi hotspot
![]() Setting up and using Android Pay or Samsung Pay
Setting up and using Android Pay or Samsung Pay
Your Galaxy Note 5 can connect to Bluetooth devices, such as headsets, computers, and car in-dash systems, as well as to Wi-Fi networks and 2G, 3G, and 4G cellular networks. It has all the connectivity you should expect on a great smartphone. Your Galaxy Note 5 can also connect to virtual private networks (VPNs) for access to secure networks. You can share files or pay at the check-out counter using your Note 5’s NFC radio. Your Galaxy Note 5 can even share its cellular data connection with other devices over Wi-Fi.
Connecting to Bluetooth Devices
Bluetooth is a great personal area network (PAN) technology that allows for short-distance wireless access to all sorts of devices, such as headsets, other phones, computers, smartwatches, Google Glass, and even car in-dash systems for hands-free calling and playing music. The following tasks walk you through pairing your Galaxy Note 5 to your device and configuring options.
Pair with a New Bluetooth Device
Before you can take advantage of Bluetooth, you need to connect your Galaxy Note 5 with that device, which is called pairing. After you pair your Galaxy Note 5 with a Bluetooth device, the two devices can connect to each other automatically in the future.
Putting the Bluetooth Device into Pairing Mode
Before you pair a Bluetooth device to your Galaxy Note 5, you must first put it into Pairing mode. If you are pairing with a Bluetooth headset, you normally have to hold the button on the headset for a certain period of time. Consult your Bluetooth device’s manual to find out how to put that device into Pairing mode.
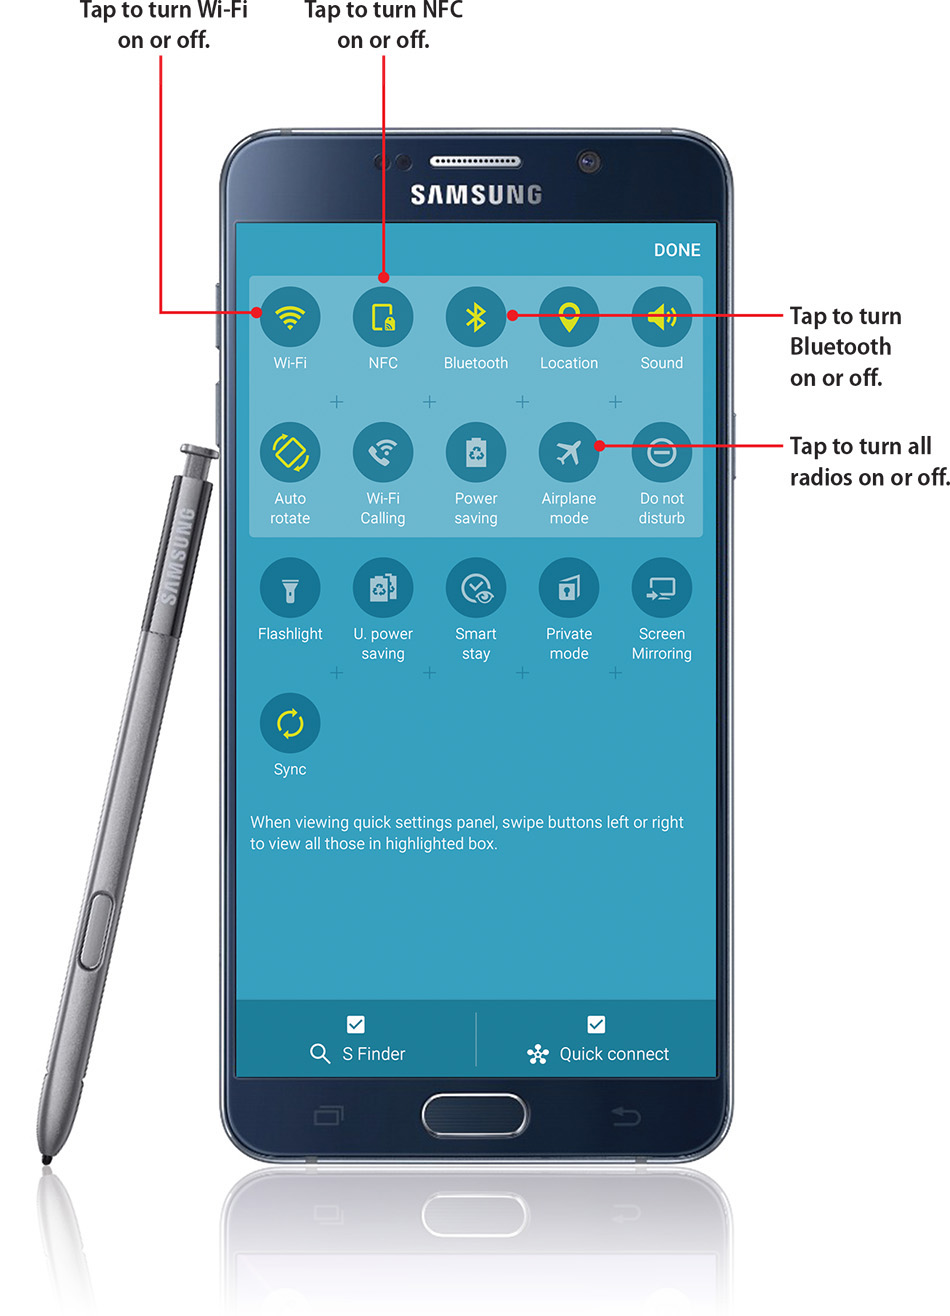
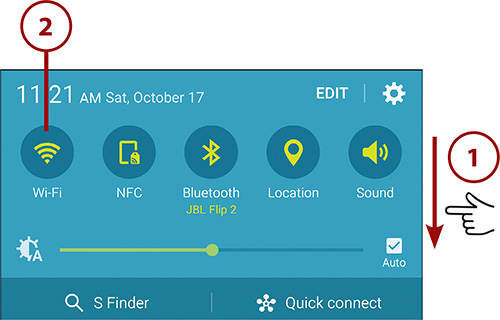
1. Pull down the Notification bar.
2. Touch and hold the Bluetooth icon to configure Bluetooth.
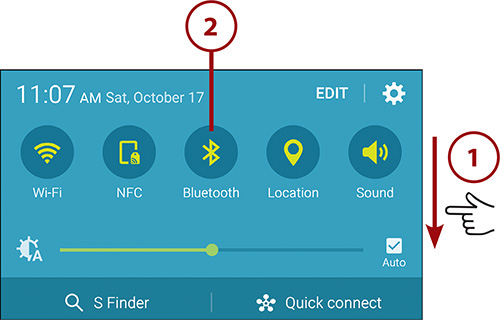
3. Tap to turn the Bluetooth radio on, if it is not already on.
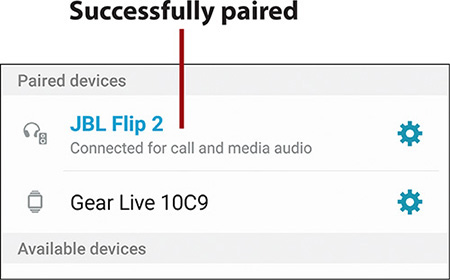
4. Tap the Bluetooth device you want to connect to. This example uses a JBL Flip 2 Bluetooth Speaker.
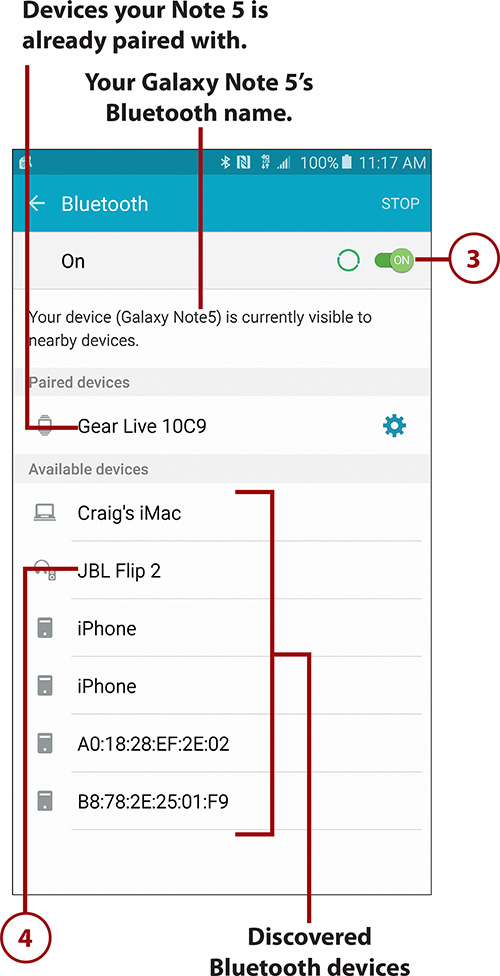
5. If all went well, your Galaxy Note 5 should now be paired with the new Bluetooth device.
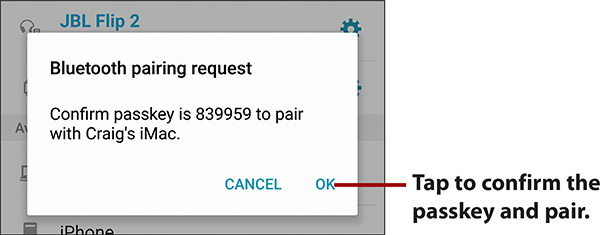
If you are pairing with a device that requires a passkey, such as a car in-dash system, smartwatch, other smartphone, or a computer, the screen shows a passkey. Make sure the passkey is the same on your Galaxy Note 5 and on the device you are pairing with. Tap OK on your Galaxy Note 5 and confirm the passkey on the device you are pairing with.
All Zeros
If you are pairing with an older Bluetooth headset, you might be prompted to enter the passkey. Try using four zeros; it normally works. If the zeros don’t work, refer to the headset’s manual.
Change Bluetooth Device Options
After a Bluetooth device is paired to your Note 5, you might be able to change a few options for it. The number of options depends on the Bluetooth device you are connecting to. Some have more features than others.
1. Tap the Settings icon to the right of the Bluetooth device.

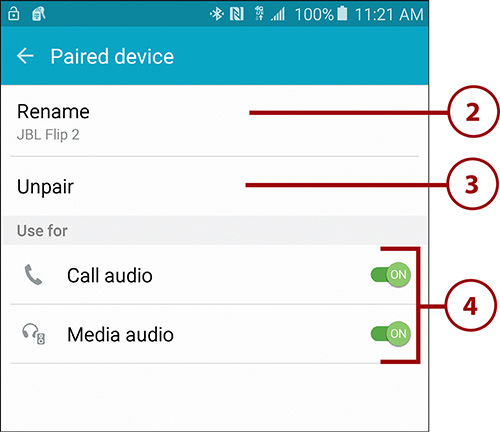
2. Tap to rename the Bluetooth device to something more descriptive.
3. Tap to disconnect and unpair the Galaxy Note 5 from the Bluetooth device. If you do this, you won’t be able to use the Bluetooth device again until you redo the pairing as described in the “Pair with a New Bluetooth Device” task.
4. Tap to use or not use the device’s features. Sometimes Bluetooth devices have more than one profile. You can use this screen to select which ones you want to use.
Each Bluetooth device can have one or more Bluetooth profiles. Each Bluetooth profile describes certain features of the device. This tells your Galaxy Note 5 what it can do when connected to the device. A Bluetooth headset normally only has one profile, such as Phone Audio (or Call Audio). This tells your Galaxy Note 5 that it can only use the device for phone call audio. Some devices might have this profile but also provide other features such as a Phone Book Access profile, which would allow it to synchronize with your Galaxy Note 5’s address book. The latter is typical for a car’s in-dash Bluetooth device. The example shown in step 4 of the “Change Bluetooth Device Options” task is a Plantronics Bluetooth headset that has two Bluetooth profiles: Call Audio and Media Audio. Media Audio allows your Galaxy Note 5 to play media such as sounds your Note 5 makes and other media such as music, audio from a video, and so on. You might decide that you want to use the headset only for phone calls (Call Audio) and would prefer the media audio to continue to be directed to your Note 5’s built-in speaker. In that case, you would uncheck Media Audio.
Quick Disconnect
To quickly disconnect from a Bluetooth device, tap the device on the Bluetooth Settings screen and then tap OK.
Wi-Fi
Wi-Fi (Wireless Fidelity) networks are wireless networks that run within free radio bands around the world. Your local coffee shop probably has free Wi-Fi, and so do many other places, such as airports, train stations, malls, and other public areas. Your Galaxy Note 5 can connect to any Wi-Fi network and provide you faster Internet access speeds than the cellular network.
Connect to Wi-Fi
The following steps explain how to find and connect to Wi-Fi networks. After you have connected your Galaxy Note 5 to a Wi-Fi network, you automatically are connected to it the next time you are in range of that network.
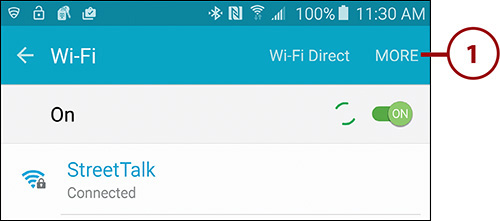
1. Pull down the Notification bar.
2. Touch and hold the Wi-Fi icon.
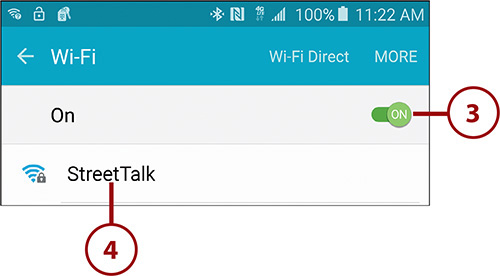
3. Tap to turn Wi-Fi on if the slider is in the off position.
4. Tap the name of the Wi-Fi network you want to connect to. If the network does not use any security, you can skip to step 10.
You Are Prompted to Log In
If you are in a hotel, on a plane, or in some other place that provides Wi-Fi, many times even though the Wi-Fi network does not use any security, right after step 4, you are redirected to a login page. The login page is typically there for you to charge the cost of the Wi-Fi usage to your hotel room or some other account. Sometimes it is just to display a terms of use message for you to accept. If the login page is not displayed and you find that your Internet access is not working, open a web browser (Chrome or the default Internet browser) and type any website (such as abc.com). This should prompt the Wi-Fi network to display the login page.
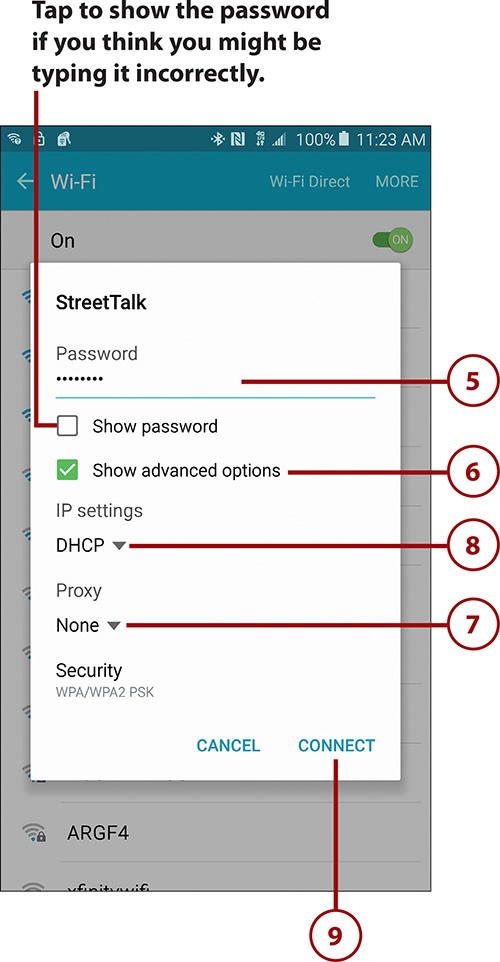
5. Enter the Wi-Fi network password.
6. Tap to configure advanced options such as to use a specific web browsing proxy server or to use static IP settings. If you don’t need to configure advanced options, skip to step 9.
7. Tap to use a special web browsing proxy server while connected to this Wi-Fi network.
8. Tap to decide whether to let the Wi-Fi network router provide you with an IP address and IP settings or to use a static IP address and enter your own IP settings.
9. Tap to connect to the Wi-Fi network.
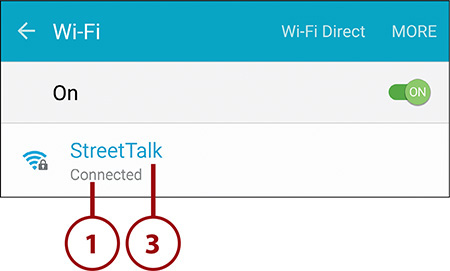
10. If all goes well, you see the Wi-Fi network in the list with the word “Connected” under it.

If the network you want to connect to is not listed on the screen, it might be purposely hidden. Hidden networks do not broadcast their name—which is known as their Service Set Identifier (SSID). Tap More, and tap Add Network, type in the SSID, and choose the type of security that the network uses. You need to get this information from the network administrator before you try to connect.

Configure Wi-Fi Network Options
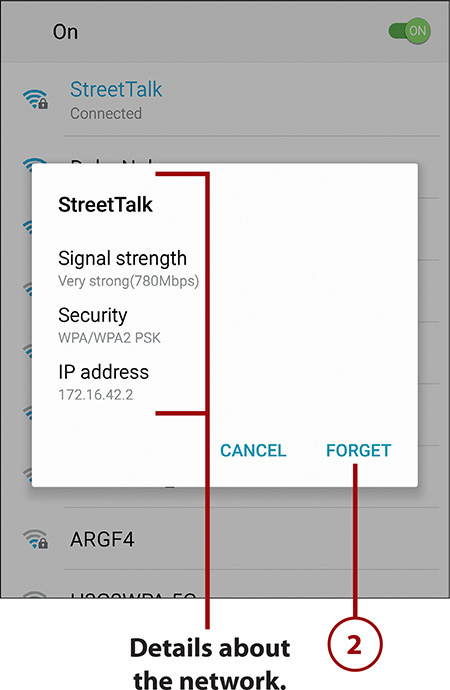
1. Tap a Wi-Fi network to reveal a pop-up that shows information about your connection to that network.
2. Tap Forget to tell your Galaxy Note 5 to not connect to this network in the future.
3. Touch and hold on a Wi-Fi network to reveal two actions.
4. Tap to forget the Wi-Fi network and no longer connect to it.
5. Tap to change the Wi-Fi network password or encryption key that your Galaxy Note 5 uses to connect to the network.
6. Tap to write the Wi-Fi network’s information to an NFC tag.
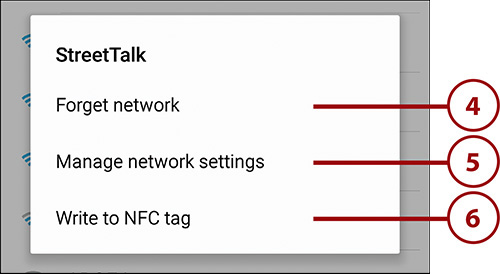
Writing Wi-Fi Information to an NFC Tag
In step 6, there is an option called Write to NFC Tag. This option enables you to write the information about the selected Wi-Fi network to a Near Field Communications (NFC) tag. This is useful if you want to pass out the tags to people so they can more easily connect to your Wi-Fi network, or stick a tag on the wall so people passing by can tap on the tag and quickly connect to your Wi-Fi network without knowing the network name or password.
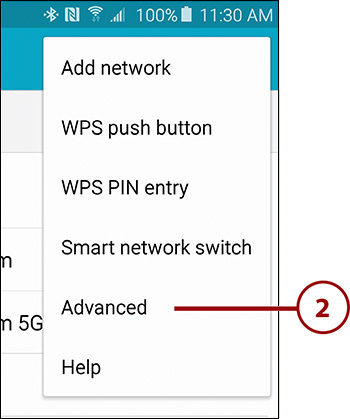
Configure Advanced Wi-Fi Options
Your Galaxy Note 5 enables you to configure a few advanced Wi-Fi settings that can actually help preserve your battery life.
1. Tap More.
2. Tap Advanced.
3. Tap to enable or disable the ability for your Galaxy Note 5 to automatically notify you when it detects a new Wi-Fi network.
4. Tap to let your Note 5 automatically connect to Wi-Fi networks that support Passpoint.
5. Tap to change the Wi-Fi sleep policy. This enables you to choose whether your Galaxy Note 5 should keep its connection to Wi-Fi when it goes to sleep.
6. Tap to choose whether to allow Google and apps running on your Note 5 to scan for Wi-Fi networks, even if you have turned Wi-Fi off.
7. Tap to install certificates for authentication onto Wi-Fi networks that are provided by your administrator, and that you earlier stored on the SD card (external memory).
8. Use this Wi-Fi MAC address if you need to provide a network administrator with your MAC address in order to be able to use a Wi-Fi network.
9. This shows the IP address that has been assigned to your Galaxy Note 5 when it connected to the Wi-Fi network.
10. Tap to save your changes and return to the previous screen.

Should You Keep Wi-Fi on During Sleep?
In step 5 of the “Configure Advanced Wi-Fi Options” task, you can choose how your Galaxy Note 5 handles its connection to Wi-Fi when it goes to sleep. Because Wi-Fi is much faster and more efficient than 3G or 4G, and is free, you should keep this set to Always. However, battery usage can be affected by always being connected to Wi-Fi, so you might want to set this to Only When Plugged In, which means that if your Galaxy Note 5 is not charging, and it goes to sleep, it switches to the cellular network for data; when the Galaxy Note 5 is charging and it goes to sleep, it stays connected to Wi-Fi. If you choose Never for this setting, when your Galaxy Note 5 goes to sleep, it switches to using the cellular network for all data. This can lead to more data being used out of your cellular data bundle, which might cost extra, so be careful.
Passpoint is a technology that is being used increasingly by operators of Wi-Fi hotspots, and its purpose is to let your Note 5 (and other Passpoint-enabled smartphones and tablets) to automatically roam onto the hotspots with no need for you to search for them or log in to them using the typical hotspot login web page. Simply based on the SIM card in your Note 5, you are automatically authenticated onto these hotspots and provided a secure encrypted connection.
Wi-Fi Direct
Wi-Fi Direct is a feature that allows two Android devices running version 4.1 (Jelly Bean) or later to connect to each other using Wi-Fi so they can exchange files. Because Wi-Fi is much faster than Bluetooth, if you are sending large files, using Wi-Fi Direct makes sense. You do not need to be attached to an existing Wi-Fi network to use Wi-Fi Direct.
Send a File Using Wi-Fi Direct
Follow these steps to connect to an Android device running version 4.1 (Jelly Bean) or later via Wi-Fi Direct and send it files from your Note 5.
1. Ask the other person to enable Wi-Fi Direct on his Android device. The Wi-Fi Direct screen is normally under the Wi-Fi Settings or Wi-Fi Advanced Settings.
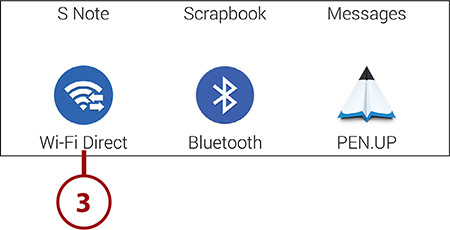
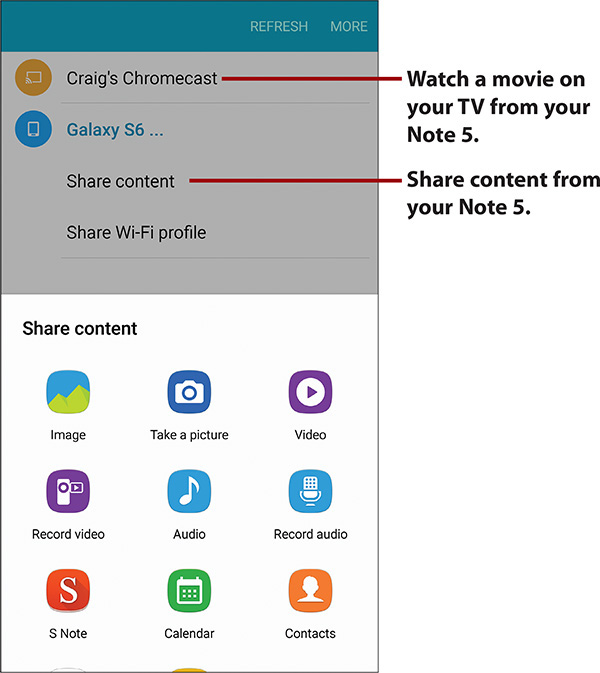
2. Tap the Share icon for the item you want to send. This can be a picture in the Gallery app, for example.
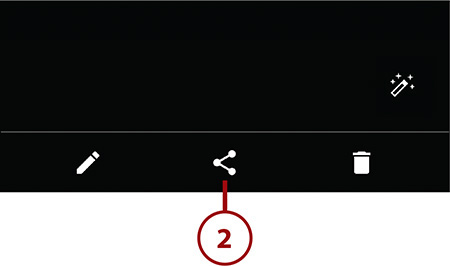
3. Tap the Wi-Fi Direct icon.
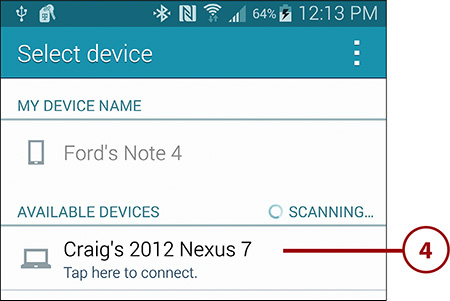
4. Tap the other user’s device name to invite it to connect with your Galaxy Note 5 via Wi-Fi Direct and send the file to that device.
5. Ask the other person to tap Accept or Connect on the device you are inviting.
6. If the Wi-Fi Direct connection is made successfully, the file is sent to the other device.
Receive a File Using Wi-Fi Direct
Follow these steps to receive files from an Android device running 4.1 (Jelly Bean) or later.
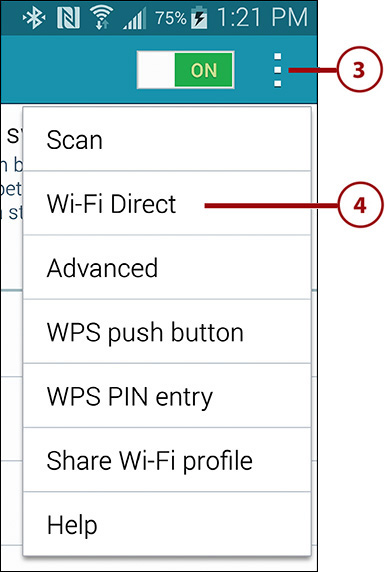
1. Pull down the Notification bar.
2. Touch and hold the Wi-Fi icon.

4. Tap Wi-Fi Direct and wait for the other person to invite you.
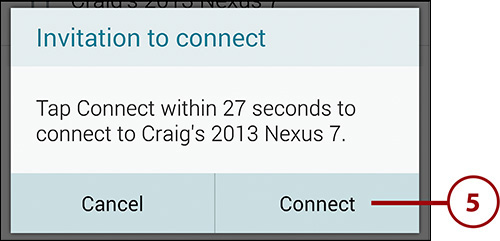
5. Tap Connect when the other person invites you to connect using Wi-Fi Direct. One or more files should now start copying to your Note 5.
Does Wi-Fi Direct Work for All Android Devices?
Theoretically, all Android devices running version 4.1 should be able to send or receive files via Wi-Fi Direct; however, some devices do have reported issues.
Near Field Communications (NFC)
Your Galaxy Note 5 has the ability to swap data via its NFC radio with other phones that use NFC or read data that is stored on NFC tags. You can also use NFC to pay for items you have purchased. Android Beam also uses NFC to send files between Android devices by setting up the sending process automatically via NFC and then continuing it via Bluetooth or Wi-Fi Direct.
Enable NFC and Android Beam
To get the full benefit from NFC, you need to enable the NFC radio. You should also enable Android Beam.
1. Pull down the Notification bar.
2. Touch and hold the NFC icon.
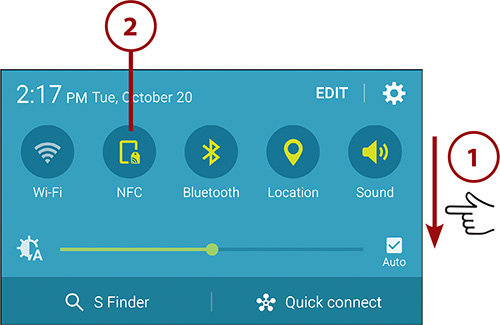
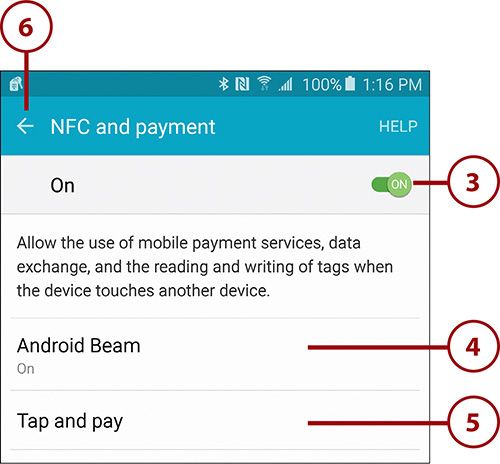
3. Tap to enable NFC if the switch isn’t already in the On position.
4. Tap to enable Android Beam. (See the next section for more about Android Beam.)
5. Tap to choose which contactless payment service you want to use. If you have set up both Android Pay and Samsung Pay, you can use the option to choose which one is used at the checkout counter. Learn more about contactless payments later in this chapter.
6. Tap to save your changes and go back to the main Settings screen.
Use Android Beam to Send Links to Content
You can use Android Beam to send links to content—such as apps, music, and video in the Google Play Store or website links—to another device. Android Beam only works between devices that are both running Android 4.0 (Ice Cream Sandwich) or later. The following example shows you how to send a website link.
1. Open a website that you’d like to share the link to. Put the back of your Galaxy Note 5 about 1” from the back of another NFC-enabled device. You know that the two devices have successfully connected when the web page zooms out.
2. Tap the web page after it zooms out.

3. The browser on the other device opens and immediately loads the link you shared.
Beam Google Play Content and YouTube Videos
If you like a song, movie, book, or app that is in the Google Play Store, you can beam it to someone. Simply open the song, movie, book, or app in Google Play, tap your devices together, and tap to beam. To beam a YouTube video, open the video in the YouTube app, tap the devices together, and tap to beam. The other device opens YouTube and jumps directly to the video.
Use Android Beam to Send Real Files
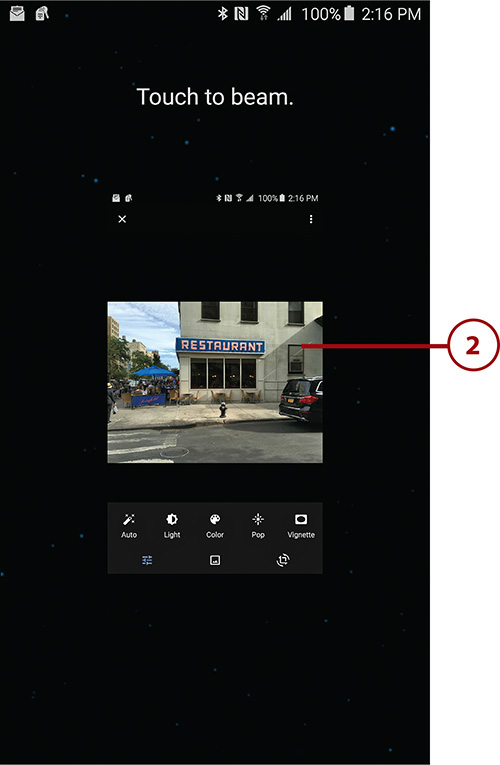
You can also use Android Beam to send real content such as pictures, music, and video that’s stored on your Galaxy Note 5. Sending real files using Android Beam only works between devices that are running Android 4.1 (Jelly Bean) or later. This task describes how to beam a picture.
1. Open the picture you want to beam. Then put the back of your Galaxy Note 5 about 1” from the back of another NFC-enabled phone. You know that the two devices have successfully connected when the picture zooms out.
2. Tap the picture after it zooms out.
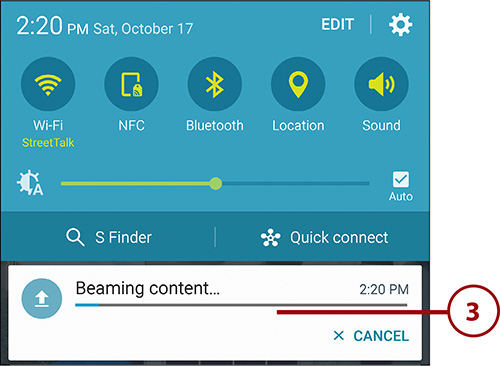
3. Pull down the Notification bar to see the progress of the file transfer.
Cellular Networks
Your Galaxy Note 5 can connect to many different cellular networks around the world. The exact networks that it can connect to are determined by the variant of Galaxy Note 5 you have because not all carriers use the same technology. To complicate things even more, many network carriers use different frequencies from one another.
Change Mobile Settings
Your Galaxy Note 5 has a few options when it comes to connecting to cellular (or mobile) networks.
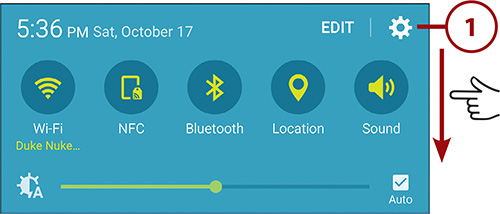
1. Pull down the Notification bar.
2. Tap the Settings icon.
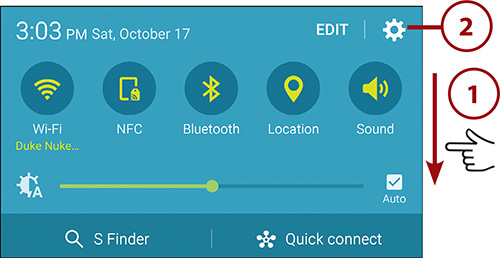
3. Tap Mobile Networks.

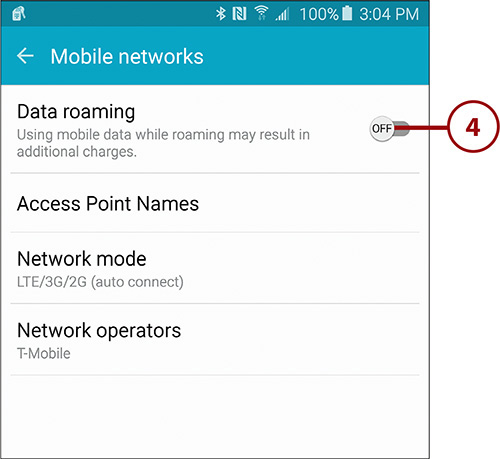
4. Tap to enable or disable cellular data roaming. If this is unchecked, your Galaxy Note 5 does not attempt to use data while you roam away from your home cellular network.
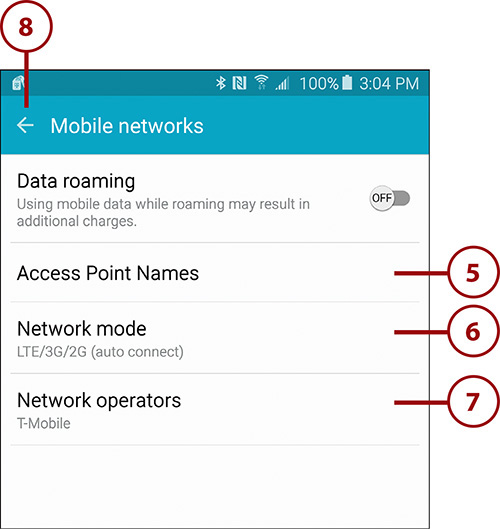
5. Tap to view, edit, and add APNs. It is unlikely that you need to make any APN changes.
6. Tap to change the network mode. This setting enables you to choose to force your Note 5 to connect to a slower 2G network (GSM Only) to save battery, but it also allows you to manually select whether you want your Note 5 to only connect to 3G networks (WCDMA Only), automatically select between 3G and 2G (WCDMA/GSM Auto Connect), or let your Note 5 automatically select between 4G, 3G, and 2G networks (LTE/WCDMA/GSM Auto Connect).
7. Tap to view and choose mobile operators to use manually.
8. Tap to save your changes and return to the previous screen.
What Is an APN?
APN stands for Access Point Name. You normally don’t have to make changes to APNs, but sometimes you need to enter them manually to access certain features. For example, if you need to use tethering, which is where you connect your laptop to your Galaxy Note 5, and your Galaxy Note 5 provides Internet connectivity for your laptop, you might be asked by your carrier to use a specific APN. Think of an APN as a gateway to a service.
Can I Disable Mobile Data?
If you disable mobile data, you can save on battery life; however, you effectively kill the functionality of any app that needs to be connected all the time, such as instant messaging apps (Yahoo! or Google Talk) or apps such as Skype. You also stop receiving email in real time. When this feature is disabled, about 5 minutes after your Galaxy Note 5 goes to sleep, it disconnects from the mobile data network; however, it remains connected to the mobile voice network.
Virtual Private Networks (VPNs)
Your Galaxy Note 5 can connect to virtual private networks (VPNs), which are normally used by companies to provide a secure connection to their inside networks or intranets.
Add a VPN
Before you add a VPN, you must first have all the information needed to set it up on your Galaxy Note 5. Speak to your network administrator to get this information ahead of time (and save yourself some frustration). The information you need includes the type of VPN protocol used, the type of encryption used, and the name of the host to which you are connecting.
1. Pull down the Notification bar.
2. Tap the Settings icon.
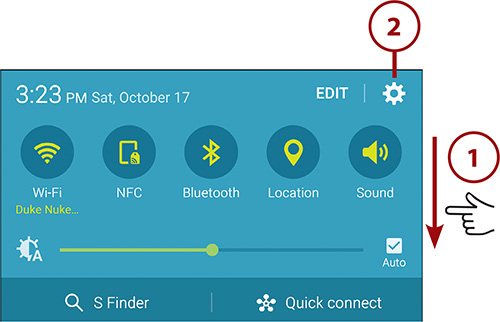
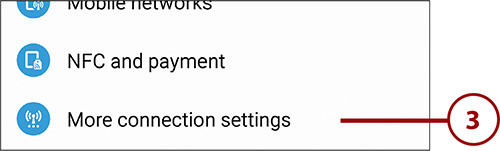
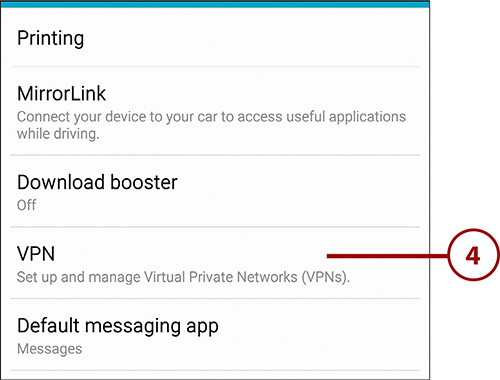
3. Tap More Connection Settings under the Connections section.
4. Tap VPN. If you have not secured your Note 5 with a PIN, password, pattern, or fingerprint, you are prompted to take care of that when you tap VPN. After you take care of securing your Note 5, you can continue with the next step.
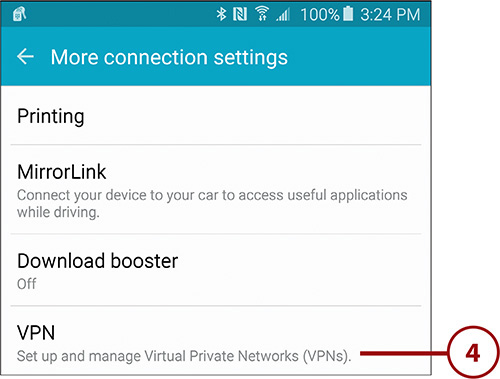
Why Do You Need to Set a PIN or Password?
If you don’t already have a screen lock PIN, password, or pattern set up before you create your first VPN network connection, you are prompted to create one. This is a security measure that ensures your Galaxy Note 5 must first be unlocked before anyone can access a stored VPN connection. Because VPN connections are usually used to access company data, this is a good idea.
5. Tap More.

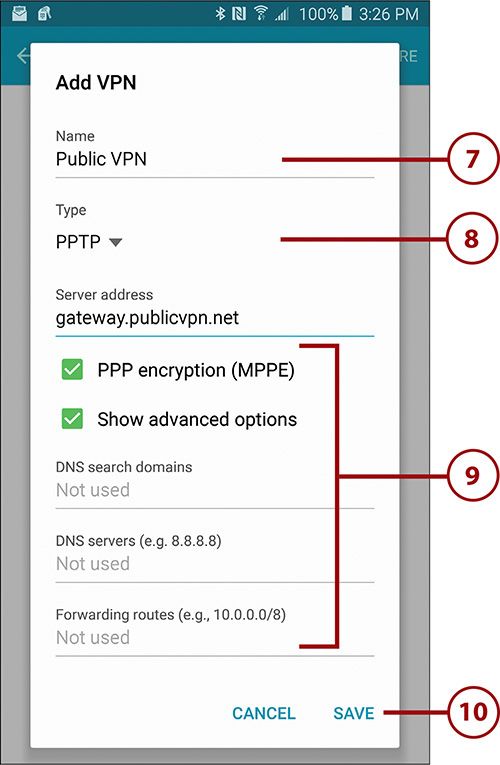
6. Tap Add VPN.
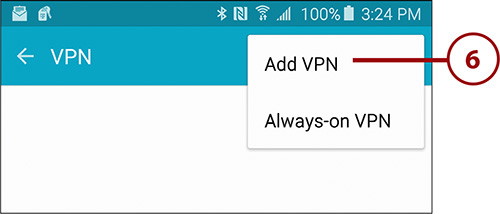
7. Enter a name for your VPN network. You can call it anything, such as Work VPN, or the name of the provider, such as PublicVPN.
8. Tap to choose the type of encryption technology used to create the VPN.
9. Enter the remaining parameters that your network administrator has provided.
10. Tap Save.
Connect to a VPN
After you have created one or more VPN connections, you can connect to them when the need arises.
1. Pull down the Notification bar.
2. Tap the Settings icon.

3. Tap More Connection Settings under the Connections section.

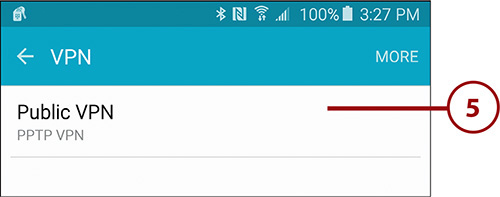
5. Tap a preconfigured VPN connection.
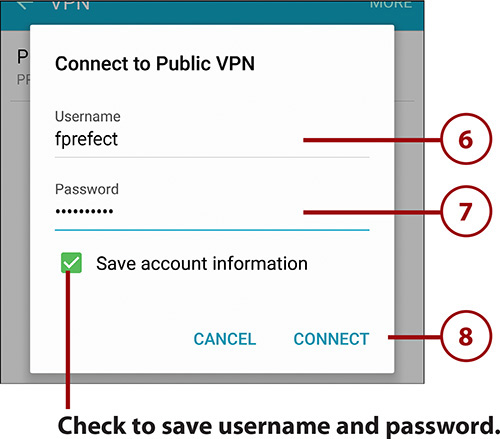
6. Enter the VPN username.
7. Enter the VPN password.
8. Tap Connect. After you’re connected to the VPN, you can use your web browser and other applications normally, but you now have access to resources at the other end of the VPN tunnel, such as company web servers or even your company email.
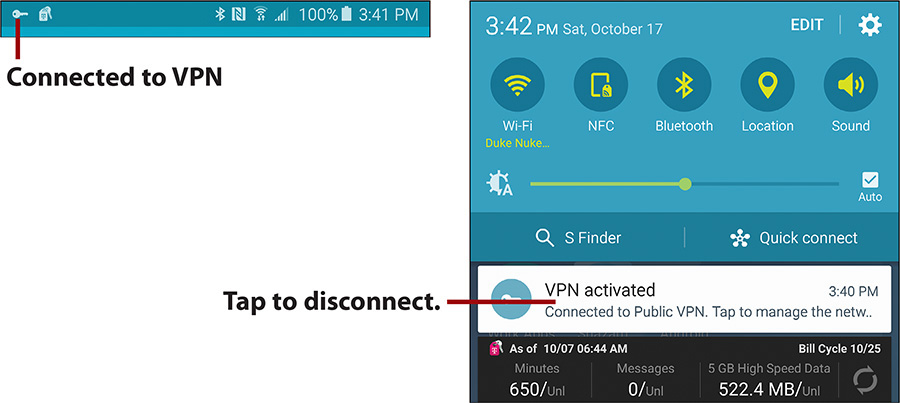
Editing or Deleting a VPN
You can edit an existing VPN or delete it by touching and holding the name of the VPN. A window pops up with a list of options.

Mobile Wi-Fi Hotspot
Your Galaxy Note 5 has the ability to share its cellular data connection with up to eight devices over Wi-Fi. Before you use this feature, you need to normally sign up for a tethering or hotspot plan with your cellular provider, which is normally an extra monthly cost.
Start Your Mobile Wi-Fi Hotspot
After your Wi-Fi hotspot is set up the way you want it, you can start it and begin sharing your Internet connection.
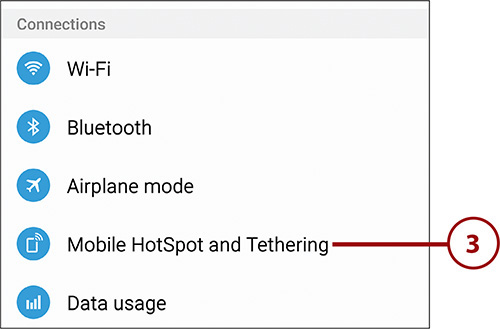
1. Pull down the Notification bar.
2. Tap the Settings icon.

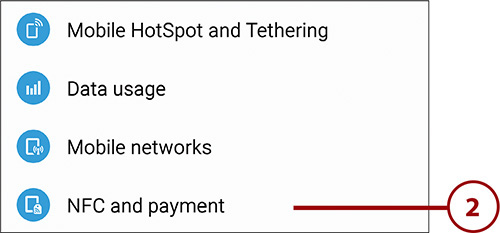
3. Tap Mobile HotSpot and Tethering under the Connections section.
4. Tap Mobile HotSpot to configure and start your hotspot.
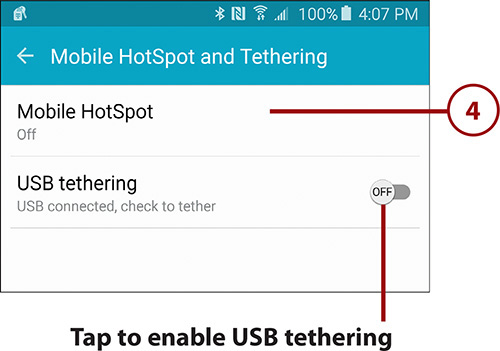
USB tethering is a feature that enables you to share your Note 5’s Internet connection with a computer via the USB port. To use this, connect your Note 5 to the computer using the supplied USB cable and enable USB tethering. On the computer there will be some extra setup to do, which includes choosing your Note 5 as an Internet access point. (And on older Windows computers you might need to install a device driver. Be sure to consult the computer’s manual for instructions.)
5. Tap More to preconfigure your hotspot before starting it (recommended). If you would rather just start the hotspot now, skip to step 17.

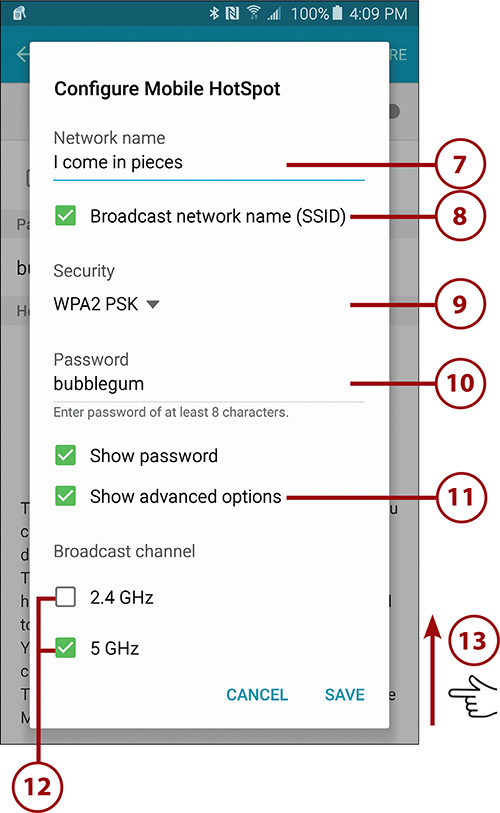
6. Tap Configure Mobile HotSpot.
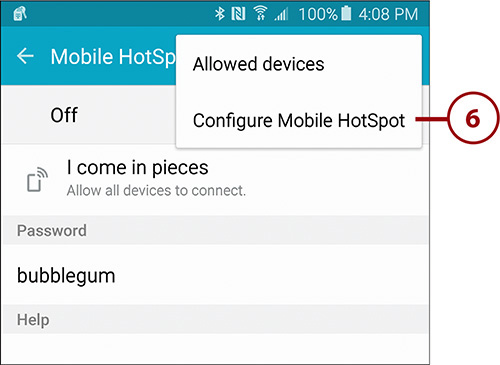
7. Choose a network name (also known as the SSID) for your mobile hotspot. You can leave it set to the auto-generated name or change it to something more friendly.
8. Tap to enable or disable broadcasting your hotspot’s network name (its SSID). If you choose not to broadcast it, your network will be hidden, but you have to take more steps to connect to it.
9. Tap to choose the type of security to use for your mobile hotspot or choose Open to use no security.
10. Enter a password for your portable hotspot if you chose to use a security method in step 9.
11. Tap to show advanced options for your hotspot.
12. Choose either the 2.4GHz or 5GHz radio bands for your hotspot. Because the 2.4GHz bands can be overcrowded, choosing the 5GHz bands can help with performance.
13. Swipe up for more options.
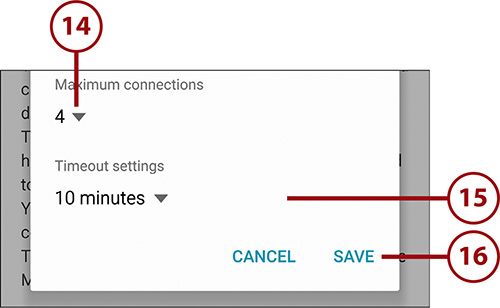
14. Tap to change the maximum number of people who can connect to your hotspot. Because Wi-Fi is a shared network, fewer people normally means faster performance for everyone.
15. Tap to change the number of minutes of inactivity that must pass before the hotspot turns itself off.
16. Tap to save your hotspot settings.
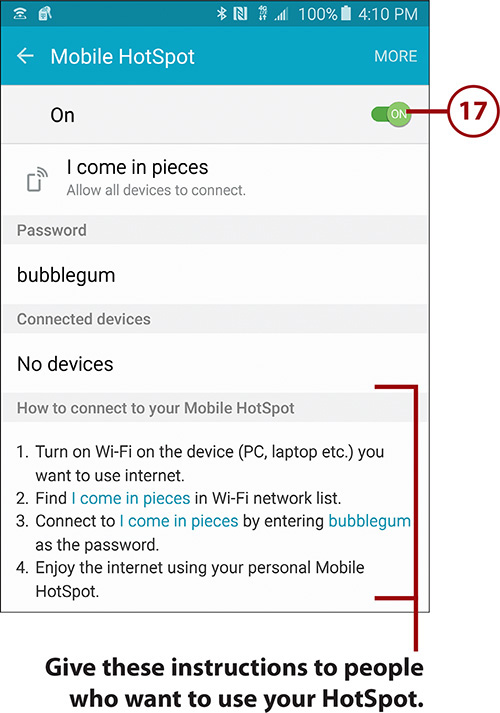
17. Tap to turn your hotspot on. Provide the hotspot connection information at the bottom of the screen to people you want to connect to your hotspot.
Limit Who Can Connect
People can only connect to your hotspot after you give them the connection information; however, you can further limit who can connect to your hotspot by allowing devices that have specific MAC addresses.
1. From the Mobile HotSpot screen, tap the plus symbol to add an already connected device to the allowed devices list. Because the devices are already connected, your Note 5 already knows its MAC address.
2. Tap More and then tap Allowed Devices to add devices to the allowed list manually. You need to ask the device owner for her MAC address.
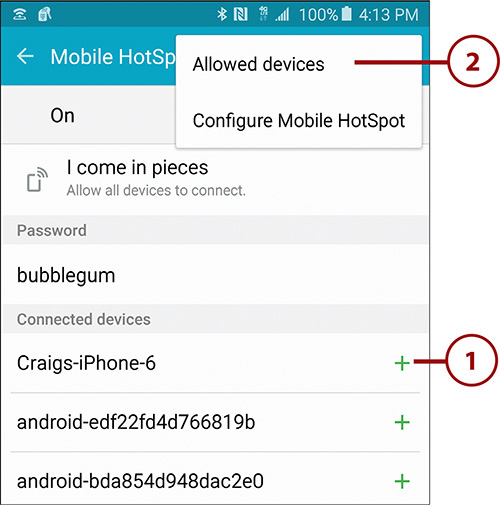
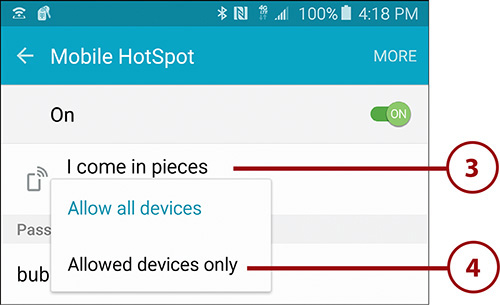
3. Tap the name of the hotspot to choose what devices are allowed to connect to your hotspot.
4. Tap Allowed Devices Only to limit the devices to the ones on the allowed list.
Contactless Payments
You can pay for items at the checkout counter just by holding your Note 5 close to the contactless terminal. For this functionality you can choose to use Android Pay or Samsung Pay. This section describes how to set up Android Pay and Samsung Pay.
Set Up Android Pay
Android Pay is available for any Android device, regardless of manufacturer. If you think that you might change to a non-Samsung device in the future, consider using Android Pay.
1. Tap the Android Pay icon. If you don’t see the icon, install Android Pay from the Google Play Store.

2. Tap the plus symbol to add a new credit or debit card for use with Android Pay.

3. On the next screen, hold your Note 5 so that the card you want to add is lined up in the view finder. Your Note 5 should be able to read the information off the card. (not shown).
4. Tap Accept to accept your bank’s terms and conditions for using your card with Android Pay.

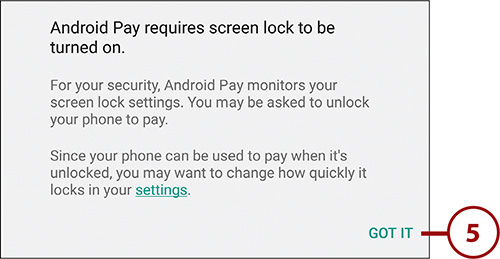
5. Tap Got It to indicate that you understand that you must secure your Note 5 using a PIN, password, pattern, or fingerprint to use Android Pay.
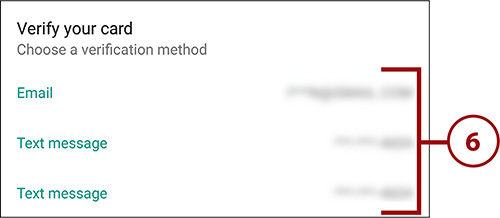
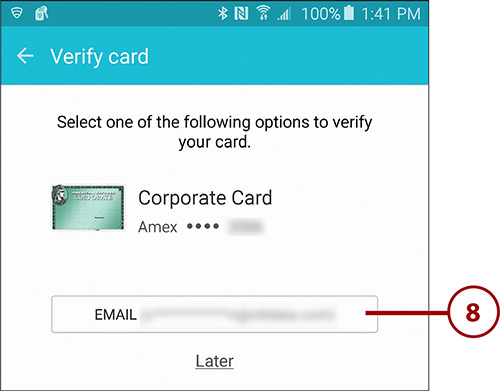
6. Choose a verification method; a code will be sent to you to verify the card you are adding. You can choose an email or text message.
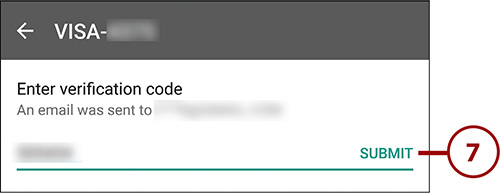
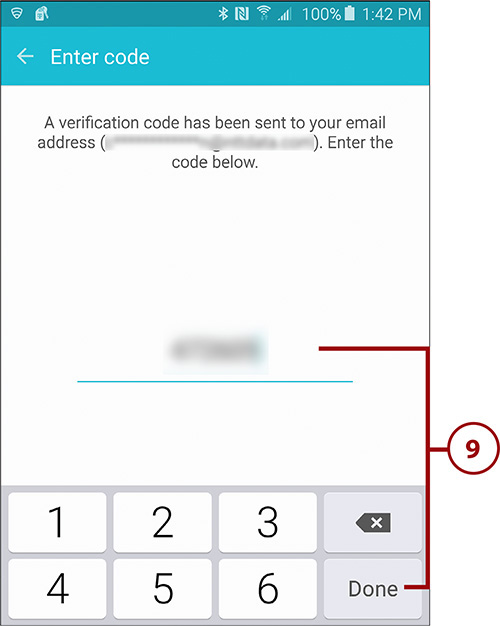
7. After you receive the verification code, enter it and tap Submit.
8. Repeat steps 2 through 7 to add additional credit and debit cards to Android Pay.
Set Up Samsung Pay
Samsung Pay is only available on Samsung devices like your Note 5. If you think that you might change to a non-Samsung device in the future, you may consider using Android Pay, or try out Samsung Pay now.
1. Tap the Samsung Pay icon.
2. The first time you run Samsung Pay you have to decide whether you want to use your fingerprint for verification or you want to type in a PIN. It is highly recommended to use your fingerprint. To use your fingerprint, place your finger on the Home button so your fingerprint can be verified.

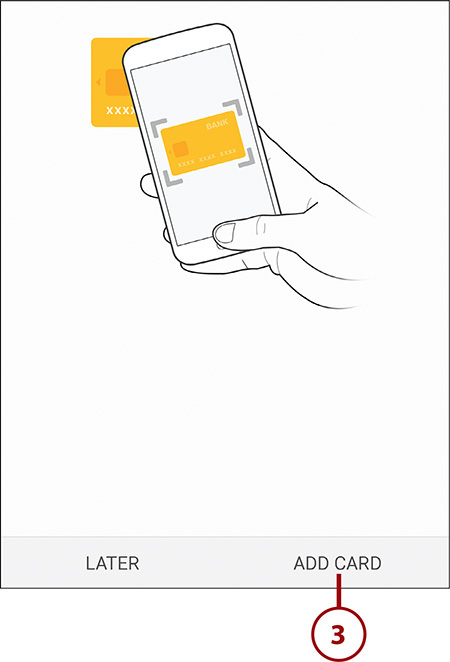
3. Tap Add Card to add a new credit or debit card for use with Samsung Pay.
4. On the next screen, hold your Note 5 so that the card you want to add is lined up in the view finder. Your Note 5 should be able to read the information off the card.
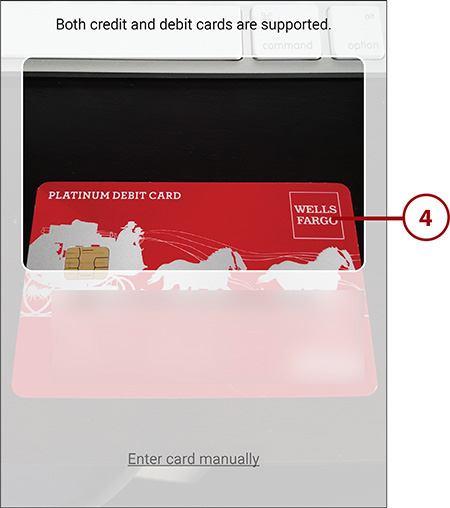
5. Verify the information captured from your card, and enter any missing information.
6. Tap Next.

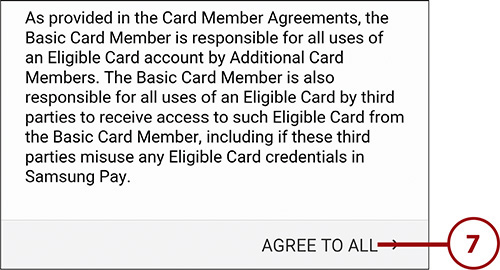
7. Tap Agree to All to accept your bank’s terms and conditions for using your card with Samsung Pay.
8. Choose a verification method; a code will be sent to you to verify the card you are adding. You can choose an email or text message.
9. After you receive the verification code, enter it and tap Done.
10. Tap Done.

Choose Android Pay or Samsung Pay
If you have set up both Android Pay and Samsung Pay on your Note 5, you need to decide which one to use before you go shopping. If you set up only one payment service, you can skip these steps.
1. Pull down the Notification bar and tap the Setting icon.
2. Tap NFC and Payment under the Connections section.
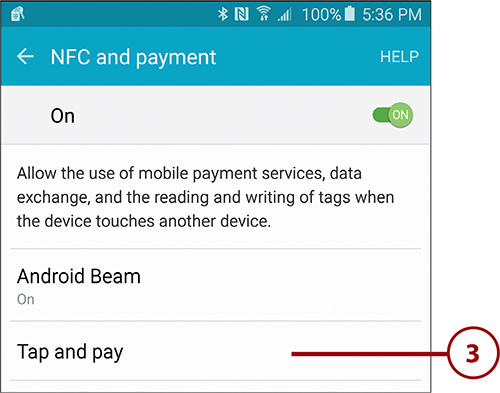
4. Choose Android Pay or Samsung Pay.
5. Tap the back icon to save your change.

Using Android Pay
1. Unlock your Note 5. Depending on how your set it up, you might use a PIN, password, pattern, or your fingerprint.
2. Tap your Note 5 against the terminal that has the contactless pay logo.

Using Samsung Pay
1. Swipe up from the bottom of the screen to reveal your credit or debit card. You can do this from any Home screen or the Lock screen.

2. If you have more than one card and you want to use a different card to pay, swipe left and right to choose a different card.
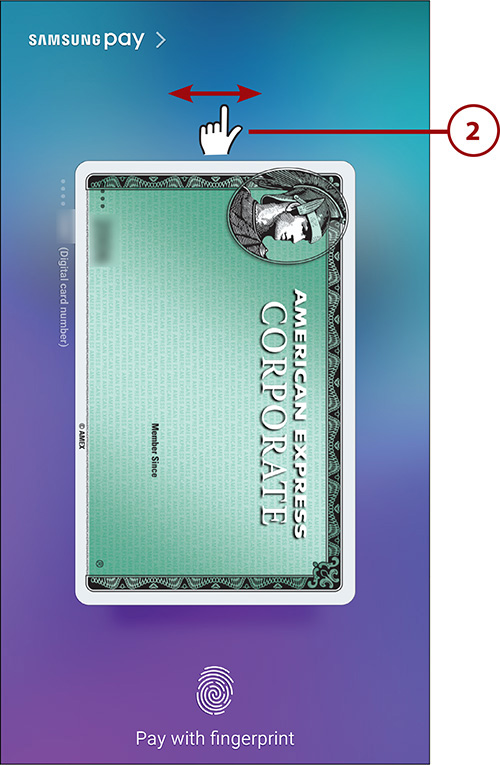
3. Put your finger on the Home button to verify your identify, or if you chose to use a PIN, type in the PIN to get ready to pay (not shown).
4. Put your Note 5 close to a terminal that has the contactless payment logo on it, or hold it close to the magnetic strip reader of an older credit/debit card reader.
