7. Contacts
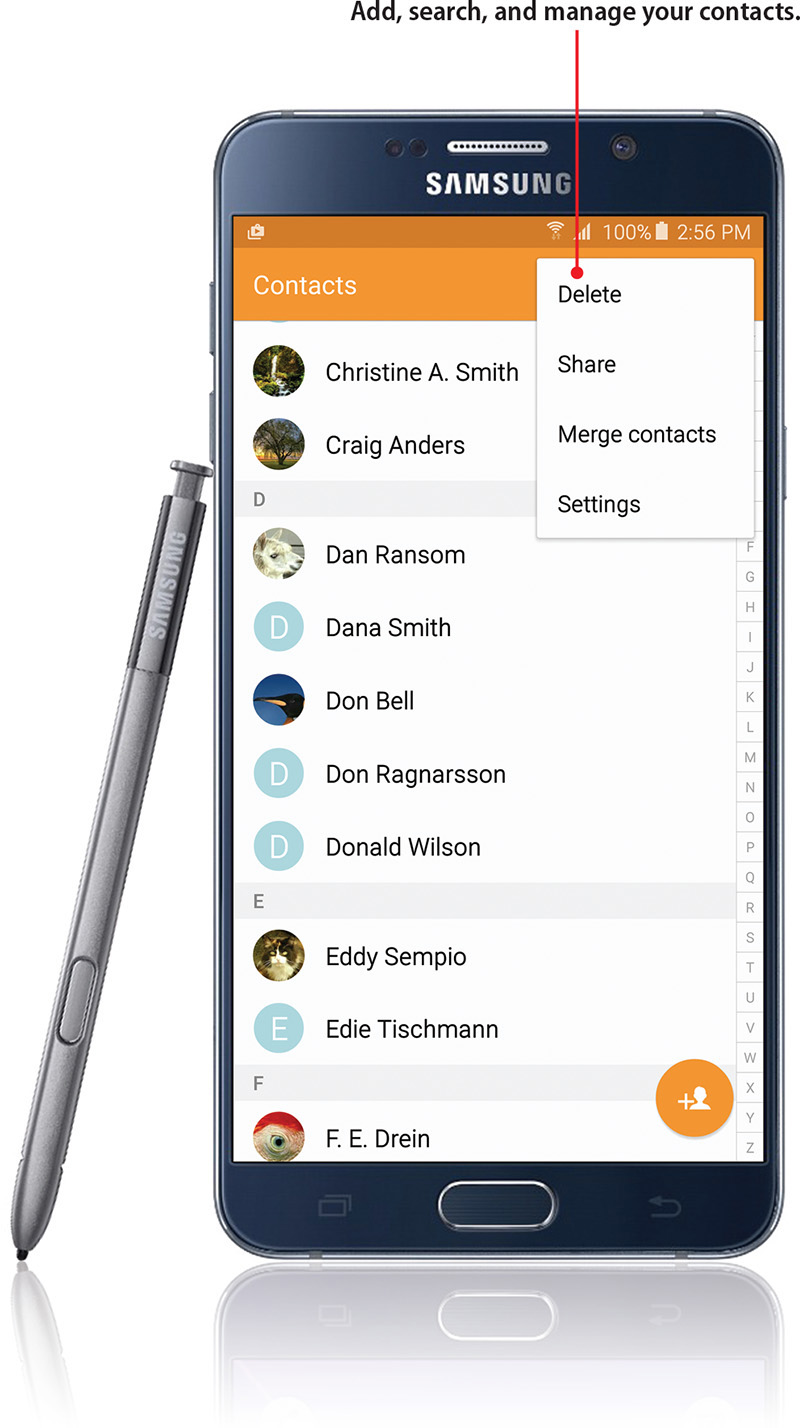
In this chapter, you become familiar with your Galaxy Note 5’s contact-management application, which is called Contacts. You find out how to add contacts, synchronize contacts, join duplicate contacts, and add a contact to your Home screen for instant access. Topics include the following:
![]() Adding accounts for syncing contacts
Adding accounts for syncing contacts
![]() Navigating the Contacts app
Navigating the Contacts app
![]() Adding and managing contacts
Adding and managing contacts
![]() Creating contact groups and favorite contacts
Creating contact groups and favorite contacts
On any smartphone, the application for managing contacts is essential because it is where you keep all of your contacts’ information. On the Galaxy Note 5, this application is called simply Contacts. It is the central hub for many activities, such as calling and sending text messages (SMS), multimedia messages (MMS), or email. You can also synchronize your contacts from many online sites, such as Facebook and Gmail, so as your friends change their Facebook profile pictures, their pictures on your Galaxy Note 5 change as well.
Adding Accounts
Before you look around the Contacts app, add some accounts to synchronize contacts from. You already added your Google account when you set up your Galaxy Note 5 in the Prologue.
Adding Facebook, Twitter, LinkedIn, and Other Accounts
To add accounts for your online services such as Facebook, Twitter, LinkedIn, and so on to your Galaxy Note 5, you might need to install the apps for those services from the Google Play Store. You can see how to install apps in Chapter 11, “Working with Android Apps.” After the apps are installed and you have signed in to them, you visit the Accounts settings, as shown in the following sections, to see the accounts for each online service.
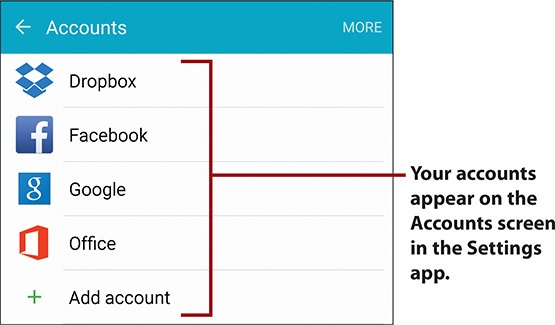
1. From the Home screen, pull down to open the Notifications panel.
2. Tap the Settings icon to open the Settings app.
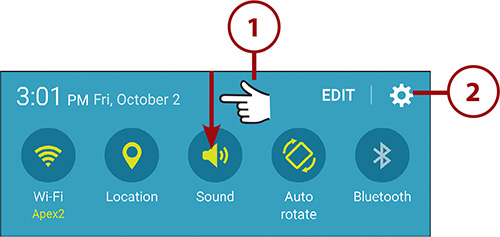
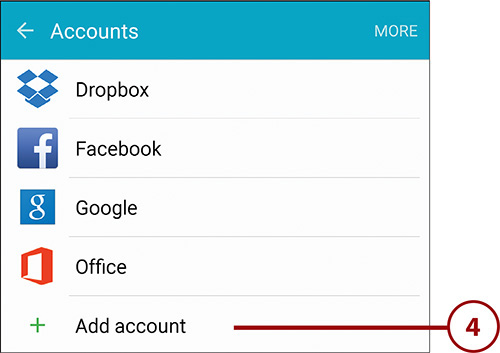
3. In the Personal section, tap Accounts to display the Accounts screen.
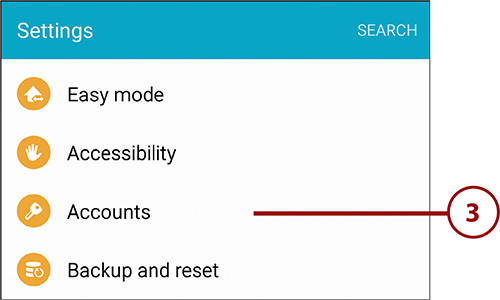
4. Tap Add Account to display the Add Account screen.
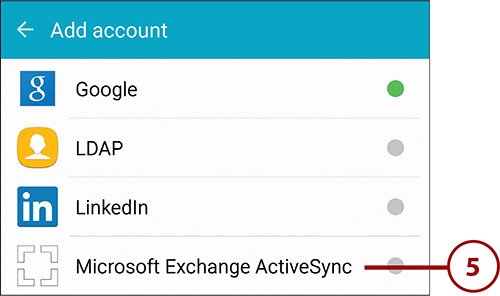
5. Tap Microsoft Exchange ActiveSync to display the Exchange ActiveSync screen.
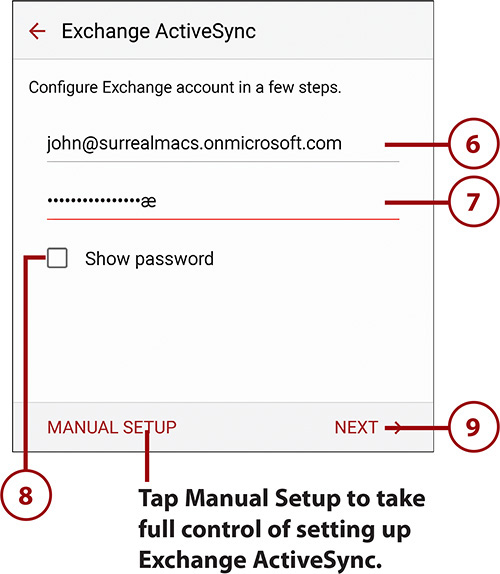
6. Type the email address for the account.
7. Tap Password and type the password.
8. Tap Show Password if you want to see the password rather than the dots the Galaxy Note 5 shows for security. Seeing the password can be helpful when entering complex passwords.
9. Tap Next. The Settings app tries to set up the account with the information you’ve provided.
Dealing with Exchange ActiveSync Setup Problems
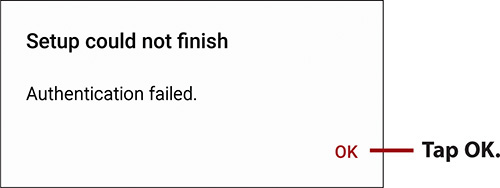
Your Galaxy Note 5 tries to work out some information about your company’s ActiveSync setup. If it can’t, it displays the Setup Could Not Finish screen to explain the problem. Often, you see the “Authentication failed” message. Tap the OK button to dismiss the screen so that you can change the details.
Need Domain Name?
On the Exchange Server Settings screen that appears, type the domain name before your username, separating the two with a backslash (for example, CORPjohn). Type the Exchange Server’s name in the Exchange Server box. Then tap Next to try the credentials again with this extra information.

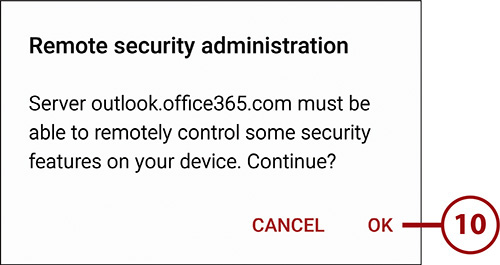
10. In the Remote Security Administration dialog, tap OK to agree that your mail administrator may impose security restrictions on your Galaxy Note 5 after you connect to the Exchange Server. The Device Administrator screen appears.
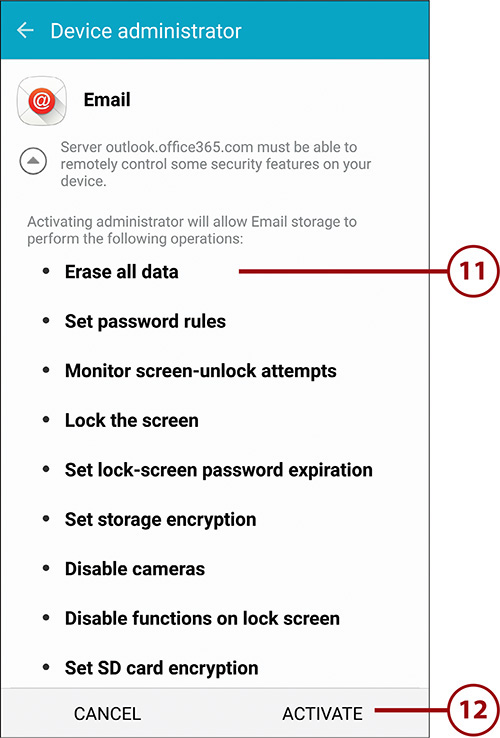
11. Read the details of the powers you’re about to assign to the Exchange server. Swipe up to see the full list of horrors.
What Is Remote Security Administration?
Remote Security Administration says that when you activate your Galaxy Note 5 against your work email servers, your email administrator can add restrictions to your phone. These can include forcing a device password, imposing the need for a very strong password, and requiring how many letters and numbers the password must contain. Your Exchange administrator can also remotely wipe your Galaxy Note 5, restoring it to factory defaults. This is normally done if you lose your phone or it is stolen.
12. Tap Activate. Android finishes setting up the account, and it appears on the Accounts screen.
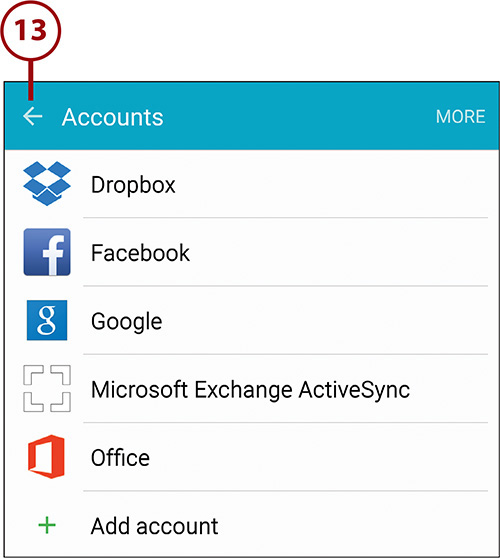
13. Tap the arrow button or the Back button to display the Settings screen again.
Removing an Account
To remove an account, open the Settings screen. Tap Accounts to display the Accounts screen and then tap the account you want to remove. On the screen for the account, tap the More button and then tap Remove Account.
Navigating Contacts
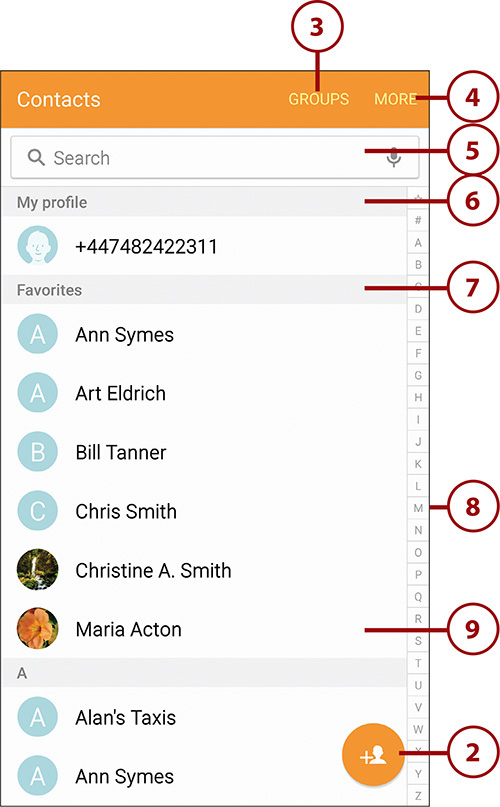
The Contacts app consists of four screens: Keypad, Logs, Favorites, and Contacts. Normally, the Contacts app displays the Contacts screen first, showing your list of contacts, but you can navigate to any of the other screens by tapping its tab.
1. From the Home screen, tap the Contacts icon. If the Contacts icon doesn’t appear on the Home screen, tap it on the Apps screen.
2. Tap the Add (+) icon to add a new contact.
3. Tap Groups to see your contact groups and change which groups appear in the Contacts list. See more information about creating contact groups in the section titled “Create Contact Groups,” later in this chapter.
4. Tap More to open the menu, which contains commands for working with contacts.
5. Tap the Search box to search for a contact.
6. Look at the My Profile section to see your phone number. This appears for quick reference in case you haven’t memorized it.
7. The Favorites list gives you quick access to the contacts you’ve designated as favorites.
8. Tap a letter on the right side of the screen to jump to that letter in the contacts list. Jumping to a letter is usually faster than scrolling, especially if you have many contacts. Tap the star at the top to display the Favorites list.
9. Tap a contact to see all information about her.
Edit a Contact
When you need to, you can easily change a contact’s existing information or add further information to it.
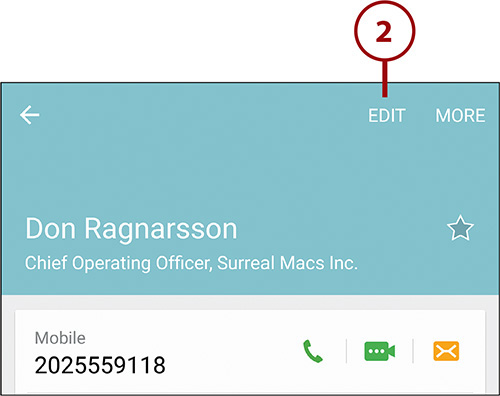
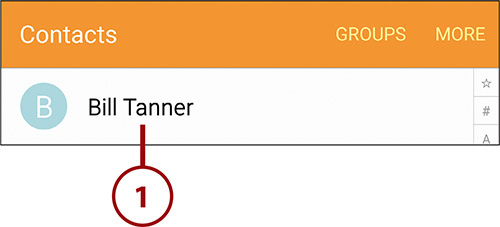
1. Tap the contact you want to edit. The contact record appears.

2. Tap the Edit button to open the contact record for editing.
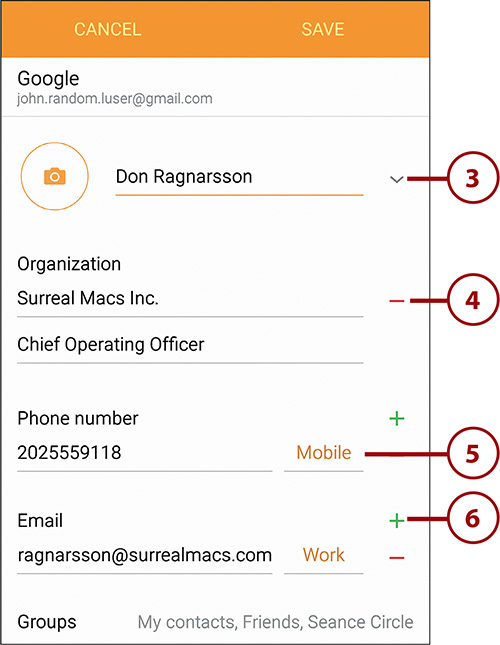
3. Tap the downward caret to the right of the contact’s name to enter a name prefix, middle name, or name suffix.
4. Tap the – icon next to an existing field to delete it.
5. Tap a field subcategory, such as the Mobile subcategory for the phone number, to display a screen with options for changing the field subcategory. For example, you can change a phone number from Mobile to Home or to Work.
6. Tap the + icon to add a new field in a specific category. In this example, tapping + enables you to add a new email address and choose its subcategory, such as Work or Home.
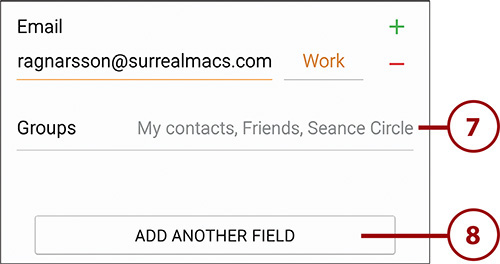
7. Tap Groups to put the contact in a contact group. The Galaxy Note 5 comes with built-in groups, including ICE – Emergency Contacts, Co-Workers, Family, and Friends, but you can also create as many other groups as you need.
8. Tap Add Another Field to add a new field to the contact record. The Add Another Field screen appears, showing a wide range of fields, including Address, Web Address, Event, Nickname, Ringtone, Message Tone, and Vibration Pattern.
9. Tap the field you want to add. For example, tap Ringtone to assign a custom ringtone to the contact so you can easily identify when this person phones you. The contact record appears again, now with the field you added.

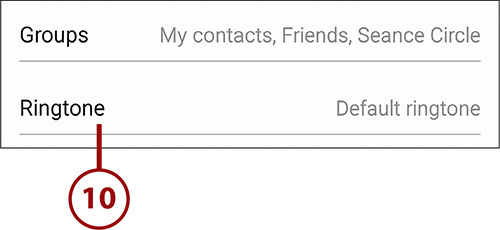
10. Tap the new field to display the screen or controls for adding information to it. For example, tap Ringtone to assign a distinctive ringtone to the contact.
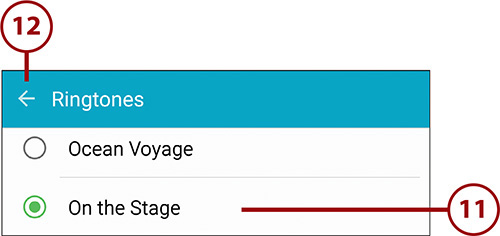
11. Tap the ringtone you want to hear.
12. When you have chosen a ringtone, tap the arrow button or the Back button to return to the contact record.
13. Tap Save to save the changes to the contact record.

Using Tones and Vibration to Distinguish Your Contacts
Use the Ringtone field, Message Tone field, and Vibration Pattern field to enable yourself to distinguish your contacts from each other. By assigning a distinctive ringtone to each of your most important contacts, you can easily determine who is calling you and (perhaps) whether you need to answer. Similarly, you can use the Message Tone field to make your Galaxy Note 5 play a distinctive tone when messages from vital contacts arrive.
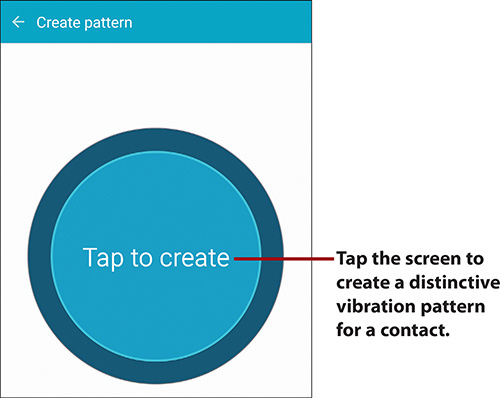
For times when you mute your Galaxy Note 5’s ringer, set a distinctive vibration pattern to enable you to tell one caller from another. In the contact record, tap Add Another Field to display the Add Another Field screen. Tap Vibration Pattern to display the Vibration Pattern screen. You can then tap one of the preset vibrations, such as Waltz or Zig-Zig-Zig; or tap Create Pattern and then create a custom pattern by tapping on the Create Pattern screen.
Add a Contact Photo
A contact record on your Galaxy Note 5 includes a contact photo when you link a social network account to the contact or when you import a contact record that includes a photo (for example, from a vCard file). You can manually add a picture as needed, either from an existing file or by taking a photo.
1. Tap the contact to open the contact record.
2. Tap the Edit button to open the record for editing.

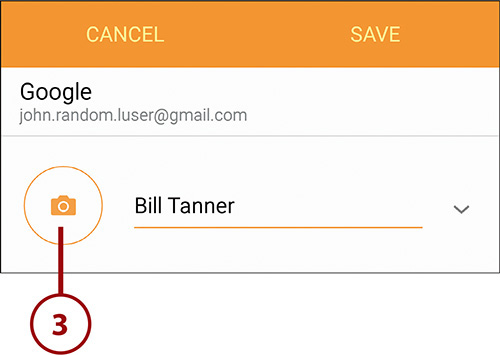
3. Tap the contact photo (if there is one) or the contact photo icon (if there is not) to open the Contact Photo screen.
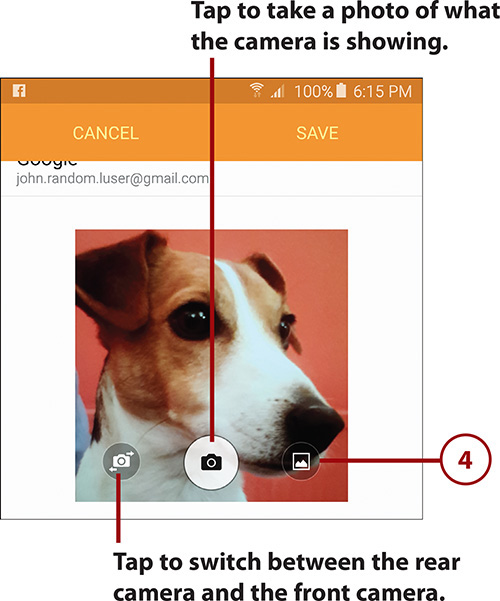
4. Tap the Image icon to add a photo already saved on your Galaxy Note 5.
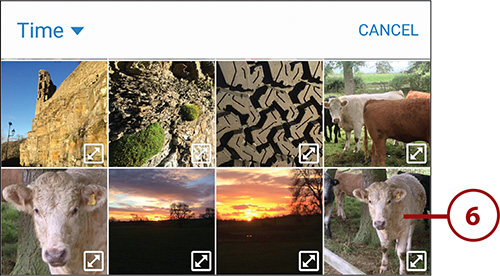
5. Navigate to the photo you want to use. In Time view, scroll down as needed. In Albums view, tap the album that contains the photo, and then scroll down if necessary.

6. Tap the photo you want to use. The photo opens.
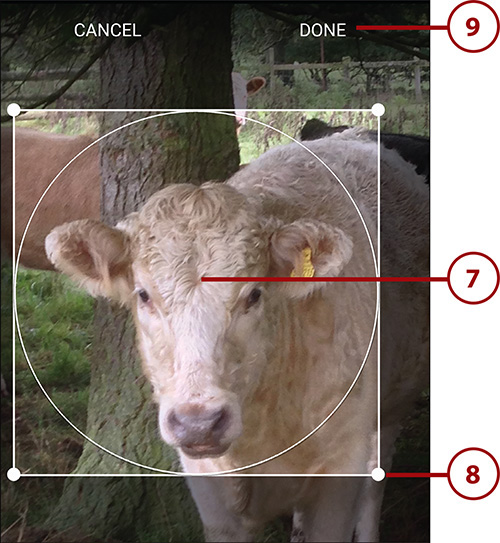
7. Drag the cropping box to select the area of the photo you want to use for the contact photo.
8. Drag the outside of the cropping box to expand or contract it, as needed. You can also pinch outward to enlarge the view.
9. Tap Done to add the cropped photo to the contact record.
10. Tap Save to save the contact record.

Adding and Managing Contacts
As you add contacts to your work email account or Google account, those contacts are synchronized to your Galaxy Note 5 automatically. When you reply to or forward emails on your Galaxy Note 5 to an email address that is not in your Contacts, those email addresses are automatically added to the contact list or merged into an existing contact with the same name. You can also add contacts to your Galaxy Note 5 directly.
Add a Contact from an Email
To manually add a contact from an email, first open the Email app or the Gmail app and then open a message. See Chapter 4, “Email and Text Messages,” for more on how to work with email.
Add a Contact in the Email App
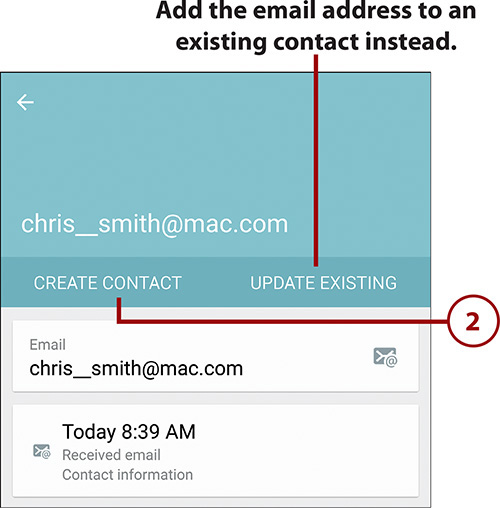
1. Tap the sender’s name to display information about the sender and the message.

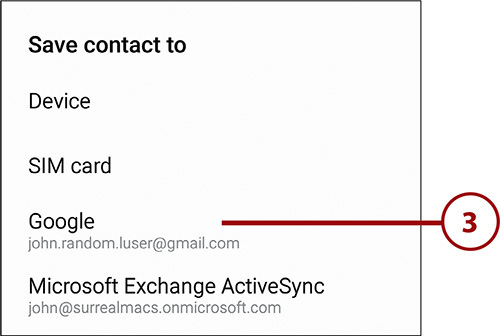
2. Tap Create Contact to open the Save Contact To dialog.
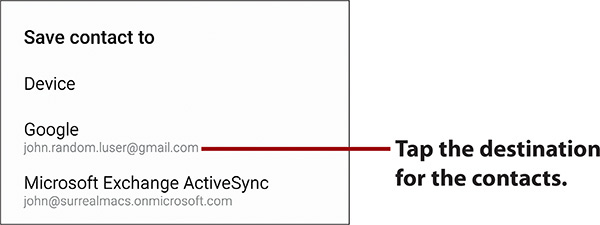
3. Tap the account to which you want to save the contact.
What If Android Warns Me Some Contact Information May Be Lost?
Sometimes, when you go to save a contact, Android displays the Change Save Location dialog, warning you that some contact information may be lost. If this happens, click OK to close the dialog. When the new contact record appears in the Contacts app, you’ll be able to see soon enough if anything vital has gone missing.
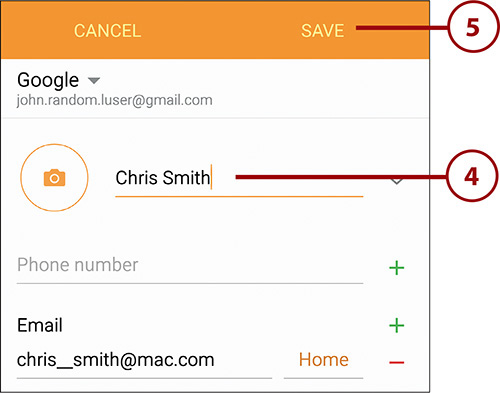
4. Type the contact’s name if Contacts has not picked it up from the email message.
5. Tap Save to save the contact.
Add a Contact in the Gmail App
1. Tap the sender image or initial letter to the left of the sender’s name to display details about the sender.

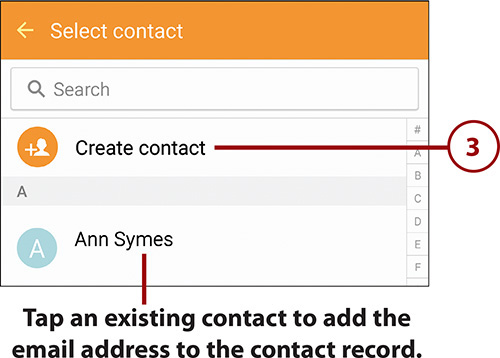
2. Tap Add Contact to display the Select Contact screen.

3. Tap Create Contact to create a new contact record containing the contact’s information.
4. Type the contact’s name if Contacts has not derived it from the email message.
5. Tap Save to save the contact.
Add a Contact Manually
1. Tap the Contacts icon on the Home screen. The Contacts app opens.
2. Tap New (+) to add a new contact.

3. Tap the pop-up menu to select the account you want to add the new contact to. For example, you might add the new contact to your work email account instead of to your personal account.
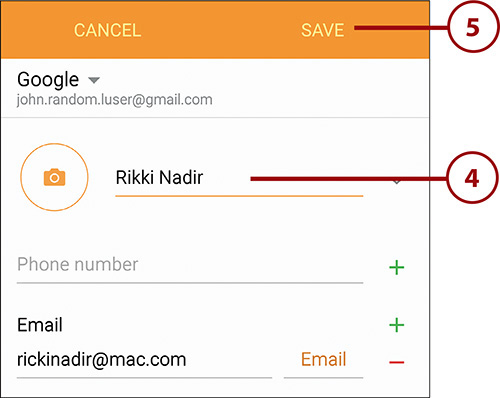
4. Type the person’s full name, including any middle name. Your Galaxy Note 5 automatically populates the first name, middle name, and last name fields.
5. Tap the photo icon to choose a contact picture.
6. Tap Add Another Field to display the Add Another Field screen, where you can add other fields such as Nickname and Events.
7. Tap Save to save the new contact.

Add a Contact from a vCard
A vCard is a file that contains a virtual business card, which can include a contact’s name, job title, email address, physical address, phone numbers, and so on. You can easily exchange vCards with other people by attaching them to email messages or instant messages. When you receive a vCard, you can import it into the Contacts app as a new contact. The procedure is different in the Email app and the Gmail app.
Add a Contact from a vCard in Email
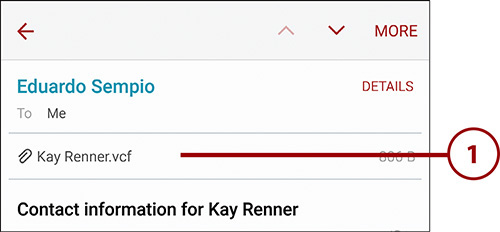
1. In the Email app, open the message and tap the attachment’s button to display the Attachments screen.
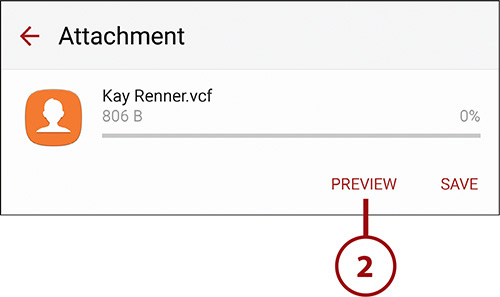
2. Tap the Preview button to display a preview of the vCard file.
Choosing the App for vCard Files
If your Galaxy Note 5 displays the Complete Action Using dialog when you tap Preview to open a vCard file, tap Contacts and then tap Always.
3. Tap the Save button. The Save Contact To dialog opens.

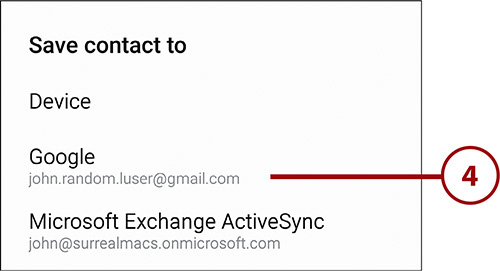
4. Tap the account you want to add the new contact to. For example, you might want to add the new contact to your work email account instead of to your personal account.
Add a Contact from a vCard in Gmail
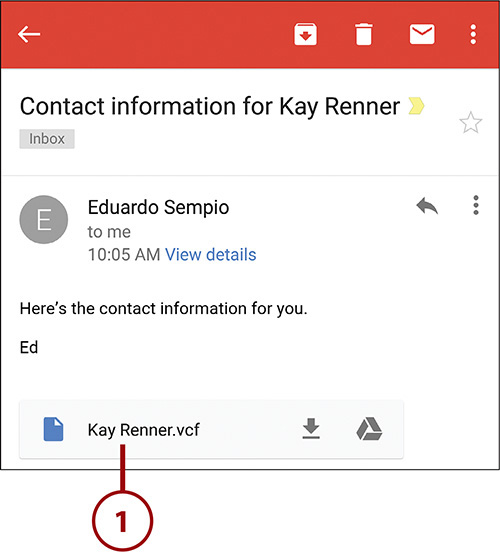
1. In the Gmail app, open the message and tap the attachment icon to display the attachment.
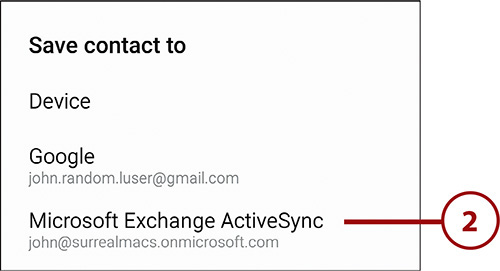
2. Tap the Save button. The Save Contact To dialog opens.

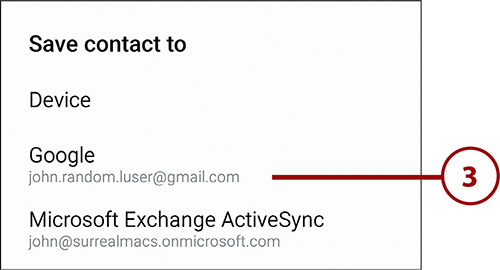
3. Tap the account you want to add the new contact to.
Add a Contact Using Near Field Communications
Your Galaxy Note 5 has Near Field Communications (NFC) functionality built in. NFC (discussed in Chapter 1, “Working with Different Networks, NFC, and Contactless Payments”) enables you to exchange contact cards between NFC-enabled smartphones or to purchase items in a store by holding your Galaxy Note 5 near the NFC reader at the checkout counter. If you encounter someone who has an NFC-enabled smartphone, or she has an NFC tag that contains her business card, follow these steps to import that information:
1. Hold the other person’s smartphone back to back with your Galaxy Note 5 and give the command for sharing via NFC, or hold the NFC tag close to the back cover of your Galaxy Note 5. Your Galaxy Note 5’s screen dims and the phone plays a tone to indicate that it is reading the NFC information. The Save Contact To dialog then appears.
2. Tap to select the account you want to add the new contact to.
Manage Contacts Settings
To make the Contacts app display contacts the way you prefer, you can customize it. For example, you can choose the contact list display order and whether to display contacts using their first names first or last names first.
1. Tap the Contacts icon on the Home screen.
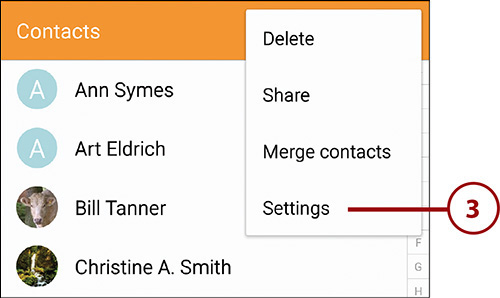
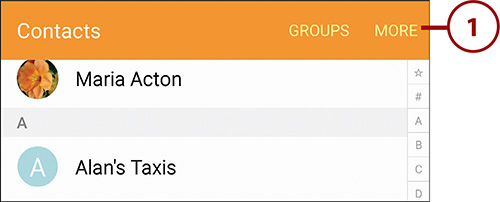
2. Tap the More button to display the menu.

3. Tap Settings to display the Contacts Settings screen.
4. Tap Sort By to choose the sort order of the list of contacts in the Contacts app. You can sort the list by first name or last name.
5. Tap Name Format to choose how each contact is displayed. You can tap “First, Last” to display contacts with the first name first or tap “Last, First” to display the last name first.
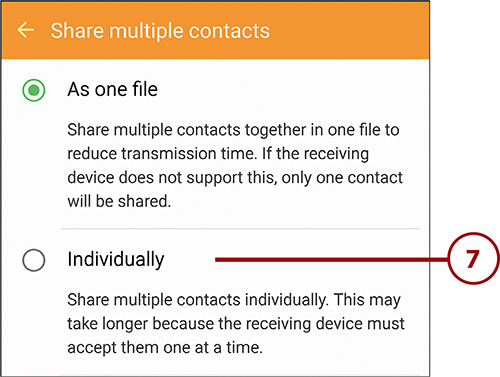
6. Tap Share Multiple Contacts to choose how to transmit multiple contacts you share at once. The Share Multiple Contacts screen appears.

7. Select the As One File radio button to send a single file containing all the contacts, or select the Individually radio button to send a separate file for each contact. When you select one of these radio buttons, the Contacts Settings screen appears again; you don’t need to tap the arrow button or the Back button to return to the Contacts Settings screen.
Should You Share Multiple Contacts as One File or Individually?
Usually, it is best to share contact files individually. Sharing individual files typically takes longer than sharing a single file, because the receiving device accepts the files one at a time rather than all at once; but unless you transfer large numbers of contacts, the extra time is unlikely to inconvenience you unduly.
Sharing individual files helps you avoid a problem with transferring multiple contacts in a single file: If the receiving device doesn’t support vCard files containing multiple contact records, the device receives only the first contact record. Most modern devices do support vCard files containing multiple contact records, but you might still run into devices that do not.
8. Tap the arrow button or the Back button to save the settings and return to the Contacts app.
Create Contact Groups
You can create contact groups—such as Friends, Family, Inner Circle—and then divide your contacts among them. This can be useful if you don’t want to search through all your contacts. For example, to find a family member, you can simply tap the Family group and see only family members.
1. On the Contacts screen, tap the Groups button to display the Groups screen.

2. Tap the Add button to display the New Group screen.

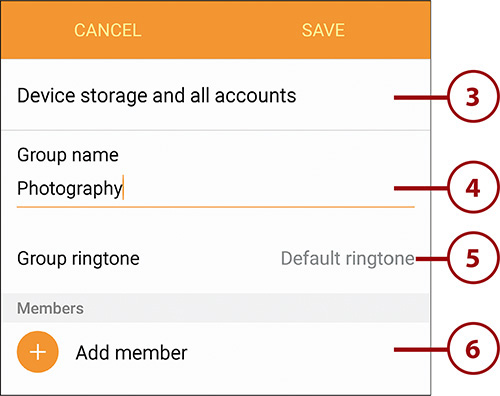
3. Tap the button at the top, select the accounts in which to create the group, and then tap Done to return to the New Group screen. The button’s name varies depending on the accounts selected. For example, the button shows Device if Contacts will store the group only on your Galaxy Note 5; Google if only your Google account is selected; or Device Storage and All Accounts if the device and all your accounts are selected.
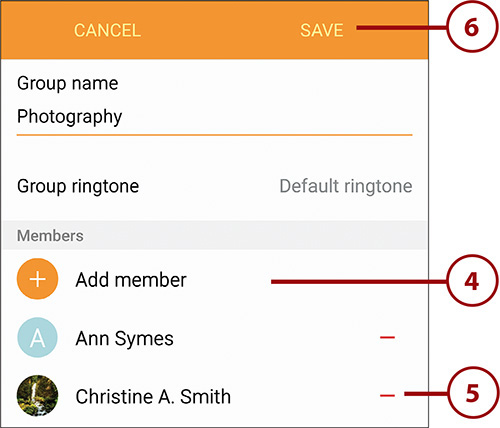
4. Tap Group Name and type a name for your new group.
5. Optionally, tap Group Ringtone to set a specific ringtone for the group. You can use the ringtone and vibration pattern to make calls from the group easy to distinguish.
6. Tap Add Member to add members to the group.
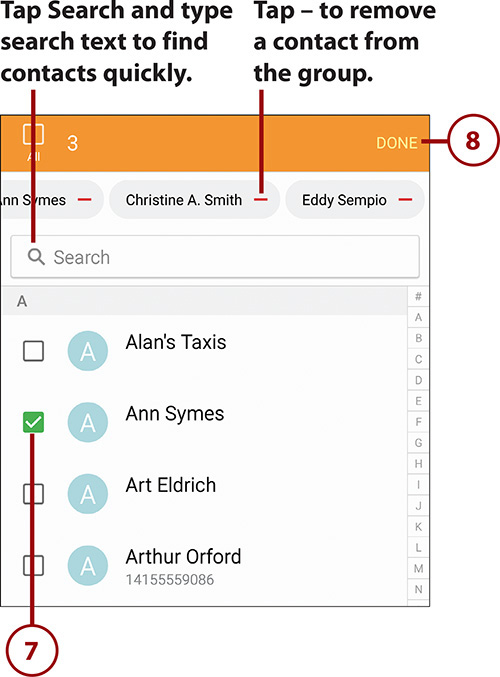
7. Tap the check box next to each contact’s name to select the members of the group. A button appears for each contact at the top of the screen, including a – button that you can tap to quickly remove the contact from the group.
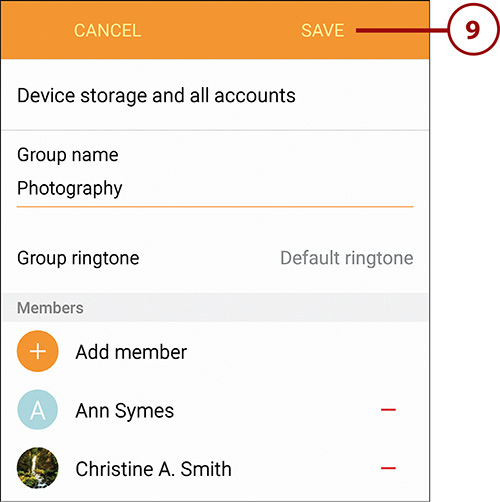
8. Tap Done. The New Group screen appears, now showing the members.
9. Tap Save to save the group.
Change the Contacts in a Contacts Group
1. On the Contacts screen, tap the Groups button to display the Groups screen.

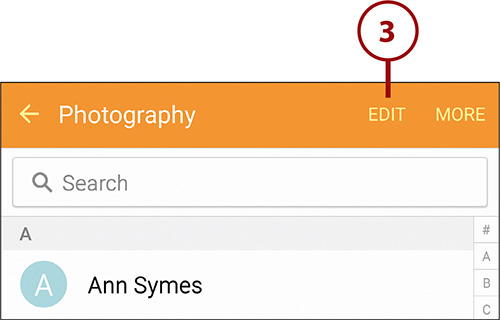
2. Tap the group to edit. A screen appears showing the group.

3. Tap the Edit button to open the group for editing.
4. Tap the Add Member button to add members to the group. On the resulting screen, check the box for each contact you want to add and then tap Done.
5. Tap the – button for each contact you want to remove.
6. Tap the Save button to save your changes to the group.
Choose Which Contacts to Display
You can choose to hide certain contact groups from the main contacts display. For example, you can choose to show only contacts from Twitter. You can also choose which contact groups in each account to include.
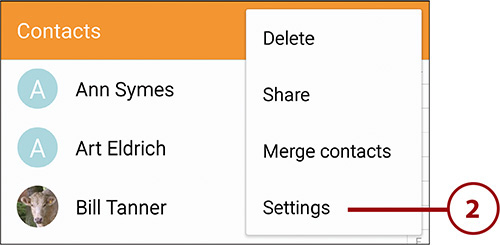
1. On the Contacts screen, tap the More button to display the menu.

2. Tap Settings to display the Contacts Settings screen.
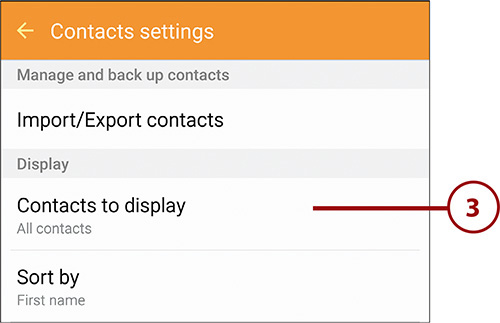
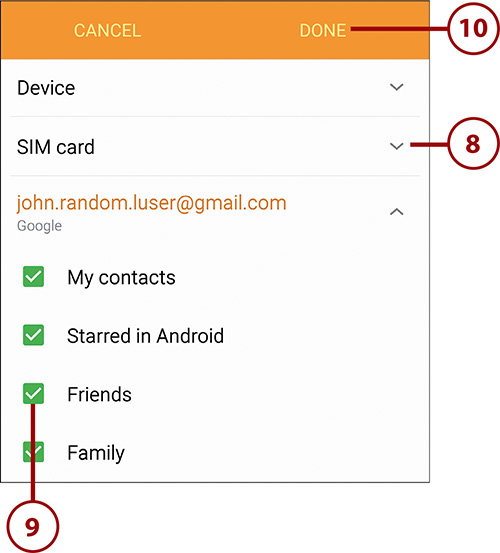
3. Tap Contacts to Display to show the Contacts to Display screen.
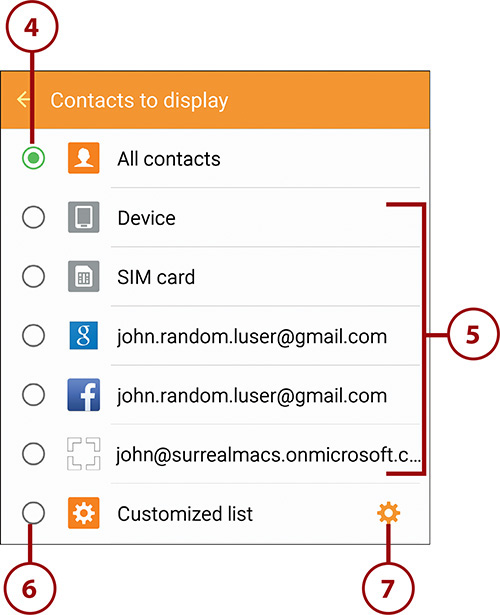
4. Tap All Contacts to display all contacts from all accounts.
5. Tap an account to show only contacts in that account.
6. Tap Customized List to choose a customized selection.
7. Tap the Settings icon (the cog) to customize which groups in each account are displayed.
8. Tap a downward caret to expand an account to see subgroups of contacts. Tap the resulting upward caret to collapse an account again, hiding its subgroups.
9. Tap a check box to select or deselect a subgroup of contacts.
10. Tap Done to save your settings.
Link and Unlink Contacts
As you add contacts to your Galaxy Note 5, the Contacts app automatically links them if the new contact name matches a name that’s already stored. Sometimes you need to manually link contacts or unlink them if your Galaxy Note 5 has joined them in error.
Link Contacts Manually
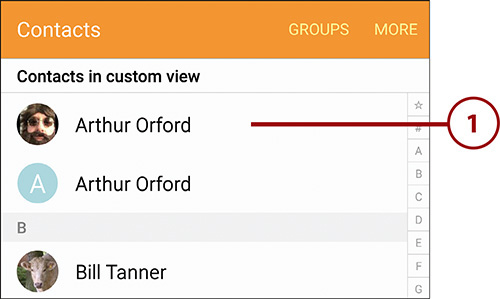
1. In the Contacts app, tap the contact you want to link a contact to. The contact record opens.
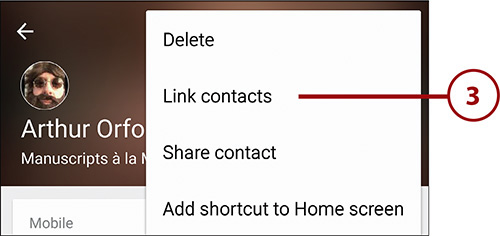
2. Tap the More button to display the menu.

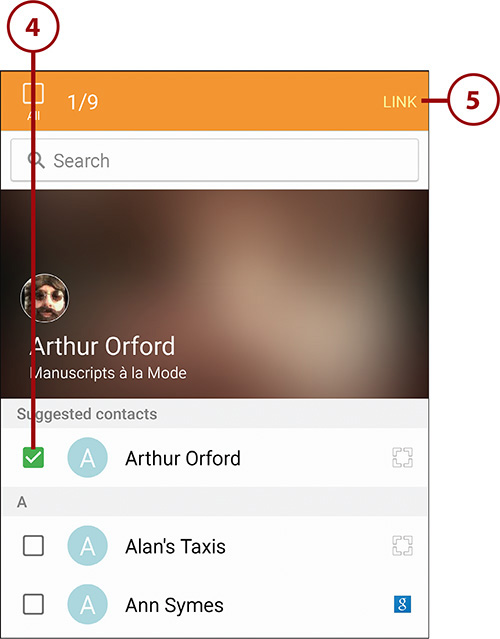
3. Tap Link Contacts to display the Link Contact screen. The Suggested Contacts list shows contacts in which Contacts has found apparently suitable data, but you can choose a contact from the main list if necessary.
4. Check the box for each contact you want to link with.
5. Tap Link to link the contacts.
Unlink Contacts
1. In the Contacts app, tap the contact you want to unlink. The contact record opens.

2. Tap the More button to display the menu.

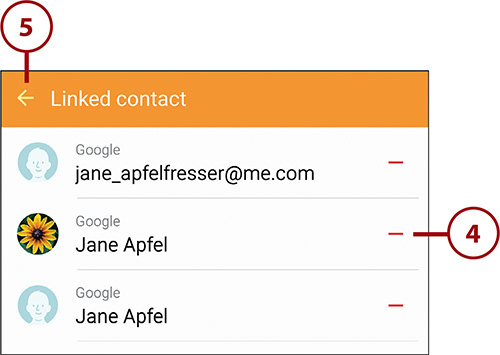
3. Tap Manage Linked Contacts to display the Linked Contact screen.

4. Tap the red – icon to the right of each contact you want to unlink.
5. Tap the arrow button or the Back button to return to the contact record.
Adding a Contact to Your Home Screen
If you communicate with any contact so much that you are constantly opening and closing the Contacts app, you can save time and effort by adding a shortcut to that contact on the Home screen.
1. In the Contacts app, tap the contact you want to add to the Home screen. The contact record opens.
2. Tap the More button to display the menu.
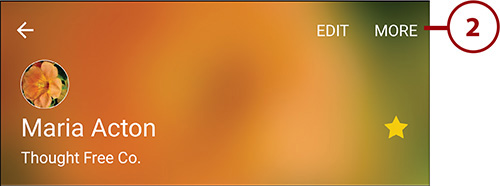
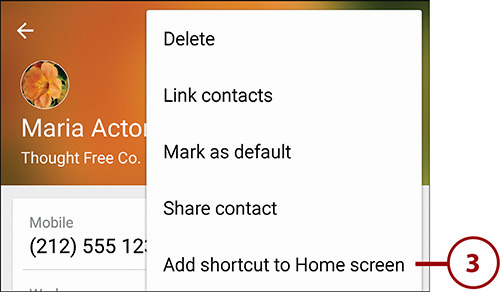
3. Tap Add Shortcut to Home Screen. Android adds a shortcut for that contact to the Home screen.
