5. Google Now and Navigation

In this chapter, you find out how to use Google Maps, Navigation, and Google Now. Topics include
![]() Google Now
Google Now
![]() Google Maps
Google Maps
![]() Navigation
Navigation
![]() Taking map data offline
Taking map data offline
You can use your Samsung Galaxy Note 5 as a GPS navigation device while you walk or drive around. Your phone also includes an app called Google Now that provides all the information you need when you need it.
Google Now
You can access Google Now from any screen (except the Lock screen), which enables you to search the Internet. Google Now provides you with information such as how long it takes to drive to work and the scores from your favorite teams.
Access Google Now
You can access Google Now from any app or the Home screen pane by pressing and holding the Home button.

1. Cards automatically appear based on your settings. Examples of these cards are scores for the sports teams you follow, upcoming meetings, weather in the location where you work, and traffic on the way to work.
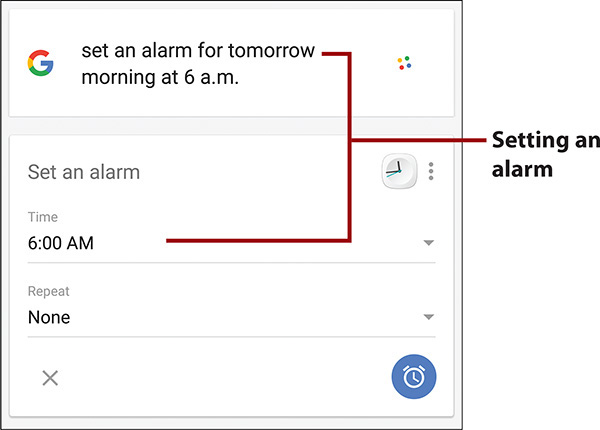
2. Say “OK Google” to speak a search, or to command Google Now to do something. You can also type your search terms.
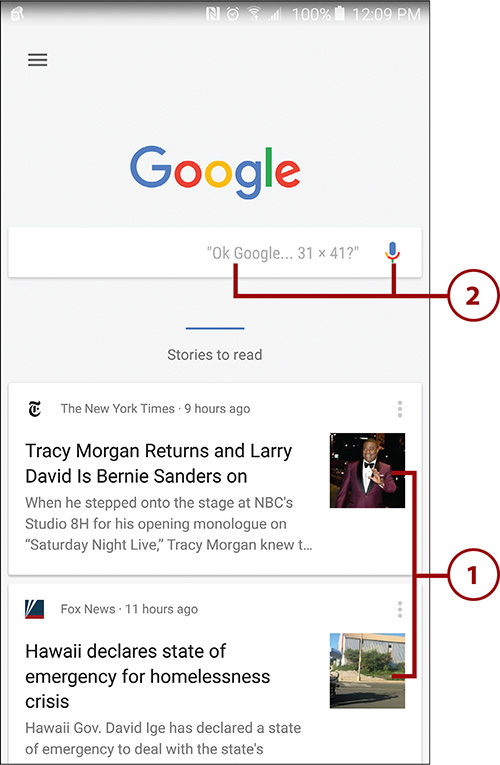
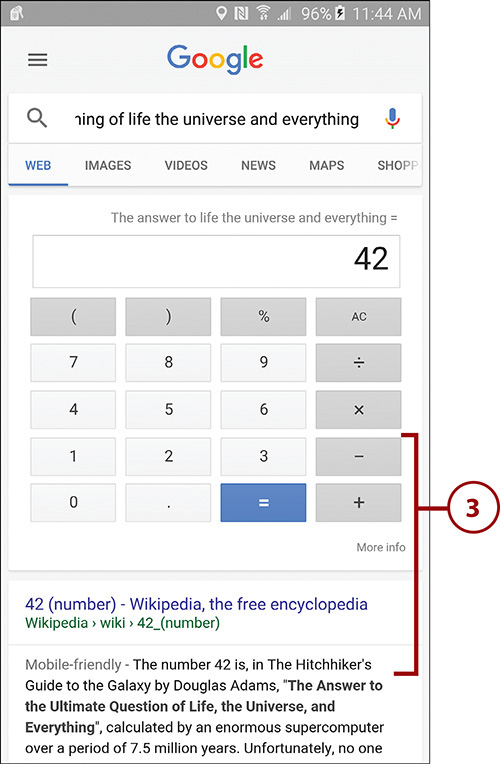
3. Information relevant to your search appears.
In addition to searching the Internet using Google Now, you can command Google to do things for you using the “OK Google” feature. For example, you can tell Google to set an alarm for you, compose a text message, or even send an email. This is just a small list of the types of things you can have Google do for you. You do not need to have the Google Now app open to use the “OK Google” feature. You can say “OK Google” from any screen. To see a comprehensive list of commands, visit http://trendblog.net/list-of-google-now-voice-commands-infographic/.
Set Up Google Now
For Google Now to work for you, you need to set it up correctly. This also means sharing your location information with Google.
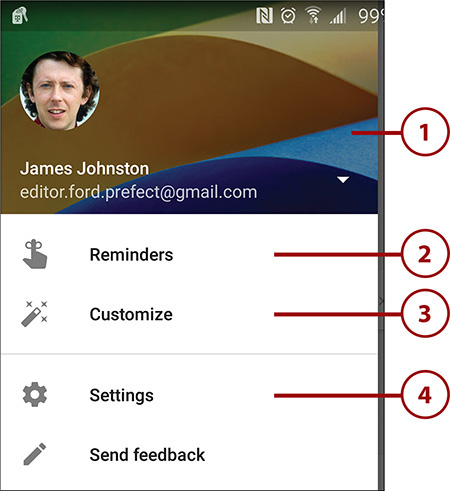
1. Swipe in from the left bezel to reveal the menu.
2. Tap to add and manage reminders. After adding a reminder, Google Now will ensure you are reminded of the activity.
3. Tap to customize what kinds of Google Now cards are displayed. This includes choosing the sports teams, stocks, places, and TV and video.
4. Tap Settings.
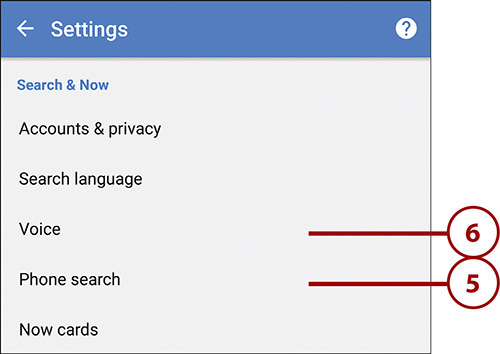
5. Tap to manage what Google Now can search for on your Note 5. This can include apps you have installed, bookmarks and web history in the Chrome web browser, your contacts, Google Play Books, Movies & TV, and Music.
6. Tap Voice to manage how and when Google Now responds to your voice.
7. Tap to choose the languages that Google Now responds to.
8. Tap to choose whether Google Now should be listening for you to say “OK Google.”
9. Tap to choose whether Google Now works when your phone is locked, and how it should listen for your commands. You can choose to let Google Now use a paired Bluetooth device, or a headset connected by a cable, or both.
10. Tap to choose when Google Now speaks back to you. Your choices are On (which means Always), Off (which means never), or only when you are using a hands-free device (such as a Bluetooth headset or your car’s built-in Bluetooth connection).
11. Tap to manage whether Google Now speech recognition can work even when there is no Internet connection. This is achieved by downloading one or more languages to your phone.
12. Tap to block offensive words being spoken when search results are returned by voice.

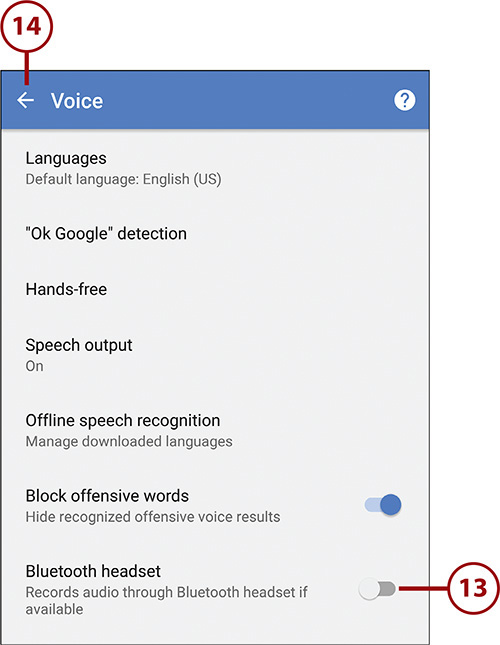
13. Tap to allow Google Now to record your voice using your Bluetooth headset or built-in car Bluetooth.
14. Tap to save your changes and return to the main Google Now settings screen.
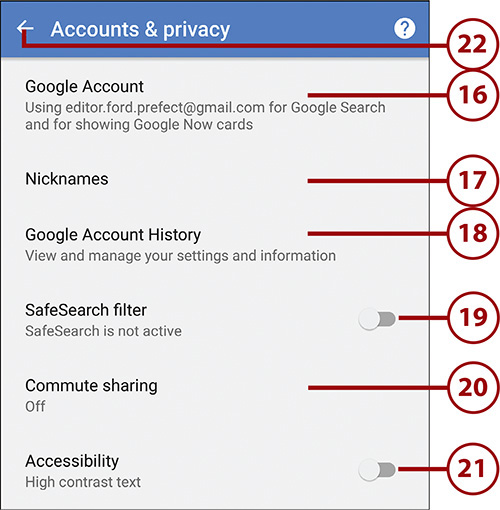
15. Tap Accounts & Privacy.

16. Tap to choose which of your Google accounts (if you have more than one) you want to use for Google Now.
17. Tap to manage any nicknames that you are using for people in your contacts.
18. Tap to manage whether apps can share your data with Google and clear any data that apps on your phone have shared with Google.
19. Tap to enable or disable the SafeSearch Filter that blocks offensive content.
20. Tap to choose whether you want to share your commute status, such as when you leave for home or leave for work. People need to be in your Google+ Circles to receive your Commute updates.
21. Tap to enable or disable high contrast text if you have a vision disability.
22. Tap to save your changes and return to the main Google Now settings screen.
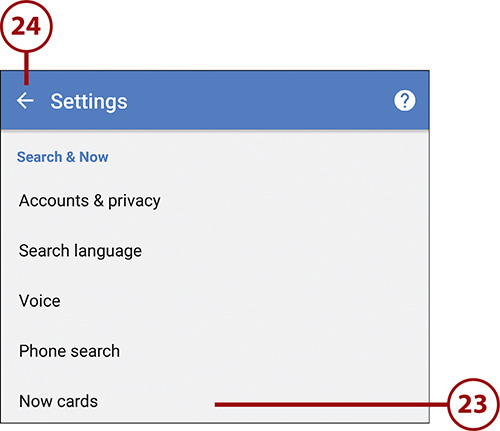
23. Tap to manage how Google Now alerts you when new cards are ready, and choose the ringtone that plays when they are ready to view.
24. Tap to save your changes and return to Google Now.
Tell Google Maps Where You Live and Work
Google Now can be even more effective if you configure your work and home addresses in Google Maps. Google Now uses that information to tell you things like how long your commute to work will be, whether there is heavy traffic on the route, and so on. See step 3 in the “Configure Google Maps Settings” task later in this chapter for information on how to configure your addresses.
Google Maps
Google Maps enables you to see where you are on a map, find points of interest close to you, get driving or walking directions, and review extra layers of information, such as a satellite view.
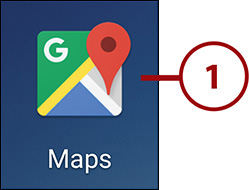
1. Tap to launch Google Maps.
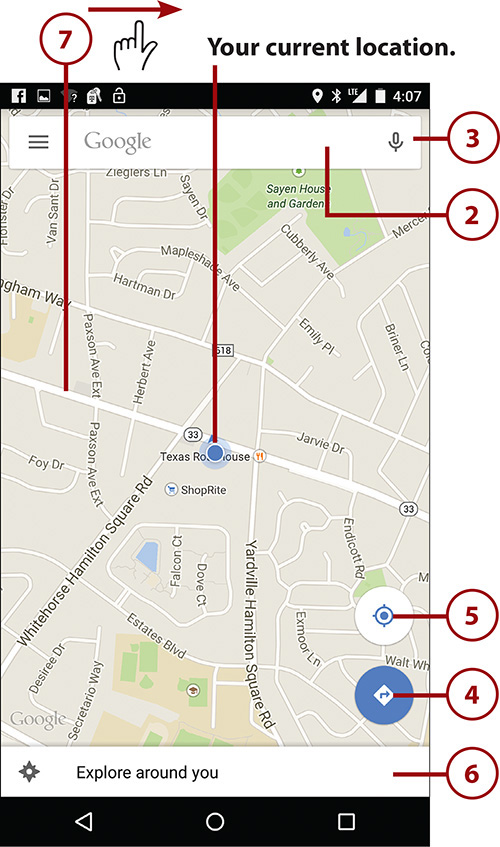
2. Tap to type a search term, the name of a business, or an address.
3. Tap to speak a search term, the name of a business, or an address.
4. Tap to get walking or driving directions from one location to another. You can also choose to use public transit or biking paths to get to your destination.
5. Tap to switch between the top-down view that always points North, and the 3D view that follows the direction your phone is pointing.
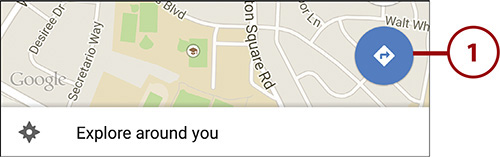
6. Tap to explore what’s around your current location.
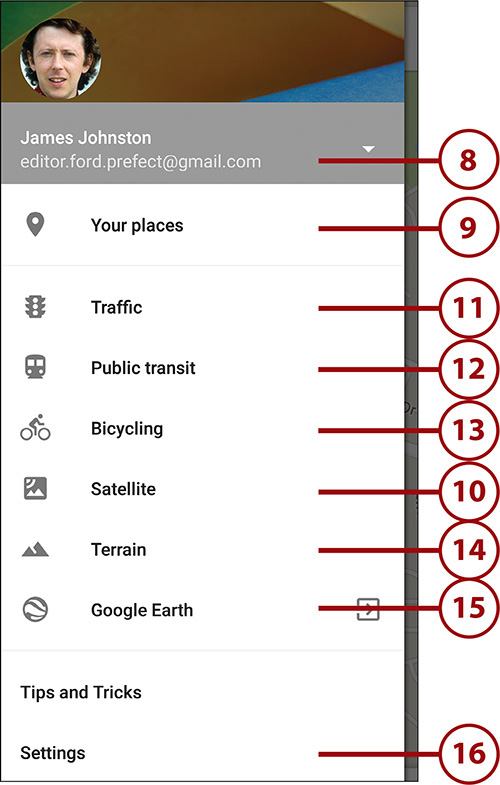
7. Swipe in from the left of the screen to reveal the menu.
8. Tap to switch to a different Google account for use with Google Maps.
9. Tap to see your work and home address, plus addresses you have recently searched for.
10. Tap to toggle between the map view and the satellite.
11. Tap to show the current traffic conditions on the map or satellite view.
12. Tap to show all public transport locations on the map view or satellite view.
13. Tap to show all bicycling routes on the map view or satellite view.
14. Tap to see the terrain view.
15. Tap to launch the Google Earth app.
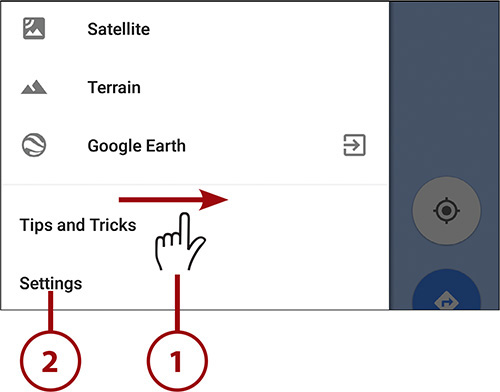
16. Touch to change the settings for Google Maps.
See the “Configure Google Maps Settings” task later in this chapter for more information about customizing Google Maps.
Get Directions
You can use Google Maps to get directions to where you want to go.
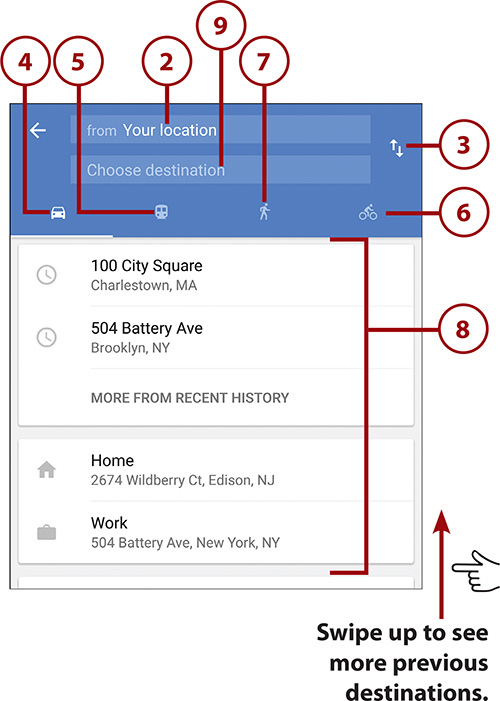
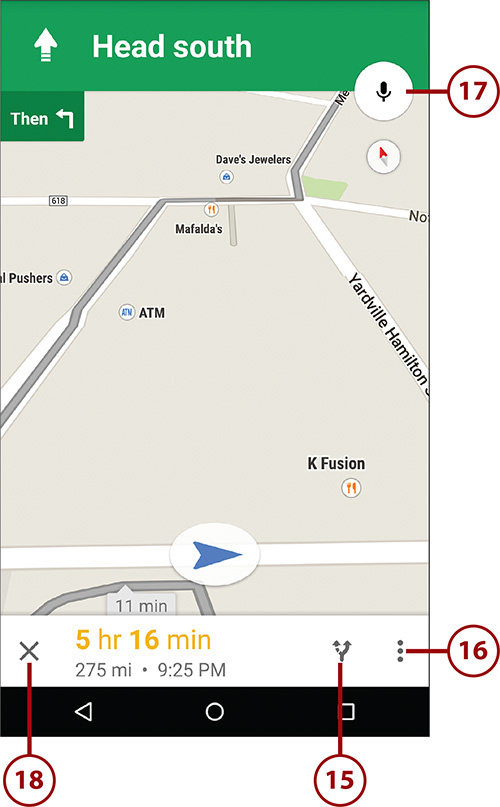
1. Tap the Directions icon.
2. Tap to set the starting point or leave it as My Location (which is where you are now).
3. Tap to flip the start and end points.
4. Tap to use driving directions.
5. Tap to use public transportation.
Public Transportation
If you choose to use public transportation to get to your destination, you have two extra options to use. You can choose the type of public transportation to use, including bus, subway, train, or tram/light rail. You can also choose the best route (fewer transfers and less walking).
6. Tap to use bike paths (if available).
7. Tap to walk to your destination.
8. Tap to choose a previous destination. If you need to type the address of your destination, skip to step 9; if not, skip to step 10.
9. Type or speak the destination address.
10. Tap to adjust how the map appears, and to modify options like avoiding toll roads. If you are happy with the route as-is, skip to step 14.
11. Tap to share your directions with someone via email, text message, and many other methods.
12. Choose how your map appears. You determine whether it should include traffic information, satellite images, or terrain.
13. Tap to adjust the route options. You can choose to avoid highways, avoid tolls, or avoid ferries.
14. Tap to start the navigation.

15. Tap to see and select alternative routes as they appear on the map.
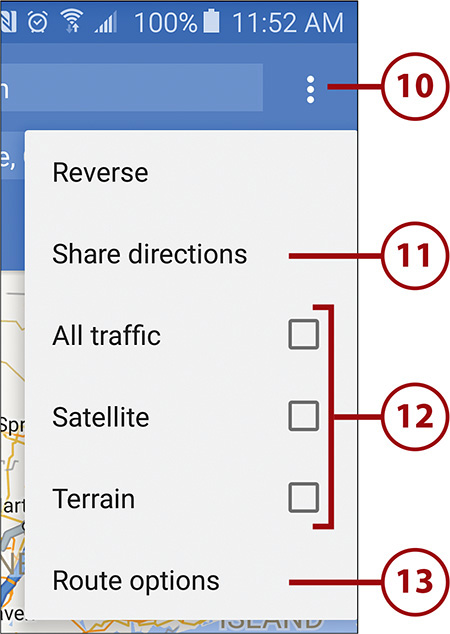
16. Tap the Menu icon to mute the voice guidance, show traffic conditions, choose the satellite view, and show the entire route alternatives.
17. Tap to speak commands like “Show alternative route”, “How’s traffic ahead?”, or “What time will I get there?”
18. Tap to cancel the route.
2. Tap Settings.
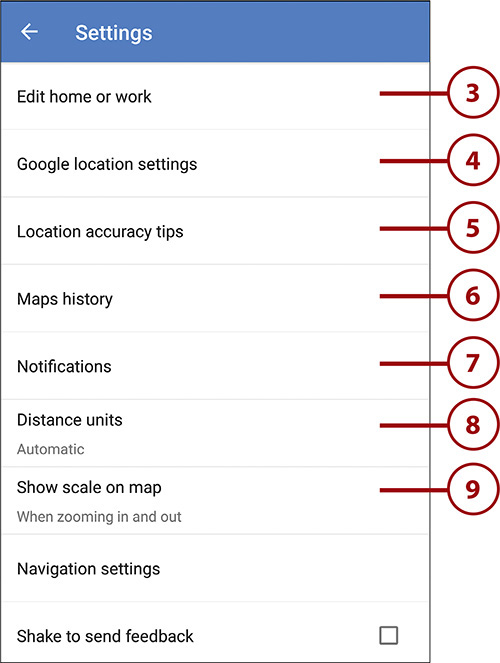
3. Tap to edit your work and home addresses. Telling Maps your home and work addresses is important for Google Now to work more effieciently, but it also helps you quickly plan new routes to work and home.
4. Tap to enable or disable the capability for your phone to report its location. You can also choose the accuracy of your location by changing the mode.
5. Tap to improve your location accuracy if you think that your phone is not reporting it correctly.
6. Tap to see addresses you have looked up and received directions to. You can also delete items in this list.
7. Tap to choose whether you want to see location-specific information such as schedules in transit stations.
8. Tap to set the distance unit of measure. You can either set it to automatic so that Google Maps adjusts it based on where you are on the planet, or you can manually set it.
9. Tap to choose when to see the scale on the map. Your choices are when zooming in and out, or always.
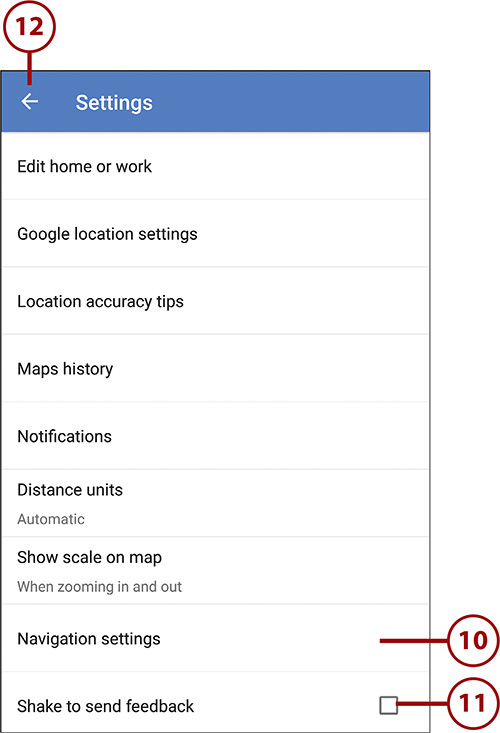
10. Tap to change the volume level for the voice that speaks the turn-by-turn directions, and choose whether you want to always start navigation using the Tilt Map. The Tilt Map is a view as if looking ahead from behind the navigation arrow.
11. Check the box if you want to be able to shake your Note 5 to send feedback about your experiences with Google Maps to Google.
12. Tap to save your changes and return to the main Google Maps screen.
Use Offline Google Maps
Google Maps enables you to download small parts of the global map to your phone. This is useful if you are traveling and need an electronic map but cannot connect to a network to download it in real time.
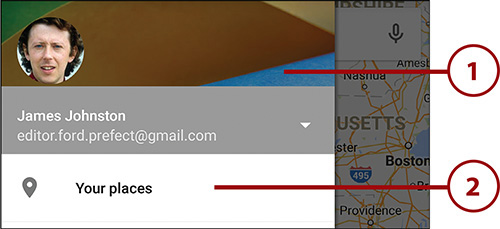
1. Swipe in from the left of the screen.
2. Tap Your Places.
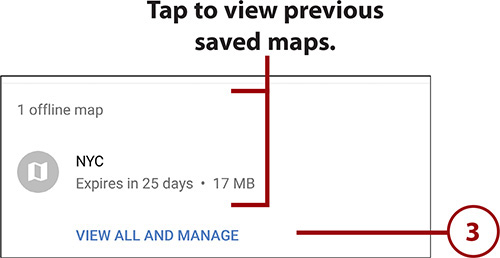
3. Scroll down to the bottom of the Your Places screen, and tap View All and Manage.
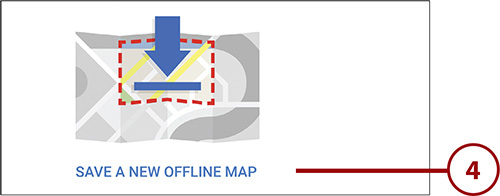
4. Tap Save a New Offline Map.
5. Pan around to find the area of the map you want to save offline.
6. Pinch to zoom out or unpinch to zoom in to the area of the map you want to save offline.
7. Tap Save when the area of the map fills the screen.
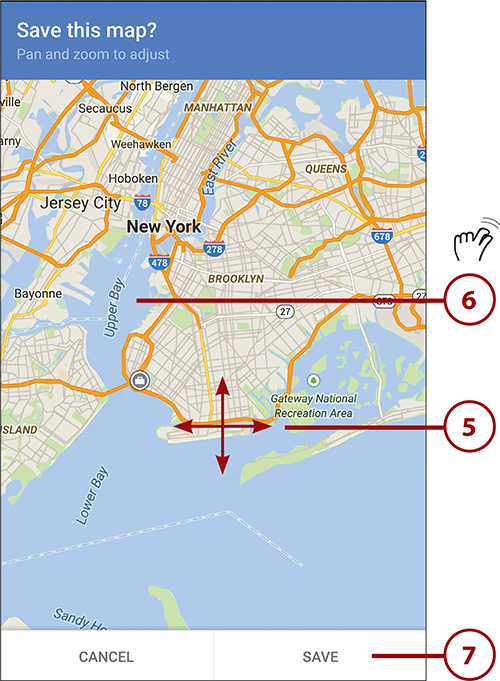
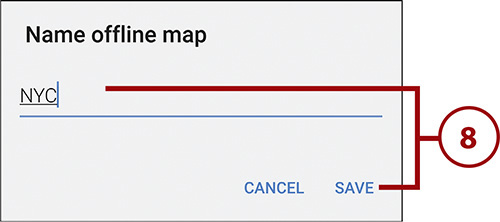
8. Type a name for the offline map and tap save.
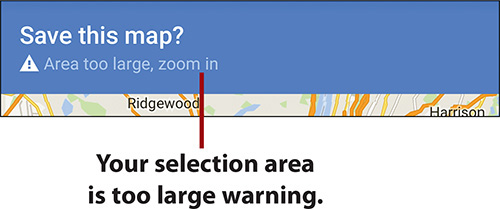
How Much Map Can I Take Offline?
When selecting the area of the map to take offline, you are limited to approximately 100 Mb of map data. You don’t need to worry about the size of the data because if you have selected an area that is too large, Google Maps gives you a warning.