4. Email and Text Messages
In this chapter, you discover your Galaxy Note 5’s email applications for Gmail and other accounts, such as POP3, IMAP, and even Microsoft Exchange. In addition, you discover how to use the Messages app for text messaging. Topics include the following:
![]() Sending and receiving email
Sending and receiving email
![]() Setting up the Gmail and Email apps
Setting up the Gmail and Email apps
![]() Sending and receiving text messages
Sending and receiving text messages
![]() Sending and receiving multimedia messages
Sending and receiving multimedia messages
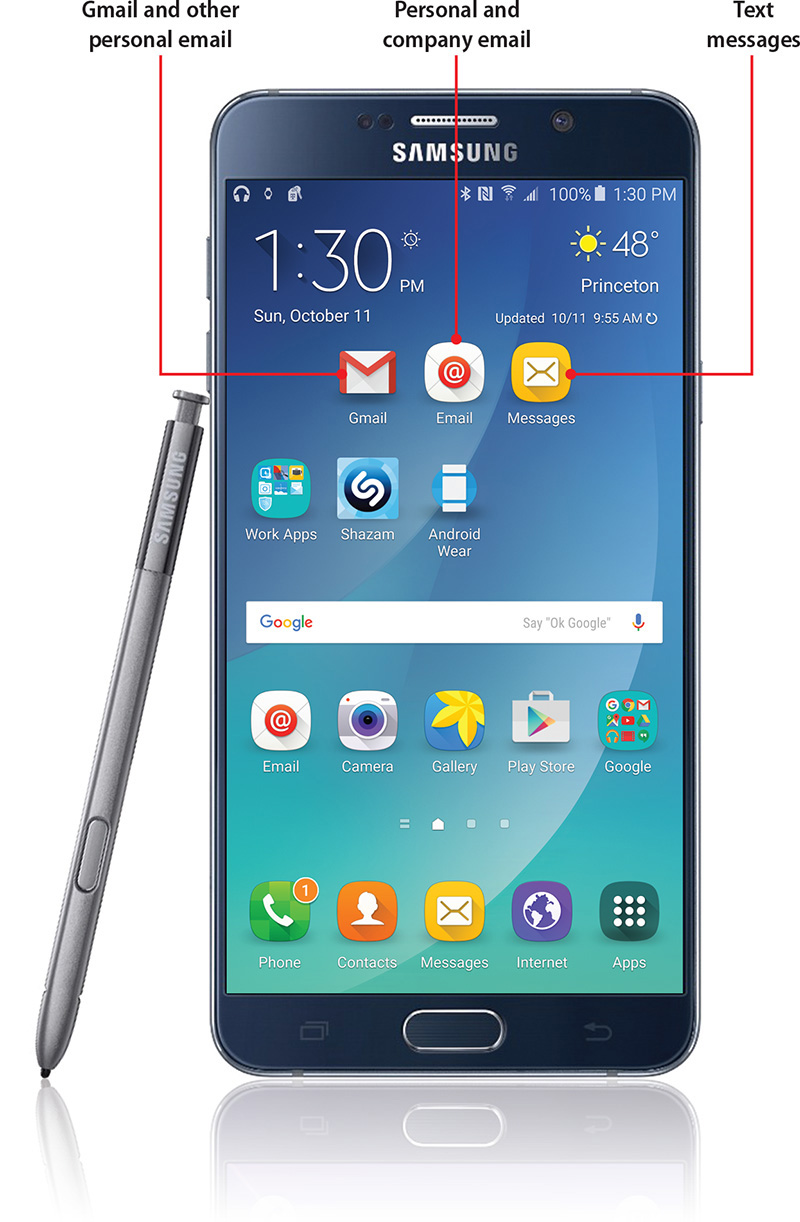
Your Galaxy Note 5 has two email programs: the Gmail app, which works with Gmail and POP3 and IMAP email accounts, and the Email app that works with POP3, IMAP, and Microsoft Exchange (corporate email) accounts. In addition, you can use the Messages app to send and receive text messages
Gmail
When you first set up your Galaxy Note 5, you set up a Gmail account. The Gmail application enables you to have multiple Gmail accounts, which is useful if you have a business account and a personal account. If you don’t want to add a second Gmail account, you can skip this section.
Add a Google Account
When you first set up your Galaxy Note 5, you added your primary Google (Gmail) account, but you might have other Gmail accounts that you’d also like to access through your Galaxy Note 5. The following steps describe how to add a second account.
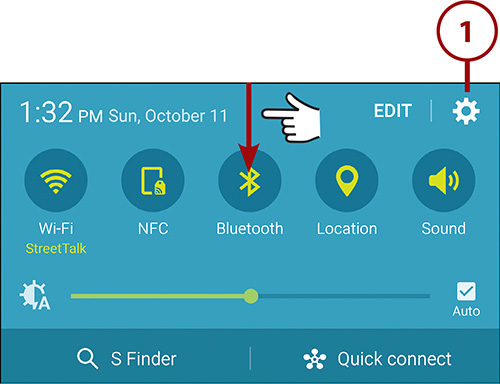
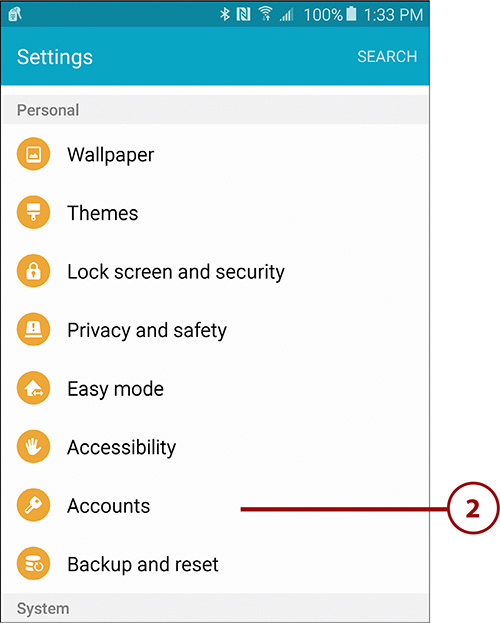
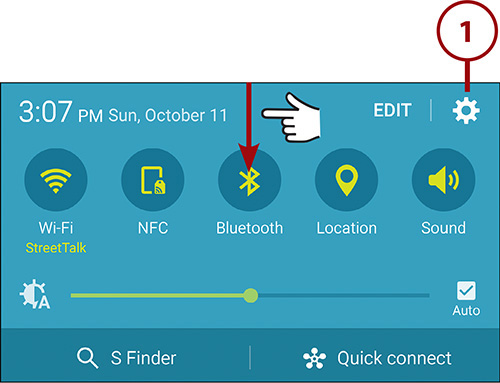
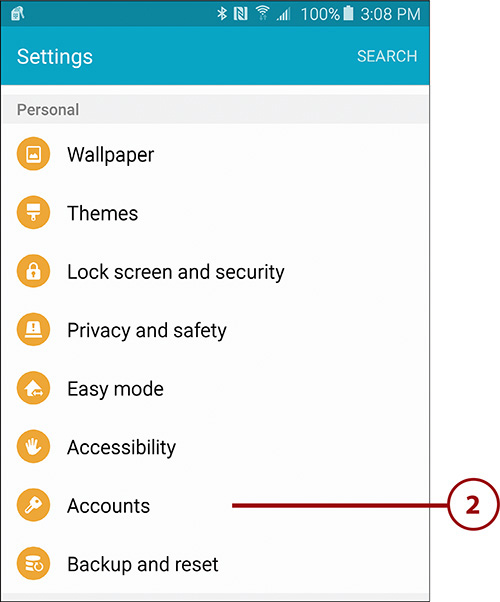
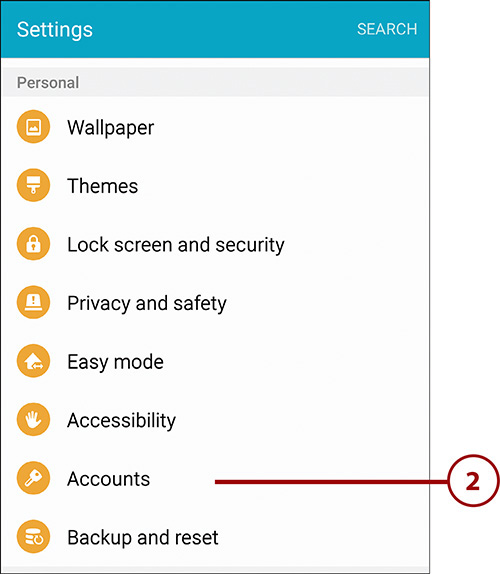
1. Pull down the Notification bar and tap the Settings icon.
2. Tap Accounts under the Personal section.
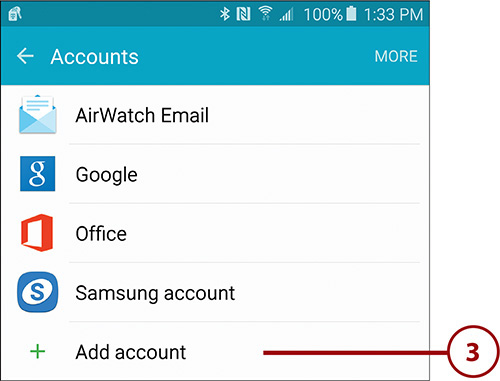
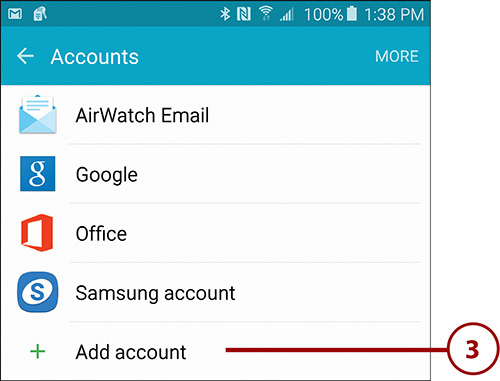
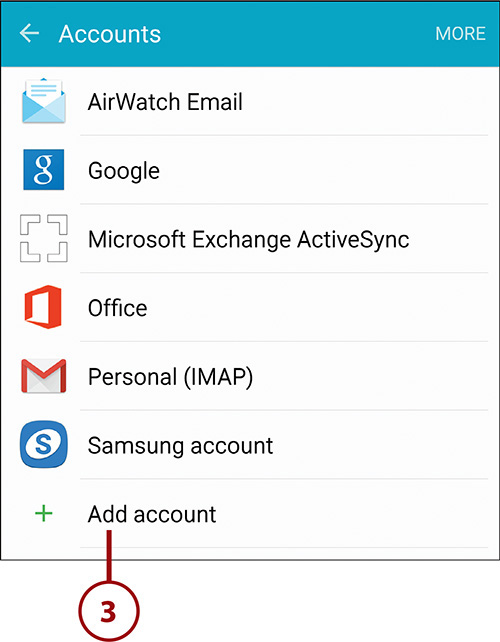
3. Tap Add Account.
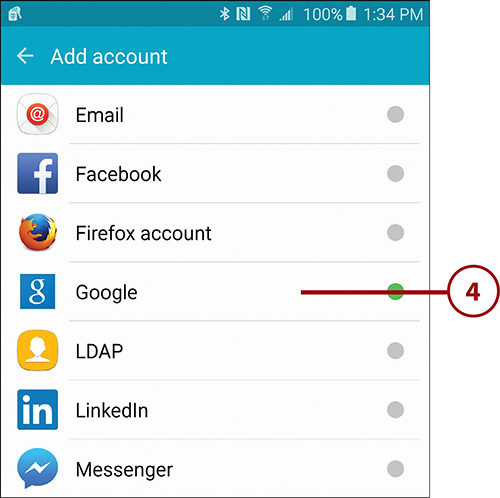
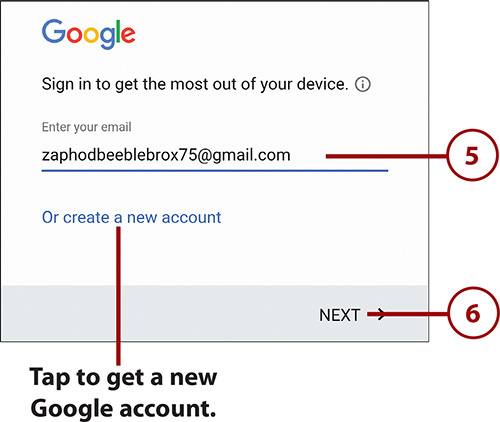
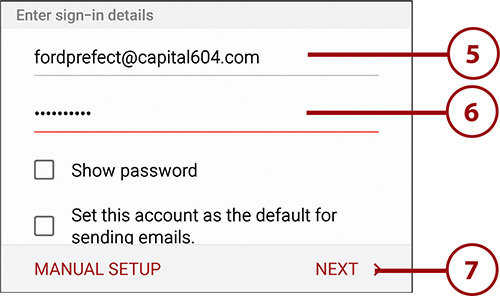
5. Enter your existing Google account name. This is your Gmail address.
What If I Don’t Have a Second Google Account?
If you don’t already have a second Google account but want to set one up, in step 5, tap New. Your Galaxy Note 5 walks you through the steps of creating a new Google account.
6. Tap Next.
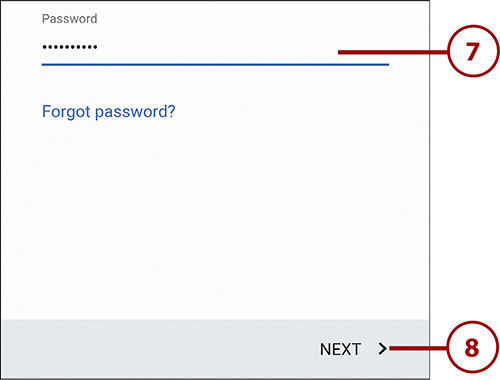
7. Enter your existing Google password.
8. Tap Next.
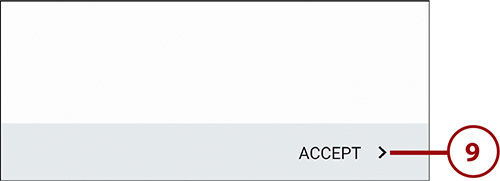
9. Tap Accept.
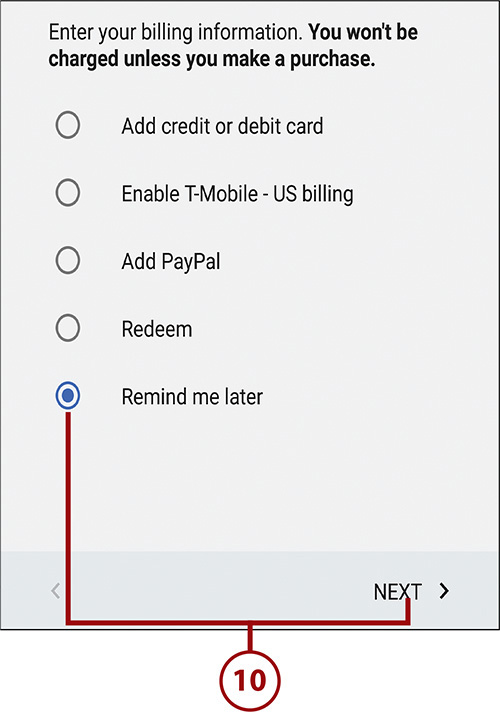
10. Select Remind Me Later and tap Next to bypass setting up payment information for Google Wallet for this Google account. Right now you just want to set up the email account.
Why Multiple Google Accounts?
You are probably wondering why you would want multiple Google accounts. Isn’t one good enough? Actually, it is not that uncommon to have multiple Google accounts. It can be a way to compartmentalize your life between work and play. You might run a small business using one account, but email only friends with another. Your Galaxy Note 5 supports multiple accounts, but still enables you to interact with them in one place.
Add a POP3/IMAP Account
Unlike previous versions of the Gmail app, the latest version supports the non-Gmail account types of POP3 and IMAP. If you don’t want to add a POP3 or IMAP account to the Gmail app, you can skip this section.
1. Pull down the Notification bar and tap the Settings icon.

2. Tap Accounts under the Personal section.

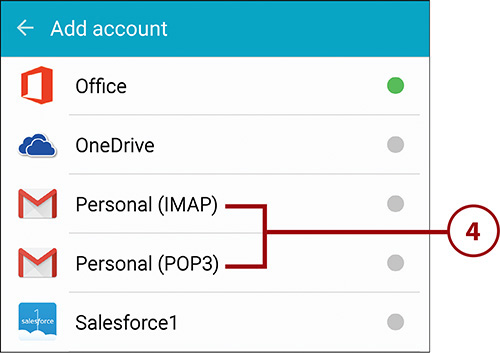
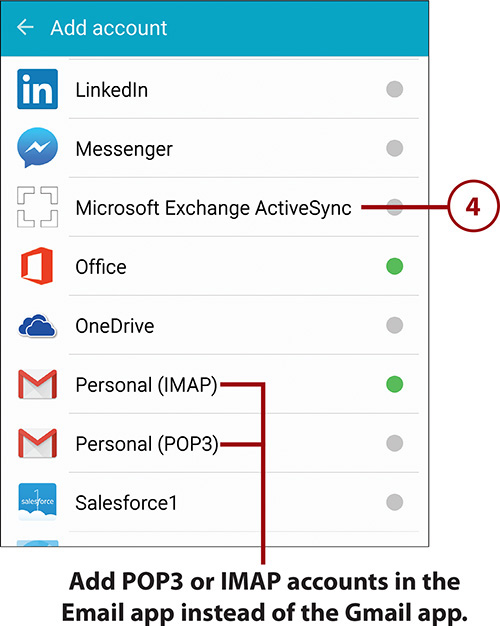
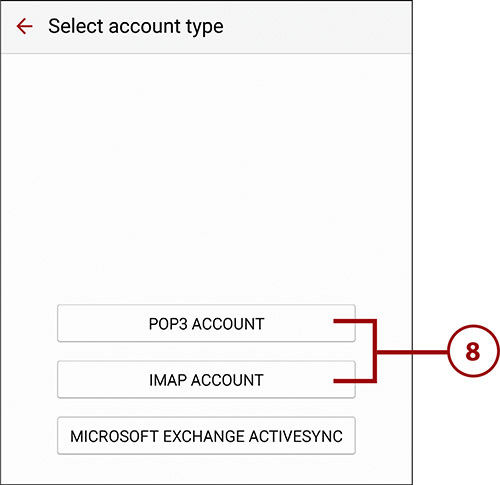
4. Tap Personal (IMAP) or Personal (POP3). This example uses an IMAP account type. However, the steps are the same for a POP3 account type.
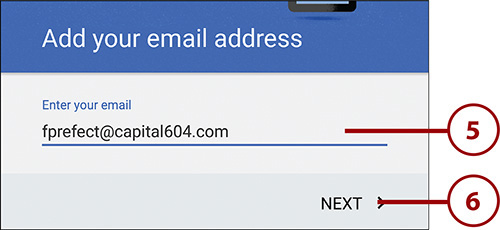
5. Enter your IMAP account’s email address.
6. Tap Next.
What Is Manual Setup?
If you are using an email service provider that is not well known, or you are using email from your personal domain, the Gmail app may not be able to automatically work out the server settings. In that situation you might want to tap Manual Setup, which enables you to enter all information manually.
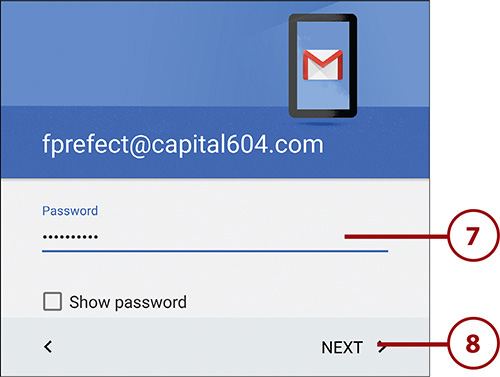
7. Enter the password for the email account you are adding.
8. Tap Next.
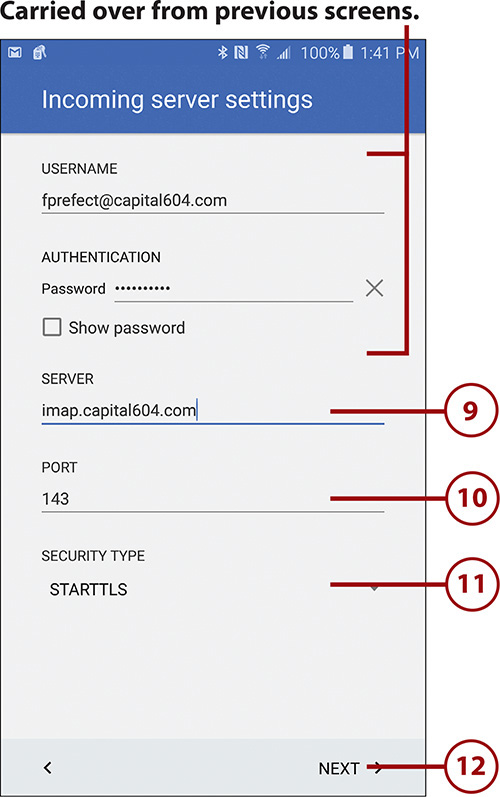
9. Verify the incoming server name and change if needed.
10. Verify the port number and change if needed.
11. Verify the security type and change if needed.
12. Tap Next.
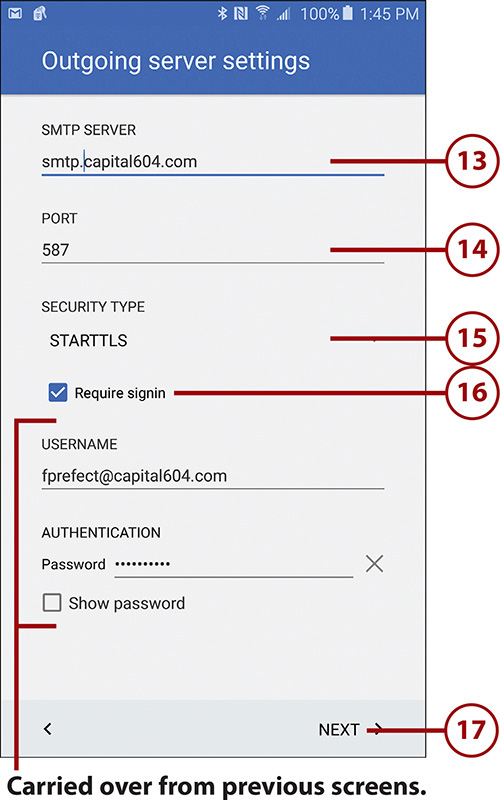
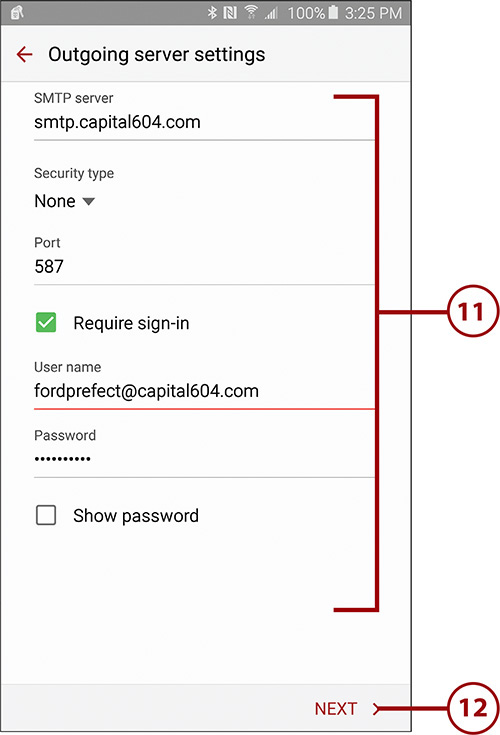
13. Verify the outgoing server name and change if needed.
14. Verify the port number and change if needed.
15. Verify the security type and change if needed.
16. Check the box if your email provider requires that you use your username and password when sending email. This is almost always the case.
17. Tap Next.
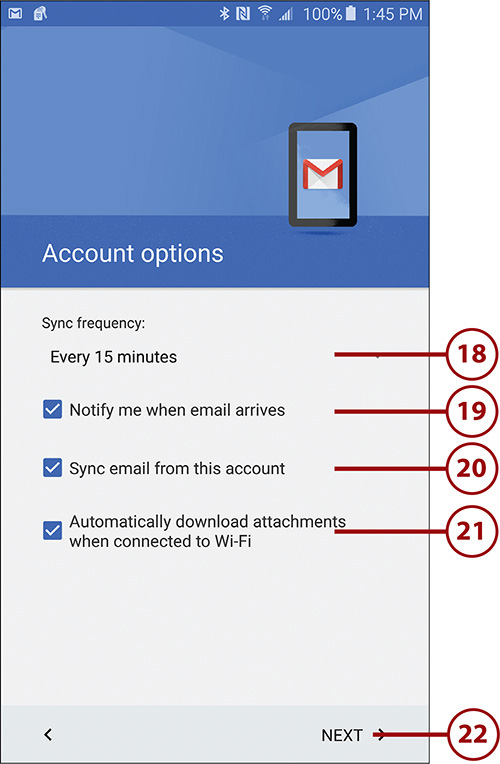
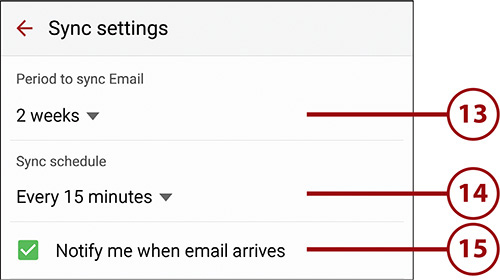
18. Tap to choose how often the Gmail app automatically looks for and downloads new email in this account. You can also set it to Never, which means that email from this account is only downloaded when you open the Gmail app.
19. Check the box to be notified when new email arrives in this account.
20. Check the box if you want to synchronize mail from this account. Unchecking this box means that you don’t want email to synchronize (not common).
21. Check the box if you want the Gmail app to automatically download email attachments when it detects that your Note 5 is connected to a Wi-Fi network.
22. Tap Next.
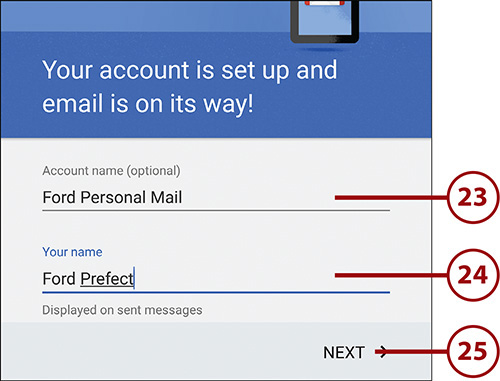
23. Enter a friendly name for this account.
24. Enter the name you want to use when sending email from this account.
25. Tap Next to complete the setup of the email account.
Be Secure If You Can
If your mail provider supports email security such as SSL or TLS, you should strongly consider using it. If you don’t, emails you send and receive go over the Internet in plain readable text. Using SSL or TLS encrypts the emails as they travel across the Internet so that nobody can read them. Set this under the Advanced settings for the Incoming and Outgoing Servers.
Navigate the Gmail App
Let’s take a quick look at the Gmail app and find out how to navigate the main screen.
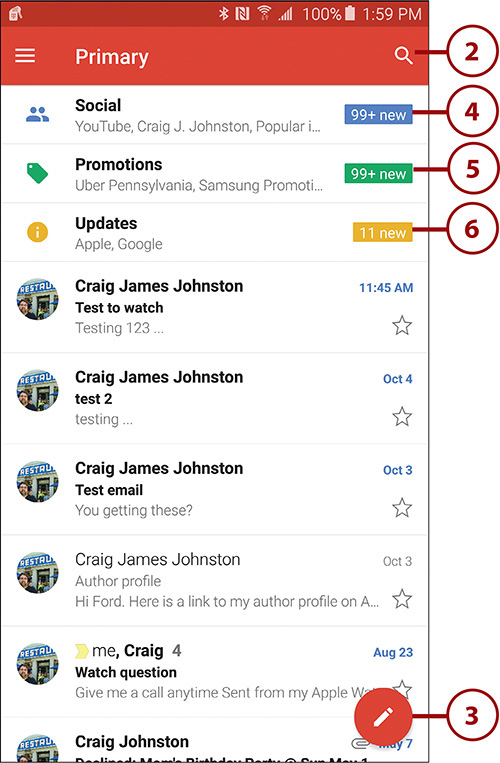
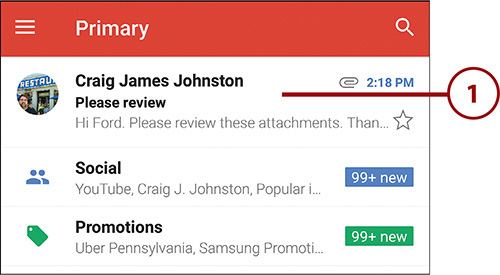
1. Tap the Gmail icon to launch the app. Your initial view will be of the Inbox of your primary Google (Gmail) account, which is the account you used when setting up your tablet.
2. Tap to search the current folder for an email.
3. Tap to compose a new email.
4. Tap to see only new messages received from your social networking sites such as Facebook and Google+. When you have tapped it once, the Social option disappears until new social media emails arrive.
5. Tap to see any new emails that are promotions for products. When you have tapped it once, the Promotions option disappears until more promotional emails arrive.
6. Tap to see any new updates. Updates include messages about updating an app, but can also include email relating to things you have purchased, bills you need to pay, and even updates to meeting invites. After you have tapped Updates once, this option disappears until there are more new updates.
7. Swipe in from the left to reveal the menu.
8. Tap to switch between your email accounts, if you have more than one.
9. Tap to view Social, Promotions, or Updates. These are only visible when viewing Google (Gmail) accounts.
10. Tap to view messages in any forums you are participating in. This is only visible when viewing Google (Gmail) accounts.
11. Tap to switch between your different folders (or labels, as the Gmail app calls them).
12. Scroll down to see all of your labels.
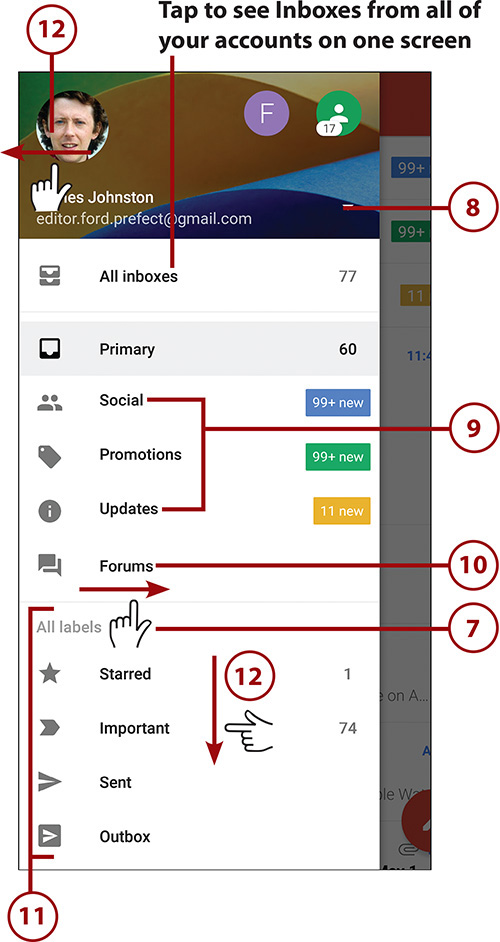
13. Swipe the vertical action bar to the left to close the menu.
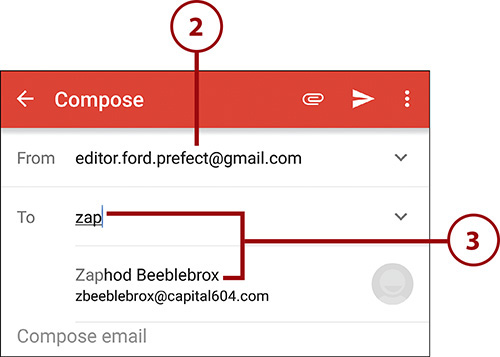
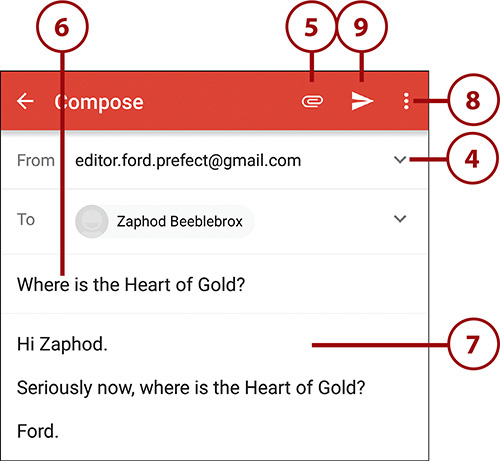
2. Tap to change the email account from which the message is being sent (if you have multiple accounts).
3. Type names in the To field. If the name matches someone in your Contacts, a list of choices is displayed and you can tap a name to select it. If you only know the email address, type it here.
4. Tap to add Carbon Copy (CC) or Blind Carbon Copy (BCC) recipients.
5. Tap the paperclip icon to add one or more attachments or insert links to one or more Google Drive files. See the next section for more information.
6. Type a subject for your email.
7. Type the body of the email.
8. Tap to save the email as a draft or discard it.
9. Tap to send the email.
Add Attachments or Insert Drive Links
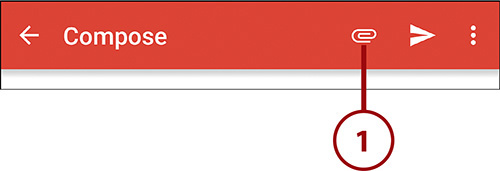
Before sending an email, you can add one or more attachments or insert links to files you have in your Google Drive account. The Gmail app can attach files that you’ve saved on your tablet and in your Google Drive account. Here is how to add attachments and link Drive documents.
1. After filling in the fields as described in the “Compose an Email” task, tap the paperclip icon.
2. Tap either Attach File or Insert from Drive. This example uses the Attach File option.
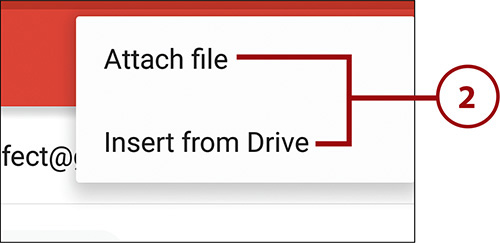
What Is the Difference Between Attaching and Inserting?
When you choose to attach a file to an email, you can choose a file located on your tablet, in the Photos app, or in your Google Drive account. The file is then copied from that location and attached to the email. If you choose to insert a file from Google Drive, the file you choose is not actually copied out of Google Drive and attached to the email. Instead, a link to that file is placed in the body of the email. The link enables the recipients to tap the link and open the document right in your Google Drive account.
3. Choose where you want to search for the file. This can include your recent downloads, your Google Drive account, the Downloads folder, internal tablet storage, or the Photos app.
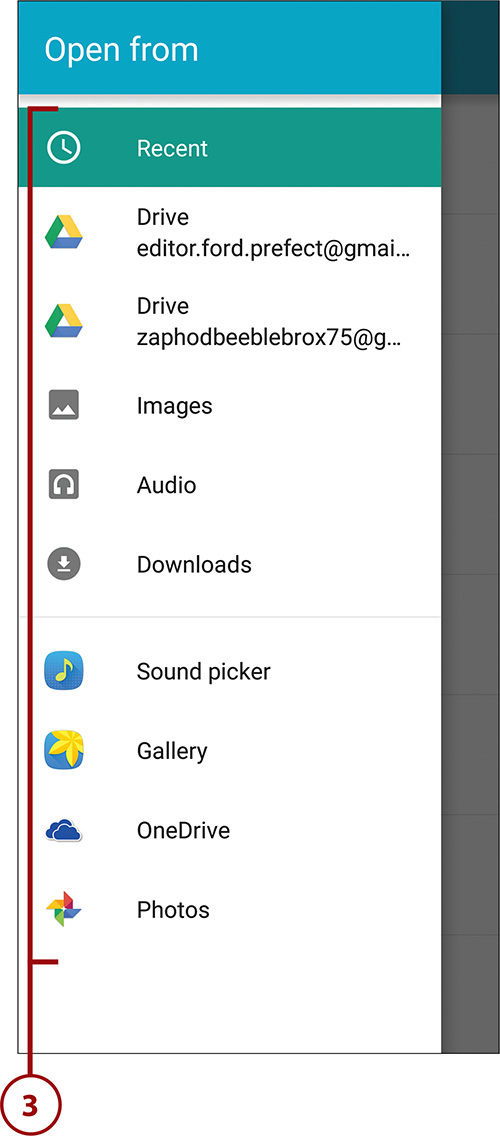
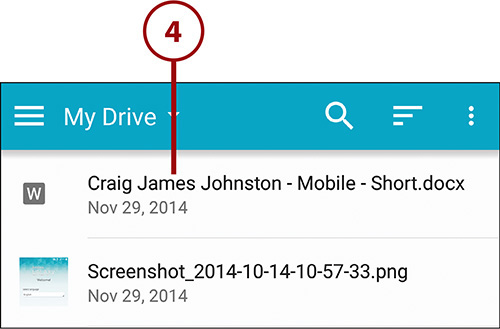
4. Tap the file to attach it. In this example, the attachment is a document in my Google Drive account.
5. Tap Send.

Read an Email
1. Tap an email to open it. The sender name and subject for unread emails are in bold; those same items for emails that you have already read are not bold.
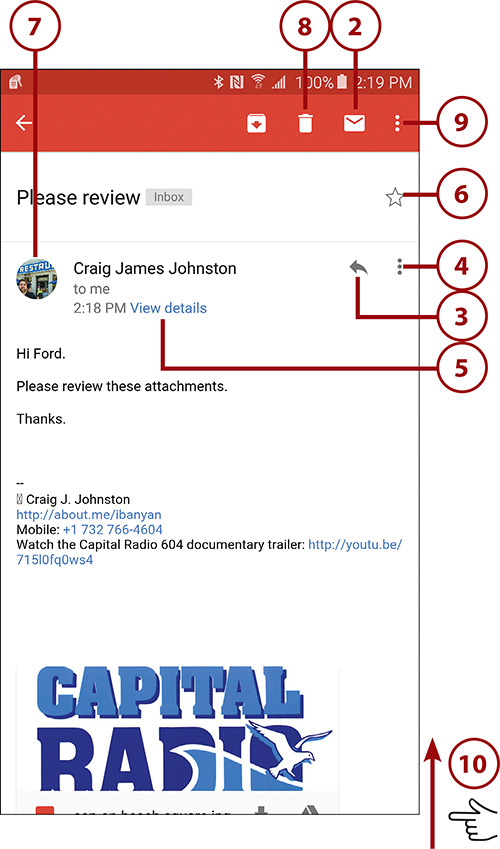
2. Tap to mark the email as unread and return to the email list view.
3. Tap to reply to the sender of the email. This does not reply to anyone in the CC field.
4. Tap the Menu icon to reply to the sender of the email and any recipients in the To and CC fields (Reply All). You can also choose to forward the email or print it.
5. Tap to expand the email header to see all recipients and all other email header information.
6. Tap to “star” the message, or move it to the “starred” label.
7. Tap the sender’s contact picture to see more contact information about them.
8. Tap to move the email to the Trash folder.
9. Tap to move the email to a different label.
10. Swipe up to see the rest of the email and extra actions you can take.
Rich Text Formatting
A Rich Text Formatting (RTF) message is a message formatted with anything that is not plain text. RTF includes bulleted lists, different fonts, font colors, font sizes, and styles such as bold, italic, and underline. Although you cannot type an email on your tablet with the standard keyboard using RTF, when you receive an RTF email, your tablet preserves the formatting and displays it correctly.
What Are Conversations?
Conversations are Gmail’s version of email threads. When you look at the main view of the Gmail app, you are seeing a list of email conversations. The conversation might have only one email in it, but to Gmail that’s a conversation. As you and others reply to that original email, Gmail groups those messages in a thread, or conversation.
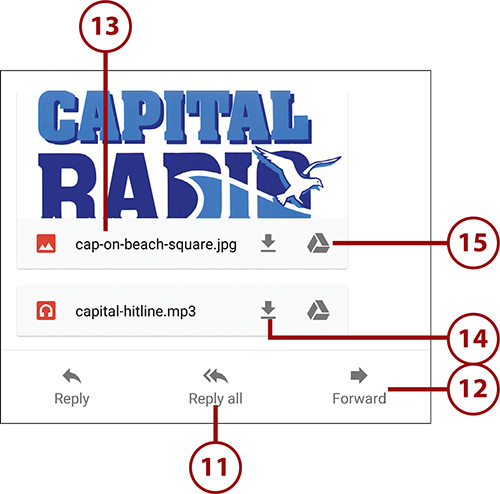
11. Tap to reply to the email and all recipients (Reply All).
12. Tap to forward the email.
13. Tap attachments to open them.
14. Tap the download icon to download the attachment to your Note 5. It will be saved in the Download folder on your Note 5. Use the My Files app to view and manage your downloaded files.
15. Tap the Google Drive icon to save the attachment to your Google Drive.
>>>Go Further: Gmails Have Extra Options

What Is Important?
Gmail tries to automatically figure out which of the emails you receive are important. As it learns, it might sometimes be wrong. If an email is marked as important but it is not important, you can manually change the status to “not important.” Important emails have a yellow arrow whereas emails that are not important have a clear arrow. All emails marked as “important” are also given the Priority Inbox label.

What Happens to Your Spam or Phishing Emails?
When you mark an email in Gmail as spam or as a phishing scam, two things happen. First, it gets a label called Spam. Second, a copy of that email is sent to Gmail’s spam servers so that they are now aware of a possible new spam email that is circulating around the Internet. Based on what the servers see for all Gmail users, they block the emails that have been marked as spam and phishing emails from reaching other Gmail users. So the bottom line is that you should always mark spam emails because it helps all of us.
Customize Gmail App Settings
You can customize the way the Gmail app works, and you can also customize how each independent email account functions.
1. Swipe in from the left and tap the current email account to reveal its folders.
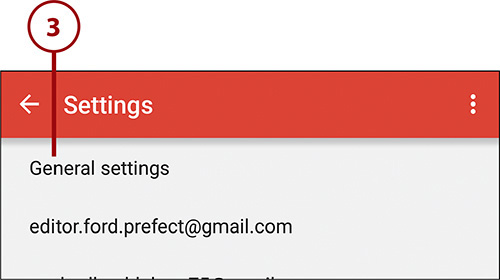
2. Tap Settings.
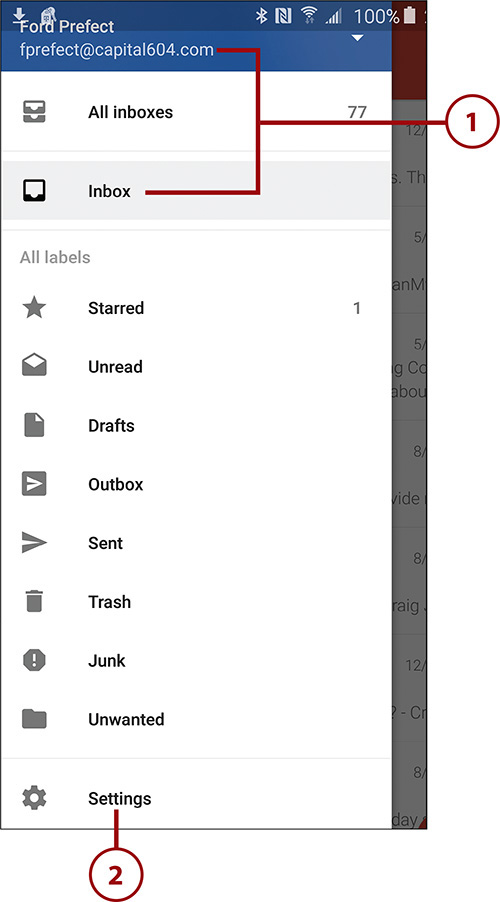
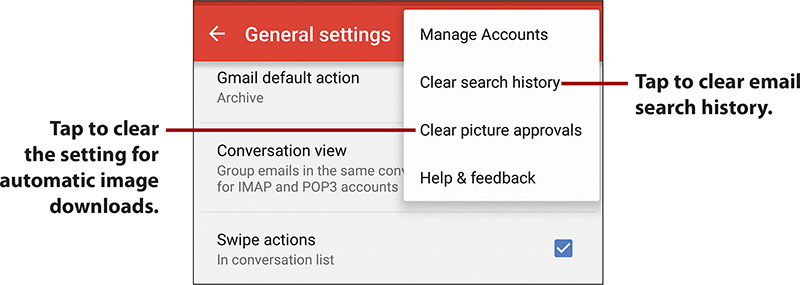
3. Tap General Settings.
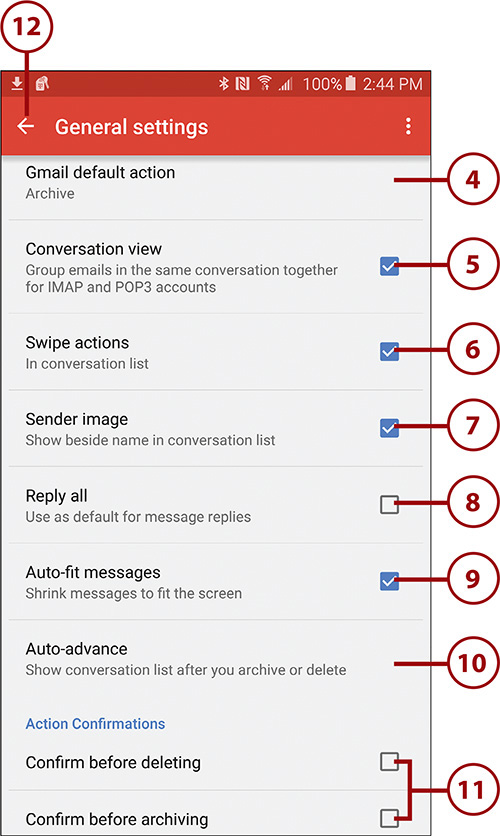
4. Tap to choose what the default action is when you choose to archive or delete a message in Gmail accounts. The choices are Archive and Delete.
5. Check the box to enable the feature where emails with the same subject line are grouped together. Emails with the same subject line are normally in the same conversation.
6. Check the box to enable the ability to swipe an email left or right to archive it.
7. Check the box to enable showing the email sender’s contact image in the conversation list.
8. Check the box to enable making Reply All the default reply action.
9. Tap to enable automatically shrinking the emails to fit on the screen.
10. Tap to choose what happens when you archive or delete a message. Your choices are to show newer messages, older messages, or the conversation list.
11. Choose which actions you want to show a confirmation screen for.
12. Tap to save your changes and return to the main Settings screen.
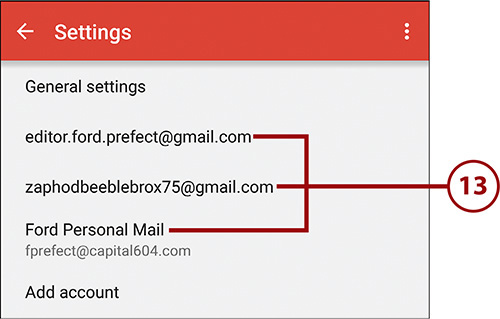
13. Tap one of your accounts to change settings specific to that account, and then follow the steps in the following sections.
Additional Options in General Settings
While in the General Settings screen, if you tap the Menu icon, you can clear your email search history or your picture approvals. When you clear picture approvals, you are clearing your previous decisions on which emails you wanted to automatically load the images for.
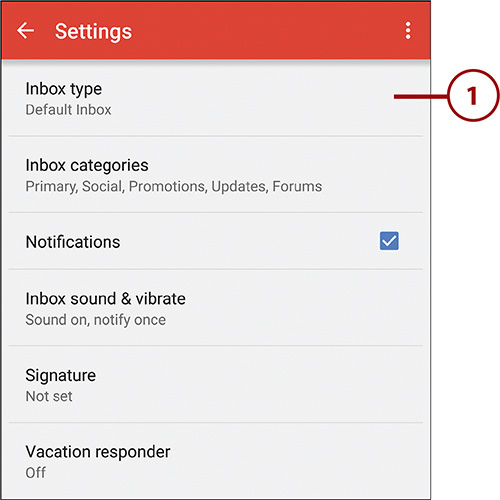
Customize Google Account Settings
1. Tap to choose whether you want to see your Priority Inbox instead of your regular Inbox (Default Inbox) when opening the Gmail app.
What Is the Priority Inbox?
Google introduced the Priority Inbox as a way to sort emails that are important to you into a folder called Priority Inbox. It does this by analyzing which emails you open and reply to. If it makes a mistake, you can mark a message as less important or more important. Over time, Google’s handle on which emails are important to you gets more accurate. Because the Priority Inbox probably has the most-important emails, you might want to open it first and then go to the regular Inbox later to handle less-important emails. Learn more about the Priority Inbox at https://youtu.be/5nt3gE9dGHQ.
2. Tap to choose what Inbox categories will be shown. As shown earlier in the chapter, by default the Social and Promotions categories are displayed. You can also show Updates and Forums.
3. Tap to enable or disable notifications when new email arrives for this Gmail account.
4. Tap to select how to get notified when new email arrives for this account. You can choose a different notification for each label and also decide which labels in addition to the Primary label you will be notified for.
5. Tap to enter a signature to be included at the end of all emails composed using this account.
Email Signature
An email signature is a bit of text that is automatically added to the bottom of any email you send from your Galaxy Note 5. It is added when you compose a new email, reply to an email, or forward an email. A typical use for a signature is to automatically add your name and some contact information at the end of your emails. Email signatures are sometimes referred to as email footers.
6. Tap to set your Vacation Responder. This is a message that is automatically sent to people when you are on vacation.
7. Swipe up for more settings.

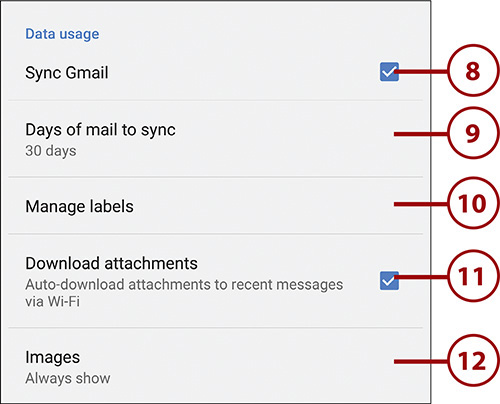
8. Tap to choose whether to synchronize Gmail to this device. Turning this off stops Gmail from arriving on your Note 5.
9. Tap to choose how many days’ worth of email to synchronize to your Note 5.
10. Touch to manage labels. Labels are like folders. You can choose which labels synchronize to your Note 5, how much email synchronizes, and what ringtone to play when new email arrives in that label.
11. Check the box to automatically download attachments to recently received emails while connected to a Wi-Fi network.
12. Tap to choose how images embedded in emails are handled. They can be automatically downloaded, or you can be prompted before they are downloaded for each email.
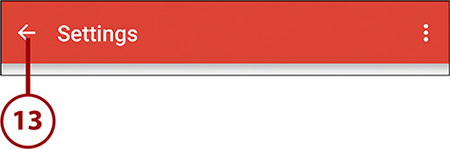
13. Tap to save your changes and return to the main Settings screen.
Customize POP/IMAP Account Settings
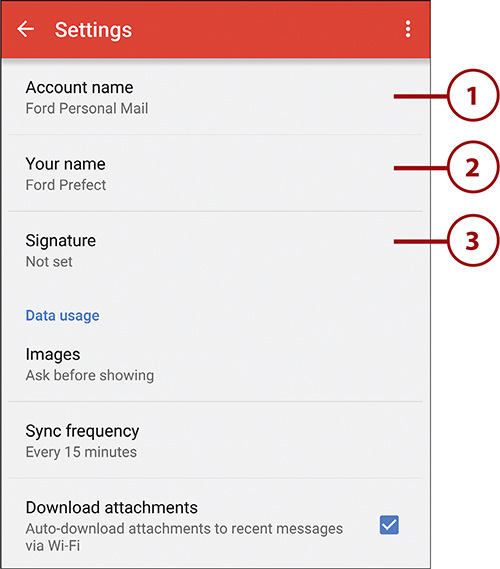
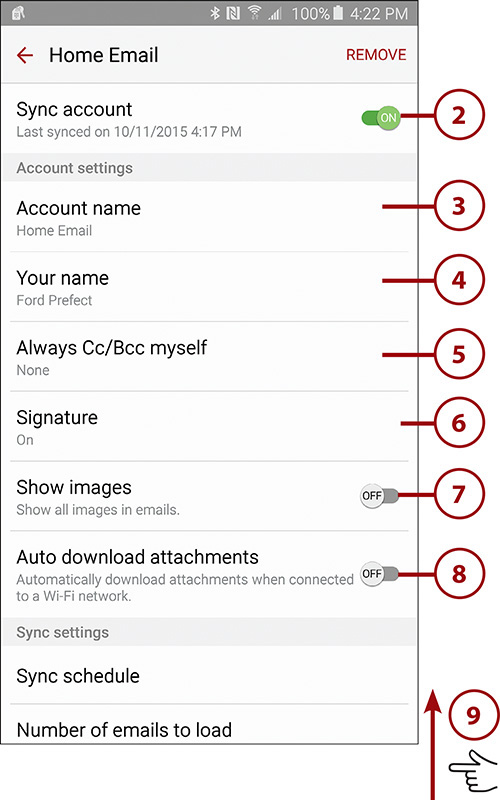
1. Tap to change the name of your account. This is the friendly name you may have typed when you originally set it up on your Galaxy Note 5.
2. Tap to change the full name you want people to see when you reply to emails using this account.
3. Tap to enter a signature to be included at the end of all emails composed using this account.
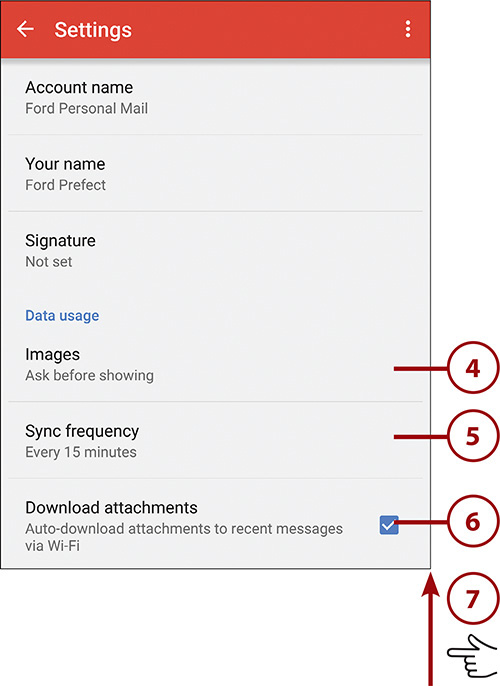
4. Tap to choose how images in emails are handled. You can choose to ask you before showing them, or always show them.
5. Tap to change the frequency with which your Note 5 checks for new email for this account. You can set it to Never, which means that your phone checks for email only when you open the Gmail app, or you can set it to automatically check between every 15 minutes to every hour.
6. Check the box to automatically download attachments to recently received emails while connected to a Wi-Fi network.
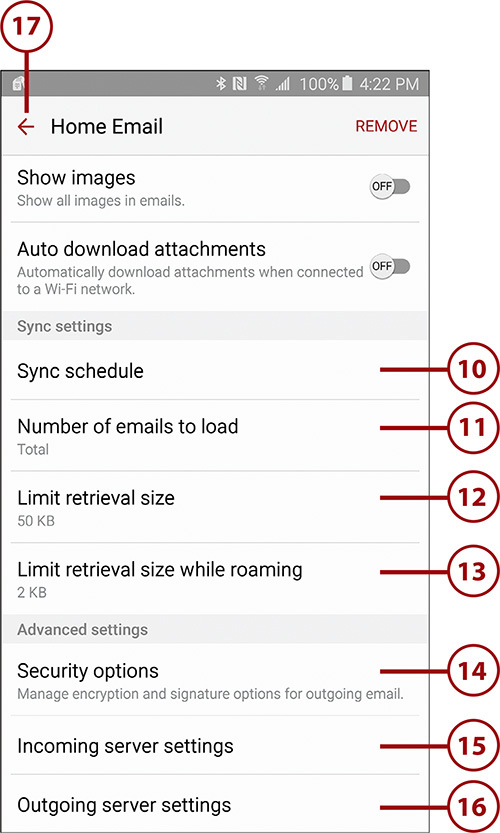
7. Swipe up for more settings.
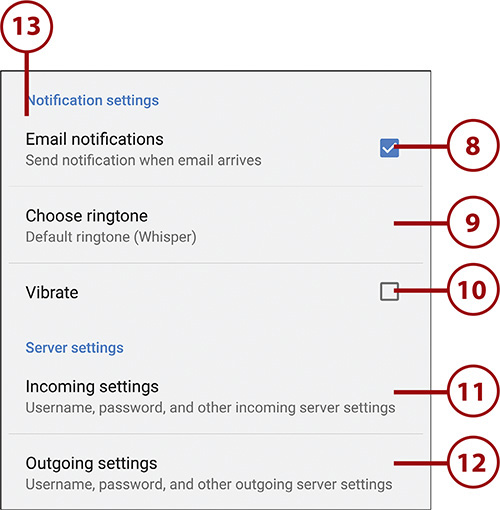
8. Tap to enable or disable notifications when new email arrives for this email account.
9. Tap to select the ringtone to play when you are notified of new email for this account.
10. Check the box if you also want to feel a vibration when new email arrives for this account.
11. Tap to change the incoming email server settings for this account.
12. Tap to change the outgoing email server settings for this account.
13. Tap to save your changes and return to the main Settings screen.
Email Application
The Email application supports all email accounts with the exception of Gmail. This includes any corporate email accounts that use Microsoft Exchange or corporate email systems, such as Lotus Domino/Notes, that have an ActiveSync gateway. In addition to corporate email accounts, the Email application also supports POP3 and IMAP accounts. POP3 and IMAP accounts are also supported by the Gmail app, so this is a duplication of functionality.
Add a Work Email Account
Your Galaxy Note 5 can synchronize your contacts from your work email account as long as your company uses Microsoft Exchange or an email gateway that supports Microsoft ActiveSync (such as Lotus Traveler for Lotus Domino/Notes email systems). It might be useful to be able to keep your work and personal contacts on one mobile device instead of carrying two phones around all day.
1. From the Home screen, pull down the Notification bar and tap the Settings icon.
2. Tap Accounts under the Personal section.
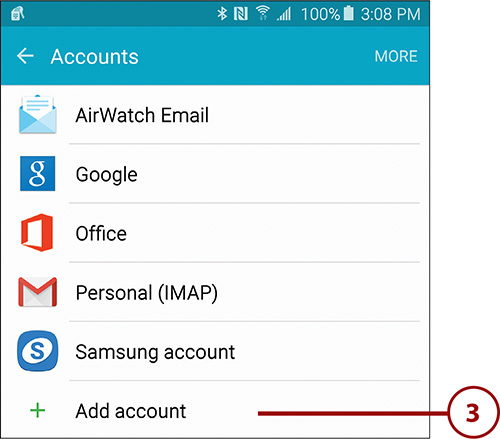
4. Tap Microsoft Exchange ActiveSync.
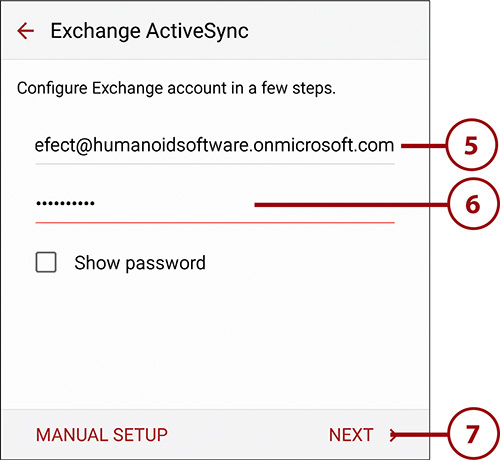
5. Enter your full corporate email address.
6. Enter your corporate network password.
7. Tap Next.
Error Adding Account? Guess the Server.
Your Galaxy Note 5 tries to work out some information about your company’s ActiveSync setup. If it can’t, you are prompted to enter the ActiveSync server name manually. If you don’t know what it is, you can try guessing it. If, for example, your email address is [email protected], the ActiveSync server is most probably webmail.allhitradio.com or autodiscover.allhitradio.com. If options like these don’t work, ask your email administrator.
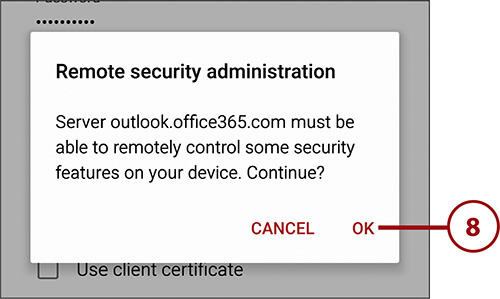
8. Tap to agree that your mail administrator may impose security restrictions on your Galaxy Note 5 if you proceed.
9. Tap to choose how many days’ worth of email to synchronize to your Note 5.
10. Tap to choose how often your corporate email is delivered to your Galaxy Note 5. Auto means that as it arrives in your Inbox at work, it is delivered to your phone. You can set it to Manual, which means that your work email is only delivered when you open the Email app on your phone. You can also set the delivery frequency from every 5 minutes to every hour.
11. Tap to choose how much of each email is retrieved. You can also set this to have no size limit so that the entire email is downloaded.
12. Tap to choose how many days in the past calendar items are synchronized to your Galaxy Note 5.
13. Swipe up to see more settings.
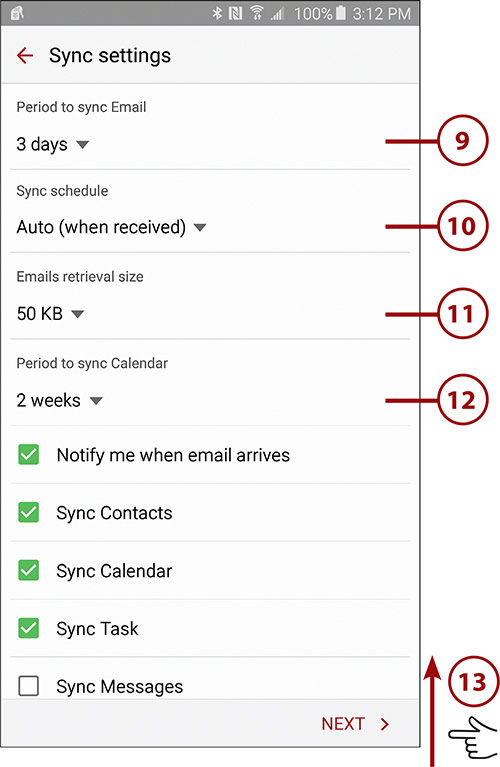
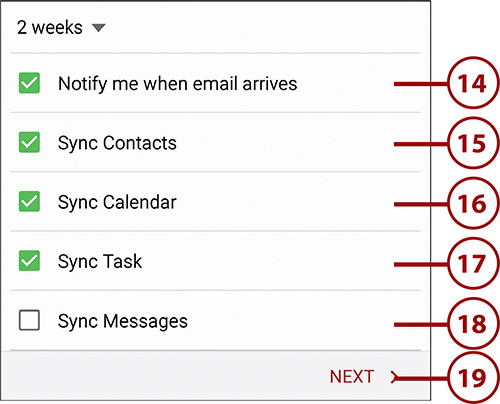
14. Tap to enable or disable being notified when new email arrives from your corporate Inbox.
15. Tap to enable or disable synchronizing your corporate contacts to your Galaxy Note 5.
16. Tap to enable or disable synchronizing your corporate calendar to your Galaxy Note 5.
17. Tap to enable or disable synchronizing your corporate tasks to your Galaxy Note 5.
18. Tap to enable or disable synchronizing SMS (text) messages you receive on your Galaxy Note 5 to your corporate Inbox.
19. Tap Next.
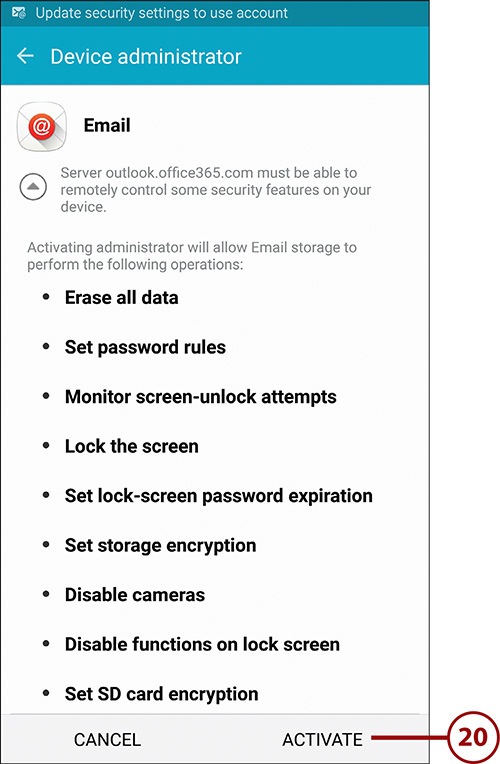
20. Tap Activate to allow your company’s mail server to act as a device administrator for your Note 5.
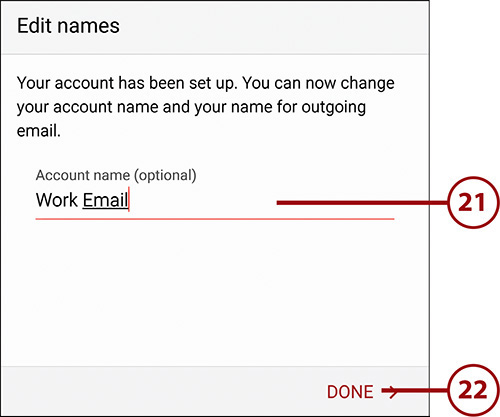
21. Enter a name for this email account. Use something meaningful that describes the purpose of the account, such as Work Email.
22. Tap Done to complete the setup.
Add a New POP3 or IMAP Account
Remember that the Gmail app also supports POP3 and IMAP accounts, so you might not want to use the Email app for this type of account. It is up to you.
1. Pull down the Notification bar and tap the Settings icon.

2. Tap Accounts under the User and Backup section.
3. Tap Add Account.
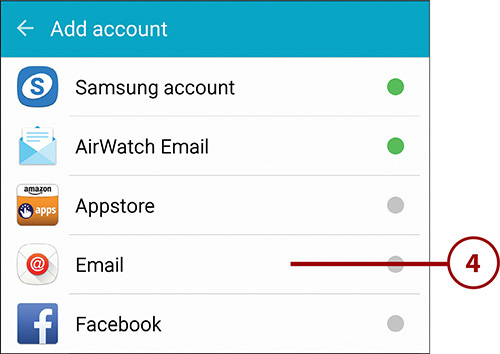
4. Tap Email.
6. Enter your password.
7. Tap Next.
Why Manual Setup?
Your Galaxy Note 5 tries to figure out the settings to set up your email account. This works most of the time when you are using common email providers such as Yahoo! and Hotmail. It also works with large ISPs such as Comcast, Road Runner, Optimum Online, and so on. It might not work for smaller ISPs, in smaller countries, or if you have created your own website and set up your own email. In these cases, you need to set up your email manually.
8. Tap POP3 or IMAP. IMAP has more intelligence to it, so select that option when possible.
9. Ensure that the information on the incoming server screen is accurate.
10. Tap Next.

Where Can I Find This Information?
If you need to manually set up your email account, you must have a few pieces of information. Always check your ISP’s (or email service provider’s) website, and look for instructions on how to set up your email on a computer or smartphone. This is normally under the Support section of the website.
Username and Password
On the Incoming Server and Outgoing Server screens, your username and password should already be filled out because you typed them in earlier. If not, enter them.
11. Ensure that the information on the outgoing server screen is accurate.
12. Tap Next.
13. Tap to change how far back in the past email must synchronize.
14. Tap to change the frequency with which email from this account synchronizes to your Galaxy Note 5.
15. Tap to check the box if you want to be notified when new email arrives into this account.
16. Tap Next.

17. Enter a friendly name for this account, such as Home Email.
18. Enter your full name or the name you want to be displayed when people receive emails sent from this account.
19. Tap Done to save the settings for this account and return to the Add Accounts screen.

Be Secure If You Can
If your mail provider supports email security, such as Secure Sockets Layer (SSL) or Transport Layer Security (TLS), you should strongly consider using it. If you don’t, emails you send and receive go over the Internet in plain readable text. Using SSL or TLS encrypts the emails as they travel across the Internet so nobody can read them. Set this under the Advanced settings for the incoming and outgoing servers.
Working with the Email App
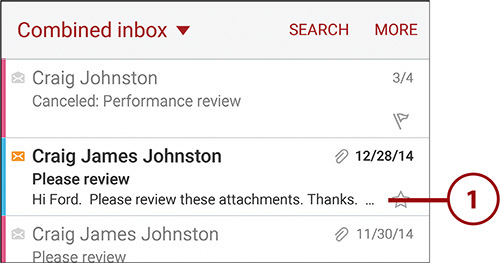
Now that you have added two new accounts, you can start using the Email application. Everything you do in the Email application is the same for every email account. The Email app enables you to work with email accounts either separately or in a combined view.
Navigate the Email Application
Before you learn how to compose or read emails, you should become familiar with the Email application.
1. Tap to launch the Email app.
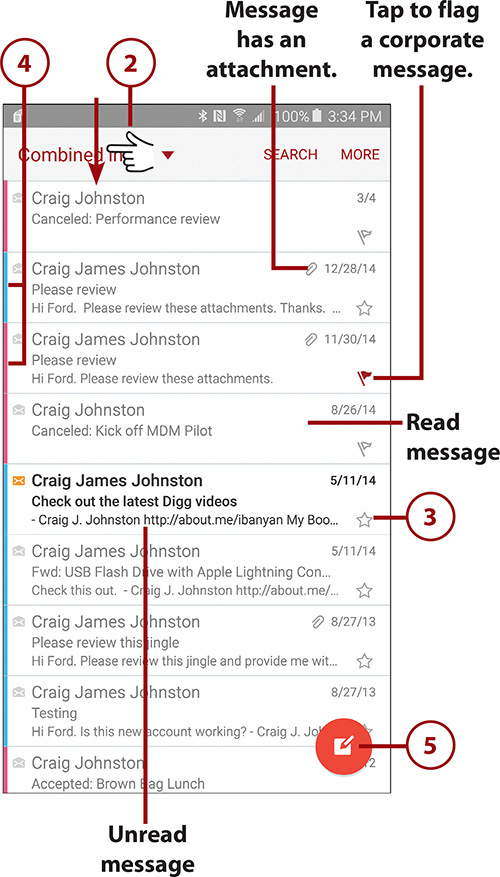
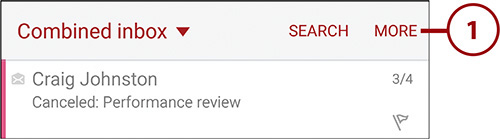
2. Tap to switch between email accounts or select Combined Inbox, which shows all emails from all accounts.
3. Tap the star to mark a personal account (POP3/IMAP) email as flagged.
4. Each color represents a specific email account.
5. Tap to compose a new email.

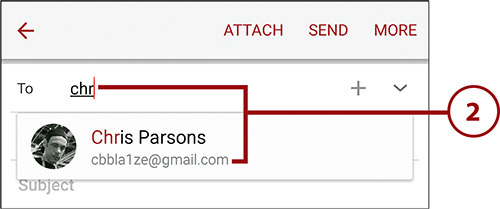
2. Enter one or more recipients. As you type, your Galaxy Note 5 tries to guess who you want to address the message to. If you see the correct name, tap it to select it. This includes names stored on your Galaxy Note 5 and in your company’s corporate address book.
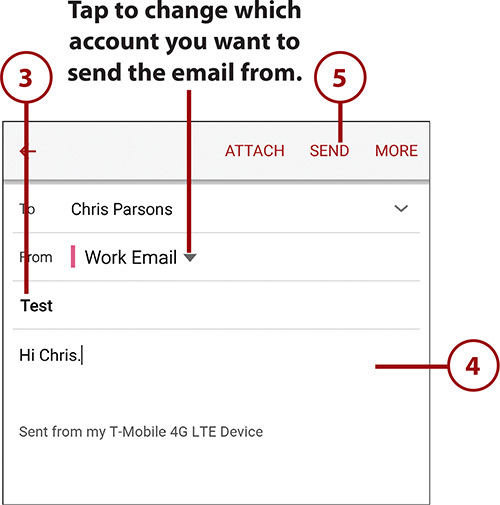
3. Enter a subject.
4. Type the body of the email.
5. Tap to send the message.
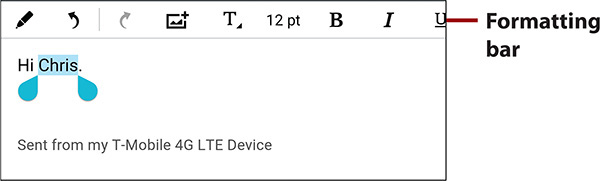
Enable Rich Text
If you want to format your email using different fonts and formatting (bold and italic) or you want to embed images, you can do this by tapping on More, and tapping Turn On Rich Text. You will then see a bar that has formatting options. Scroll left and right over the formatting bar to see all formatting options. To change the formatting of a specific work, touch and hold the word, drag the end markers to select more words if needed, and then change the formatting using the formatting bar.
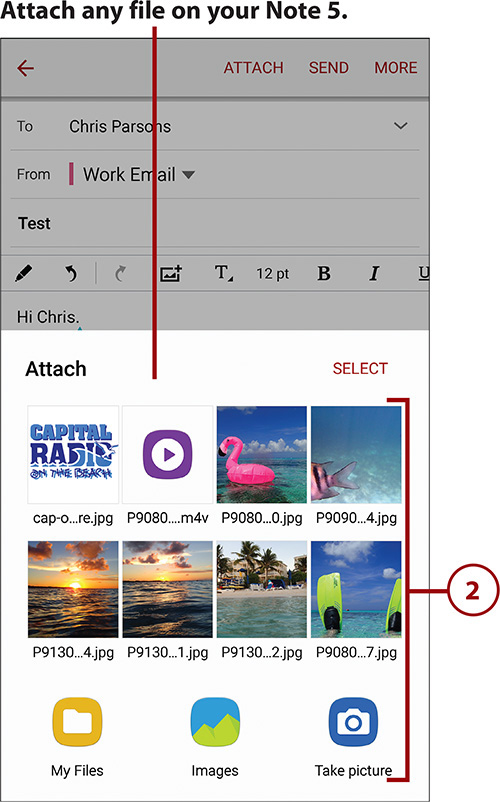
Add Attachments to a Message
Before you send your message, you might want to add one or more attachments. You can attach any type of file, including pictures, video, audio, contacts, and location.
1. Tap Attach.

2. Choose the type of attachment. If you choose My Files, you will be able to browse your Note 5 and attach any file type, including documents, presentations, and spreadsheets.
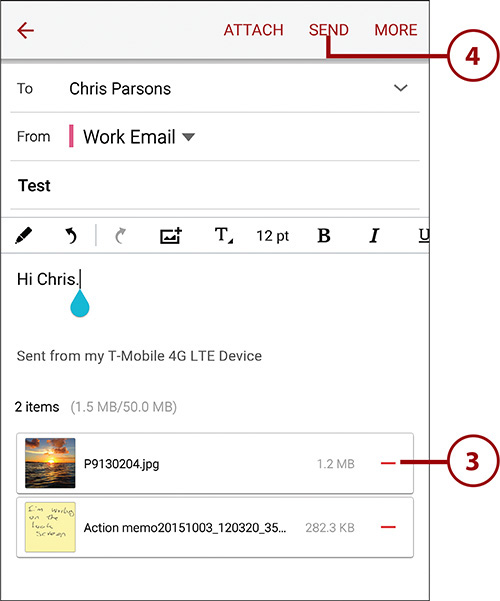
3. Tap the red minus symbol to the right of each attachment to remove it from the email.
4. Tap to send your email.
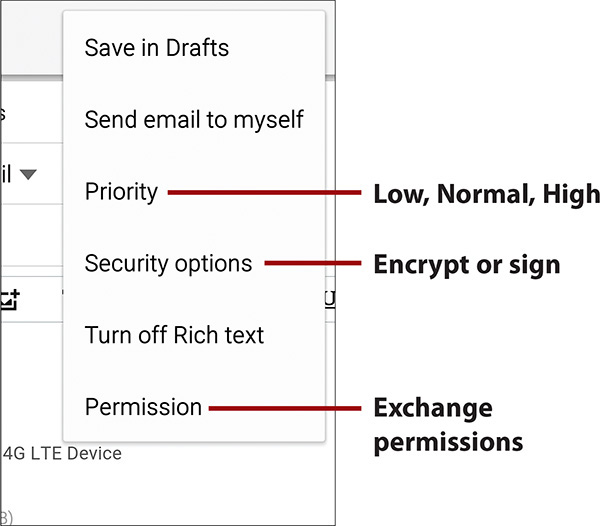
Before you send your email, you can change a few additional options. To see these additional options, tap More. Tap Priority to change the priority of the email to high, normal, or low. Tap Security Options to Encrypt the email, or digitally sign it. To encrypt or sign an email, you need certificates installed on your Note 5. When you are sending an email using your company’s Exchange email system, tap Permissions to set the permissions for the sent email. These permissions can include preventing it from being forwarded and setting an expiration date on the email. The permissions options are set by your email administrator.
Read Email
Reading messages in the Email application is the same regardless of which account the email has come to.
1. Tap an email to open it.
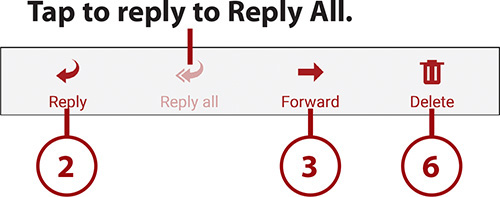
2. Tap to reply to the sender of the email. This does not reply to anyone in the Cc field.
3. Tap to forward the email.
4. Tap to expand the email header to see all recipients and all other email header information.
5. Tap to mark the message as flagged.
6. Tap to delete the message.
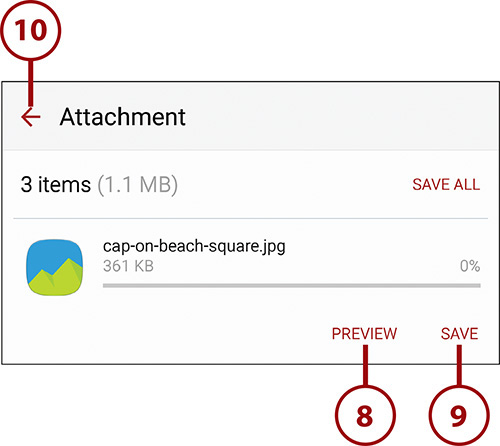
7. Tap to see the attachments on a separate screen.
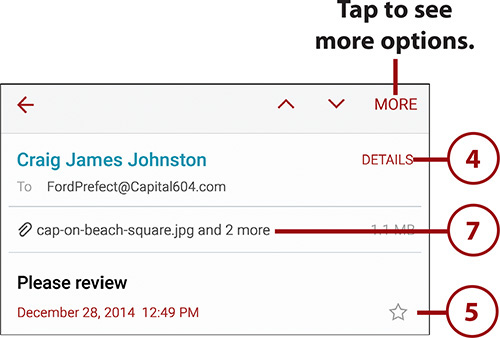
8. Tap to preview the attachment. In this example it is an audio file.
9. Tap to save the attachment to your phone.
10. Tap to return to the email view.
11. Tap More to see more options (not shown).
12. Tap to mark the message as unread.
13. Tap to move the message to a different folder.
14. Tap to save the email as a file on your phone (outside the Email app).
15. Tap to set yourself a reminder to respond to this email.
16. Tap to mark the message as spam or junk mail.
17. Tap to add the sender to the Priority Sender list. Email from people in the Priority Sender list are displayed in the Priority Sender view.
18. Tap to compose a new email.
19. Tap to print the email on a Samsung printer available on the Wi-Fi network, or save the email as a Portable Document Format (PDF) file.

2. Tap Settings.
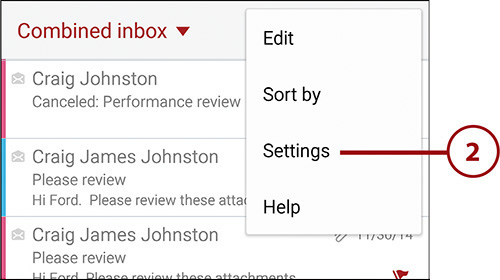
General Settings
General settings are settings that take effect no matter what type of email account you are working with.
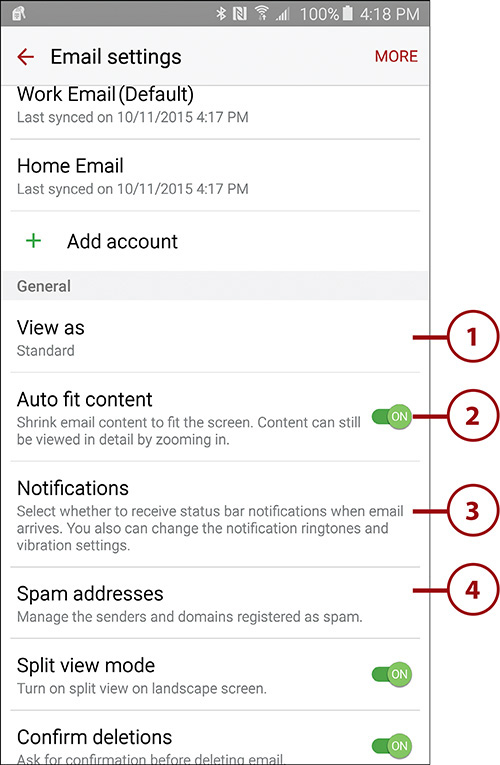
1. Tap to choose whether you want your email shown in the standard way, where each received email is on its own line, or in Conversation mode, where emails are grouped together based on the email subject line, to form an email conversation.
2. Tap to enable or disable auto-fit. When Auto Fit Content is enabled, your Note 5 adjusts emails so they fit on the screen properly when you read them.
3. Tap to manage when you receive notifications of new emails. You can choose to receive notifications when senders you have placed on the Priority Senders list send you email, and you can choose which email accounts to receive notifications from.
4. Tap to manage your spam address list. This includes manually adding email addresses and removing ones already on the Spam list.
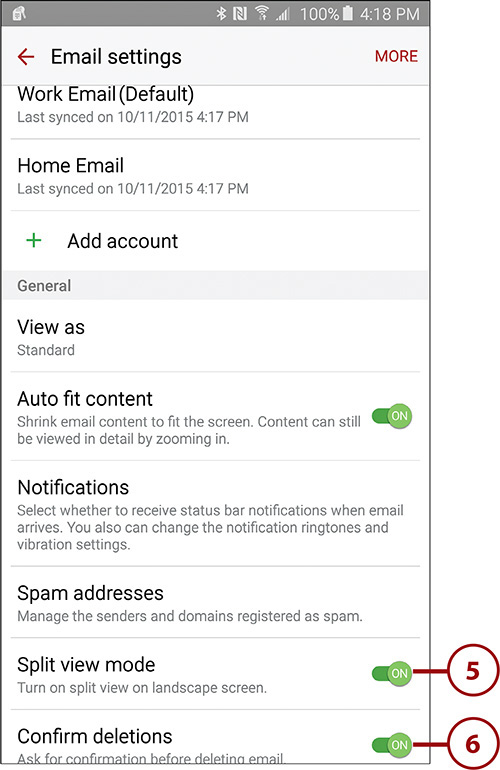
5. Tap to choose whether you want to use the split screen view when you rotate your Note 5 sideways. Split screen view shows the list of emails on the left and the contents of the selected email on the right.
6. Tap to choose whether you want to see a confirmation screen when you delete emails.
What Is the Priority Sender List?
Emails received from people who you have listed in the Priority Sender list are shown in the Priority Sender Inbox as well as in the regular Inbox. Opening the Priority Sender Inbox folder shows only emails from these people, which can be a way of filtering email so that you respond to the important people first and then switch to the regular Inbox and respond to everyone else.
Corporate Account Settings
You are able to change your email signature as well as control what components are synchronized and how often they are synchronized.
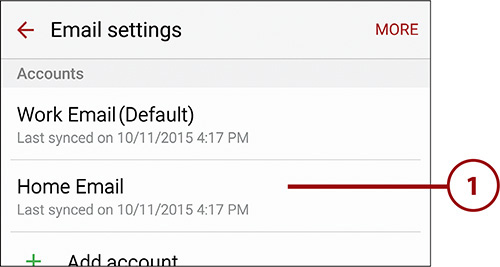
1. Tap your corporate email account.

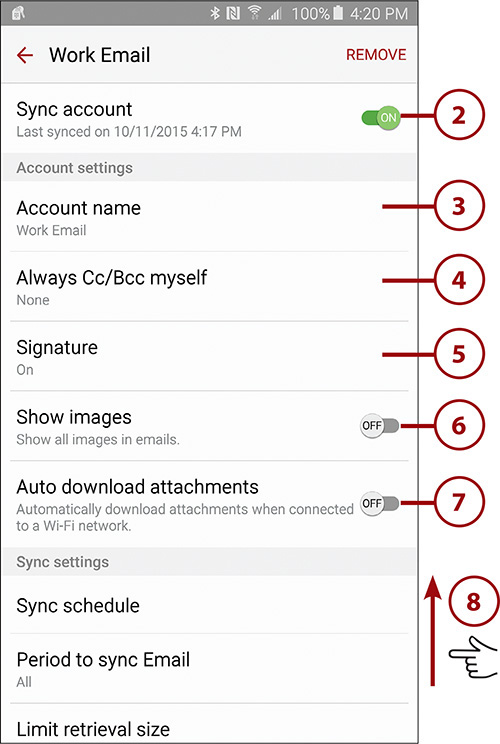
2. Tap to choose whether you want this account to synchronize with your Note 5.
3. Tap to change the friendly name for this account.
4. Tap to choose whether to always Bcc or Cc yourself on emails you send.
5. Tap to enable or disable using an email signature, add an email signature, or edit a signature.
6. Tap to enable or disable automatically loading embedded images in emails sent to you on this account.
7. Choose whether you want email attachments to automatically download when your Note 5 is connected to a Wi-Fi network.
8. Swipe up for more settings.
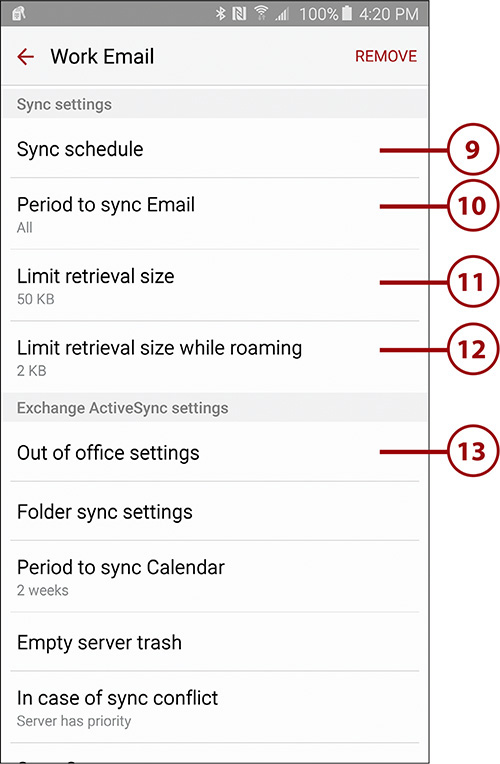
9. Tap to manage the synchronization settings for this account. This includes choosing different synchronization options depending on peak and off-peak times.
10. Tap to choose how far back in the past your email synchronizes.
11. Tap to choose how much of each email is retrieved.
12. Tap to choose how much of each email is retrieved when you are roaming outside your home cellular provider network.
13. Tap to set whether you are out of the office and your out-of-office message. This synchronizes to the out-of-office feature on your corporate mailbox so your out-of-office messages will be sent by your mail server.
14. Tap to choose which folders (excluding Inbox and Outbox) you want to synchronize from your office email account and when they synchronize based on the peak and off-peak schedule.
15. Tap to choose how far back in the past your calendar synchronizes.
16. Tap to empty your Trash folder on the email server back in the office.
Why Empty the Office Trash Folder?
Step 16 describes how you can choose to empty your Trash folder back in the office. This feature is useful because sometimes your email administrator sets a limit on the size of your mailbox, and when you reach that limit, you are unable to send emails. By emptying your Trash folder back at the office, you might be able to clear a little bit of space in your mailbox so you can send that important email.
17. Swipe up for more settings.

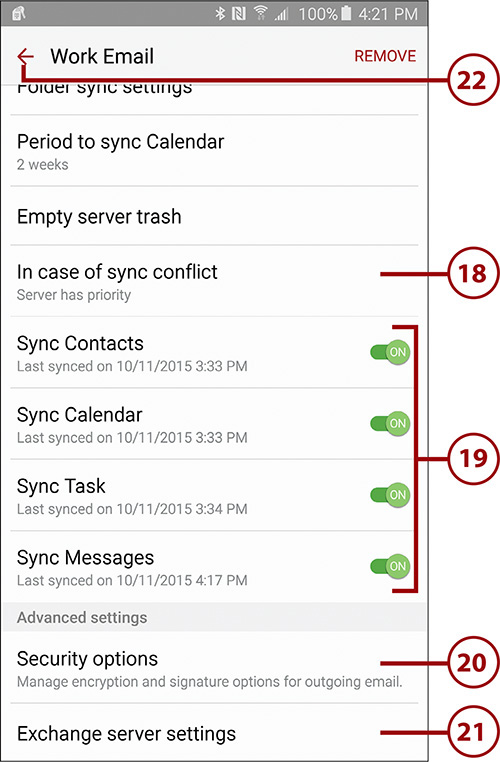
18. Tap to change which device wins if there is a conflict between your phone and your email account back at the office.
How Are There Conflicts?
A conflict can occur if you or someone who has delegate access on your email account makes a change in your mailbox using a desktop email client such as Outlook (for example, your delegate moves an email to a folder) and you then make a change on your Galaxy Note 5 (say, you delete that same email). Now there is a conflict because an email has been both moved and deleted at the same time. If you set the server to have priority, then the conflict is resolved using your rule that the server wins. In this example, the email is not deleted but rather is moved to a folder.
19. Select what to synchronize between your Note 5 and your office email account.
20. Tap to set advanced security options, including whether you want to encrypt your emails, sign emails with an electronic signature, and email certificates to use with S/MIME (if your company supports it).
21. Tap to change the Exchange mail server settings for this account. This includes your account username and password if these have changed.
22. Tap to return to the previous screen.
2. Tap to choose whether you want this email account to synchronize with your Note 5.
3. Tap to change the friendly name for this account.
4. Tap to edit the name that is displayed when you send email to others.
5. Tap to choose whether to always Bcc or Cc yourself on emails you send.
6. Tap to enable or disable using an email signature, add an email signature, or edit a signature.
7. Tap to enable or disable automatically loading embedded images in emails sent to you on this account.
8. Tap to enable or disable automatically downloading email attachments when your Note 5 is connected to Wi-Fi.
9. Swipe up for more settings.
10. Tap to manage the synchronization settings for this account. This includes choosing different synchronization options depending on peak and off-peak times.
11. Tap to choose how far back in the past your email synchronizes.
12. Tap to choose how much of each email is retrieved.
13. Tap to choose how much of each email is retrieved when you are roaming outside your home cellular provider network.
14. Tap to set advanced security settings for this account, including choosing to encrypt emails, sign them with a digital signature, and manage encryption keys on your phone for use with encrypting emails.
15. Tap to change the incoming server settings for this account.
16. Tap to change the outgoing server settings for this account.
17. Tap to return to the Settings main screen.
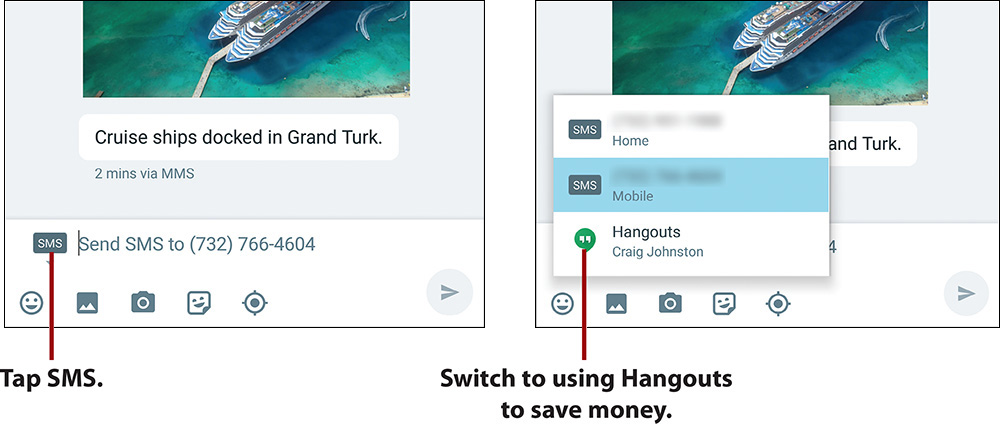
SMS and MMS
Short Message Service (SMS), also known as text messaging, has been around for a long time. Multimedia Message Service (MMS) is a newer form of text messaging that can contain pictures, audio, and video as well as text. Your Galaxy Note 5 can send and receive both SMS and MMS messages.
Get to Know the Messages App
The Messages app is what you use to send and receive text messages. This app has all the features you need to compose, send, receive, and manage these messages.
1. Tap the Messages icon.

2. Tap to compose a new text message.
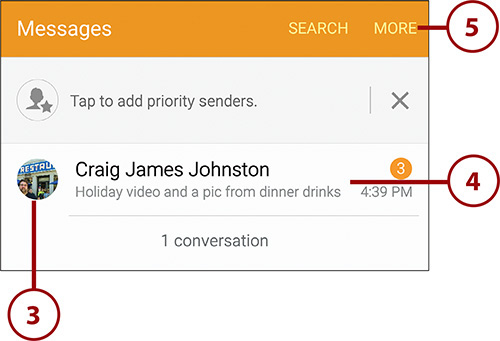
3. Tap the picture of someone who has sent you a message to show their contact card. You can then contact the person using email, phone, and other methods.
4. Tap a message thread to open it.
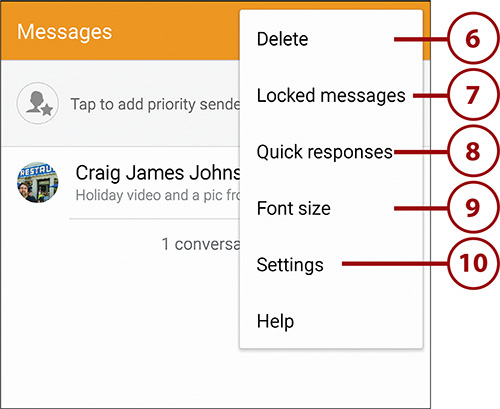
5. Tap More to see more options.
6. Tap to select one or more message threads and delete them or mark them as spam.
7. Tap to open the Locked Messages folder. Locked messages are messages that you have chosen to lock so they are not accidentally deleted. See the “How Do I Lock Messages?” margin note for more information.
8. Tap to select from a list of Quick Responses to send and manage the current Quick Responses. When you select a Quick Response, a new message opens with that Quick Response added to the text field.
9. Tap to choose to use your Note 5’s built-in font size, or select a smaller or larger size while you have the Messages app open.
10. Tap to open the Settings screen. See the next section for more on Settings.
You might want to lock a message so that it does not get accidentally deleted when you delete the message thread. To lock a message, touch and hold on the message and choose Lock when the menu pops up. The lock symbol displays just below the locked message. To unlock the message, touch and hold on the message and choose Unlock.
>>>Go Further: Swipe to Call

Manage Settings for the Messages App
You use the settings of the Messages app to manage how the app handles your SMS and MMS messages. Before you actually start working with SMS and MMS, let’s take a look at the settings.
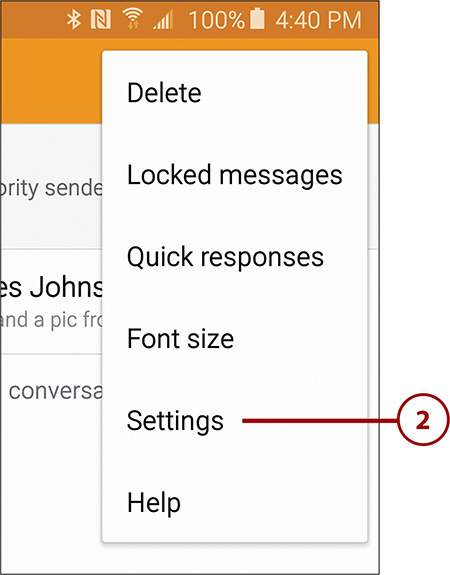
1. Tap More on the top-right of the main Messages app screen (as shown in Step 5 of the previous task).
2. Tap Settings.
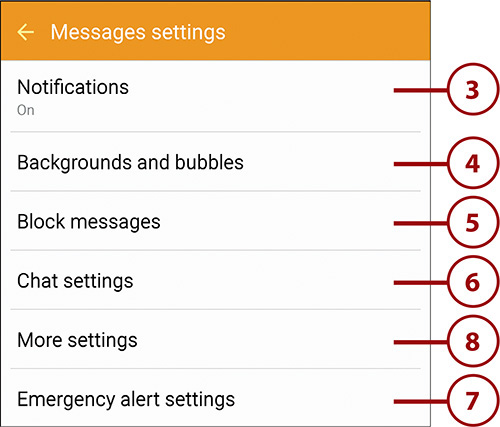
3. Tap to manage how you are notified when new messages arrive. This includes choosing the notification sound, whether you want to feel a vibration, whether you want to see the new message in a pop-up display, and whether you want a preview of the message in the status bar.
4. Tap to manage how the Messages app looks. You can choose what kind of bubble style is used for text message display and which background the app uses for messages.
5. Tap to manage the settings for blocking messages and viewing previously blocked messages, if there are any. You can block messages based on phrases, or simply block messages from certain phone numbers.
6. Tap to manage chat settings. This includes choosing to receive a delivery report for text messages you send, choosing to limit the size of incoming MMS messages, whether you want to automatically download messages when you are roaming, and whether you want to send an indication to others when you are typing.
7. Tap to manage which emergency alerts you want to receive. These alerts are sent out by your government or law enforcement (for example, AMBER alerts).
8. Tap to see more settings.
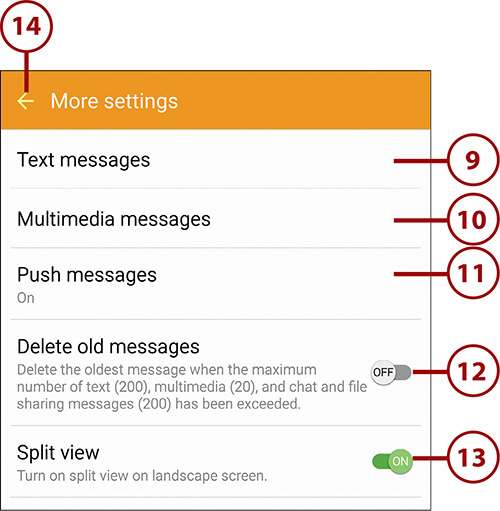
9. Tap to control and manage text messages. This includes choosing to receive a delivery report for text messages you send, choosing the input mode (leaving it set to Automatic is recommended), and managing text messages that may still be on your old SIM card.
10. Tap to control how the Messages app handles multimedia messages. Settings include the ability to request delivery and read reports and as well as to control whether to automatically retrieve multimedia messages while roaming outside your wireless carrier’s home area.
11. Tap to enable or disable receiving messages “pushed” from the server. Push messages arrive at your Galaxy Note 5 shortly after they arrive at the server, which is usually faster than waiting until the Galaxy Note 5 checks for messages. You can also choose how to handle remote requests to load services. Your choices are Always, Prompt, and Never.
12. Tap to enable or disable automatically deleting old text or multimedia messages when the limit you set is reached. When the limit is reached, messages within the thread or conversation are deleted using the FIFO method.
13. Tap to enable or disable split view when in landscape mode. This controls whether your Note 5 goes into split screen mode when you rotate it on its side. In split screen mode, the conversation lists are on the left while the selected conversation is shown on the right.
14. Tap to save your changes and return to the previous screen.
What Does the Manage SIM Card Messages Option Do?
Many old cell phones store text messages on the SIM card and not in the phone’s memory. If you have just upgraded from an older phone, you might still have text messages on the SIM card that you would like to retrieve. If you choose the option to manage text messages on your SIM card, as mentioned in step 9, you can then copy the messages to your Galaxy Note 5’s memory and copy the senders to your contacts in the Contacts app.
Don’t Auto-Retrieve MMS While Roaming
Disable the automatic retrieval of multimedia messages when you travel to other countries because automatically retrieving these messages when you’re roaming can result in a big bill from your provider. International carriers love to charge large amounts of money for people traveling to their countries and using their networks. The only time it is a good idea to leave this enabled is if your carrier offers an international SMS or MMS bundle, where you pay a flat rate up front before leaving. When you have the auto-retrieve feature disabled, you see a Download button next to a multimedia message. You have to tap it to manually download the message.
What’s the Difference Between a Delivery Report and a Read Report?
A delivery report indicates that the message has reached the destination device. A read report indicates that the message has been opened for viewing. There is still no guarantee that whoever opened the message has actually read it, let alone understood it.
Compose Messages
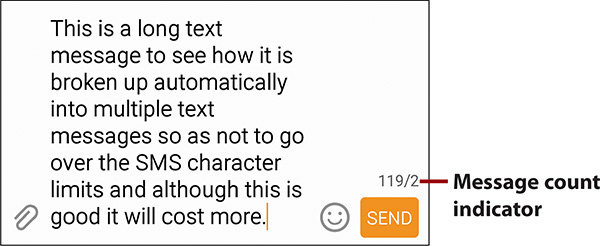
When you compose a new message, you do not need to make a conscious decision whether it is an SMS message or an MMS message. As soon as you add a subject line or attach a file to your message, your Galaxy Note 5 automatically treats the message as an MMS message.
Here is how to compose and send messages:
1. Tap the pencil compose icon to compose a new message.

2. Start typing the recipient’s name or phone number, or if the person is in your contacts, type the name. If a match is found, tap the mobile number.

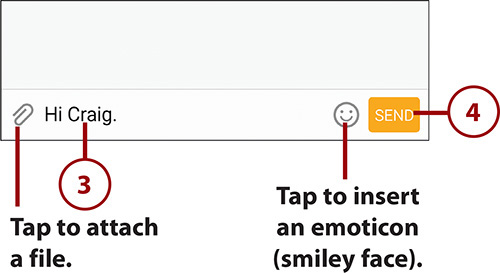
3. Tap and start typing your message.
4. Tap to send your message.
You might decide that you want a text message to be sent automatically at a later time. To do this, before sending the message, tap More and choose Schedule Message. Choose the date and time you want your message to be sent and tap Done. Then tap the Send button, and your message sends when you set it to.
>>>Go Further: Message Limits and Messages
Attach Files to Messages
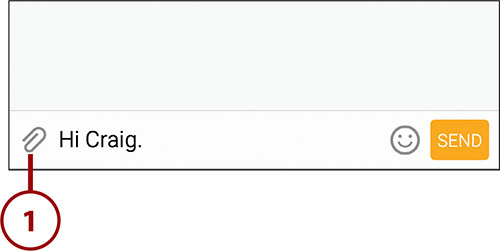
If you want to send a picture, audio file, or video along with your text message, all you need to do is attach the file. Be aware that attaching a file turns your SMS text message into an MMS multimedia message and might be subject to additional charges.
1. Tap the paperclip icon to attach a file.
2. Choose a picture that you recently took on your Note 5 or...
3. Choose other attachment types, including the option to take a picture or record a video and attach it directly.
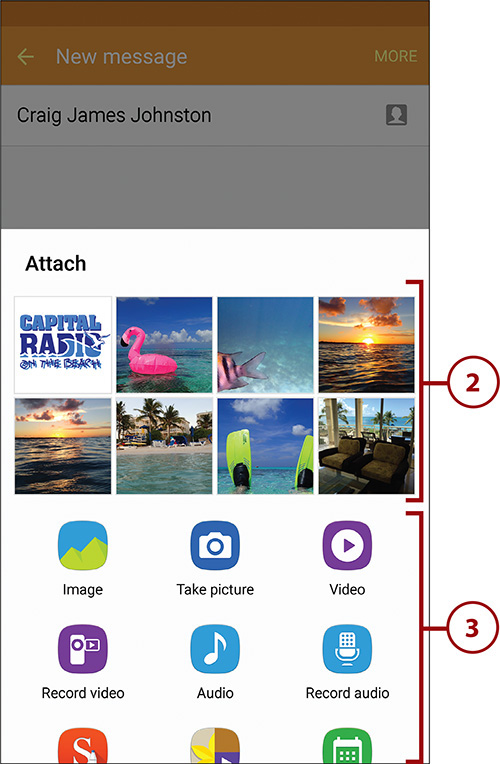
4. Tap to send your MMS.

Receive Messages
When you receive a new SMS or MMS message, you can read it, view its attachments, and even save those attachments to your Galaxy Note 5.
1. When a new SMS or MMS message arrives, your Galaxy Note 5 plays a ringtone and displays a notification in the status bar.
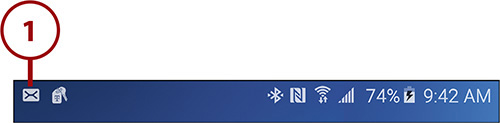
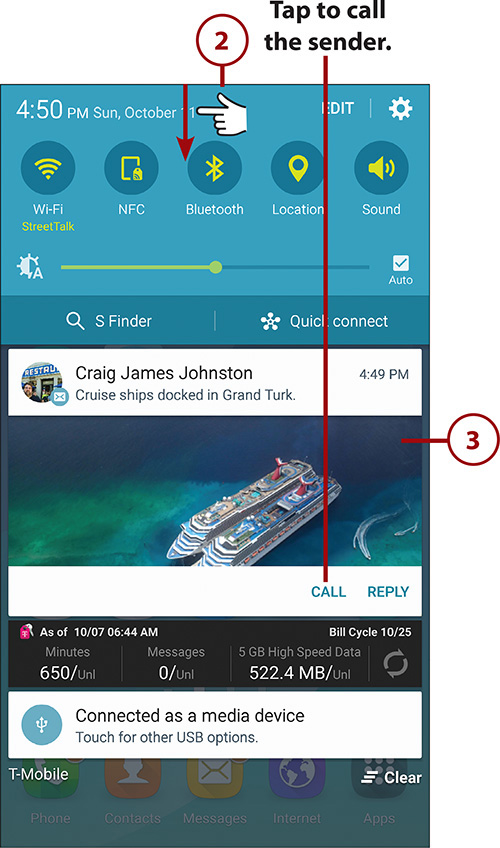
2. Pull down the notification shade to see newly arrived messages.
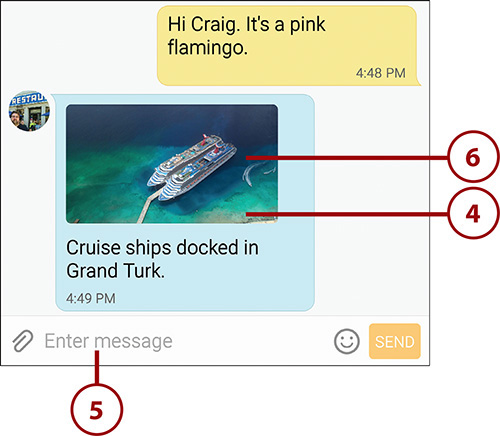
3. Tap a message alert to display the message and reply to it.
4. Tap an attachment to open it for viewing.
5. Tap to write a reply to the message.
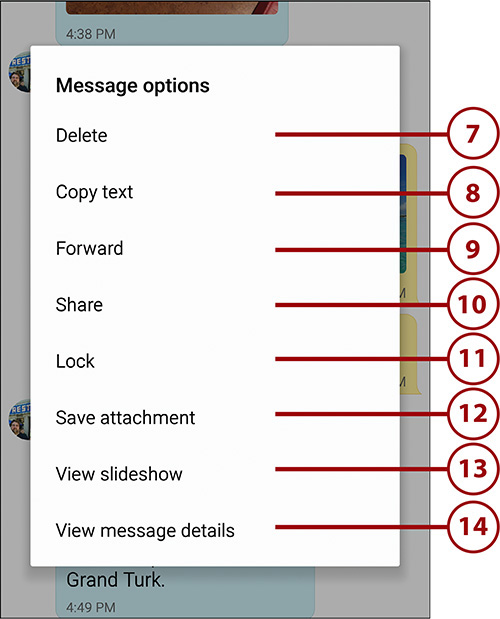
6. Touch and hold a message to display the Message Options dialog.
7. Tap to delete the message. This deletes just the message and not the entire thread.
8. Tap to copy the message text so you can paste it elsewhere.
9. Tap to forward the message and attachment to someone else.
10. Tap to share the message via social media or other methods.
11. Tap to lock the message against deletion if you later decide to delete the message thread.
12. Tap to save the attachment to your Galaxy Note 5.
13. Tap to view a slideshow of attached images.
14. Tap to view the message details, such as its size and the date and time it was sent.
Usable Content
If a text message contains links to websites, phone numbers, or email addresses, tapping those links makes the Galaxy Note 5 take the appropriate action. For example, when you tap a phone number, your Galaxy Note 5 calls the number; when you tap a web link, the Galaxy Note 5 opens the page in Chrome or your other default browser.