8. Making and Receiving Calls
In this chapter, you find out how to make and take phone calls (including conference calls) using your Galaxy Note 5. Topics include the following:
![]() Making phone calls
Making phone calls
![]() Receiving phone calls
Receiving phone calls
![]() Making conference calls
Making conference calls
![]() Configuring the Phone app
Configuring the Phone app
As a cellular phone, your Galaxy Note 5 includes powerful features that enable you to make phone calls swiftly and easily.
Getting to Know the Phone App
With the Phone app, you can quickly make and receive calls across the cellular network. This section introduces you to some of the features you might frequently use.
Open and Navigate the Phone App
The Phone app contains three tabs that enable you to make calls in various ways and to track the calls you receive.
1. On the Home screen, tap Phone.
2. Tap the dialpad icon to display the dialpad. The dialpad icon is always visible on the bottom right of the screen while you are in the Phone app.

3. Tap the keys to dial a number.
4. If the Phone app displays a suggested contact with a matching number, you can tap the contact if it is the one you want.
5. Tap the green phone icon to place the call.
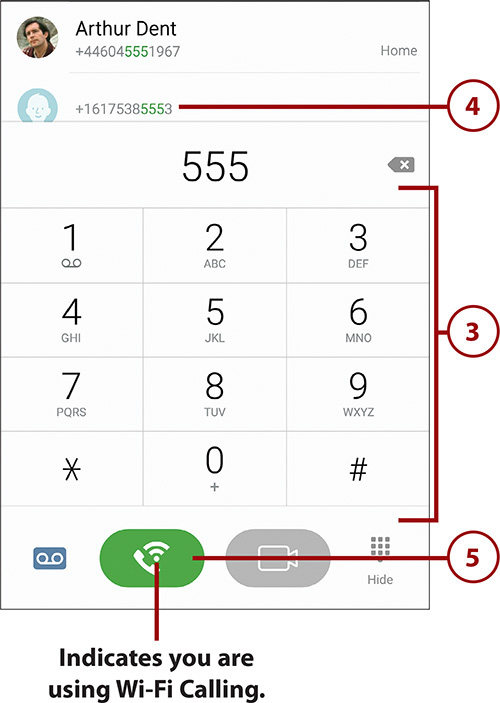
What Is Wi-Fi Calling?
The technical name for Wi-Fi Calling is Universal Media Access (UMA). This technology is provided by some carriers around the world and enables your Galaxy Note 5 to roam between the cellular network and Wi-Fi networks. Typically when you are connected to a Wi-Fi network, any calls you make are free and of higher audio quality because of the faster speeds. As you move out of Wi-Fi coverage, your Note 5 hands the call off to the cellular network—and vice versa—allowing your call to continue without interruption. The Phone app indicates when you are using Wi-Fi Calling by placing a Wi-Fi symbol next to the phone icon. If you want to read more about UMA or Wi-Fi Calling, read this online article: http://crackberry.com/saving-call-charges-recession-your-blackberry. The article is on a BlackBerry blog, but the descriptions of the technology still apply.
Call Log
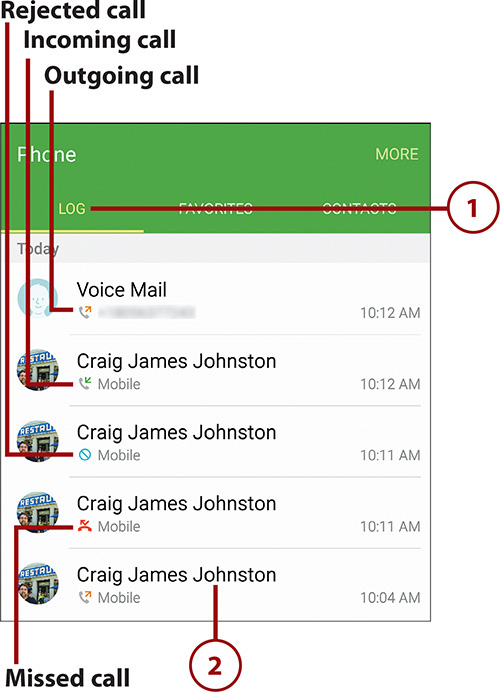
The Call Log tab shows all activity in the Phone app, including incoming calls, missed calls, rejected calls, and placed calls.
1. Tap Log to see a list of the calls you have missed, placed, and received.
2. Tap a log entry to see more information about the caller.
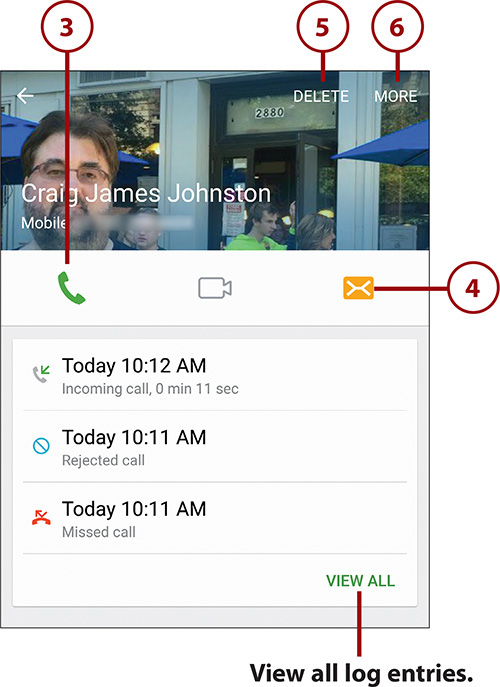
3. Tap the phone icon to place a call to the caller.
4. Tap the envelope icon to send an SMS (text message) to the caller.
5. Tap Edit to delete one or more call log entries for this caller.
6. Tap More to view the full contact record for this caller, or add the caller to your Auto Reject List.
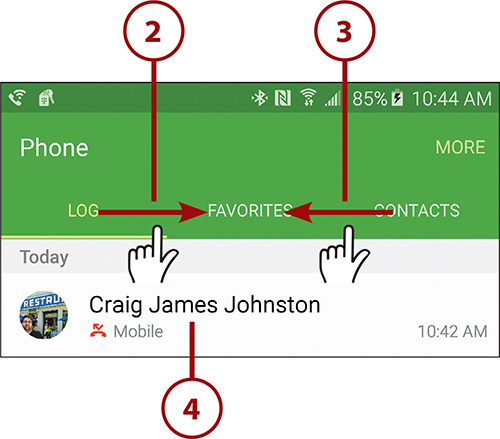
Favorites
The Favorites tab shows contacts who you have marked as favorite and contacts who you call often.
1. Tap Favorites to see your favorite and frequently called contacts.
2. Tap the contact image of a favorite contact to place a call to them.
3. Tap the information icon to the right of a favorite contact’s name to see all of the information about the contact.
4. Tap Add to add additional favorite contacts from your Contacts list.
5. Tap More to remove favorite contacts, or to reorder thair positions on the Favorites tab.

Contacts
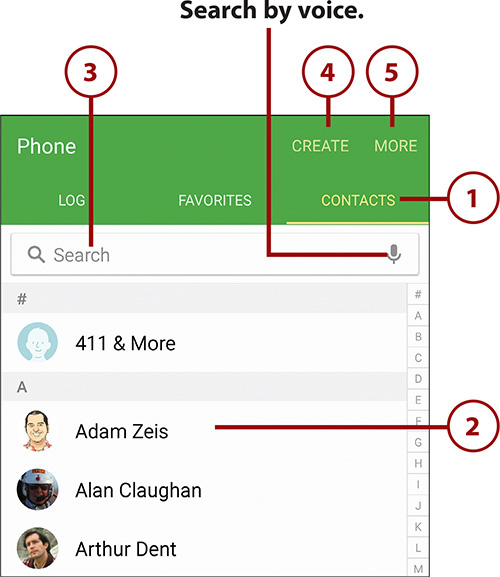
The Contacts tab shows all of the contacts that you have added to the Contacts app.
1. Tap Contacts to see all of your contacts.
2. Tap a contact to see all information about that contact.
3. Tap to search for a contact.
4. Tap Create to add a new contact.
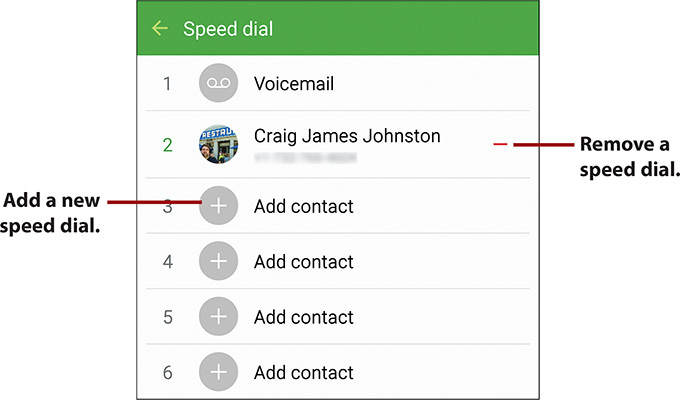
5. Tap More to remove contacts or see your Speed Dial screen.
Receiving a Call
When someone phones your Galaxy Note 5, you can accept the call, reject it, or reject it and send a text message.
Accept a Call
1. When the phone rings, look at the contact name (if it is available) or the phone number (if it is not) and decide whether to take the call.
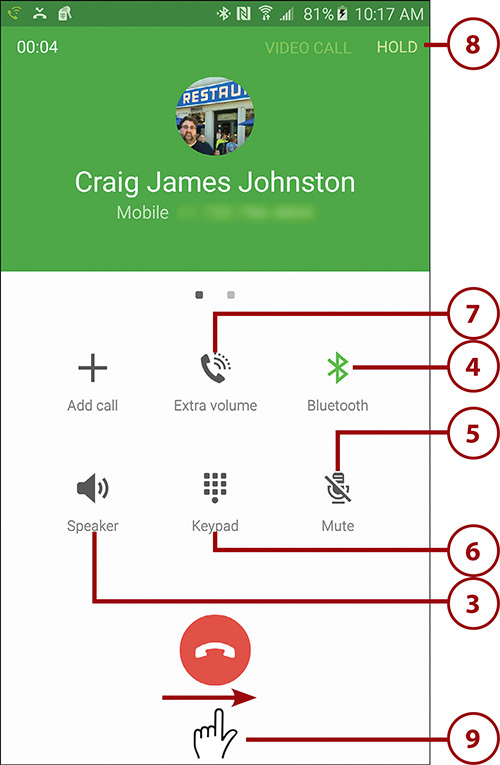
2. Swipe the green phone icon to the right to accept the call.

3. Tap to switch the call audio to the speaker.
4. Tap to switch the call audio to a Bluetooth device you have previously paired, such as a headset, your smartwatch, or your vehicle’s built-in Bluetooth.
5. Tap to mute the call. Tap again to turn off muting.
6. Tap to show the keypad if you need to type extra numbers after the call is connected.
7. Tap to boost the call volume if the call volume is very quiet.
8. Tap to put the call on hold.
9. Swipe to the right to see more options, such as the ability to write a memo that is associated with the caller.
10. Tap to write a memo that is associated with the caller while you’re on the call.
11. Tap to open the Calendar app, view the calendar, and create a new appointment if needed.
12. Tap to open the Internet browser and use it while on the call.
13. Tap to send an SMS (text message) to the caller.
14. Tap to send an email to the caller.
15. Tap to show the caller’s information in the Contacts app.
16. Swipe to the left to return to the main call screen.
17. Tap to end the call.

Reject a Call
If you do not want to accept the call, you can reject it so that it goes to your voicemail.
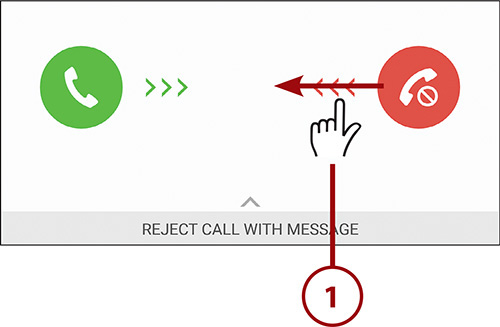
1. When the phone rings, swipe the red phone icon to the left to reject the call.
The call goes to voicemail, and your Galaxy Note 5 displays the screen you were using before the call came in.
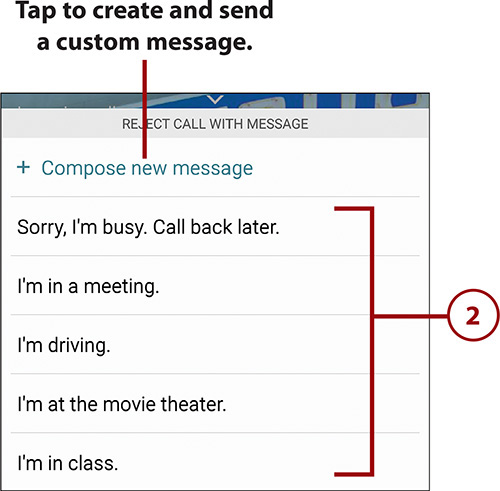
Reject a Call and Send a Text Message
Instead of simply declining a call and sending it to your voicemail, you can send an SMS (text message) straight back to the caller. Your Galaxy Note 5 provides a selection of canned messages for general needs. You can also create your own messages or type custom messages for particular calls.
1. When the phone rings, swipe up to display the Reject Call with Message shade.
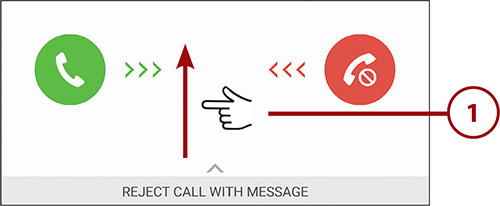
2. Tap to send one of the canned messages.
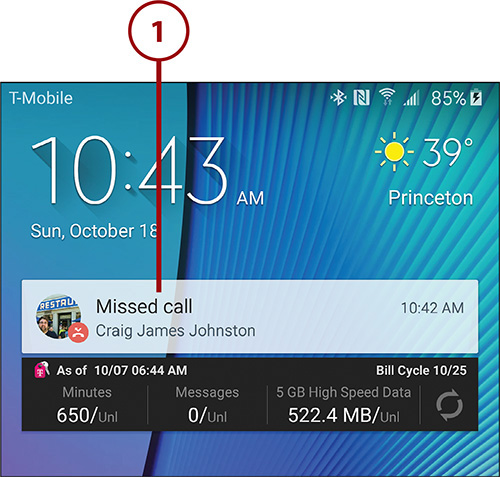
Handle Missed Calls
If you miss a phone call, you can quickly locate it in the Phone app’s logs so that you can return it, but you can also take actions on missed calls from the Lock screen or any other screen.
1. Tap to see the missed call from the Lock screen. If you use a Lock screen password or other method of locking your Note 5, you are required to use that method to unlock your Note 5 before you can continue.
2. Swipe from left to right across the missed call log entry to call the number back.
3. Swipe from right to left across the missed call log entry to send an SMS (text message) to the caller.
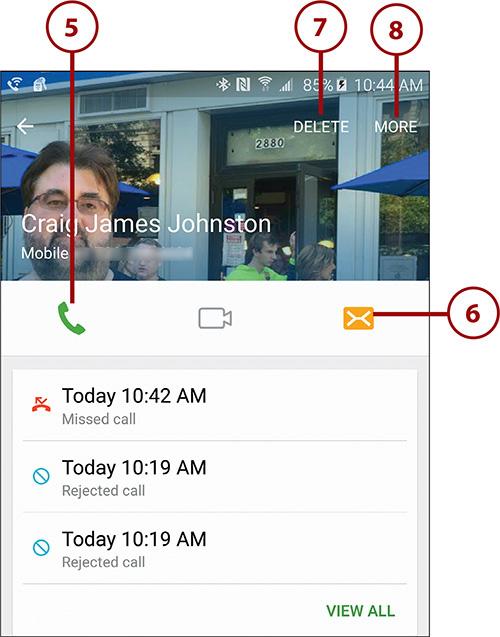
4. Tap the missed call log entry to see its details.
5. Tap to call the person back.
6. Tap to send an SMS (text message) to the caller.
7. Tap to delete one or more call log entries from this caller.
8. Tap to view the caller’s full contact information (if you already have the person in your Contacts), or add the number to your Auto Reject list. When someone’s number is on the Auto Reject list, your Note 5 automatically rejects calls from that number.
Making Calls
Aside from making a call the traditional way—by using the dialpad to punch in the numbers—you voice-dial a call on your Galaxy Note 5, or you can make a conference call.
Starting a Call from the Contacts App
Instead of launching the Phone app and then tapping the Contacts tab to go to the Contacts app, you can start a call directly from the Contacts app. Tap Contacts on the Home screen or the Apps screen to launch the Contacts app, tap the contact to display his or her details, and then tap the green phone icon to the right of the number you want to call.
Dial Using Your Voice
With the S Voice feature, your Galaxy Note 5 enables you to dial calls using your voice.
1. Say “Hi Galaxy” or whatever you set your S Voice Wake-up command to. A blue bar appears on the bottom of your screen indicating that S Voice is listening for a command. Please refer to the Prologue in the section “First-Time Setup” (step 36) to read more about the wake-up command.

2. Say “Call,” followed by the contact’s name; if the contact has multiple phone numbers, say the type of number as well. For example, say “Call Dana Smith mobile” or “Call Craig at home.”
3. Wait while S Voice dials the number. The Dialing screen appears.
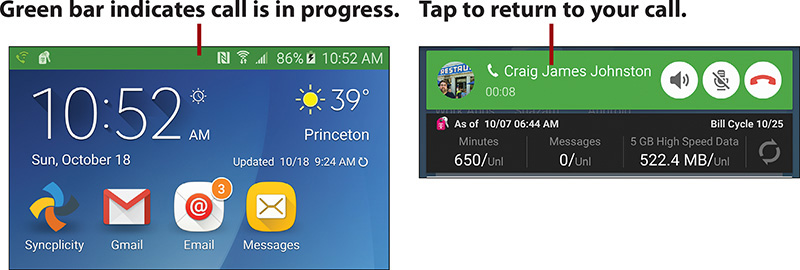
Using Other Apps During a Call
During a call, you can use most other apps freely, but you cannot play music or video. You can take photos with the Camera app, but you cannot shoot videos. To switch to another app, either use the Recent Apps list or press the Home button and use the Apps screen as usual. While you are using another app, your Galaxy Note 5 displays a green bar at the top of the screen to remind you that you are in a call. Pull down the Notification panel to control the call or return to it or take actions such as switch to speakerphone, mute, and hang up.
Make Conference Calls
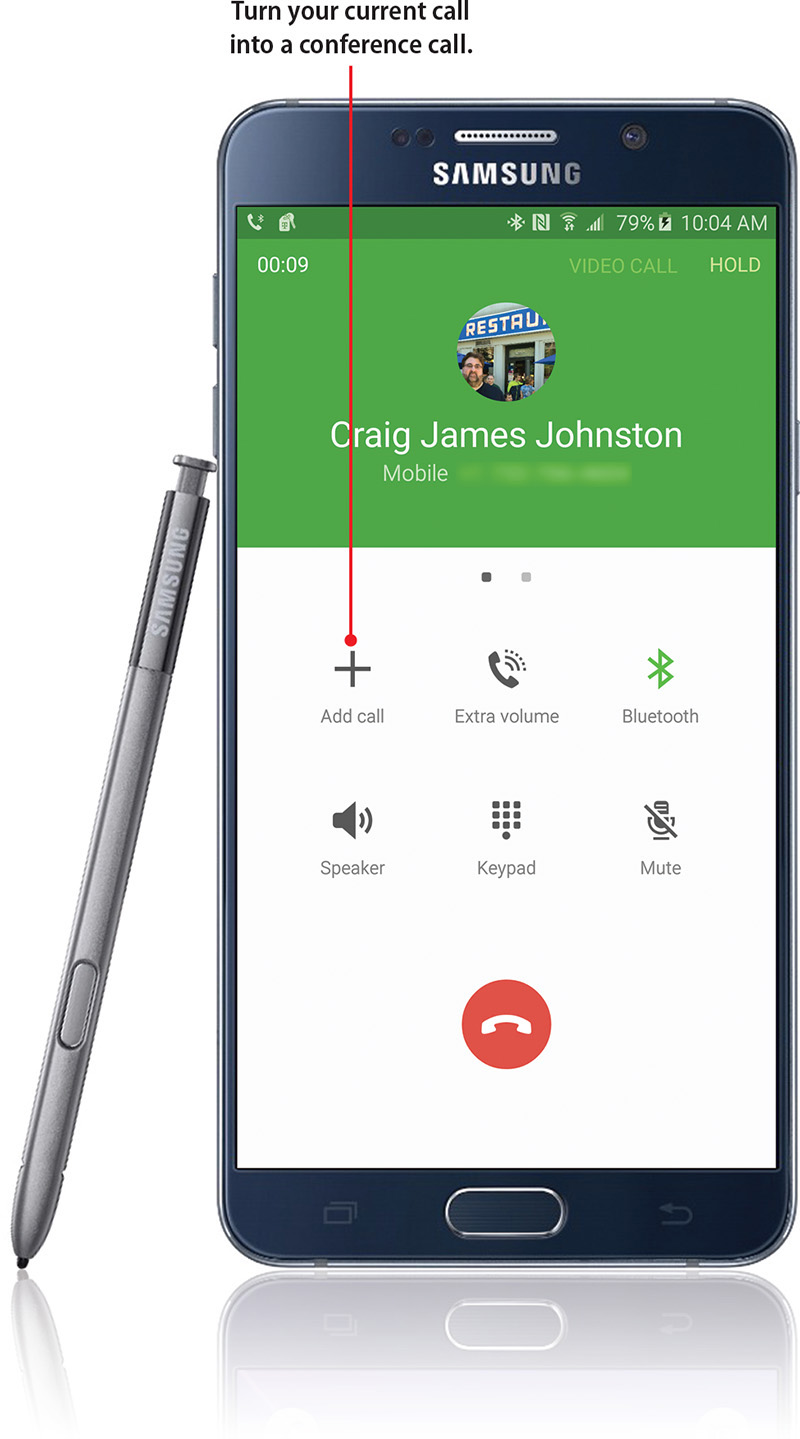
You can quickly turn your current call into a conference call by adding other participants.
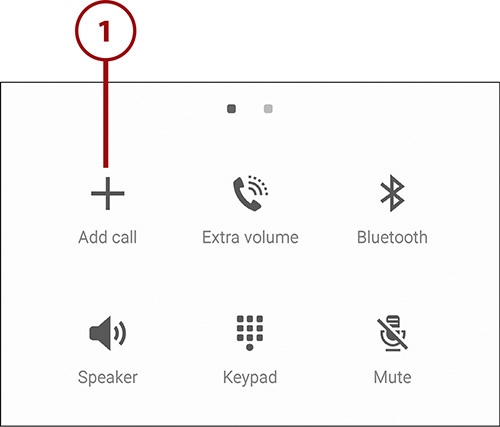
1. With a call in progress, tap Add Call on the call screen.
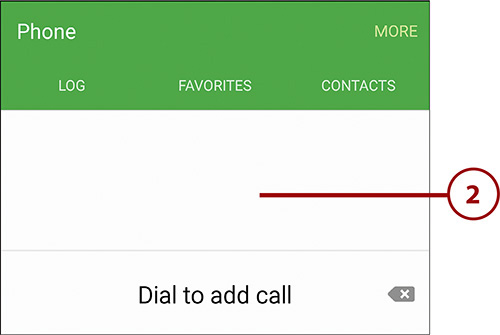
2. Dial the call in the most convenient way. For example, either type out the phone number or dial from the call log, Favorites, or Contacts.
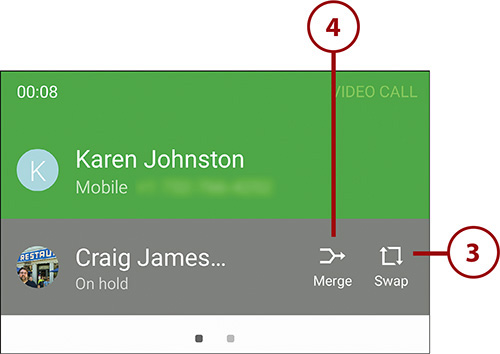
3. Tap to swap between the original call and the one you just added, if you need to.
4. Tap Merge to merge the calls and complete the conference call setup.
5. Repeat steps 1–4 to add additional callers. The exact number of callers you can have on a conference call is governed by your wireless carrier.
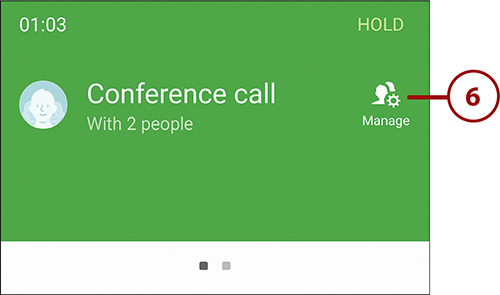
6. Tap Manage if you need to hang up on only one of the conference call parties, or if you need to split one of the parties off the conference call while still keeping them connected and on hold.
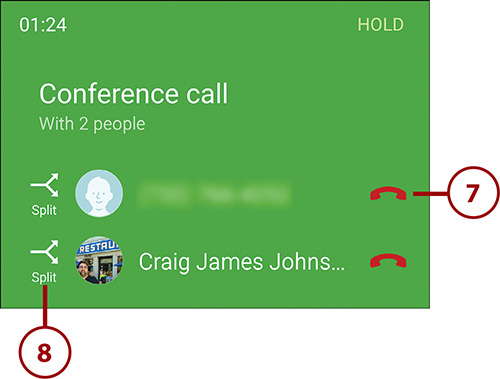
7. Tap the red phone icon to the right of a conference party you want to hang up on and remove from the conference call.
8. Tap Split if you want to remove the party from the conference call, but need to keep them connected to your phone and on hold.
Configuring the Phone App
To make the Phone app work your way, you can configure its settings.
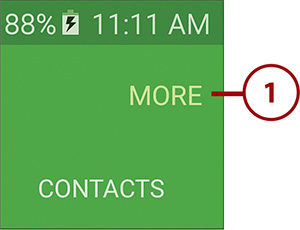
1. Tap More.
2. Tap Settings.

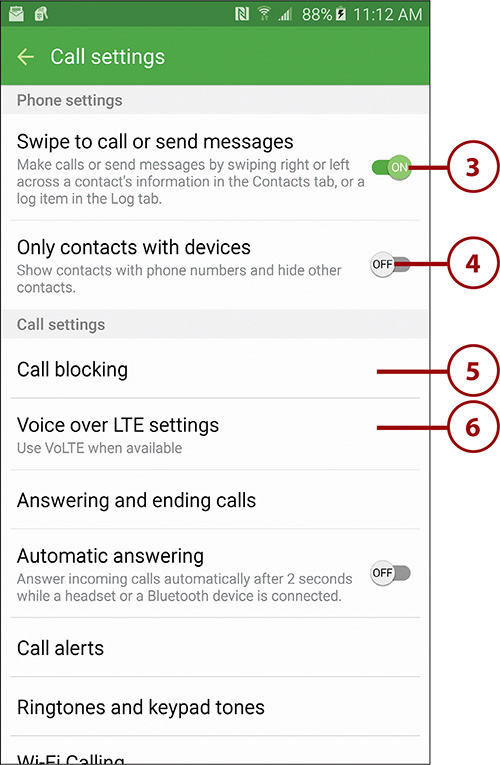
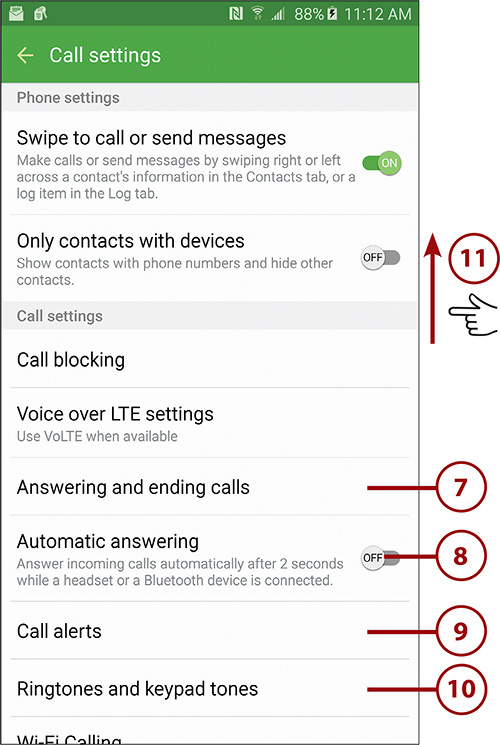
3. Tap to enable or disable the feature that allows you to swipe over a call log entry to either place a call to that number or send a text message to it.
4. Tap to enable or disable the feature that shows only contacts that include phone numbers in the phone app.
5. Tap to choose certain numbers for which calls will be automatically rejected. Tapping here also lets you edit your canned call rejection messages.
What Does Call Rejection Do?
Your Galaxy Note 5’s call rejection feature allows you to specify certain numbers to automatically reject, or to reject incoming calls that have no number or show as Unknown. Automatically rejecting specific numbers enables you to avoid calls from people you do not want to talk to.
6. Tap to choose whether you want to use Voice over LTE (VoLTE) when it is available.
What Is VoLTE?
LTE (or Long-Term Evolution) is the fourth generation of cellular data technology (not to be confused with the slightly faster version of 3G technology that has been incorrectly called 4G for years). VoLTE stands for Voice over LTE. Effectively, your voice call is sent as regular data over the LTE data channel as opposed to over the cellular voice channel. Voice quality is much better due to the higher rate at which the data is transmitted and received, and if the person you are calling also uses VoLTE, you can speak at the same time. Most wireless carriers treat VoLTE as regular voice minutes and don’t let it count against your data plan. However, you should verify the situation with your local wireless carrier; otherwise, your data plan might take an unexpected hit.
7. Tap to choose how you want to answer and end calls. You can choose to use your voice (saying “Answer” or “Reject”), press the Home button, or press the Power button.
8. Tap to enable or disable a feature that automatically answers an incoming call if you have your Note 5 connected to a Bluetooth device or your vehicle’s built-in Bluetooth.
9. Tap to choose options for vibrations, cell status tones, and alerts during calls. You can choose whether your Galaxy Note 5 vibrates or plays a tone when someone answers your call and when they hang up. You can also choose to receive or suppress notifications during calls.
10. Tap to choose the ringtone that plays when you receive an incoming call. You can also choose whether you want your phone to vibrate when you receive an incoming call, and what vibration pattern to use.
11. Swipe up for more settings.
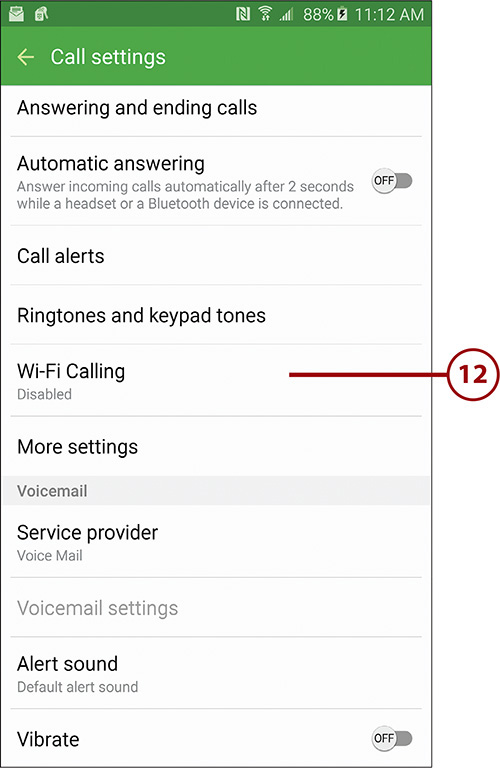
12. Tap to enable or disable Wi-Fi Calling, and choose how you want your Note 5 to utilize Wi-Fi Calling. You can choose to have your Note 5 prefer Wi-Fi but use cellular if Wi-Fi is unstable; prefer the cellular network, and only use Wi-Fi if cellular service is unavailable; or only use Wi-Fi for all calls.
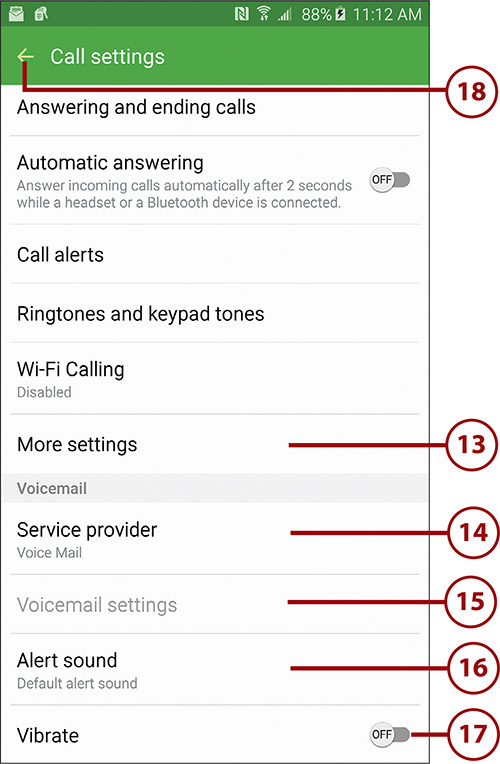
13. Tap to see additional settings, including how Caller ID is handled, call forwarding, call waiting, and Fixed Dialing Numbers (FDN). When you tap, the settings are loaded over the wireless network, so you might need to wait a few seconds before they appear.
14. Tap to choose which voicemail service to use (if you have more than one option). If you use Google Voice, it is common to use the Google Voice voicemail system as opposed to the one provided by your wireless carrier.
15. Tap to adjust voicemail settings (if options are available).
16. Tap to choose your ringtone for announcing voicemail.
17. Tap to choose to also vibrate when you are notified of a new voicemail.
18. Tap to save your changes and return to the main phone screen.
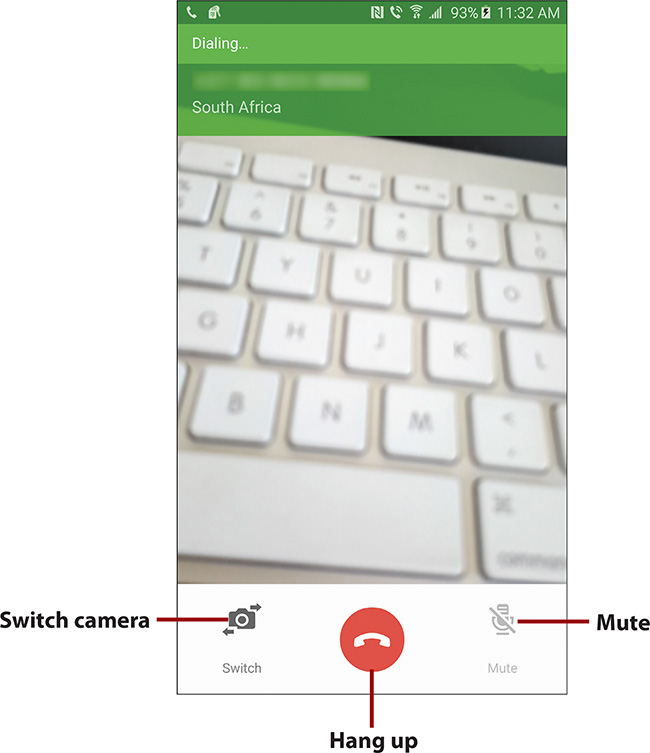
Your mobile provider might offer video calling for your Note 5. If it does, you will see a video call icon to the right of the regular phone icon. If you place a video call by tapping the video call icon, if the person you are calling has a phone that supports video calling, you are able to make use of this feature. While on a video call, you can switch between the front-facing or rear-facing camera on your Note 5.