14. Using S Health
In this chapter, you discover how to use the powerful S Health app that comes with your Galaxy Note 5. Topics include the following:
![]() Performing initial setup
Performing initial setup
![]() Configuring S Health to suit your needs
Configuring S Health to suit your needs
![]() Tracking your activities, diet, and vital signs
Tracking your activities, diet, and vital signs
Your Galaxy Note 5 includes Samsung’s S Health app for tracking health and activity information. S Health offers three overarching fitness goals, a wide range of built-in trackers that you can use to track everything from your heart rate to your caffeine intake, and several training programs focused on running. S Health can also interoperate with third-party apps that are designed to analyze health and activity information and to derive reports or recommendations from them.
What Is S Health For?
Samsung’s terms and conditions make it clear that S Health is “intended for fitness and wellness purposes only” and not for diagnosing, mitigating, treating, curing, or preventing disease or conditions.
Similarly, please be clear that this book does not offer health or diet advice, and that even if you manage to construe any of its contents as such, you should not follow it without seeking professional medical advice.
Performing Initial Setup
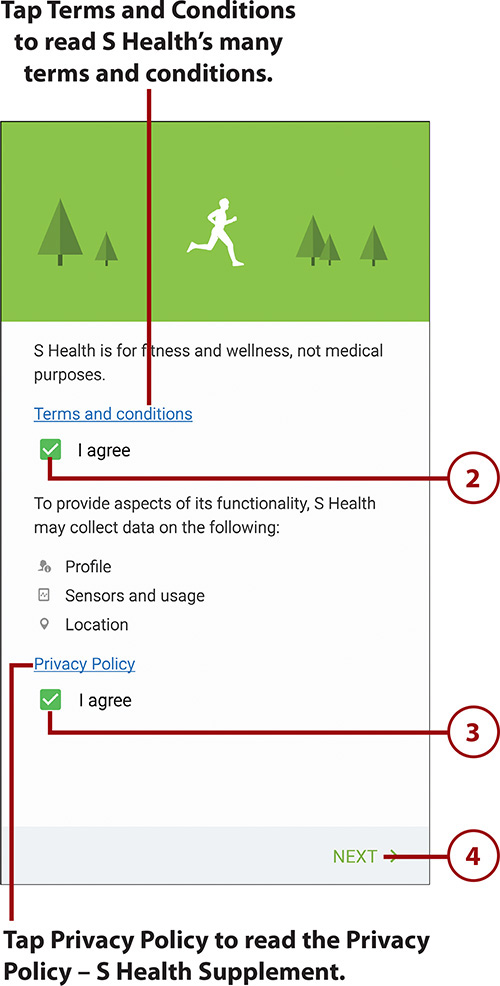
Before you can start using S Health, you must agree to its terms, conditions, and disclaimers. If you want to store your data online, you must also sign in to your Samsung account and connect S Health to the account; so if you don’t yet have a Samsung account, you must create one.
1. On the Apps screen, tap S Health. The introductory screen appears.
2. Check the upper I Agree check box.
3. Tap the lower I Agree check box.
4. Tap the Next button. The Welcome screen appears, running through a sequence of healthful activities accompanied by supposedly suitable colors.
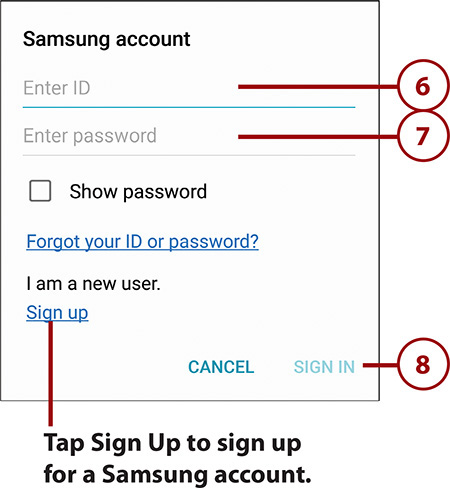
5. Tap the Sign In button if you want to sign in to your Samsung account. Signing in enables you to store your health data online and access it from other devices. See the nearby sidebar titled “Is It Safe to Store My Health Data Online with Samsung?” for advice about whether to store your data online.

6. Tap the Enter ID field and type the ID for your Samsung account—for example, the email address you used to set up the account.
7. Tap the Enter Password field and type your password. You can check the Show Password check box if you need to verify you’ve typed the password correctly.
8. Tap the Sign In button. The S Health dashboard screen appears, displaying a Welcome to S Health! banner and items you can add to the dashboard.
Customizing the S Health Dashboard
Now that you’ve finished initial setup, the S Health Dashboard appears. The Dashboard combines readouts showing your activities and progress with quick access to all your items.
Before you start using S Health, you should set up the Dashboard with the goals, trackers, and programs you want to use.
What Are Goals, Trackers, and Programs?
S Health uses three types of components for tracking and logging your activities: goals, trackers, and programs.
A goal has daily targets and long-term aims. There are three goals, which you can enable or disable as needed. The first goal is the Be More Active goal, which has a target number of active minutes in a day. The second goal is the Eat Healthier goal, which has a target number of calories for you to consume, and also tracks the nutritional content of what you eat. The third goal is the Feel More Rested goal, which logs your sleep hours.
S Health includes a wide range of trackers, including Steps, Walking, Running, Cycling, Sports, Food, Water, Caffeine, Sleep, Heart Rate, and Stress. Some trackers use the sensors built into your Galaxy Note 5, but others require you either to use a third-party device that can communicate with S Health or to log data manually. For example, you can use a sleep monitor to log your sleep hours automatically, or you can enter them in the Sleep tracker automatically. For other trackers, such as Food and Caffeine, you must enter your consumption manually, because—fortunately—no automated monitor is available.
You can also add third-party trackers to S Health to enable yourself to track other fitness or health metrics.
A program is a training program designed to get you to perform a specific race. As of this writing, S Health has four programs: Baby Steps to 5K, Run 5K, First Attempt at 10K, and Run 10K. (K stands for kilometers.)
Add Goals to the Dashboard
Begin your customization of the S Health Dashboard by choosing which of the three goals to add to it. Each goal appears in a temporary box at first, enabling you easily to either add the goal or remove it.
Add or Remove the Be More Active Goal
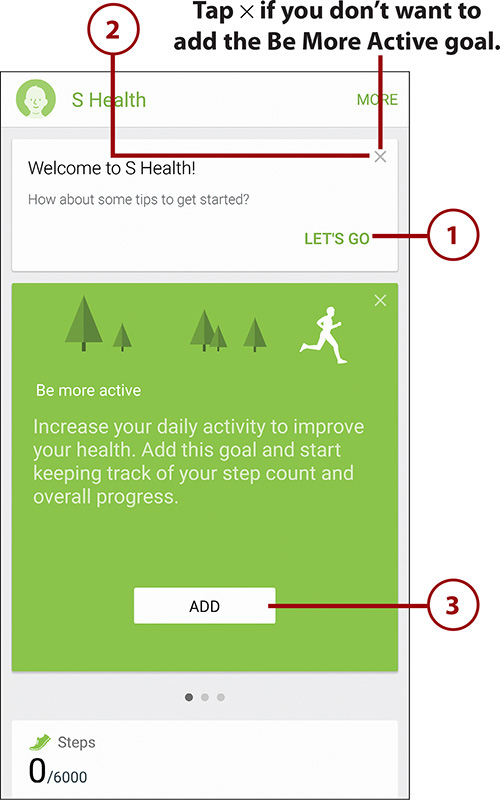
1. Tap the Let’s Go button if you want to view tips on how to get started with S Health.
2. Tap the × button to close the Welcome to S Health banner.
3. Tap the Add button on the Be More Active box to display the Be More Active screen.
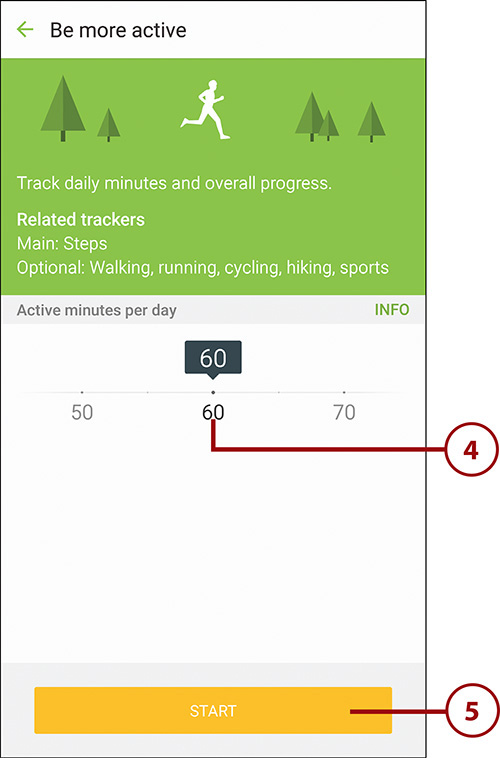
4. Drag the Active Minutes per Day slider until your target number of active minutes appears in the box.
5. Tap the Start button. The Be More Active widget appears on the Dashboard, showing your progress toward the Be More Active goal.
6. Swipe left on the Be More Active widget to display the Eat Healthier box. You can then set up the Eat Healthier goal as explained in the next section—if you want to do so.

What Does the Active Minutes per Day Setting Count?
The Active Minutes per Day setting in S Health counts light, moderate, and vigorous activity. An example of light activity is walking, and S Health uses the Steps tracker as the main related tracker for the Be More Active goal. Moderate activity includes things like cycling or swimming, both at a medium pace rather than a lung-busting sprint. Vigorous activity includes running, cage-fighting, and other pursuits that exhaust you in short order.
Fitness and medical authorities argue endlessly about how much activity and exercise people need, but many agree that a minimum of 30 minutes of moderate-intensity activity per day is a good target.
Add or Remove the Eat Healthier Goal
1. Tap the Add button on the Eat Healthier box to display the Eat Healthier screen.

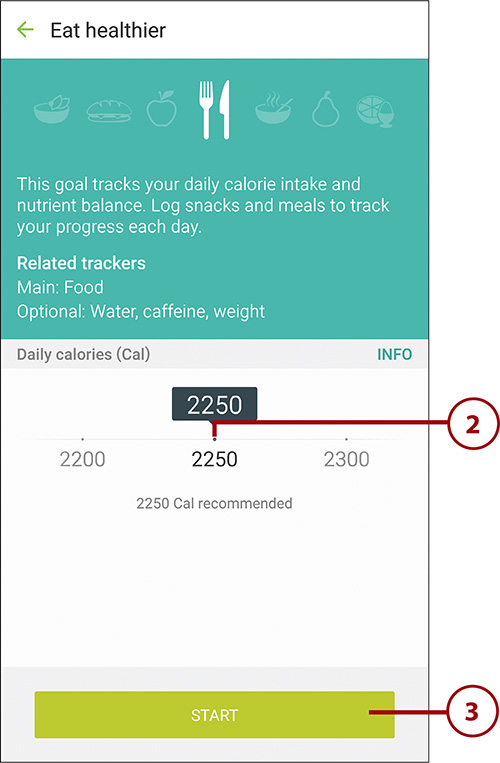
2. Drag the Daily Calories (Cal) slider until your target intake appears in the box.
3. Tap the Start button. The Eat Healthier widget appears on the Dashboard, showing your progress toward your calorie target.
4. Swipe left on the Eat Healthier widget to display the Feel More Rested box. You can then set up the Feel More Rested goal as explained in the next section.
Add or Remove the Feel More Rested Goal
S Health’s third goal is the Feel More Rested goal. This goal requires you to either log your sleep hours manually or wear a device that can record your sleep data and sync it with S Health.
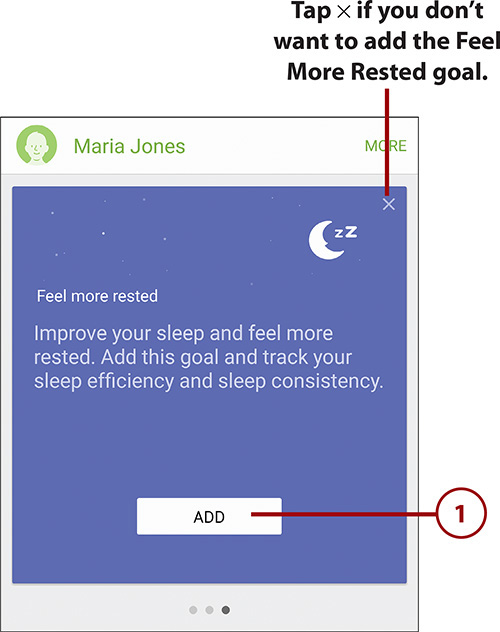
1. Tap the Add button on the Feel More Rested box to display the Feel More Rested screen.
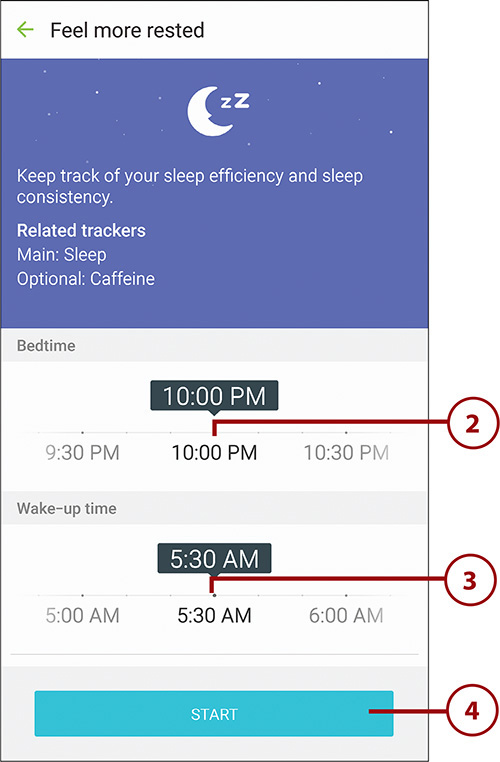
2. Drag the Bedtime slider until your target bedtime appears in the box.
3. Drag the Wake-Up Time slider until your target wake-up time appears in the box.
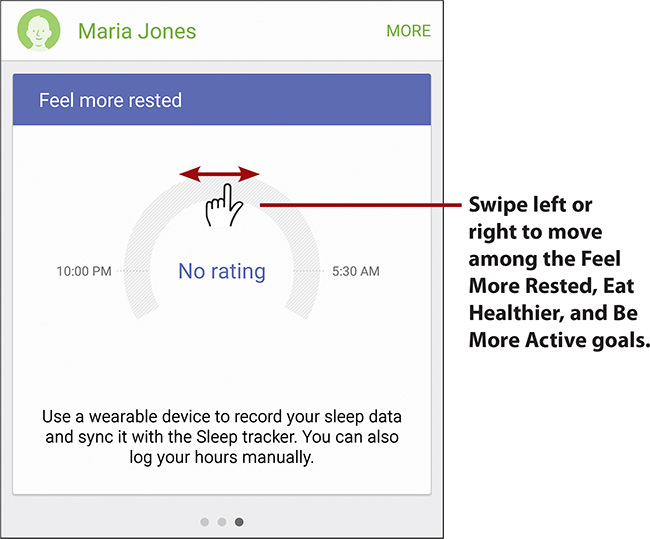
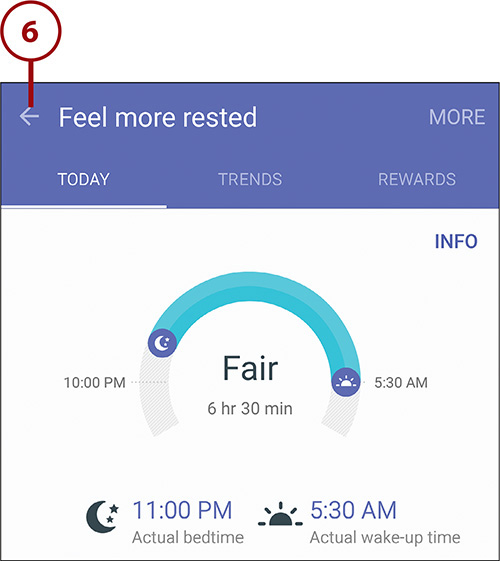
4. Tap the Start button. The Feel More Rested widget appears on the Dashboard, showing a rating dial for your sleep.
Navigating Among Goals
Now that you have added your goals to the Dashboard, you can swipe left or right to navigate from one goal to another. The goals wrap around, so you can swipe left from the last goal to display the first goal or swipe right from the first goal to display the last goal.
You find out more about how to add data to the Eat Healthier goal in the section “Record Your Food Intake,” later in this chapter. See how to add sleep data in the section “Record Your Sleep Hours,” even later in this chapter.
Set Up the Dashboard with the Trackers and Programs You Need
After choosing which—if any—of the three goals to use on your Dashboard, you can set up the trackers you want to use. The Dashboard comes with several trackers preconfigured and suggests other trackers you might want to add, but you can remove any tracker or suggested tracker and use only those you actually want.
While adding trackers, you might also want to add one of the training programs that S Health includes, such as the Run 5K program. Programs appear at the top of the Dashboard in the Goals area, so you swipe left or right to move among your programs and your goals.
1. From the Goals section at the top of the Dashboard, swipe up to scroll down until you see the Trackers section.
2. You can tap the Measure button on a tracker that uses the Galaxy Note 5’s measurement devices. Such trackers include Heart Rate, SpO2, and Stress.
3. You can tap the Start button on a tracker that measures your activity. Such trackers include Running.
4. You can tap × to remove a suggested tracker from the Dashboard.
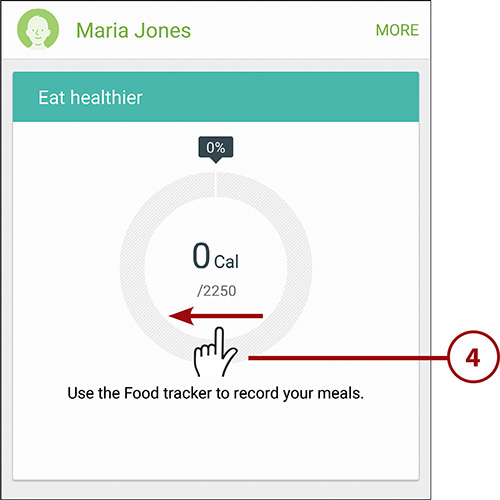
5. Tap the Add button on a tracker such as the Food tracker to add data to the tracker. For example, for the Food tracker, you can add a meal or a snack.
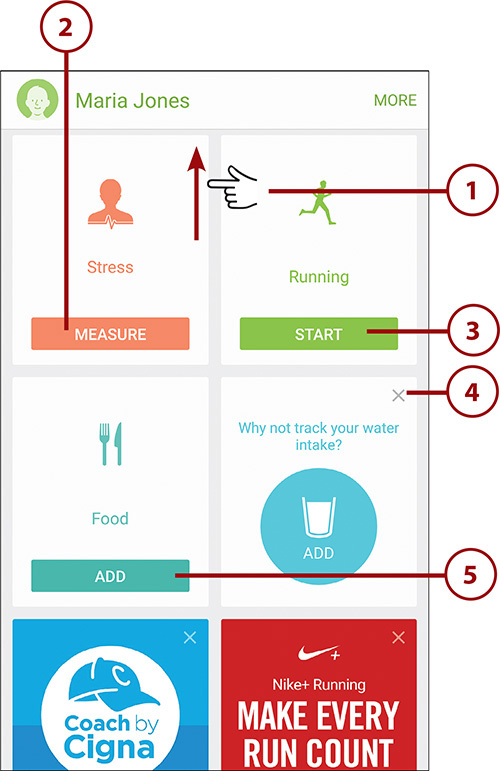
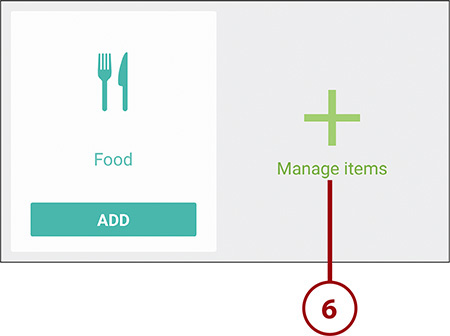
6. At the bottom of the Dashboard, tap the Manage Items button to display the Manage Items screen. This screen has three tabs: the Trackers tab, the Goals tab, and the Programs tab.
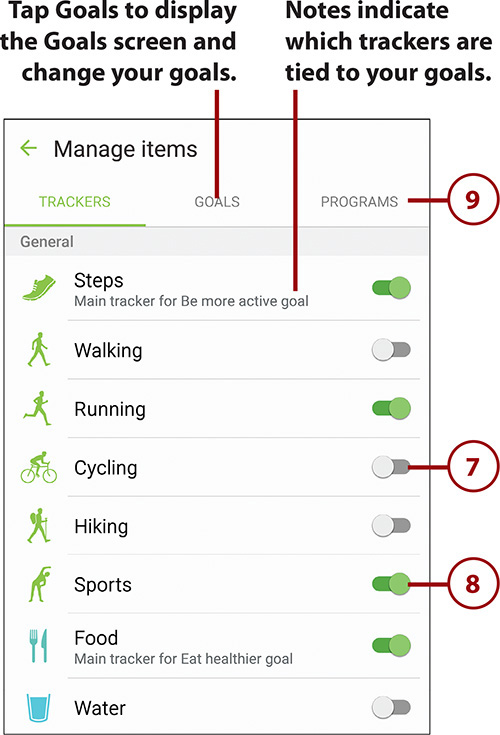
7. Set a switch to Off to remove that tracker from the Dashboard.
8. Set a switch to On to add that tracker to the Dashboard.
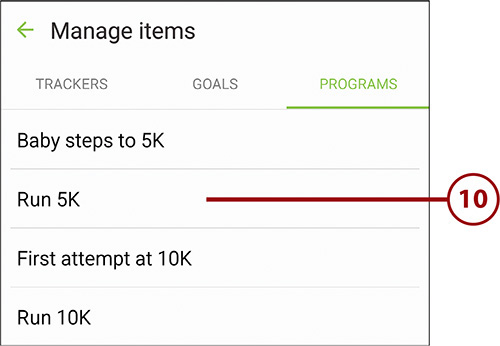
9. Tap Programs to display the Programs screen, which you use for adding specific training programs to S Health.
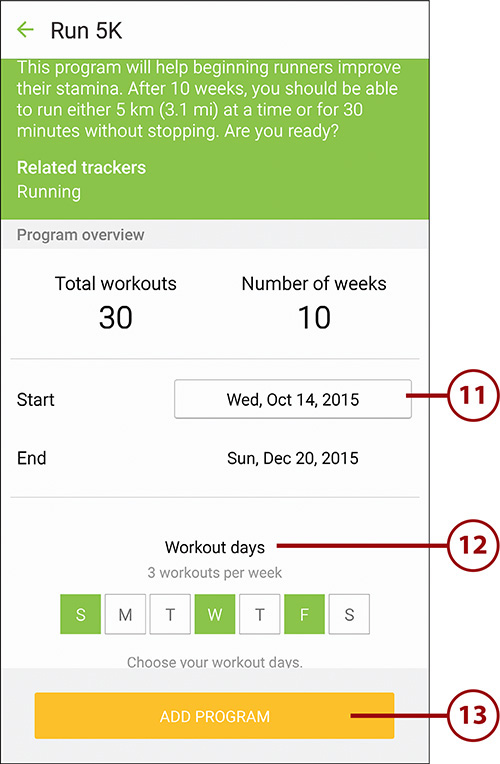
10. Tap the program you want to add. This example uses Run 5K.
11. Tap the Start button and choose your start date.
12. In the Workout Days bar, tap the buttons to select the days you want to work out. (Note: If you don’t conform to the specified number of days for the workout, S Health will chide you.)
13. Tap the Add Program button. S Health adds the program and then displays the Dashboard again.
Drag Your Dashboard Items into Order
Apart from the goals and programs at the top of the Dashboard, you can drag any of the other items into your preferred order. To move an item, tap and hold it until it becomes mobile, and then drag it to where you want it. Drop the item on another item to make the two items switch places.
Configuring S Health to Suit Your Needs
S Health has a ton of configuration options, and it’s a good idea to set them to suit your needs before you spend a lot of time using the app.
First, you might want to set your profile so that S Health knows basic information such as your gender, height, and weight.
Set Your Profile
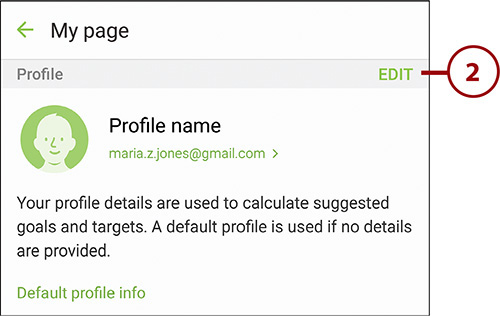
1. Tap your photo or the placeholder icon to display the My Page screen. Until you enter your details, this displays default profile information for a male born the first day in 1980.
2. Tap the Edit button to display the screen for editing the profile.
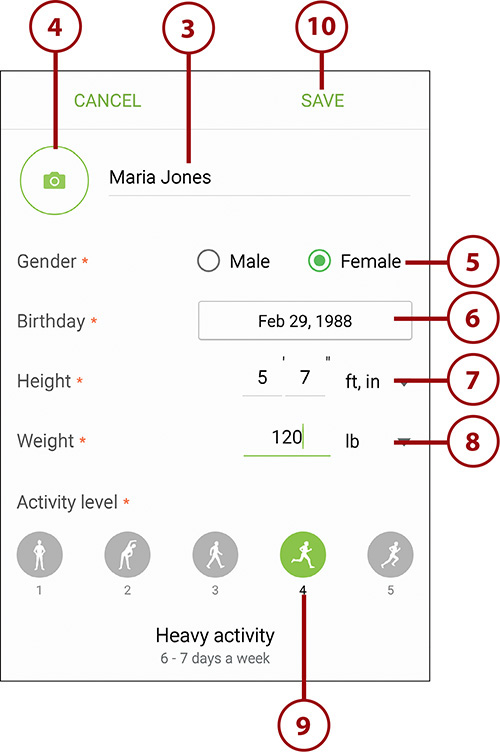
3. Tap the Name field and type your name the way you prefer it to appear.
4. Tap the Photo icon if you want to add a photo to the profile. You can either take a photo with the camera or use a photo that’s already on your Galaxy Note 5.
5. On the Gender line, tap the Male option button or the Female option button, as appropriate.
6. On the Birthday line, tap the date button, and then use the controls to pick your official birthday.
7. On the Height line, enter your height. You can tap the pop-up arrow button to switch between centimeters and feet-and-inch measurements.
8. On the Weight line, enter your weight. (Be honest.) You can tap the pop-up arrow button to switch between kilograms and pounds.
9. On the Activity Level line, tap the button that corresponds to your activity level, from 1 (Little to No Activity) to 5 (Very Heavy Activity).
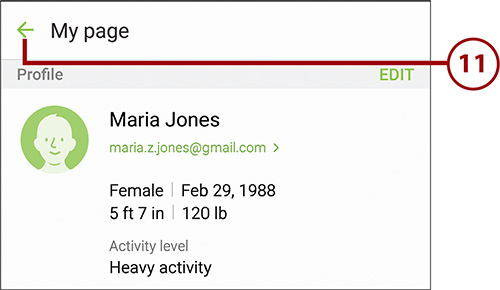
10. Tap the Save button to save the changes you’ve made. The My Page screen appears again, now showing the information you entered.
11. Tap the arrow button or the Back button below the screen. The Home screen appears again.
Choose Settings for S Health
To choose settings for S Health, you first open the S Health Settings screen, which you can reach from the Home screen in the S Health app. From the S Health Settings screen, you can configure account settings, unit settings, notifications settings, and data permissions settings. You can also erase all of your S Health data if necessary.
Display the S Health Settings Screen
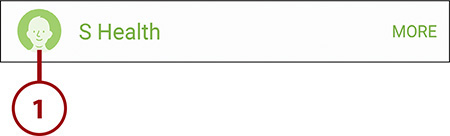
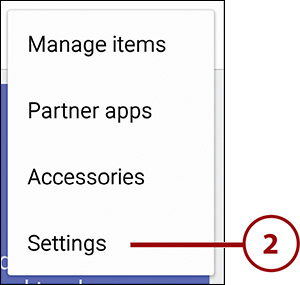
1. In S Health, tap the More button to open the menu.

2. Tap Settings to display the S Health Settings screen.
Choose Account Settings for S Health
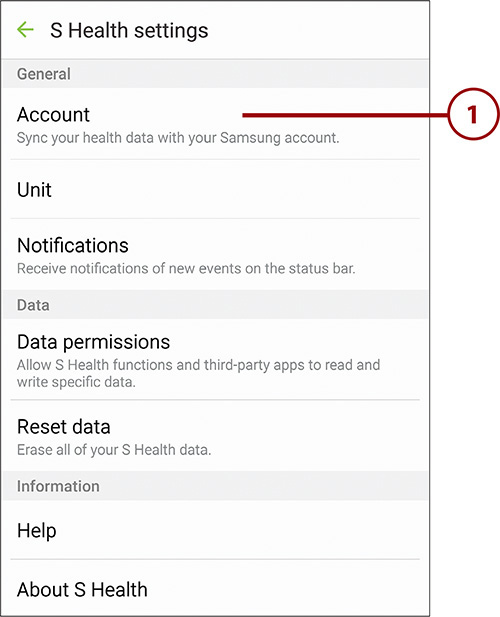
1. On the S Health Settings screen, tap Account. The Account screen appears, showing controls for configuring how to sync your account.
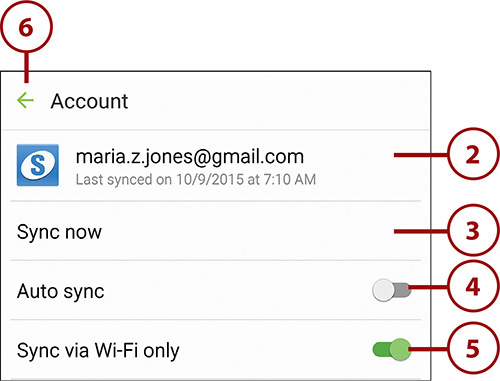
2. Tap your account to display the Samsung account screen. From here, you can tap Profile to display your account information profile, or tap Terms and Conditions if you want to revisit the terms and conditions.
3. Tap Sync Now to sync your account data to the S Health server. The Syncing readout appears under your account name as S Health syncs the data. Then the Last Synced readout appears, showing the date and time of the last sync.
4. Set the Auto Sync switch to On if you want S Health to sync your data automatically. This is normally a good idea if you want to store your S Health data online.
5. Set the Sync via Wi-Fi Only switch to On if you want to prevent S Health from syncing via cellular connections. This is a good idea if you have a limited data plan.
6. Tap the arrow button or the Back button below the screen to return to the S Health Settings screen.
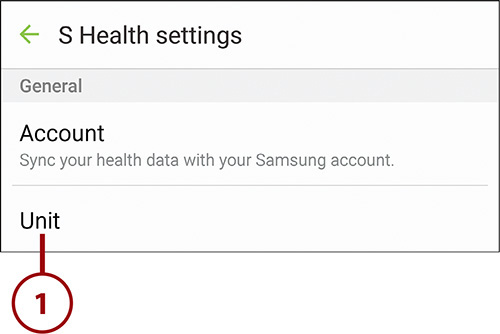
Choose Unit Settings for S Health
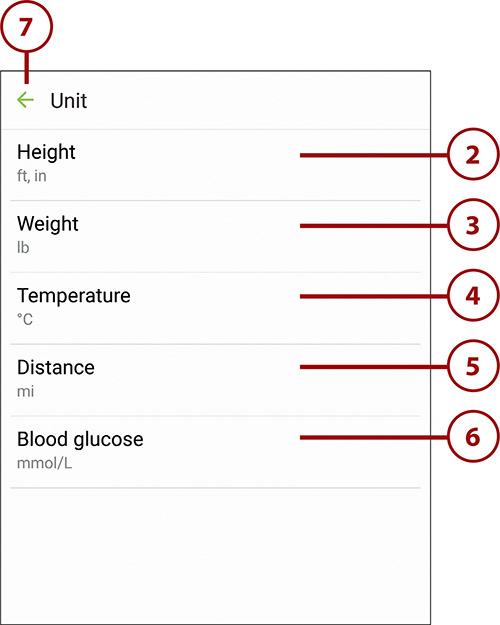
1. On the S Health Settings screen, tap Unit. The Unit screen appears, showing controls for choosing the measurement units to display for height, weight, temperature, distance, and blood-glucose levels.
2. Tap Height and then tap “cm” or “ft, in” on the pop-up menu.
3. Tap Weight and then tap “kg” or “lb” on the pop-up menu.
4. Tap Temperature and then tap °C or °F on the pop-up menu.
5. Tap Distance and then tap “km” or “mi” on the pop-up menu.
6. Tap Blood Glucose and then tap “mg/dL” or “mmol/L” on the pop-up menu.
7. Tap the arrow button or the Back button below the screen to return to the S Health Settings screen.
What Are the Blood Glucose Measurement Units?
S Health gives you a choice of two measurement units for blood-glucose levels: mg/dL and mmol/L. Normally, you would choose whichever measurement unit your monitoring device or healthcare professional uses.
Milligrams per deciliter (mg/dL) is the standard for measurement used in the U.S. and in much of Europe. A normal fasting blood-glucose measurement for a person without diabetes is in the range 70 mg/dL to 99 mg/dL. A fasting measurement is taken after eight hours with no food.
Millimoles per liter (mmol/L) is the standard for measurement used in the UK. A normal fasting blood-glucose measurement for a person without diabetes is in the range 4 mmol/L to 6 mmol/L.
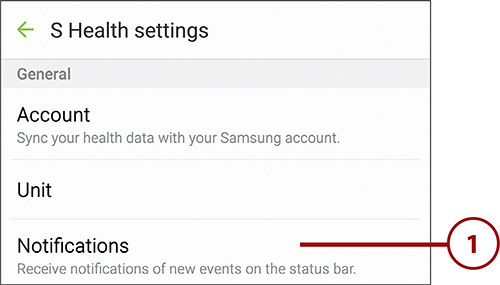
Choose Notifications Settings for S Health
1. On the S Health Settings screen, tap Notifications to display the Notifications screen.
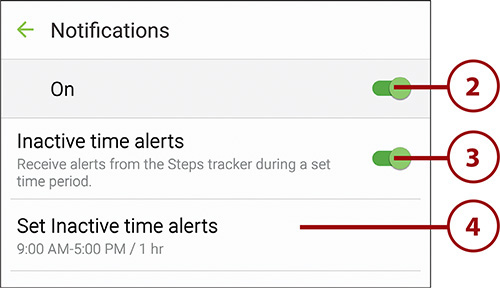
2. Set the Notifications switch to On if you want to receive notifications from S Health.
3. Set the Inactive Time Alerts switch to On if you want the Steps Tracker feature to alert you when you have been inactive for a specific length of time during the time period you specify.
4. If you set the Inactive Time Alerts switch to On, tap the Set Inactive Time Alerts button to display the Track Inactive Time screen. If you set this switch to Off, skip to step 8.
5. Tap Time of Day to display the Time of Day screen. Here, you can set the Always switch to On if you want S Health to give you inactive time notifications all the time. Usually, you’d want to set the Always switch to Off and use the From button and To button to specify the hours during which you want to receive inactive time notifications. Tap the arrow button or the Back button below the screen to return to the Track Inactive Time screen.
6. Tap Notification Interval and then tap the interval on the pop-up menu to specify how frequently S Health should notify you about being inactive. Your choices are 30 Min, 1 Hr, 1 Hr 30 Min, and 2 Hr.
7. Tap the arrow button or the Back button below the screen to return to the Notifications screen.

8. Set the Food Logging Reminders switch to On if you want S Health to raise notifications reminding you of the Eat Healthier goal.
9. Set the Sleep Logging Reminders switch to On if you want S Health to raise notifications reminding you of the Feel More Rested goal.
10. Set the Program Reminders switch to On if you want to receive notifications from apps reminding you of your goals.
11. Set the Earned Reward Alerts switch to On if you want to receive notifications from goals and trackers telling you about the rewards you have earned.
12. Tap the arrow button or the Back button below the screen to return to the S Health Settings screen.

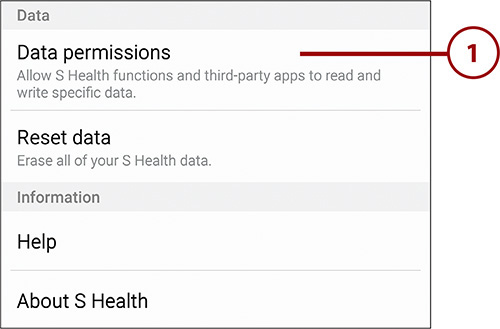
Choose Data Permissions Settings for S Health
If you have added third-party fitness and health apps to your Galaxy Note 5, you can use the Data Permissions screen in S Health settings to control which data each app can access.
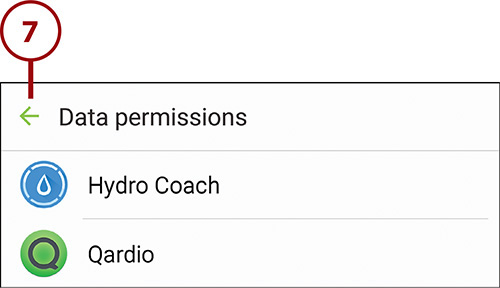
1. On the S Health Settings screen, tap Data Permissions to display the Data Permissions screen. This screen contains an entry for each third-party app for which you can set data permissions.
Which Apps Work with S Health?
You can find a list of apps that work with S Health by going to http://shealth.samsung.com, navigating to the Expand It heading, and clicking the Learn More link.
2. Tap the app for which you want to set data permissions.

3. Set the app’s master switch to On to enable the other controls.
4. In the Allowed to Write area, set any switch to On if you want the app to be able to write this type of data to S Health’s database.
5. In the Allowed to Read area, set any switch to On if you want the app to be able to read this type of data from S Health’s database.
6. Tap the arrow button or the Back button below the screen to return to the Data Permissions screen.

7. Tap the arrow button or the Back button below the screen to return to the S Health Settings screen.
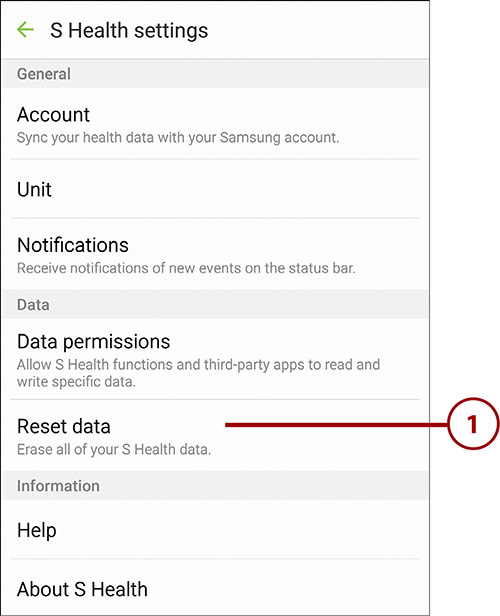
Erase Your S Health Data
If you decide to stop using S Health, you can erase your S Health data from both your Galaxy Note 5 and from the S Health server. As you would likely expect, deleting the data gets rid of it permanently, so you cannot recover it afterward.
1. On the S Health Settings screen, tap Reset Data to display the Reset Data screen.
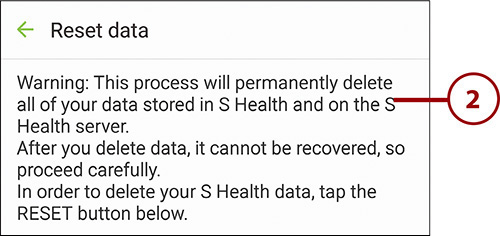
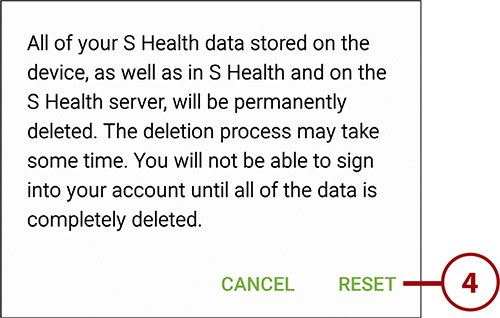
3. Tap the Reset button. S Health displays a warning dialog.

4. Tap the Reset button. The Samsung Account screen appears.
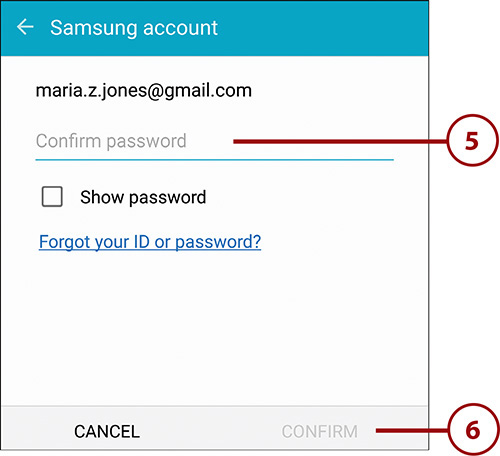
5. Tap Confirm Password and type your password.
6. Tap the Confirm button. S Health deletes your data. The app then closes, and the Home screen appears.
What Happens If I Delete the S Health App?
You can delete the S Health app from your Galaxy Note 5 in the same way you can delete most other apps, but be warned that deleting S Health does not delete your data from the S Health server. The data stays on the S Health server so you can resume using S Health on another device or after restoring it on your Galaxy Note 5 (if you have deleted the app to resolve configuration or performance issues).
Tracking Your Activities
Once you have gotten S Health set up with the goals, trackers, and programs you need, you will find tracking your activities largely straightforward. This section shows you quick examples of working with goals, trackers, and programs.
Work Toward Your Goals
S Health puts your goals and programs at the top of the Dashboard so that you can reach them instantly.
Measure Progress Toward the Be More Active Goal
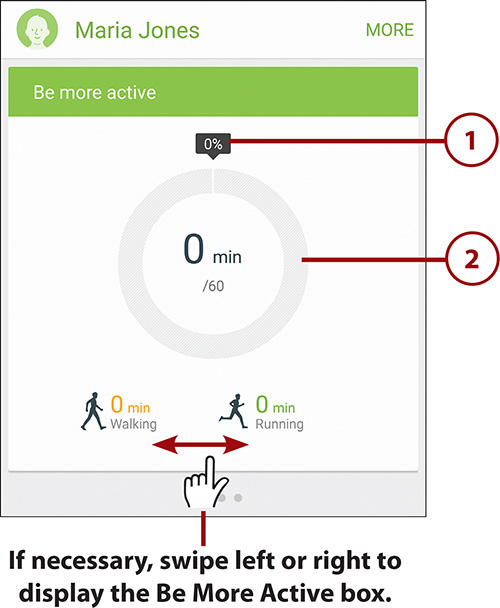
The Be More Active goal appears prominently at the top of the Dashboard, so you can quickly see your progress toward your daily activity goal.
1. View the readouts in the Be More Active box to see a summary of your progress.
2. Tap the Be More Active box to display the Be More Active screen.
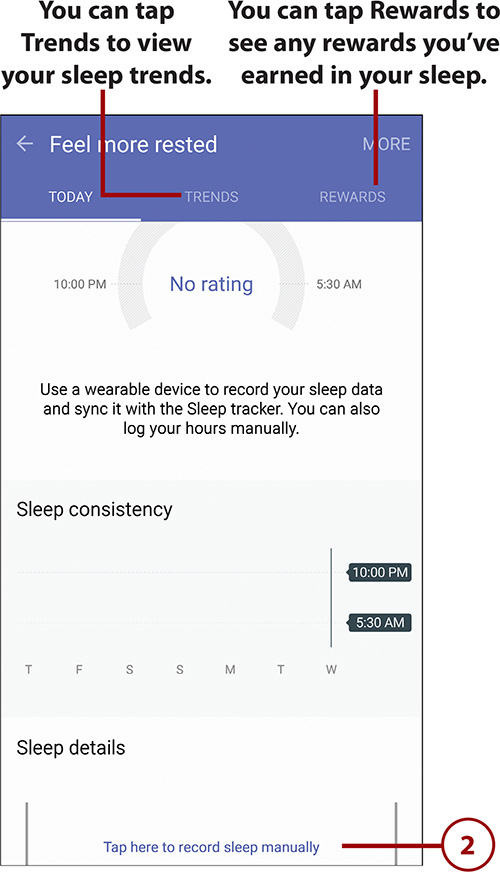
3. You can tap the Trends tab button to display the Trends tab, which shows your activity trends. You can view the data by days, by weeks, or by months.
4. You can tap the Rewards tab to see any rewards you have earned. Rewards are digital badges that commemorate your activity accomplishments, not thick slices of triple-frosted chocolate cake.
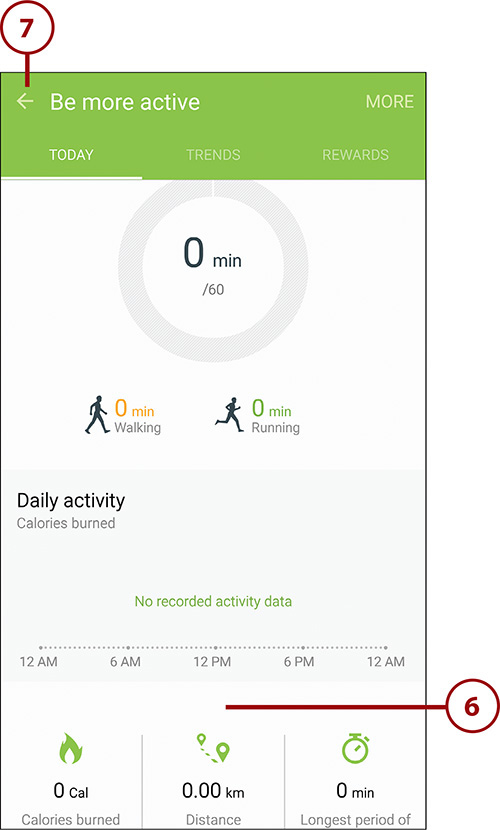
5. View the Calories Burned timeline to see the different amounts of calories you burned at different hours of the day.
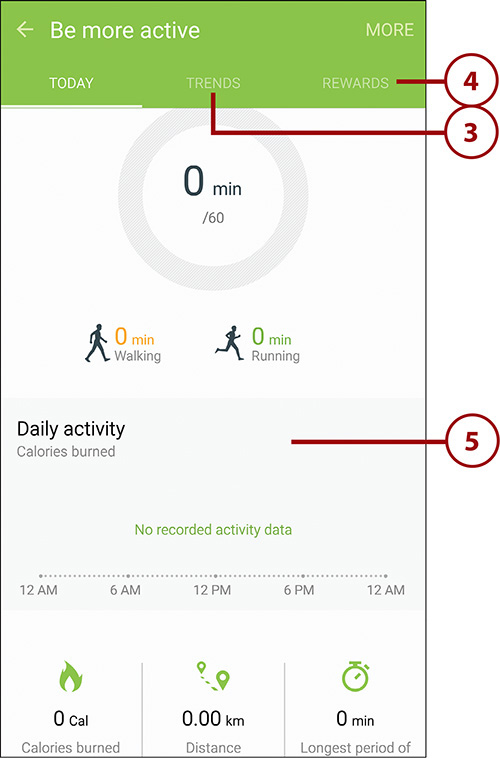
6. View the Calories Burned readout, the Distance readout, and the Longest Period of Active Min readout to see the details of your activity.
7. Tap the arrow button or the Back button below the screen to return to the Dashboard.
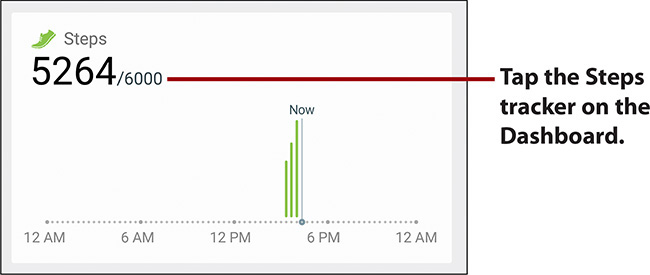
View Your Step Count and Calories Burned
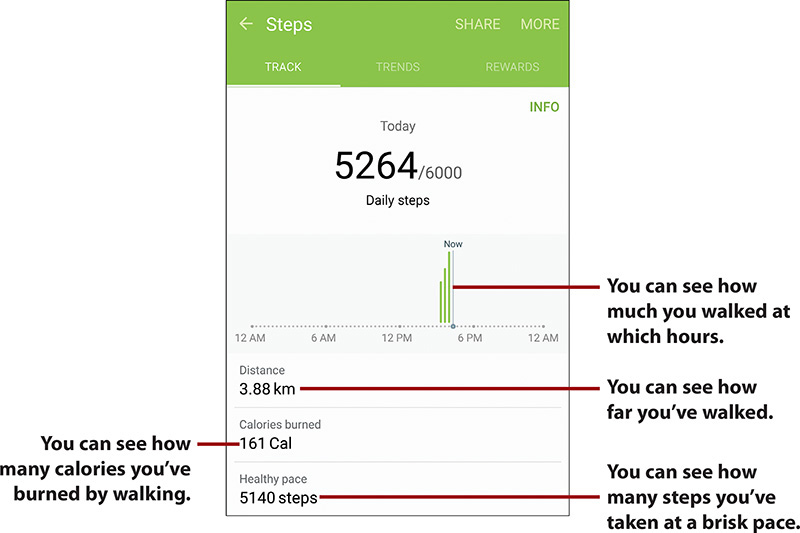
To view the number of steps you’ve taken today and learn how many calories you’ve burned, tap the Steps tracker on the Dashboard.
The Steps screen appears, showing your progress towards the day’s step count of 6000 steps, the distance you have covered, the number of calories you have burned, and the number of steps you have taken at a healthy pace. S Health displays the Healthy Pace icon after you maintain a pace of 100 steps a minute or faster for 10 minutes.
Record Your Food Intake
If you have enabled the Eat Healthier goal, you need to enter your consumption into S Health.
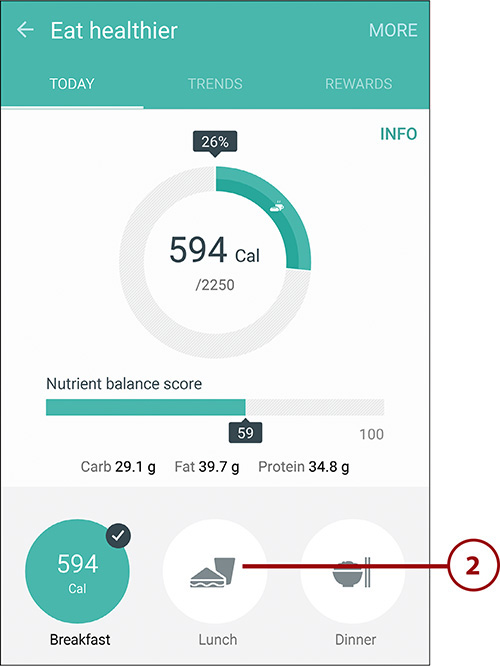
1. Tap the Eat Healthier box on the Dashboard to display the Eat Healthier screen.
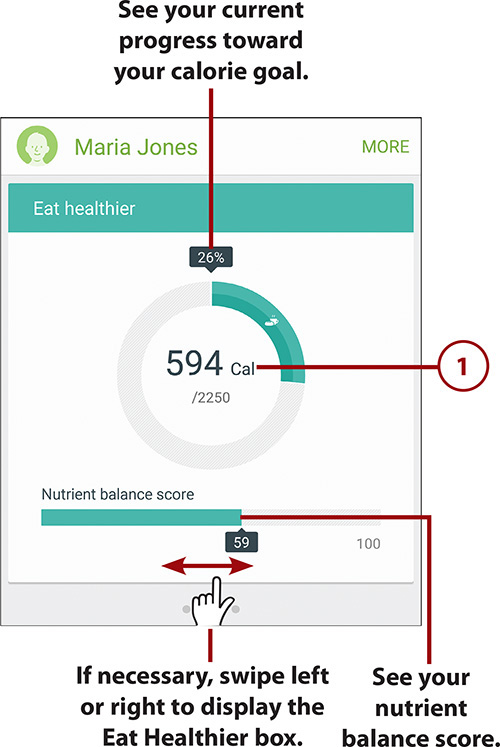
2. Tap the meal or snack you want to add; this example uses lunch. The Morning Snack icon appears below the Breakfast icon; the Afternoon Snack icon appears below the Lunch icon; and—as you might guess—the Evening Snack icon appears below the Dinner icon. You are not required to eat all of these.
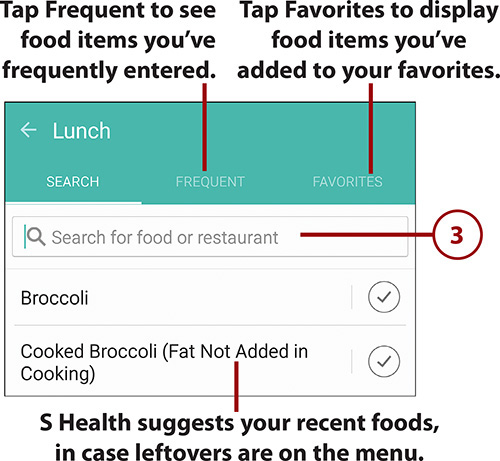
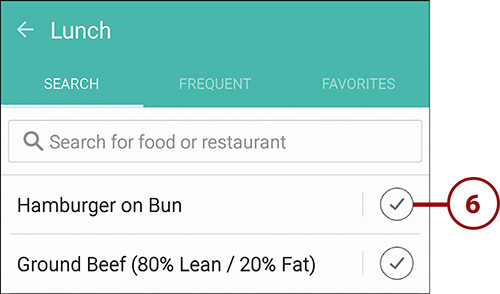
3. On the Search tab of the screen for the meal, such as the Lunch screen, tap the Search for Food or Restaurant box.
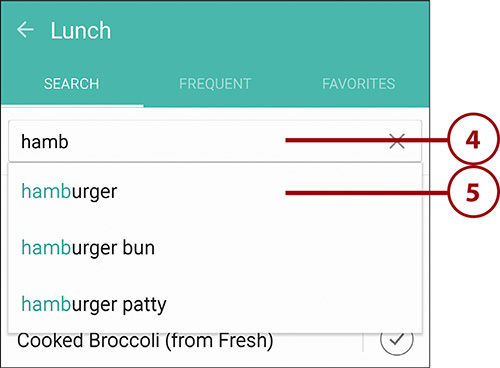
4. Type as much of the word is needed to produce suitable matches in the pop-up menu.
5. Tap the best match to display a list of options for that food item.
6. Tap the appropriate match on the list to display serving-size options and nutritional details about this food item.
7. Tap the star icon if you want to add this food item to your favorites.
8. Drag the slider to adjust the amount of the food item you have ingested.
9. If necessary, tap the pop-up menu to switch between weight and calories for the serving.
10. Look at the nutritional composition of the food item.
11. Look at the details of the food item. You need to scroll down to see the full list of horrors.
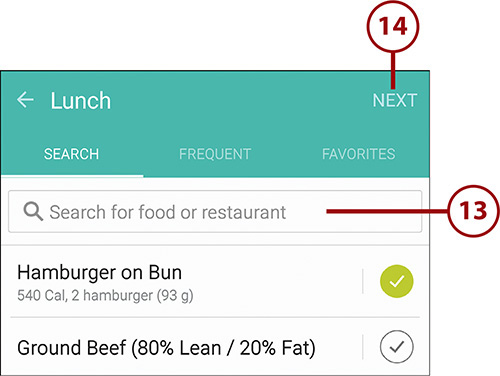
12. Tap the Done button to finish adding this food item to your meal or snack. The meal or snack screen then appears again, showing a green circle with a check mark to the right of the item.

13. Repeat steps 3 through 12 to add the remaining items you consumed for the meal or snack. (I’m sure you can guess what I’m adding next—that’s right, fries.)
14. Tap the Next button when you finish adding food items. The screen for the meal or snack appears.
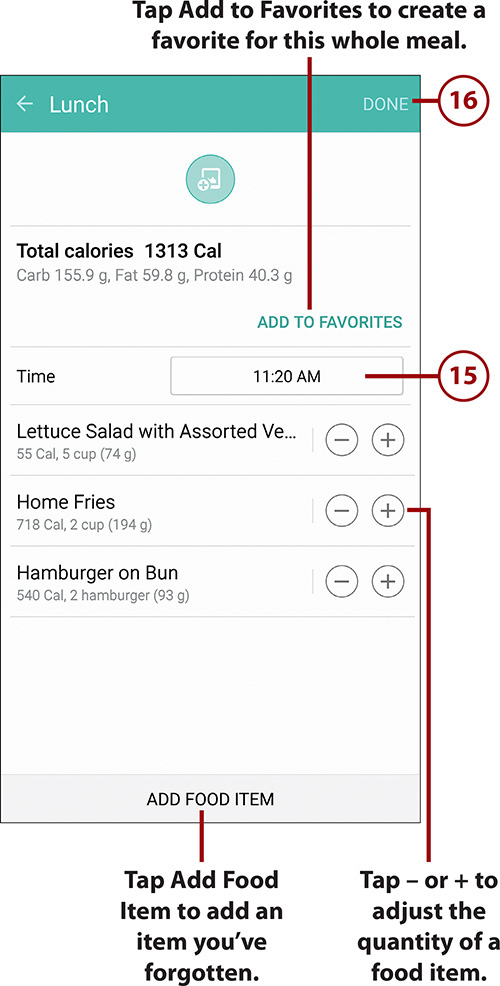
15. If necessary, tap the Time button and specify when the meal took place. S Health won’t let you set times in the future.
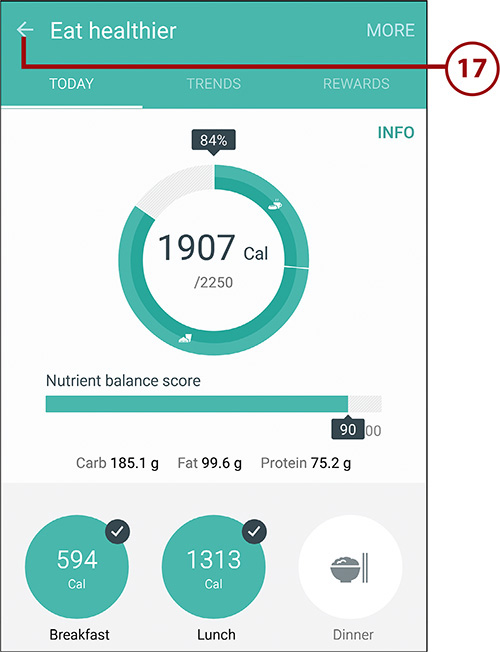
16. Tap the Done button to finish entering your meal. The Eat Healthier screen appears, now showing the meal or snack you added.
Take the “Perfectly Balanced Meal” Message with a Pinch of Salt
When you enter a meal, S Health evaluates it against certain nutritional criteria and assigns it a score out of 100. If the score is high enough, S Health might display the Perfectly Balanced Meal message.

If you get this message, take it with a pinch of (virtual) salt. The example meal that produced this message—two hamburgers, a double order of fries, and five cups of salad—is not one that most dieticians would recommend.
17. Tap the arrow button or the Back button below the screen to return to the Dashboard.
Record Your Sleep Hours
If you have enabled the Feel More Rested goal, you must either wear a sleep-tracking device that can communicate your sleep hours to S Health automatically or you must log those hours manually. This sections covers logging the hours manually.
1. In S Health, tap the Feel More Rested box to display the Feel More Rested screen.
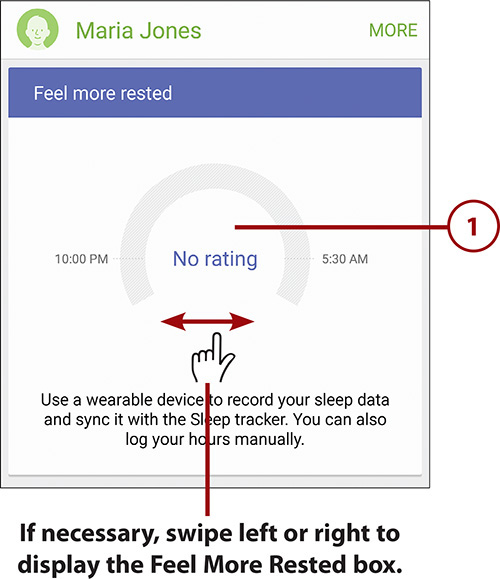
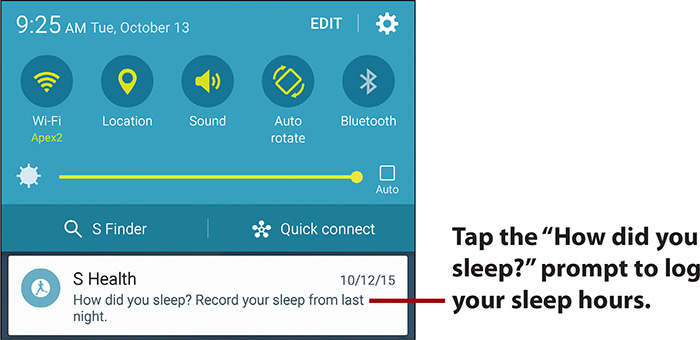
Start Recording Sleep Hours from a Notification or the Sleep Tracker
S Health might display a notification prompting you to record your sleep hours. If so, tap the notification in the Notifications panel to display the screen for logging your sleep hours.
You can also start recording your sleep hours by tapping the Sleep tracker on the Dashboard. By doing so, you can avoid the steps of visiting the Feel More Rested screen and returning from it.
2. In the Sleep Details area, tap the Tap Here to Record Sleep Manually prompt.
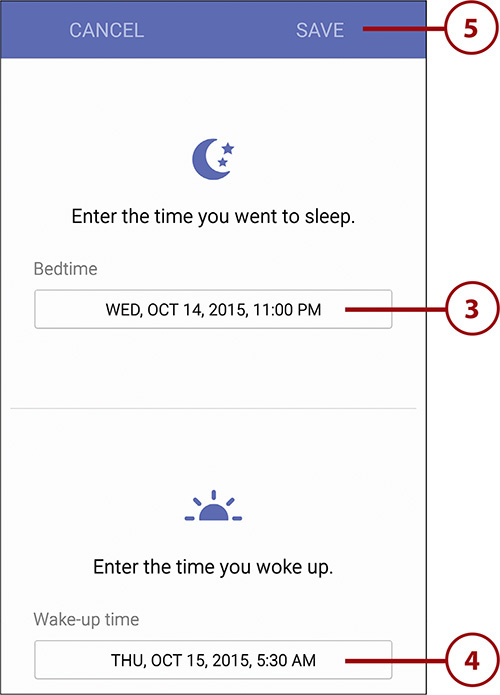
3. Tap the Bedtime button and use the resulting controls to specify the time you went to bed.
4. Tap the Wake-Up Time button and use the resulting controls to specify the time you awoke.
5. Tap the Save button. The Feel More Rested screen appears again, now showing your sleep performance.
6. Tap the arrow button or the Back button below the screen to return to the Dashboard.
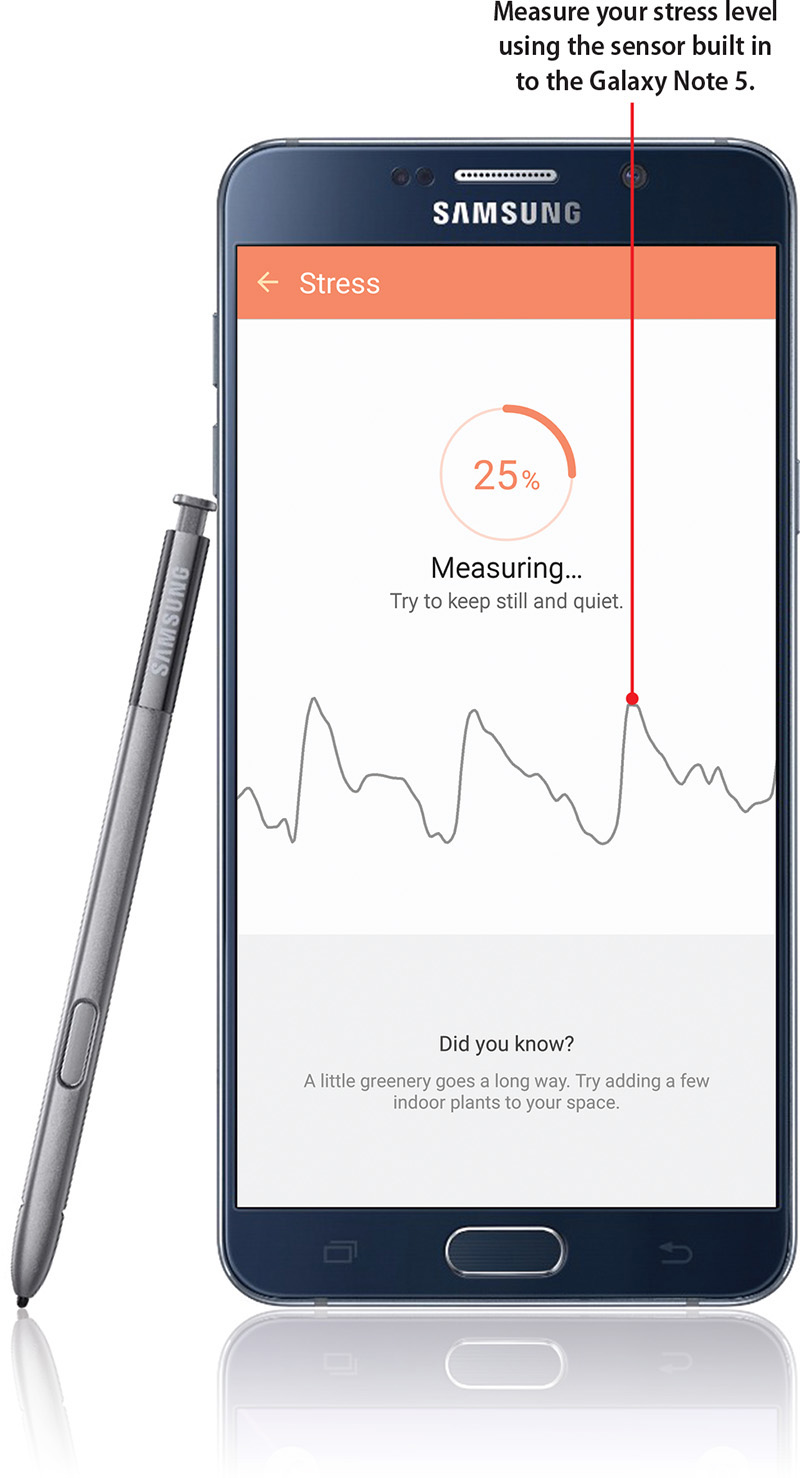
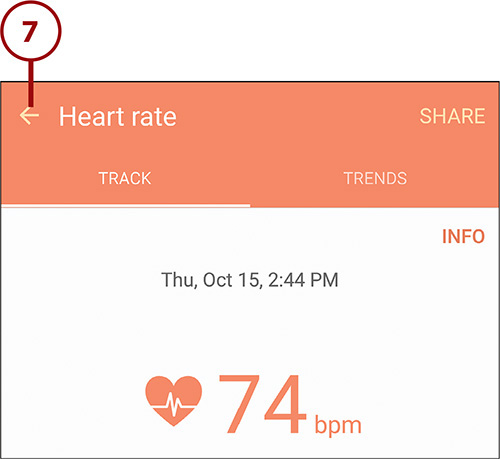
Monitor Your Vital Signs
The S Health trackers that use the monitoring devices built into the Galaxy Note 5 enable you to monitor vital signs such as your heart rate, your oxygen saturation, and your stress. This example shows you how to measure your heart rate, but you use the SpO2 tracker and the Stress tracker in the same way.
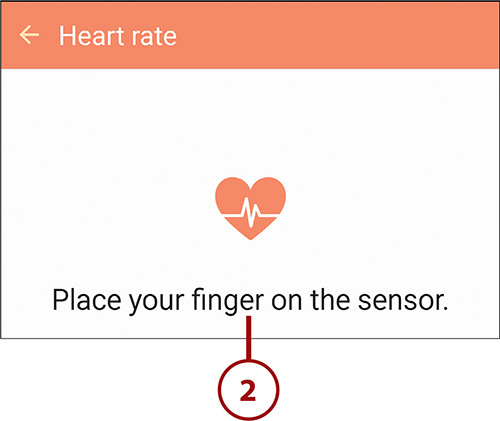
1. On the Dashboard, tap the Measure button on the Heart Rate tracker. The Heart Rate screen for measuring appears, prompting you to place your finger on the sensor.

2. Place the pad of your finger on the sensor. You need to cover the entire sensor, but you don’t need to press hard.
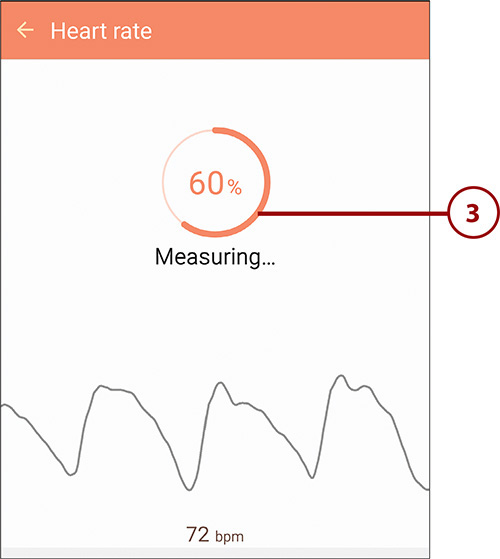
3. A progress indicator appears while the tracker measures your heart rate. A screen showing your heart rate then appears.
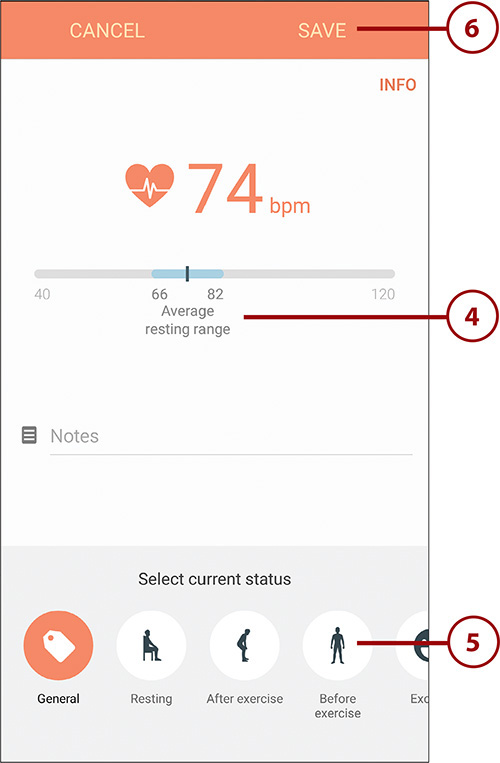
4. Tap the Notes field and type any notes needed.
5. In the Select Current Status area, tap the icon that corresponds to your current condition: General, Resting, After Exercise, Before Exercise, Excited, Tired, In Love, Surprised, Sad, Angry, Fearful, or Unwell.
6. Tap the Save button to save the data. The Heart Rate screen appears, showing your data.
7. Tap the arrow button or the Back button below the screen to return to the Dashboard.
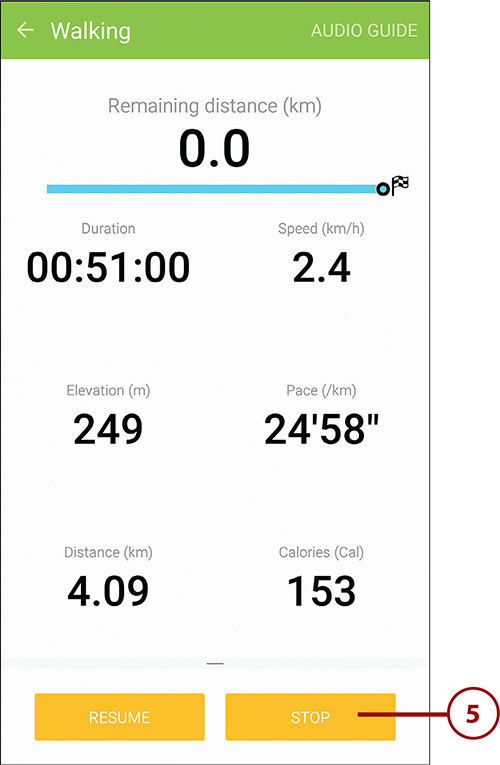
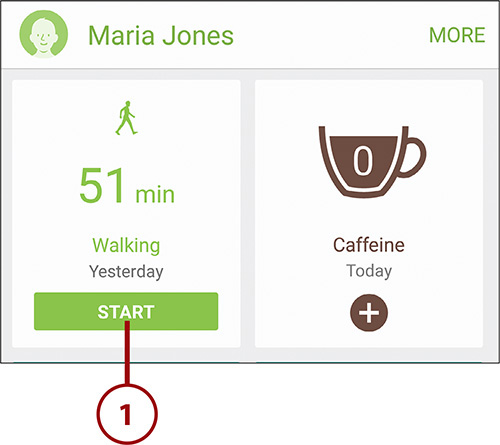
Track a Workout
S Health enables you to track your workouts for analysis or posterity. This section shows an example of a walking workout.
1. On the Dashboard, tap the Start button for the appropriate tracker. This example uses the Walking tracker.
2. On the Track screen for the tracker, tap the pop-up menu to choose a target. For example, for walking, you can choose among Distance Target, Duration Target, Burned Calorie Target, and Basic Workout. This example uses Distance Target.
3. Tap the + button and – button to set the target, such as the distance.
4. Tap the Start button to start the workout. S Health displays details of your progress and encourages you with announcements.
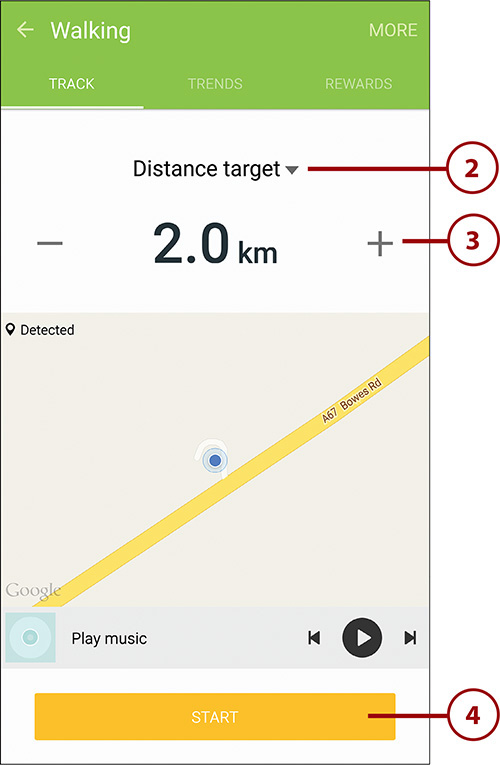
5. When you finish the workout, tap Stop. S Health displays the Results screen, which shows statistics and achievements.