2. Customizing Your Galaxy Note 5
In this chapter, you find out how to customize your Galaxy Note 5 to suit your needs and lifestyle. Topics include the following:
![]() Using wallpapers and live wallpapers
Using wallpapers and live wallpapers
![]() Replacing the keyboard
Replacing the keyboard
![]() Adjusting sound and display settings
Adjusting sound and display settings
![]() Setting the region and language
Setting the region and language
![]() Using the fingerprint scanner
Using the fingerprint scanner
Your Galaxy Note 5 arrives preconfigured to appeal to most buyers; however, you might want to change the way some of the features work, or even personalize it to fit your mood or lifestyle. Luckily, your Galaxy Note 5 is customizable.
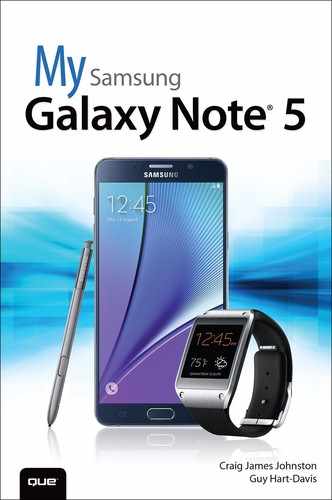
Changing Your Wallpaper
Your Galaxy Note 5 comes preloaded with a cool wallpaper. You can install other wallpapers, use live wallpapers that animate, and even use pictures in the Gallery application as your wallpaper.
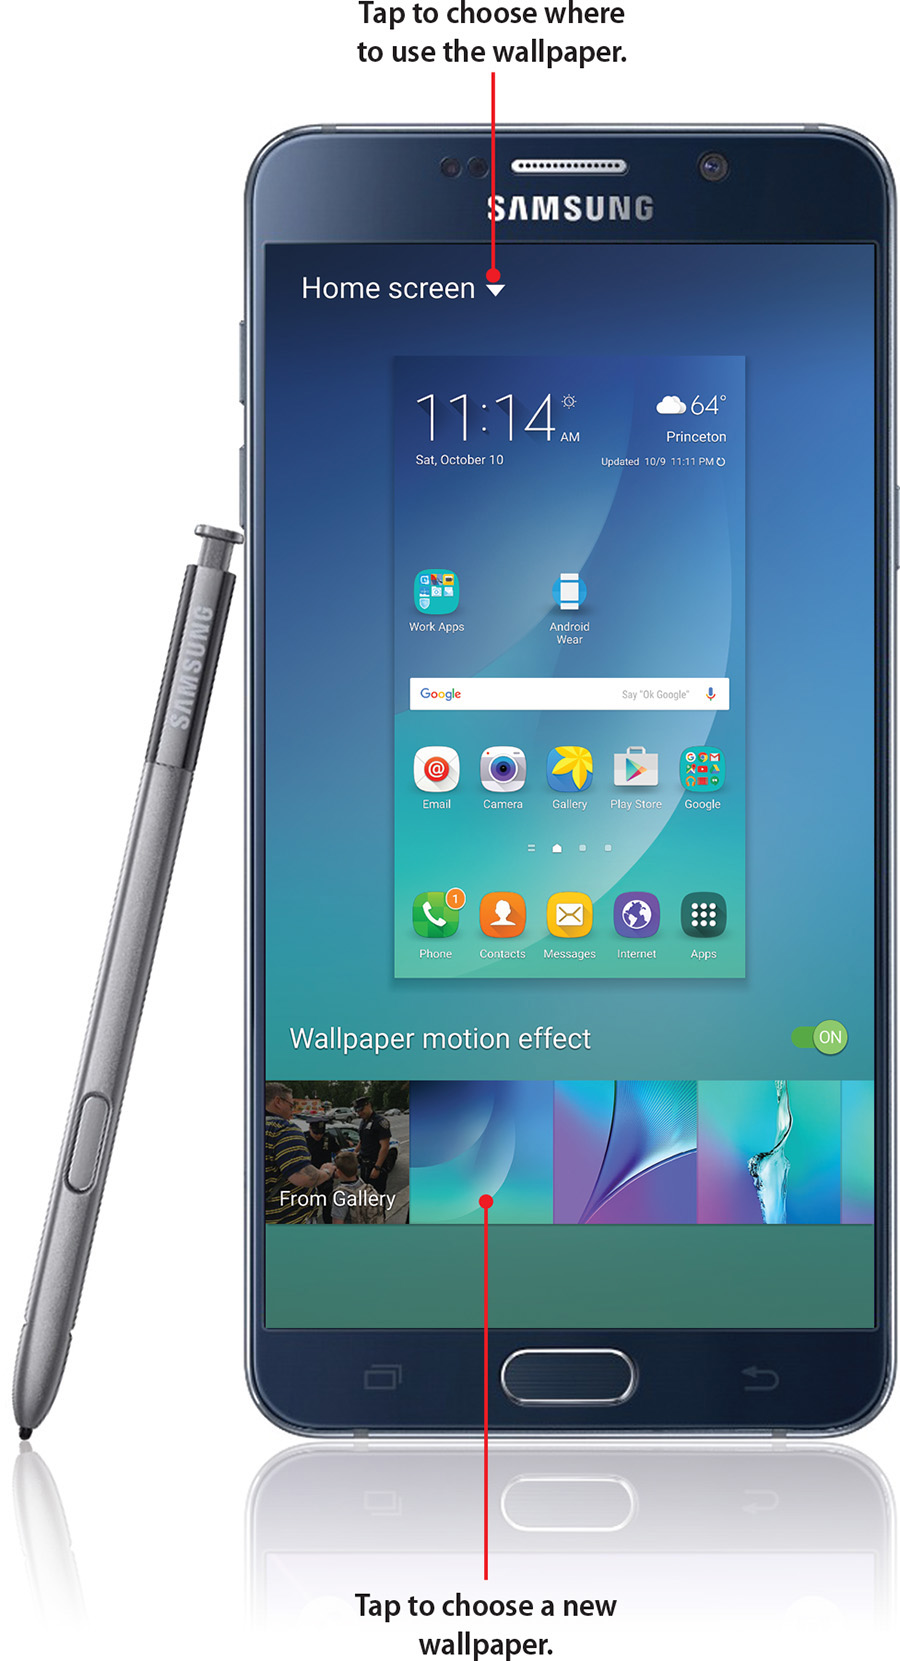
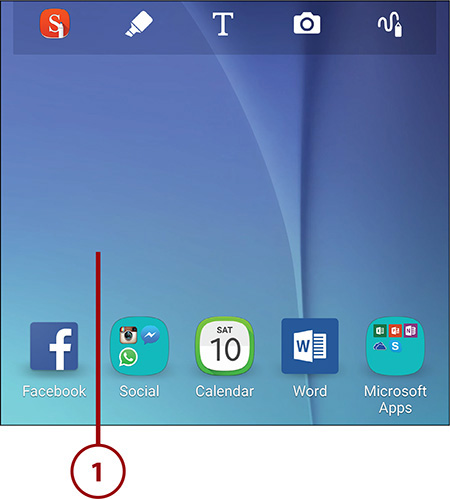
1. Touch and hold in an open area on the Home screen.
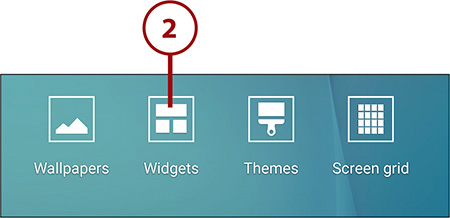
2. Tap Wallpapers.
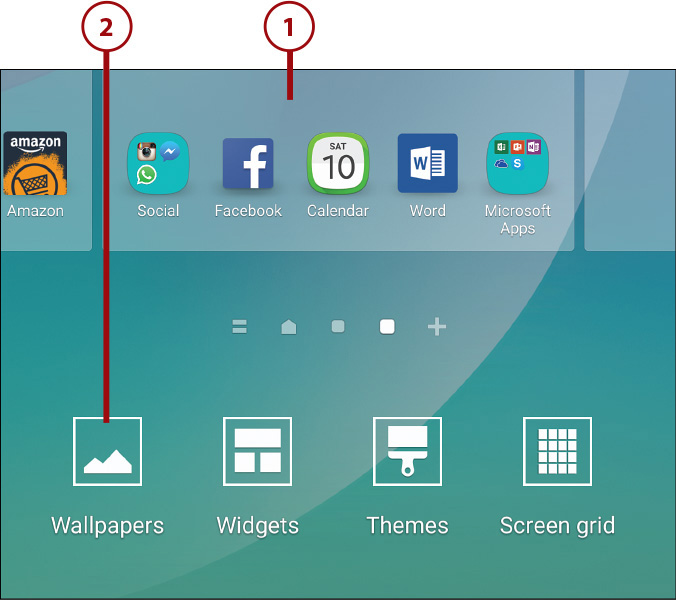
3. Tap to select where you want to change the wallpaper. You can choose a new wallpaper for the Home screen only or the Lock screen only, or you can use the same new wallpaper for both the Home and Lock screens.
4. Use the steps in one of the following three sections to choose the type of wallpaper to use as well as to select your new wallpaper.
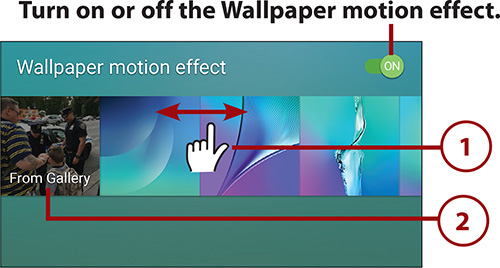
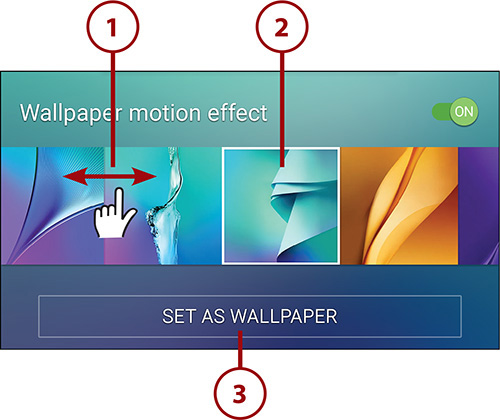
What Is Wallpaper Motion Effect?
Wallpaper Motion Effect is an effect that creates the illusion that your icons and widgets are floating above the wallpaper. When the effect is turned on, as you move your Note 5 in your hand, the wallpaper appears to move, creating the perspective illusion. Some people are sensitive to this effect and might feel dizzy or disoriented. If you don’t care for this effect, you can turn it off. This effect also uses processing power, which translates into a draw on battery charge, so turning off the effect might extend your battery life a little bit.
1. Swipe from left to right over the wallpaper thumbnails until you see one labeled From Gallery.
2. Tap From Gallery.
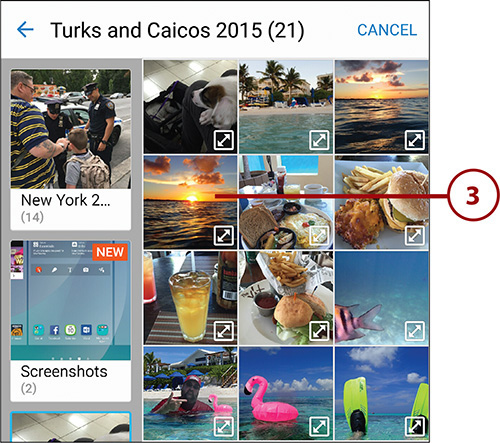
3. Navigate your photo albums and tap a photo you want to use for your wallpaper.
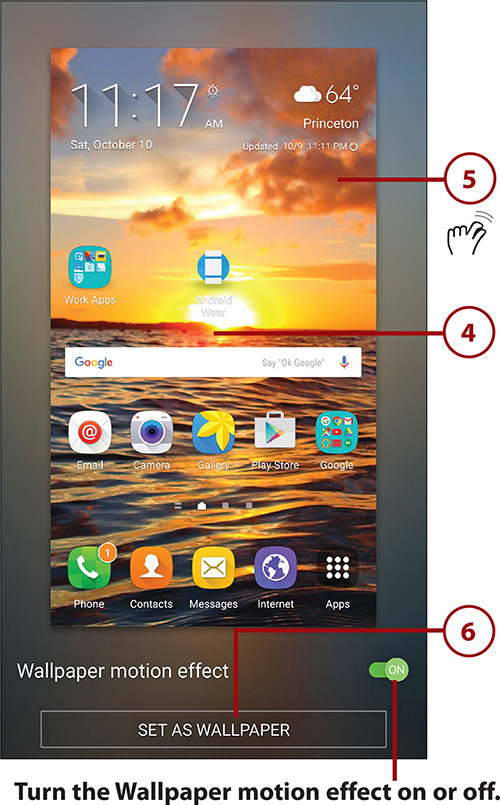
4. Drag the picture around with your finger to adjust what part of the picture you want to use as your wallpaper.
5. Zoom in and out of the picture using the pinch gesture. Sometimes if the photo you choose is very large, you are not able to zoom in or out.
6. Tap Set as Wallpaper when you have finished adjusting the picture.
Set Up Live Wallpaper
Live wallpaper is wallpaper with some intelligence behind it. It can be a cool animation or even an animation that keys off things such as the music you are playing on your Galaxy Note 5, or it can be something simple such as the time. There are some very cool live wallpapers in Google Play that you can install and use.
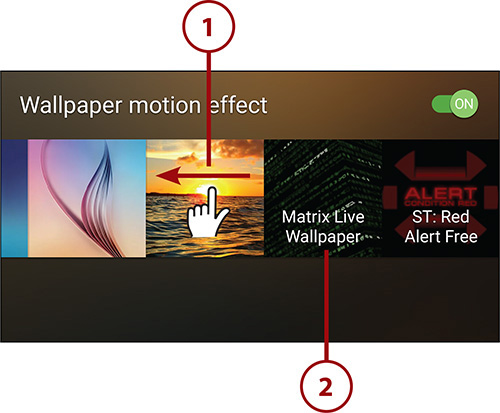
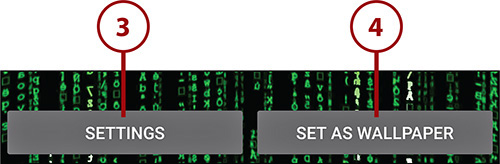
1. Swipe from left to right over the wallpaper thumbnails until you see the thumbnails with titles. Live wallpapers are kept on the right side of the wallpaper thumbnails.
2. Tap the live wallpaper you want to use.
3. Tap Settings to change the way the live wallpaper works. (Not all live wallpapers have settings that you can adjust.)
4. Tap Set as Wallpaper to use the live wallpaper.
Finding More Wallpaper
You can find wallpaper or live wallpaper in the Google Play Store. Open the Google Play Store app and search for “wallpaper” or “live wallpaper.” Read more on how to use the Google Play Store in Chapter 11, “Working with Android Apps.”
1. Swipe left and right over the wallpaper thumbnails to see static wallpaper options. Static wallpapers are in between the From Gallery option and the live wallpapers.
2. Tap a wallpaper to preview it.
3. Tap Set as Wallpaper to use the wallpaper.
Changing Your Keyboard
If you find it hard to type on the standard Galaxy Note 5 keyboard, or you just want to make it look better, you can install replacement keyboards. You can download free or purchase replacement keyboards from the Google Play Store. Most, if not all, keyboards come with their own installation wizard that walks you through adding and activating a keyboard, but if the one you installed does not have a wizard, or when you want to manually switch keyboards in the future, you need to use these steps.
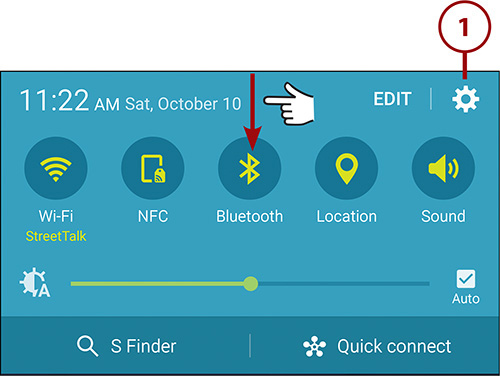
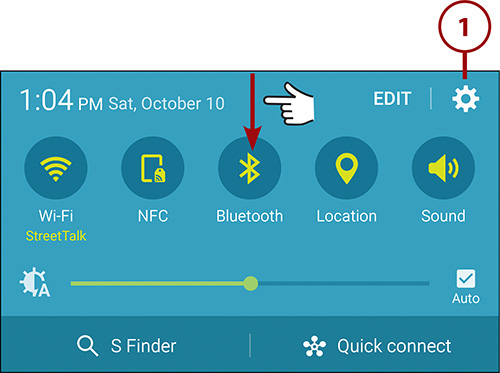
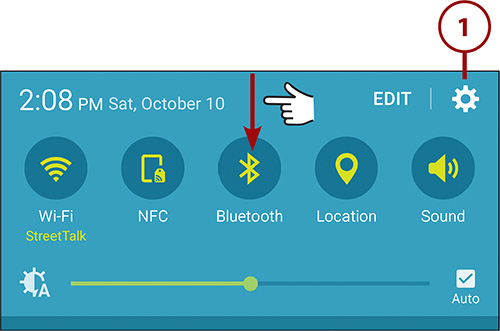
1. Pull down the notification bar and tap the Settings icon.
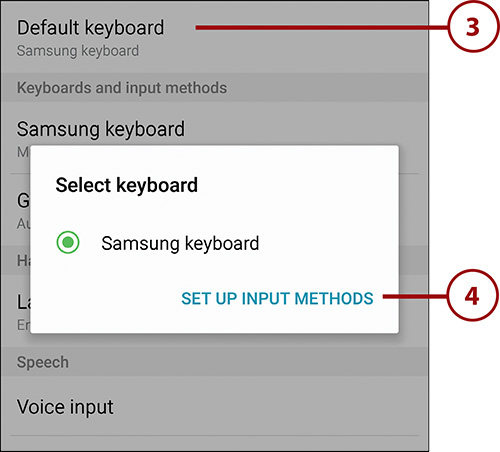
3. Tap Default keyboard.
4. Tap Set Up Input Methods.
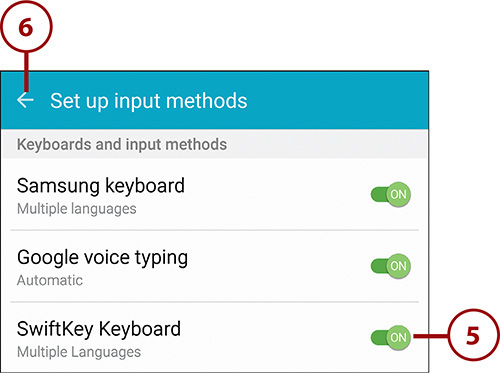
5. Tap the on/off switch next to a keyboard you have previously installed from the Google Play Store (this example uses SwiftKey Keyboard) to make that keyboard available for use.
6. Tap the back arrow to return to the previous screen.
Doing Your Research
When you enable a new keyboard in step 5, the Galaxy Note 5 gives you a warning telling you that nonstandard keyboards have the potential for capturing everything you type. Do your research on any keyboards before you download and install them.
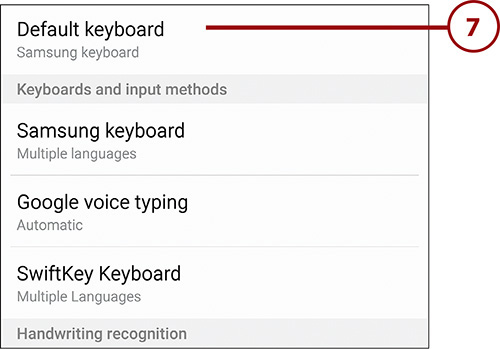
7. Tap Default Keyboard to change the default keyboard to the one you have just enabled.
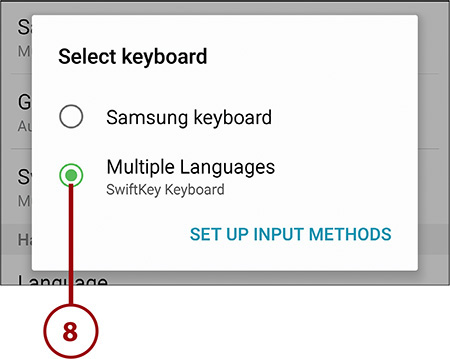
8. Tap the name of your new keyboard to select it to be the default.
What Can You Do with Your New Keyboard?
Keyboards you buy in the Google Play Store can do many things. They can change the key layout, change the color and style of the keys, offer different methods of text input, and even enable you to use an old T9 predictive input keyboard that you might have become used to when using an old “dumb phone” that had only a numeric keypad.
9. Tap the new keyboard name to make changes, including customizing it. Sometimes the keyboard’s customization wizard launches when you tap the keyboard name.
10. Tap the back arrow to save your changes.

Adding Widgets to Your Home Screens
Some applications that you install come with widgets that you can place on your Home screen panes. These widgets normally display real-time information, such as stocks, weather, time, and Facebook feeds. Your Galaxy Note 5 also comes preinstalled with some widgets. The following tasks explain how to add and manage widgets.
Add a Widget
Your Galaxy Note 5 should come preinstalled with some widgets, but you might also have some extra ones that have been added when you installed applications. Here is how to add those widgets to your Home screen panes.
1. Touch and hold an open area on the Home screen.
2. Tap Widgets.
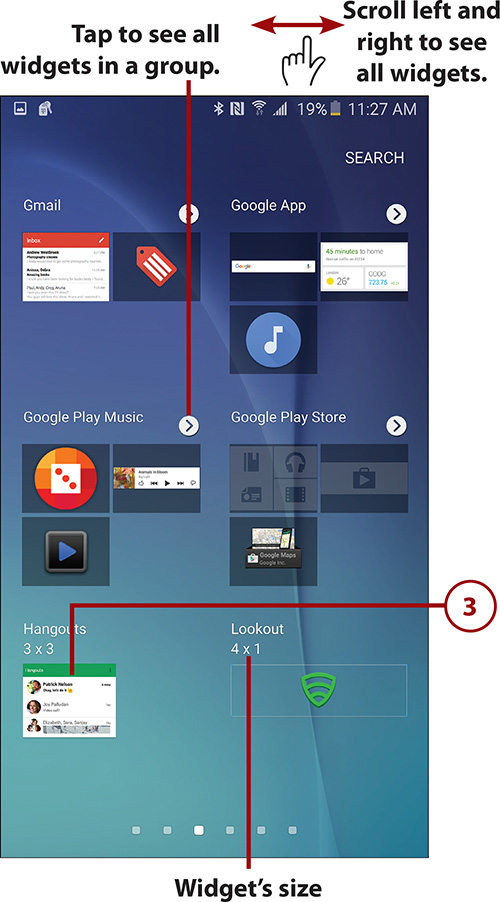
3. Touch and hold a widget to move it to a Home screen pane. Keep holding the widget as you move to step 4. This example uses the Hangouts widget.
4. Position the widget where you want it on the Home screen pane.
5. Drag the widget to different Home screen panes if you want to place it on a different pane, or drag it to the right-most pane to create a new Home screen pane and place the widget on the new pane.
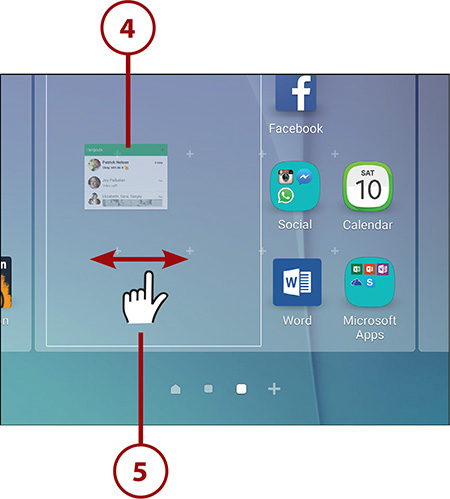
6. Release your finger to place the widget. Some widgets might help with the setup by prompting you with a few questions after they are positioned.
How Many Widgets Can I Fit?
Each part of the Home screen is divided into a grid of five blocks across and five blocks down. In the figure for step 3, notice that some widgets show their size in blocks across and down (such as 4×3). From that, you can judge if a widget is going to fit on the screen you want it to be on, but it also helps you position it in step 4. You can change the grid size of your Home screen panes: Touch and hold on the Home screen and tap Screen Grid. You can change your screen grid to 4×4, 4×5, or 5×5. Bear in mind that the fewer grid positions there are available, the less you can fit onto each Home screen pane.
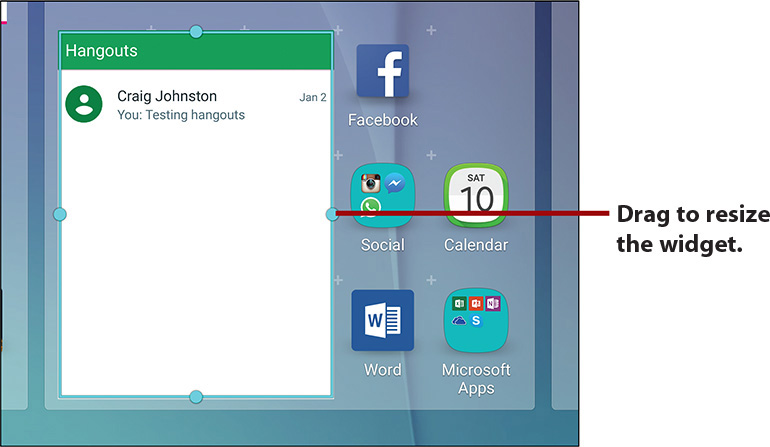
Resizing Widgets
Some (not all) widgets can be resized. To resize a widget, touch and hold the widget until you see an outline and then release it. If the widget can be resized, you see the resizing borders. Drag them to resize the widget. Tap anywhere on the screen to stop resizing.
1. Touch and hold the widget until the widget zooms out, but continue to hold it.
2. Drag the widget to the word Remove to remove it.
3. Drag the widget around the screen or drag it off the edge of the Home screen panes to reposition it on another screen.
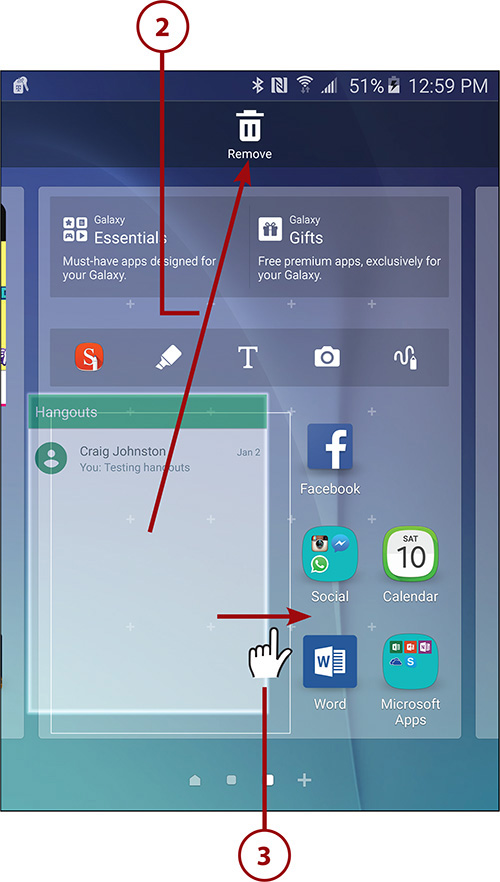
4. Release the widget.
Setting the Language
If you want to change the language used by your Galaxy Note 5, you can do so with a few taps.
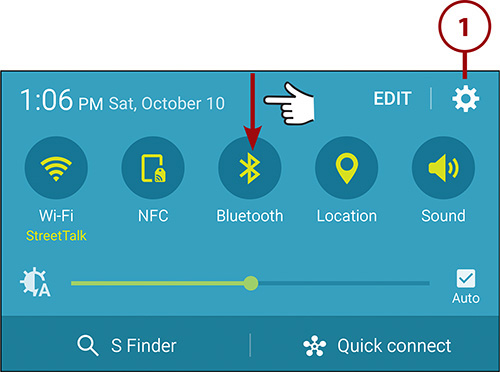
1. Pull down the Notification bar and tap the Settings icon.
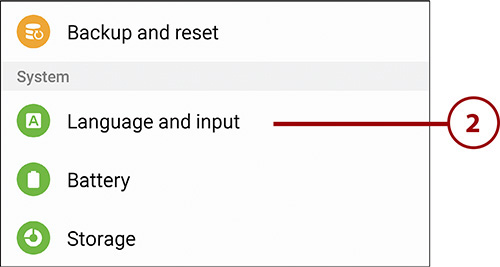
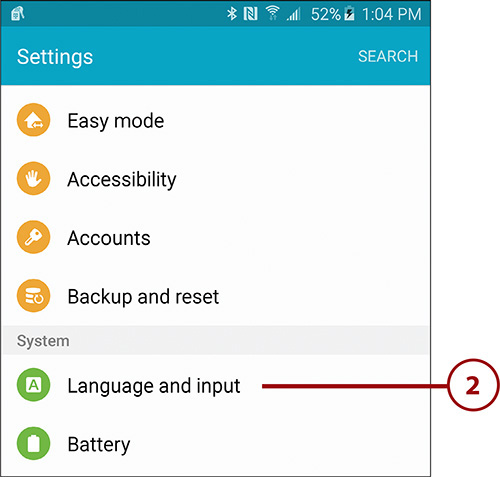
2. Tap Language and Input under the System section.
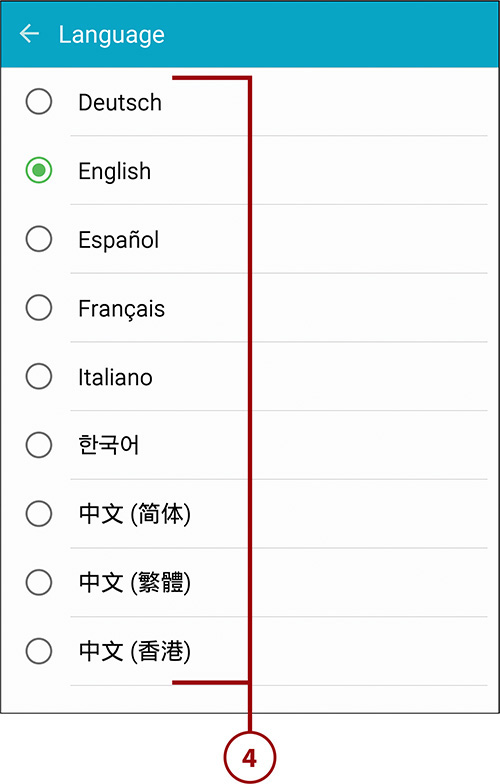
3. Tap Language.
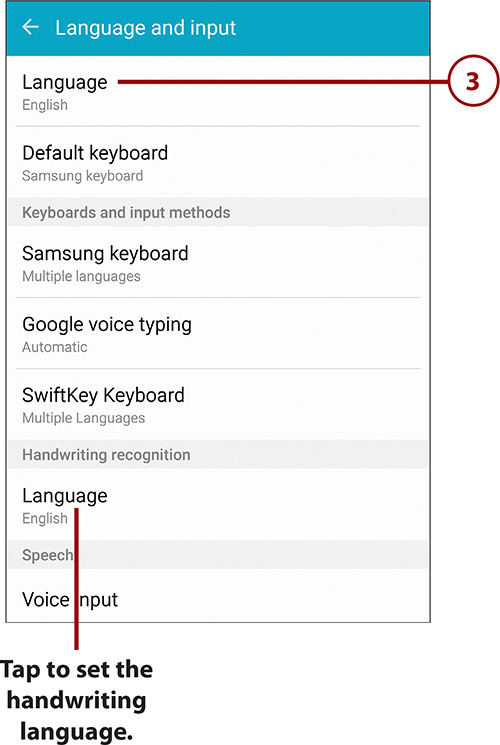
4. Tap the language you want to switch to. The language is changed, and you are returned to the previous screen automatically.
What Obeys the Language Setting?
When you switch your Galaxy Note 5 to use a different language, you immediately notice that all standard applications and the Galaxy Note 5 menus switch to the new language. Even some third-party applications honor the language switch. However, many third-party applications ignore the language setting on the Galaxy Note 5. Therefore, you might open a third-party application and find that all its menus are still in English.
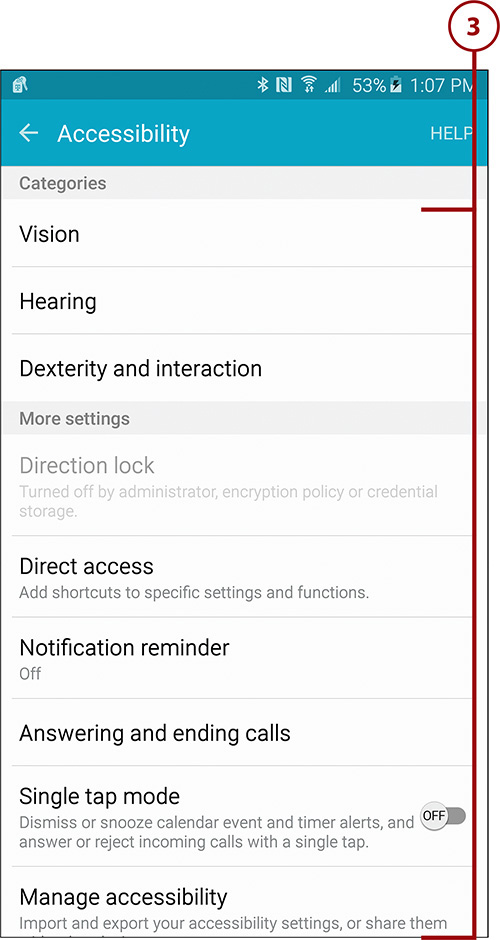
Changing Accessibility Settings
Your Galaxy Note 5 includes built-in settings to assist people who might otherwise have difficulty using some features of the device. The Galaxy Note 5 has the ability to provide alternative feedback, such as vibration and sound. It can even read menu items aloud to you.
1. Pull down the Notification bar and tap the Settings icon.
2. Tap Accessibility under the Personalization section.
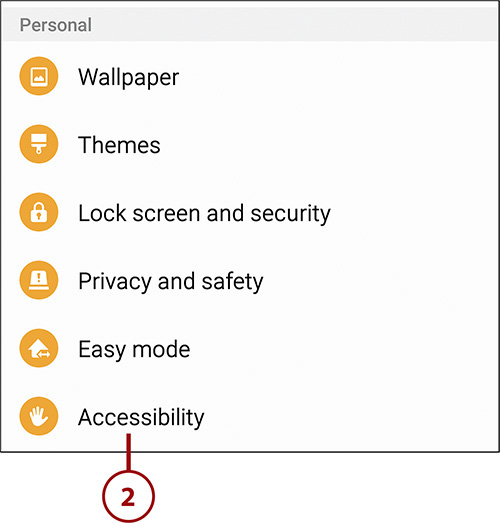
3. Tap one of the categories on the Accessibility screen and use the following sections to change the settings in the different categories.
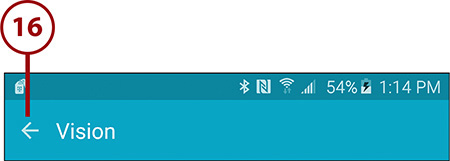
Vision
1. Tap to enable or disable Voice Assistant. When enabled, Voice Assistant speaks everything, including menus, but it also has other features, such as one that requires that you double-tap something to select it instead of single tapping.
2. Tap to see a tutorial on how Voice Assistant works.
3. Tap to enable the Dark Screen feature. After this feature is enabled, you double-press the Power key to enable and disable it. When you have it enabled, your screen remains off for privacy.
4. Tap to enable the Rapid Key Input feature. When enabled, it overrides the Voice Assistant requirement of having to double-tap each key while typing.
5. Tap to enable Speak Passwords. When this feature is enabled, Voice Assistant speaks each character of your password as you type it.
6. Tap to record voice labels and write them to NFC tags.
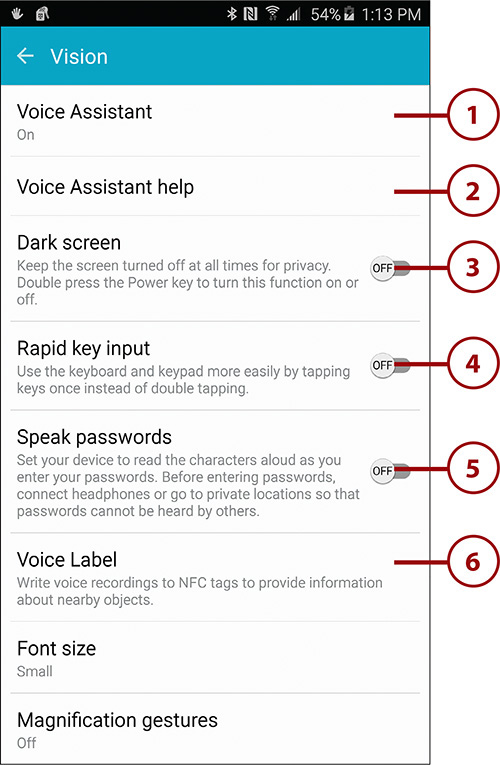
What Is a Voice Label?
Imagine if you could hold your Note 5 near an Near Field Communications (NFC) tag that was close to an object in the room, and a recording played back to tell you about the object? Voice Labels allow you to do just that. When you tap Voice Label in step 6, you can record your voice saying the name of the object, or something relevant about the object (say a refridgerator). After you have recorded what you want to say, you are prompted to hold a new NFC tag against the back of your Note 5 and your recording is writen to the NFC tag. You can then stick the NFC tag near the object. When your Note 5 comes close to the NFC tag in the future, what you recorded will be automatically played back.
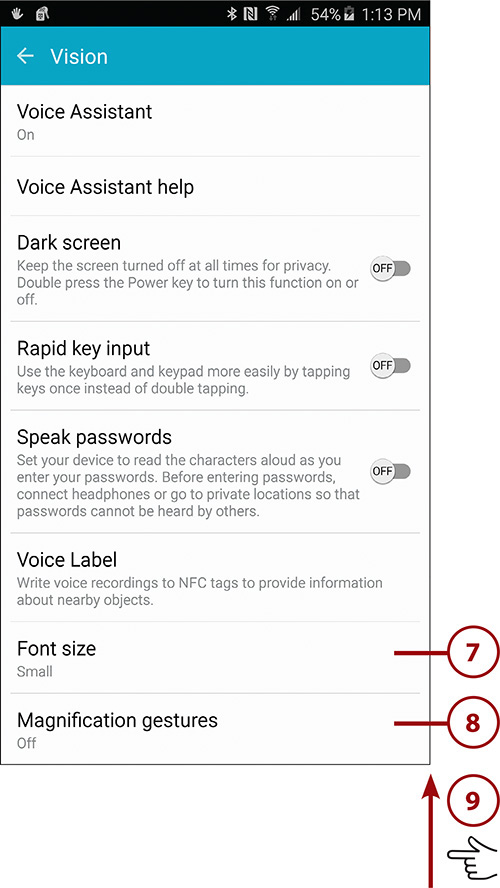
7. Tap to set the font size used on your Galaxy Note 5. You can choose sizes ranging from tiny to huge.
8. Tap to enable or disable magnification gestures, which include the ability to magnify any screen by triple-tapping it. When a screen is magnified, you can pan around it.
9. Swipe up for more settings.
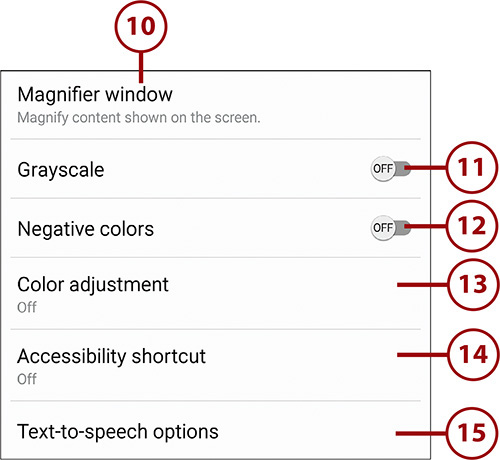
10. Tap to open a new screen that enables or disables a Magnifier Window that can magnify whatever is under it. You can change the size of the Magnifier Window and how much magnification is applied.
11. Tap to enable or disable the Grayscale feature, which makes everything on the screen grayscale instead of full color.
12. Tap to enable or disable the Negative Colors feature, which makes all colors displayed on your Galaxy Note 5 reversed. (For example, black text on a white background instead appears as white text on a black background.)
13. Tap to enable the Color Adjustment Wizard, which helps you adjust the screen colors if you have difficulty seeing it.
14. Tap to enable or disable the Accessibility Shortcut feature. When it’s enabled, you can access accessibility features by performing certain gestures.
15. Tap to change the settings for the Text-to-Speech service provided by Samsung or to switch to the Google Text-to-Speech service.
16. Tap to save your changes and return to the previous screen.
By default, your Galaxy Note 5 uses the Samsung Text-to-Speech service with an option to use the Samsung service to speak any text you need to read. You can install other text-to-speech software by searching for them in the Google Play Store. After you’ve installed the software, you’ll have multiple choices.
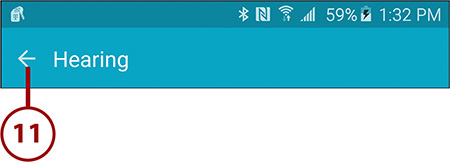
Hearing
1. Tap to enable or disable an option that makes your Note 5 vibrate when it detects a baby crying or a doorbell ringing.
2. Tap to enable or disable making your Note 5 light up the camera flash when you have a new notification.
3. Tap to turn off all sounds.
4. Tap to enable or disable improving the sound quality if you use a hearing aid.
5. Tap to enable video subtitles provided by Samsung, and adjust how the subtitles appear on the screen.
6. Tap to enable or disable video subtitles provided by Google, and adjust how the subtitles appear on the screen.
7. Tap to adjust the balance of audio played when wearing earphones.
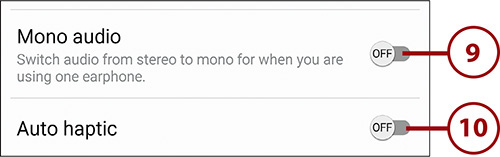
8. Swipe up for more settings.

9. Tap to use mono audio when wearing one earphone.
10. Tap to enable or disable a feature that causes your Note 5 to vibrate in time to music being played, a video being watched, or a game being played.
11. Tap to save your changes and return to the previous screen.
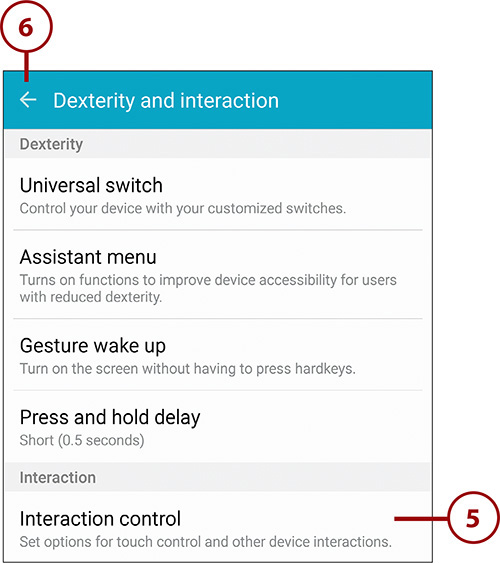
Dexterity and Interaction
1. Tap to manage using universal switches to control your Note 5. Switches can include tapping on the screen, detecting movement of your head, eyes, or mouth, and can even include buttons being pressed on an externally connected accessory.
2. Tap to enable or disable the Assistant menu. Once it is enabled, you can set your dominant hand, reorder the menu items, and adjust the level of zoom. The Assistant menu appears as a small gray box on your screen at all times. When you tap it, it provides quick access to common device functions.
3. Tap to enable or disable the Gesture Wake Up feature. When this feature is enabled, you can wave your hand over the front of the device to wake it up as it rests on a flat surface.
4. Tap to adjust the Press and Hold Delay (also known as touch and hold) feature.
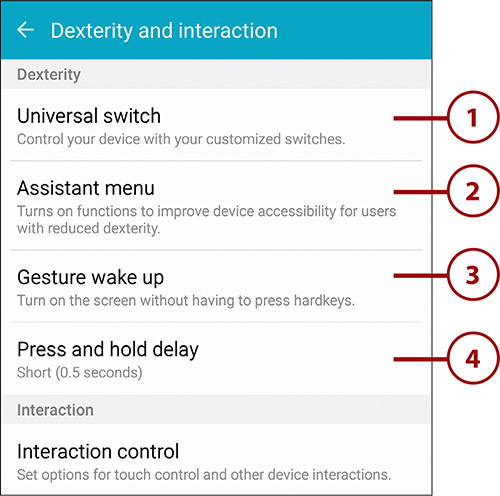
5. Tap to enable or disable Interaction control, which includes blocking areas of the screen so they do not respond to taps.
6. Tap to save your changes and return to the previous screen.
What Is Direction Lock?
Direction Lock is a method of unlocking your Note 5 by drawing a pattern of directions on the screen. When you enable Direction Lock, you are asked to draw a series of directions on the screen (consisting of up, down, left, and right) that can be used as an unlock pattern. If you have enrolled in your company’s Mobile Device Management (MDM) system, your administrator might have disabled Direction Lock, which prevents you from using this feature to unlock your Note 5.
Direct Access
1. Tap to enable or disable direct access to certain accessibility settings. When this feature is enabled, press the Home button three times in quick succession to see the direct access menu.
2. Choose which accessibility settings you want direct access to.
3. Tap to save your changes and return to the previous screen.

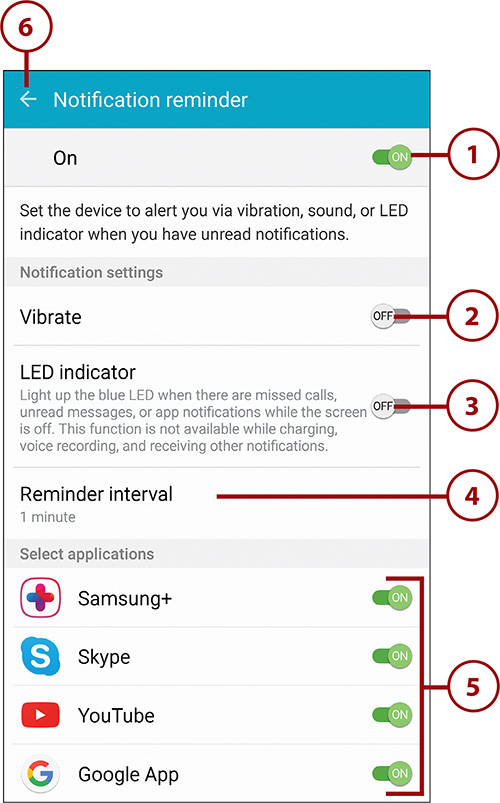
2. Tap to choose whether to vibrate when one of your chosen apps sends a notification.
3. Tap to choose whether to turn on the indicator light when one of your chosen apps sends a notification.
4. Tap to choose how frequently the reminder occurs if you have not responded to the notification.
5. Choose which apps you want to receive this extra notification for.
6. Tap to save your changes and return to the previous screen.
Answering/Ending Calls
1. Tap to enable or disable answering a call by pressing the Home button.
2. Tap to enable or disable using voice commands to answer or reject calls. When enabled, just say “Answer” or “Reject.”
3. Tap to enable or disable ending a call by pressing the Power button.
4. Tap to save your changes and return to the previous screen.

Manage Accessibility
1. Tap to import accessibility settings that someone has shared with you or to export your settings.
2. Tap to share your accessibility settings with friends. You must first export your settings as mentioned in step 1.
3. Tap to return to the previous screen.

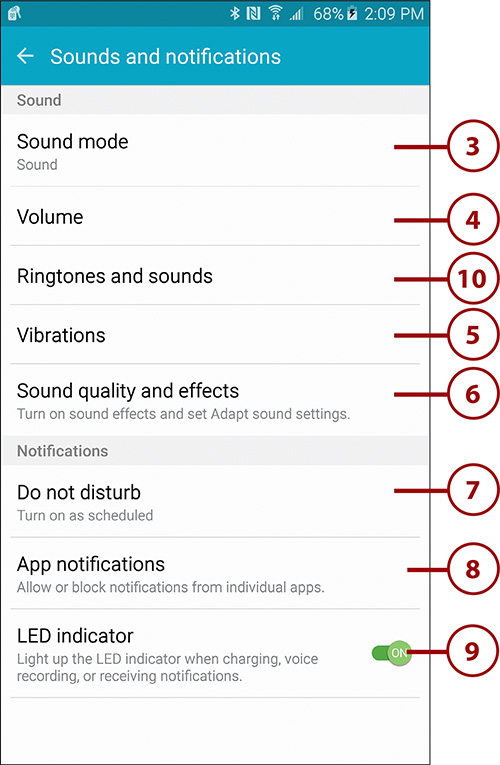
Adjusting Sound and Notifications Settings
You can change the volume for games, ringtones, and alarms, change the default ringtone and notification sound, plus control what system sounds are used.
1. Pull down the Notification bar and tap the Settings icon.
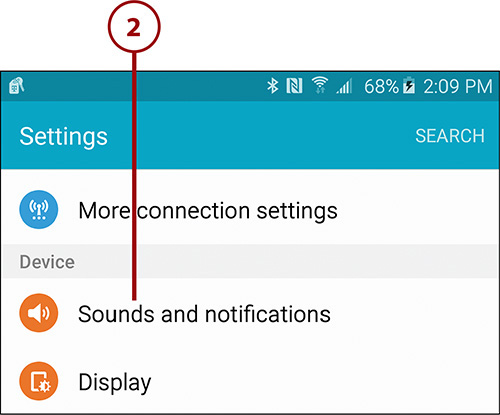
2. Tap Sound and Notifications in the Device section.
3. Tap to change the sound mode between Sound (play all sounds), Vibrate (vibrate instead of playing sounds), or Mute (silence all sounds and vibrations).
4. Tap to change the volume for ringtones, music, video games and other media, notifications, and system alerts.
5. Tap to choose the intensity of vibrations for incoming calls, notifications, and haptic feedback. This screen also enables you to create custom vibration patterns. See the “Vibrations” section later in this chapter for more information.
6. Tap to choose whether you want to go through a wizard so that your Note 5 can adapt its audio output to your ears, and choose whether you want to enhance the audio using UHQ Upscaler, SoundAlive+, or TubeAmp Pro. See the “Sound Quality and Effects” section later in this chapter for more information.
7. Tap to choose whether you want to enable Do Not Disturb, and set any exceptions. See the “Do Not Disturb” section later in this chapter for more information.
8. Tap to choose which apps you want to see notifications for, choose whether you want notifications to be displayed on the Lock screen, and also which ones you want to see as priority notifications.
9. Tap to enable or disable having the LED indicator light when charging or recording a voice memo, or when you receive a new notification.
10. Tap to change the ringtone and sounds of Messages, Calendar, and Email, plus System sounds. See the next section for more on ringtones and sounds.
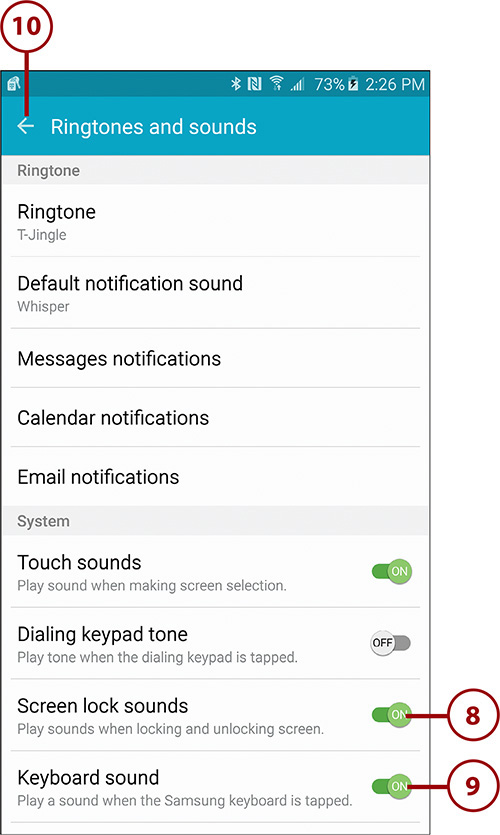
Ringtones and Sounds
1. Tap to choose which ringtone plays when you receive an incoming phone call. While choosing the ringtone, you can add any audio file on your Note 5 as your ringtone.
2. Tap to choose the default notification sound that plays when a new notification is displayed.
3. Tap to choose whether you want to be notifiied when you receive a new SMS or MMS message, what ringtone plays when the notification is shown, and whether your Note 5 must also vibrate.
4. Tap to choose whether you want to be notified when you receive a new calendar notification (like an event reminder), what ringotne plays when the notification is shown, and whether your Note 5 must also vibrate.
5. Tap to choose whether you want to be notifiied when you receive a new email, what ringotne plays when the notification is shown, and whether your Note 5 must also vibrate. This alert does not change the Gmail notification setting.
6. Tap to enable or disable playing a sound when you interact with the touch screen, like tapping a menu item.
7. Tap to enable or disable touch tones that play while you type a phone number on the dialpad.

8. Tap to enable or disable playing a sound when you lock or unlock your Note 5.
9. Tap to enable or disable playing a sound for each key that you tap on the on-screen keyboard.
10. Tap to save your changes and return to the previous screen.
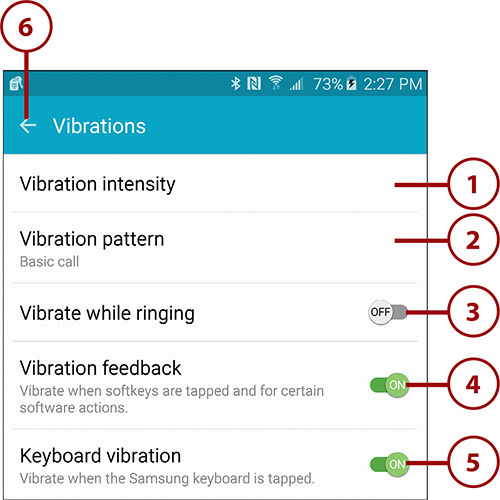
Vibrations
1. Tap to choose the vibration intensity for incoming calls, notifications, and vibration feedback.
2. Tap to choose a default vibration pattern for notifications. You can also create your own custom vibration pattern that can later be assigned to contacts.
3. Tap to choose whether you want your Note 5 to also vibrate when receiving an incoming call.
4. Tap to choose whether you want vibration feedback when you tap the Recent apps and Back buttons.
5. Tap to choose whether you want to feel a vibration as you type on the on-screen keyboard.
6. Tap to save your changes and return to the previous screen.
Creating Your Own Vibration Patterns
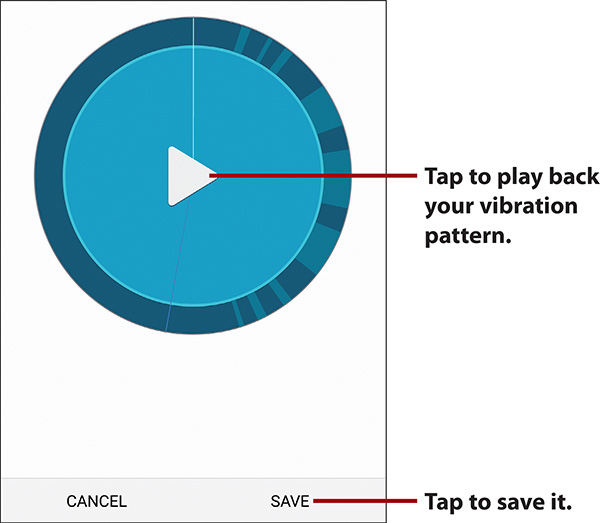
In step 2, you can choose the vibration pattern to be used when you are notified, but you can also create your own. Tap Create. On the next screen, tap in the area where it reads Tap to Create, and then tap out your vibration pattern on the screen using short taps for short vibrations and long taps for longer vibrations. The example in the figure uses Morse Code for SOS. You can create any vibration pattern you want. You can create more than one custom vibration pattern and can then use those custom patterns to distinguish between incoming calls from certain people in your Contacts. To do that, open the Contacts app, tap a contact, tap Edit, tap Add Another Field, and choose Vibration Pattern. You can then change the Vibration Pattern from Default to one of your custom patterns.
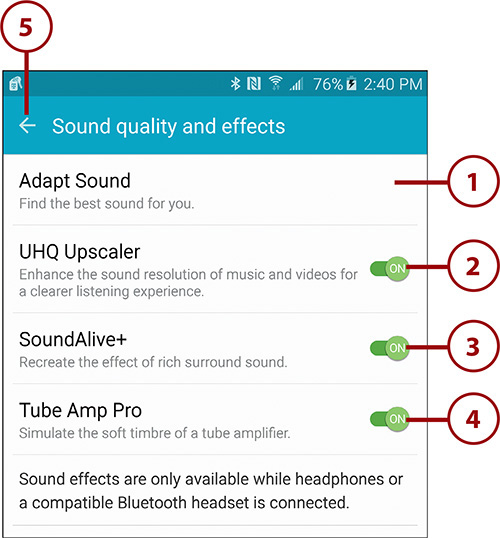
Sound Quality and Effects
1. Tap to run through an audio test to determine your exact audotory range, and have your Note 5 customize the sound to best suit your hearing abilities.
2. Tap to enable or disable the UHQ Upscaler feature that enhances the sound resolution of audio to make the sound clearer.
3. Tap to enable or disable the SoundAlive+ feature that simulates surround sound. You can only enable this feature if you have a wired or Bluetooth headset connected.
4. Tap to enable or disable the Tube Amp feature that simulates a tube amplifier. You can only enable this feature if you have a wired or Bluetooth headset connected.
5. Tap to save your changes and return to the previous screen.
Do Not Disturb
1. Tap to enable or disable the Do Not Disturb feature. When enabled, you receive no notifications unless you have specified exceptions.
2. Tap to allow exceptions to the Do Not Disturb rule. For example, you probably want to allow the alarm to still wake you up in the morning, and you might want to allow incoming calls from certain people.
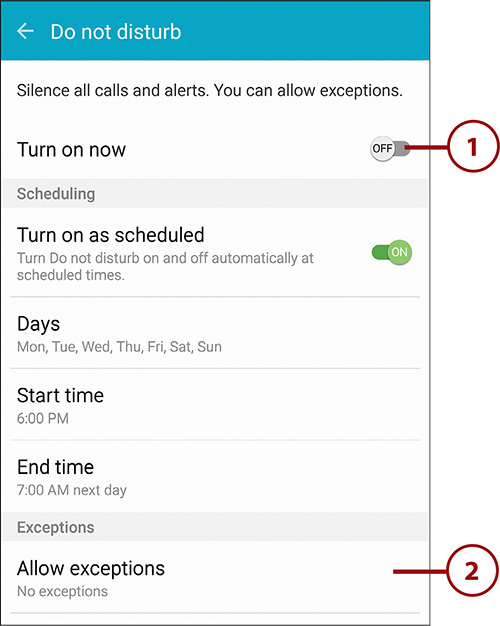
3. Tap to set a schedule when Do Not Disturb is automatically enabled and disabled. For example you might want to set it to be enabled when you go to sleep and disabled when you wake up.
4. Set the Do Not Disturb schedule.
5. Tap to save your changes and return to the previous screen.

Modifying Display Settings
You can change many display settings, the screen mode, the wait time before your Galaxy Note 5 goes to sleep, the size of the font used, and the Pulse notification light settings.
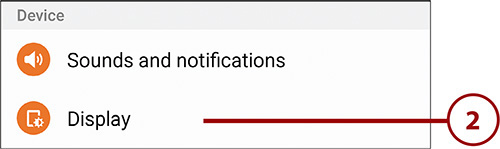
1. Pull down the Notification bar and tap the Settings icon.
2. Tap Display in the Device section.
3. Hold and move your finger along the slider to change the screen brightness manually or use the check box to set it to automatic. When on Auto, your Galaxy Note 5 uses the built-in light sensor to adjust the brightness based on the light levels in the room.
4. Tap to change the system font and how large the font style is. The system font is used for all menus, notifications, alerts, and warnings on your Note 5.
5. Tap to choose whether you want to enable the one-handed keyboard or have the ability to press the Home button three times in quick succession to reduce the screen size.
6. Tap to choose how many minutes of inactivity must pass before your Galaxy Note 5 puts the screen to sleep.
7. Tap to enable Smart Stay. When this feature is enabled, your Note 5 uses the front-facing camera to look for your eyes. It keeps the screen on as long as it detects that you are looking at the screen.
8. Tap to choose the Screen mode, which is how the screen represents colors. You can manually choose AMOLED Cinema, AMOLED Photo, and Basic, or leave it set to Adapt Display, which means your Note 5 chooses the best settings based on usage.
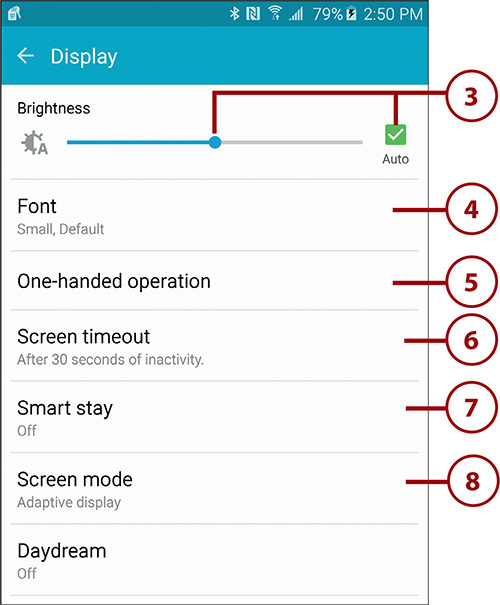
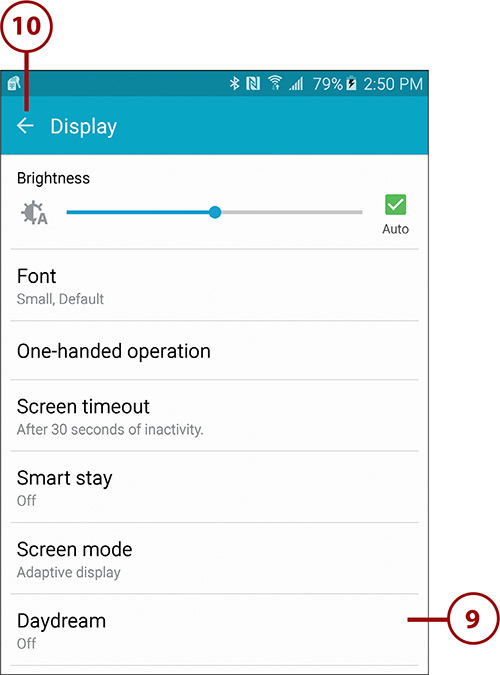
9. Tap to enable or disable Daydream mode, decide what must be displayed when daydreaming, and when to daydream. Daydream mode is essentially a screensaver.
10. Tap to save your changes and return to the previous screen.
What Is One-Handed Operation?
In step 5, you can choose to enable two features that allow you to use your Note 5 with one hand. The Note 5 is a large phone, and using it with one hand without special settings can be tricky. To help you achieve one-handed operation, you can choose to turn on reducing the screen size and/or turning on the one-handed keyboard. After you enable one-handed typing, your regular keyboard shrinks, which makes it easier to type with one hand. You can switch the shrunken keyboard to the bottom left or bottom right of the screen. When you enable the Reduce Screen Size feature, you can press the Home button three times in quick succession to make the screen shrink, which makes it easier to reach items near the top of the screen with one hand.
Is Adaptive Display Mode Good?
If you leave your screen mode set to Adaptive Display, you should know that your Note 5 adjusts the color range, saturation, and sharpness of the screen for the Gallery, Camera, Internet Web Browser, Samsung Video, Samsung Smart Remote, and Google Play Books apps only. All other system apps and apps that you install are not optimized. With this in mind, you might prefer to manually select an appropriate screen mode in step 7.
Aren’t Screensaver’s Obsolete?
Step 8 explains how to enable and manage the Daydream mode, which is essentially a screensaver as you might remember them from desktop computers. For many years now, screen savers have not been needed because we no longer use Cathode Ray Tube (CRT) monitors and screens. In the days when we used CRTs, if an image remained in one spot for a long time, it would be burned into the front of the screen. Having a screensaver on a CRT monitor made sense because the images were moving and changing constantly. Screen savers continued to be used because people liked seeing the patterns and images in the screensavers. This is why Daydream mode is on your Note 5. Once activated, it can display your photos or cool color patterns after a period of inactivity, when you plug your Note 5 into a dock, or when it is charging.
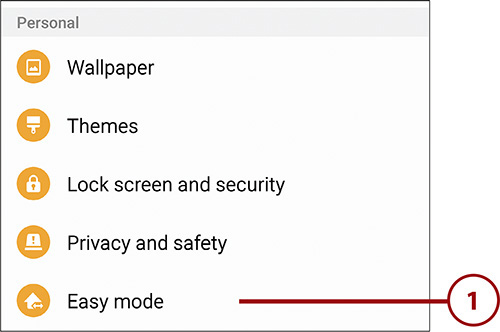
Easy Home Screen Mode
Home Screen mode changes which widgets are placed on your Home screen and how many you have on the Home screen. When Easy mode is enabled, it makes available a lot of widgets that have shortcuts to many apps, and it makes the icons larger.
1. Tap Easy Mode in the Personal section.
3. Swipe up to select which apps you want to have shortcuts to on your Home screen.
4. Tap Done to save your changes. You return to the Easy Mode Home screen.

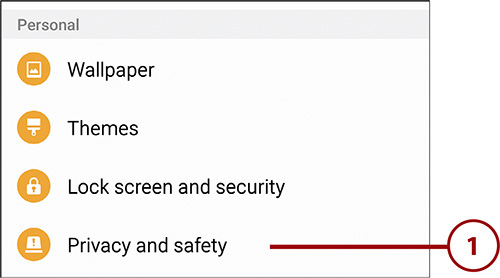
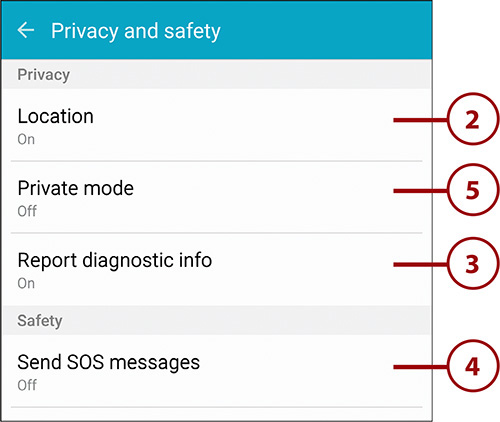
Privacy And Safety
You use Privacy and Safety to set whether you want to allow your geographic location to be available to Google and apps running on your phone, to manage Private Mode, and to set up a feature that allows your phone to send information to people when you are in an emergency situation.
1. Tap Privacy And Safety in the Personal section.
2. Tap to manage whether Google or apps running on your phone have access to your geographic location.
3. Tap to enable or disable allowing your phone to report diagnostic information to Google.
4. Tap to manage how SOS messages are handled. See the “Send SOS Messages” section later in this chapter for more information.
5. Tap to manage Private Mode, which is covered in the next section.
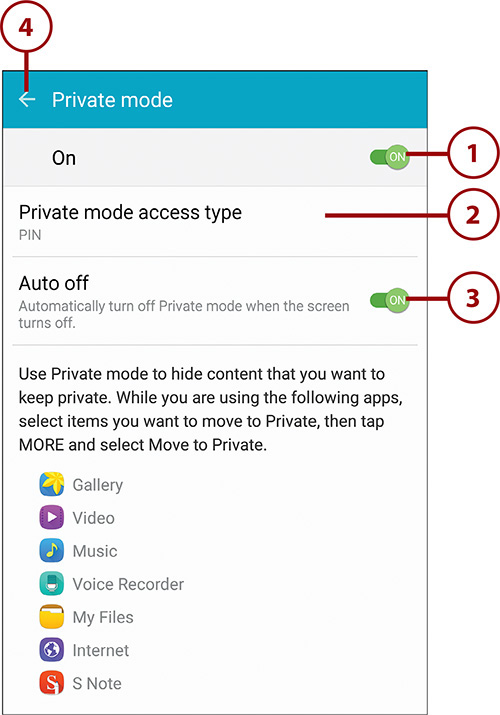
Private Mode
Private mode is a bit confusing at first. While it is enabled, you can move content from certain apps to a secret area on your Galaxy Note 5. When Private mode is disabled, the content is invisible unless you come back into Settings and enable it again.
1. Tap to enable or disable Private mode.
2. Choose a method for securing Private mode. The method you use here is in addition to the method you already use for unlocking your Note 5. You need to make this choice only one time when you first enable Private mode.
3. Tap to enable or disable automatically disabling Private mode when the screen turns off. This is recommended.
4. Tap to save your changes and return to the previous screen.
>>>Go Further: Using Private Mode
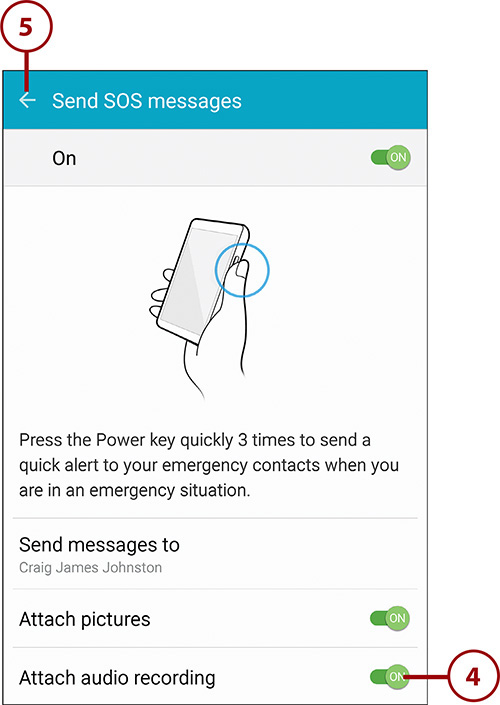
Send SOS Messages
When you have this feature enabled, if you find yourself in an emergency situation where you need help, you can press the Power button on your Note 5 three times in quick succession, and your phone starts taking note of your geographic location, recording audio, taking pictures, and sending it all to one or more contacts that you have previously set up.
1. Tap to enable the Send SOS messages feature. The first time you enable it, you are asked to choose at least one person from your contacts or to enter a new mobile phone number to be used by the feature.
2. Tap to manage which contacts will be sent your location, audio, and pictures when you trigger this feature. You can have more than one contact.
3. Tap to enable or disable including pictures with the SOS messages.

4. Tap to enable or disable including audio recordings with the SOS messages.
5. Tap to save your changes and return to the previous screen.
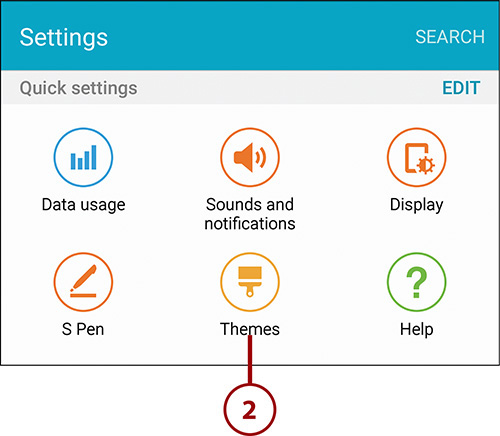
Themes
Themes are packaged changes that, once chosen, change the look and feel of your Note 5. Themes have ability to change the system sounds, wallpaper, icons, fonts used, and colors used in phone menus and including the Notification screen. The themes can also modify the look and feel of some core Samsung apps, such as the Phone app.
1. Pull down the Notifications bar and tap the Settings icon.

2. Tap Themes in the Personal section or in the Quick Settings section.
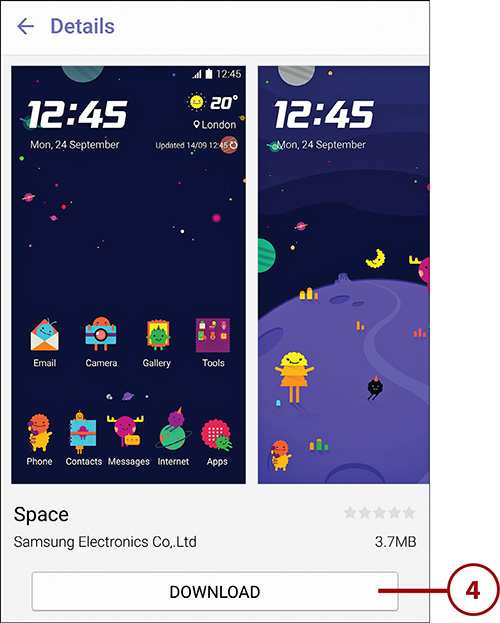
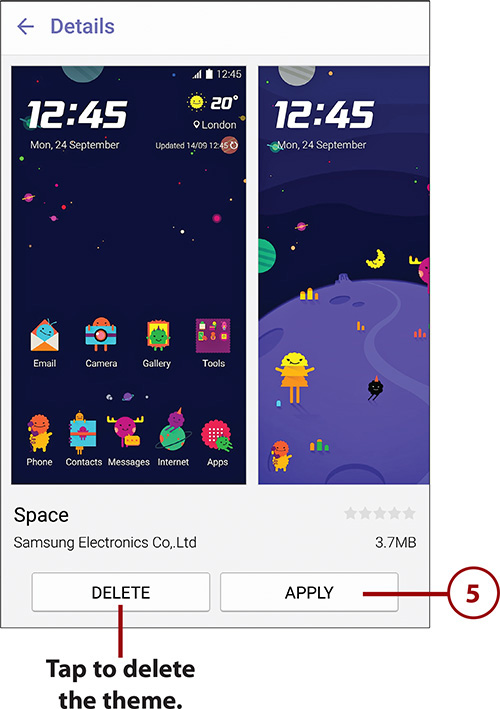
3. Tap a theme to download it and make it active. If you have previously downloaded and installed the theme, skip to step 5.

4. Tap Download to download and install the theme.
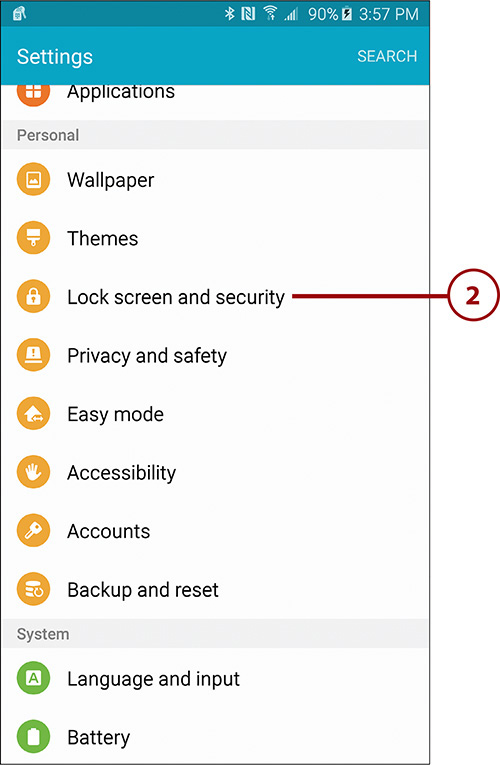
Lock Screen and Security
These settings screens allow to control what is shown on the Lock screen, how your device is unlocked, whether you want non-Google Play apps to be installed, and many other security-related options.
1. Pull down the Notification bar and tap the Settings icon.
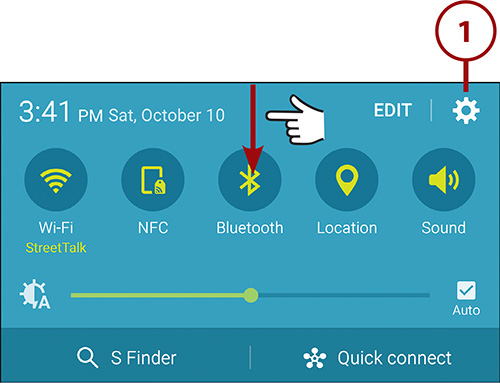
2. Tap Lock Screen and Security.
3. Tap to change what must be done to unlock your phone’s screen. You can choose to do nothing, or require a swipe across the screen, or you can use a security method like a numeric PIN, trace a pattern, type a password, or use your fingerprint.
4. Tap to choose what information is shown on the Lock screen. You can choose to show the clock, weather, and even your name.
5. Tap to choose whether notifications appear on the Lock screen, and if they do, whether they show the content of the notification or just the notification itself. You can also choose which apps can send notifications to the Lock screen.
6. Tap to manage your Secure Lock settings. Secure Lock settings include the setting for automatically locking the screen after a specified time, allowing you to press the Power button to lock the screen, and Smart Lock settings that allow you to keep your Note 5 unlocked under certain situations. See the “More About Smart Lock” margin note later in this section for more information.
7. Tap to manage your fingerprints. This includes adding or removing fingerprints, choosing when to use your fingerprint, and changing the backup password that you use when your fingerprint cannot be detected.
8. Tap to choose whether you want to enabled Samsung’s KNOX Active Protection (KAP) or install and use Samsung’s My KNOX, which is a secure container for your company apps and data.
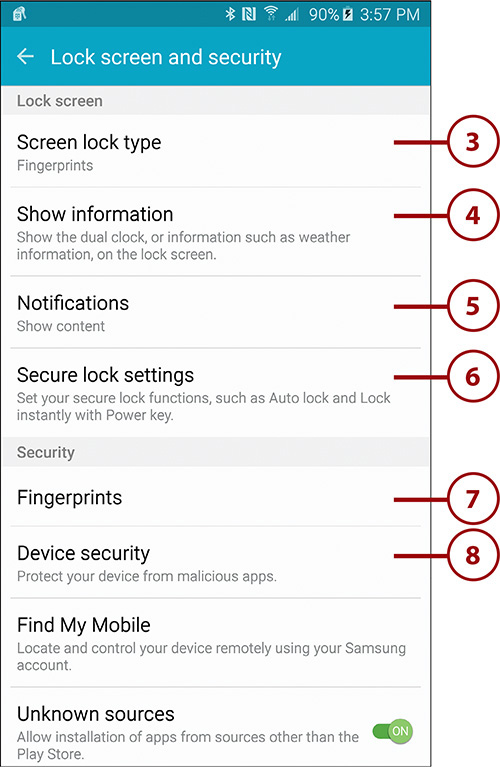
9. Tap to enable and manage Samsung’s Find My Mobile service. When it’s enabled, you can log in to the Find My Mobile website to track your stolen phone and send a remote wipe command to it. For more information, see the “More About Find My Mobile” note at the end of this chapter.
10. Swipe up for more settings.
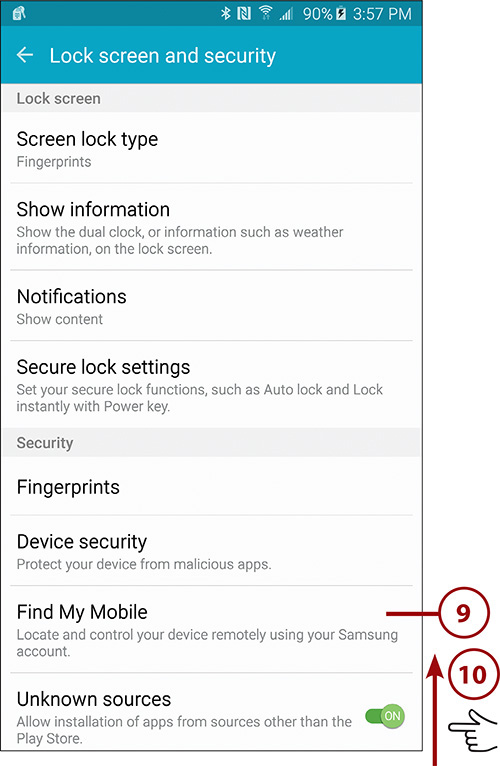
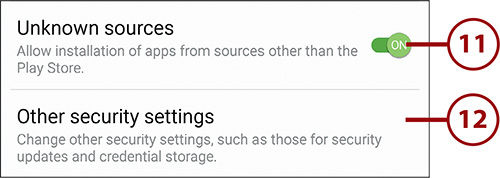
11. Tap to be allowed to install Android apps that are not found in the Google Play Store. This is not recommended because apps that aren’t in the official app store might contain viruses and malware. Proceed with caution if you enable this feature. If you have enrolled your device in your company’s Mobile Device Management (MDM) system, you might be required to enable this option.
12. Tap to see other security settings.
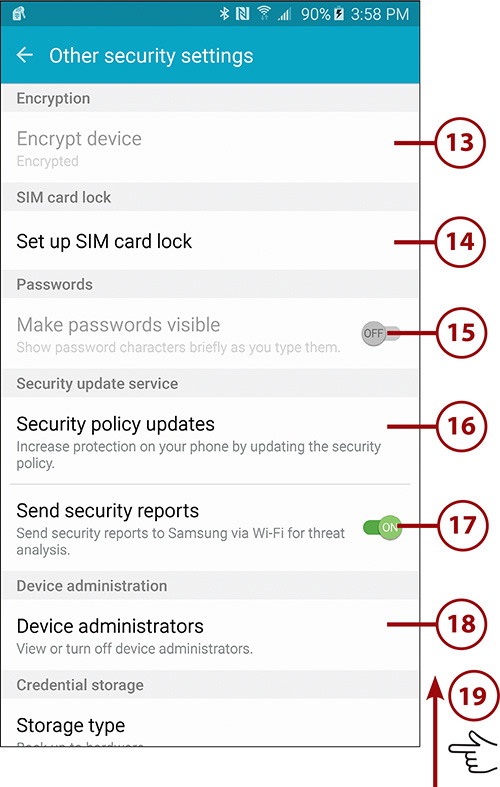
13. Tap to encrypt your phone’s file system. When the system is encrypted, if you power off your phone and then power it back on, you need to enter a numeric PIN to unencrypt your device before it starts up. In this example, the Note 5 is already encrypted.
14. Tap to set and manage a PIN to unlock your SIM card. If you use a PIN to lock your SIM card, you need to enter it in addition to entering any security measures you set for your phone.
15. Tap to enable or disable briefly showing each character of a password as you type it.
16. Tap to manage how your phone gets security policy updates from Samsung. You can choose to have them automatically download and installed, and you can choose to have them download only when you’re connected to Wi-Fi.
17. Tap to enable or disable automatically sending security reports to Samsung.
18. Tap to manage device administrators. See the nearby margin note “More About Device Adiministrators” for more information.
19. Swipe up for more settings.
More About Device Administrators
Device Administrators are apps that you have given permission to administer your phone. One of the Device Administrators is the Android Device Manager. This enables you to log in to www.google.com/android/devicemanager on a desktop computer and reset your device password or erase all your device’s data (in the event your phone has been stolen). If you enroll your phone in your company Enterprise Mobile Management (EMM) system, like those made by AirWatch or MobileIron, those systems also add a Device Administrator.
Smart Lock is an Android security service that allows your device to automatically lock and unlock based on certain criteria and situations. For example, you can have your Note 5 unlock if it detects a trusted device, such as a smartwatch or other paired Bluetooth device. You can have your Note 5 unlock when it detects that it is within a certain geographical area. Finally, you can have your Note 5 unlock when it detects that it is on your body, either in your pocket or in your hand. To set up Smart Lock, open Settings, Lock Screen and Security, Secure Lock Settings, and tap Smart Lock.
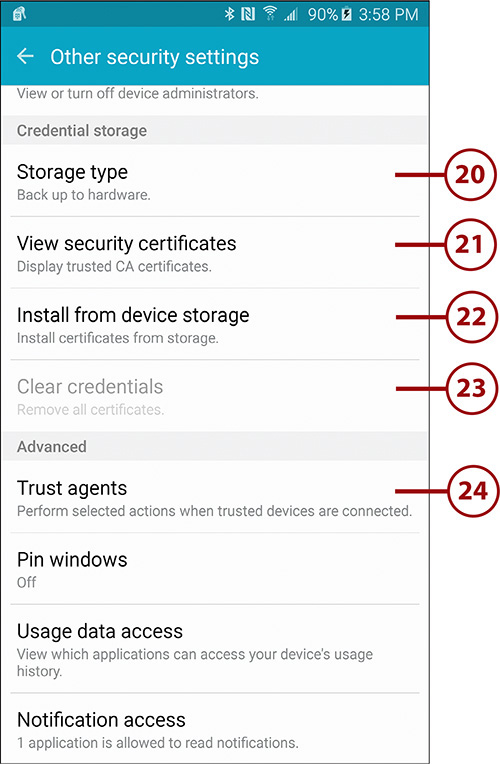
20. The Storage type item is for information only. It indicates whether your phone supports storing your private encryption keys in the hardware (Hardware-backed) or stored in software only.
21. Tap to view and select or deselect trusted certificates that the Android system uses and the ones you may be using.
22. Tap to install certificates from your phone’s storage. This assumes you previously saved the certificate to storage.
23. Tap to remove all trusted user certificates (if you are using any).
24. Tap to manage Trust Agents. Trust Agents are trusted agents or services that you trust to manage your phone’s security. Today there is only one Trust Agent called Smart Lock, which is provided by Google. Smart Lock is discussed in more detail in a previous margin note.
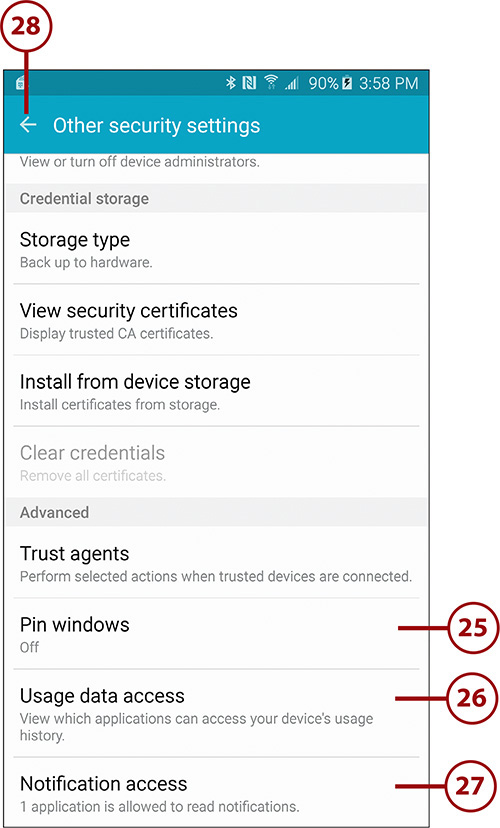
25. Tap to enable or disable Screen Pinning, which allows you to “pin” an app so that the person using it cannot exit the app. See the “More About Pinning an App” margin note for more information.
26. Tap to manage which apps running on your phone are allowed to collect app usage information about all apps you have installed. This usage information includes how often each app is run, how long it sits in the foreground (active on your screen), and how long it sits in the background (still running but not visible).
27. Tap to manage which apps have access to notifications that appear on your phone. Typically if you use an Android Wear Smartwatch, the Android Wear app is listed in this screen.
28. Tap to save your changes and return to the previous screen.
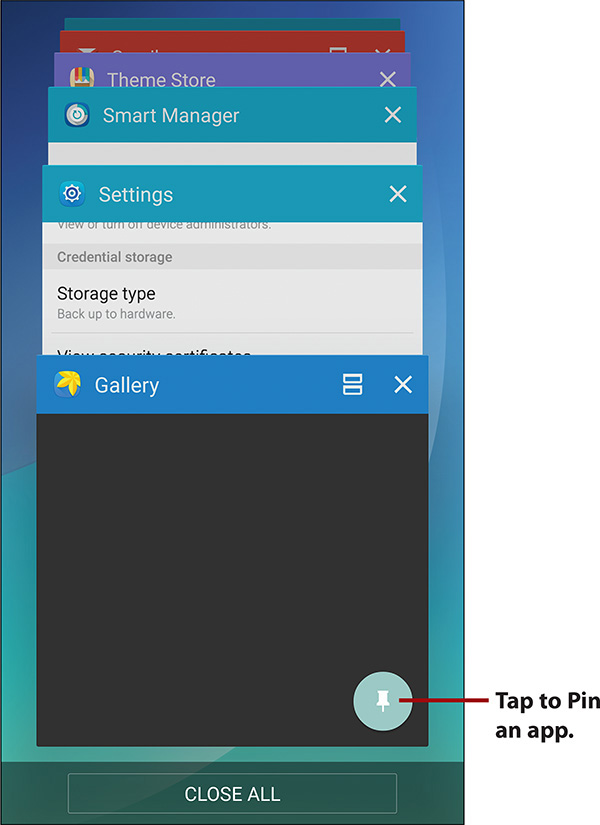
When you enable screen pinning in step 24, you are enabling a feature that allows you to “pin” an app to the screen. When an app is pinned to the screen, you cannot exit the app, go back to the Home screen, pull down the Notification or Quick Settings bars, or do anything other than interact with the app. You can only pin the app you ran most recently. To pin an app to the screen, first run the app so that it is the most recently used app. Tap the Recent Apps button, and slide the app up so that you can see the pin icon. Tap the pin icon to pin the app to the screen. To exit pinned mode, touch and hold the Back and Recent Apps buttons at the same time. Pinning an app to the screen is a quick way to allow someone to use your phone without letting them access anything else other than the app they should be using.
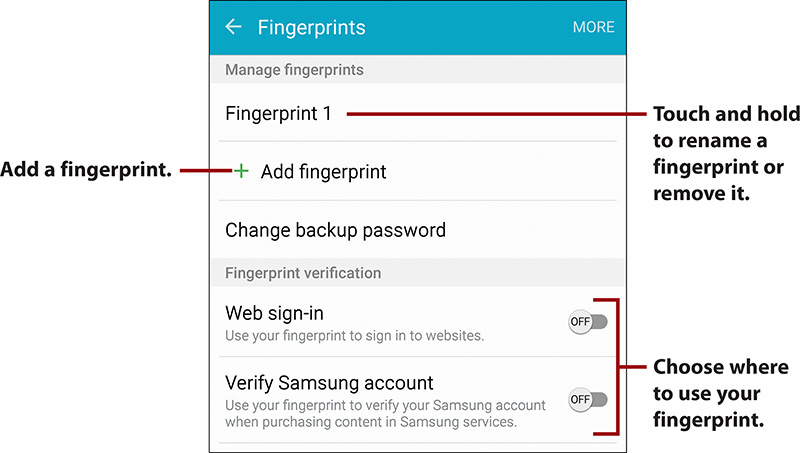
You can store one or more thumb- or fingerprints on your Galaxy Note 5, and choose to use them to unlock your phone, sign in to websites, and verify your Samsung account. To manage your fingerprints, tap Settings, Lock Screen and Security, Fingerprints. Use this screen to add fingerprints. As you add a new fingerprint, your phone walks you through the process of capturing your fingerprint via the fingerprint sensor in the Home button. You can also choose or change your backup password. You use your backup password if the fingerprint sensor cannot detect your fingerprint.
If you have a Samsung account, and you have enabled Find My Mobile in step 8, you can locate and remotely wipe your phone if it ever gets lost. To do this, open a desktop web browser on a computer, and browse to https://findmymobile.samsung.com to log in with your Samsung account. Once logged in, click Registered Device to select the device you want to work with (if you have more than one device registered). You can then locate your device, make the device play a ringtone (if you lost it in the couch and need to find it), enable Emergency mode, and enable Ultra Power Saving mode to conserve the battery. You can also remotely lock your device’s screen, or send a wipe command that wipes your device and sets it back to factory condition. You would do this last step in a situation where your device has been stolen and you want to make sure that the thief doesn’t get to your data.