10. Books, Newspapers, and Magazines
In this chapter, you discover your Galaxy Note 5’s capabilities for carrying and displaying books and magazines. Topics include the following:
![]() Reading books with the Play Books app
Reading books with the Play Books app
![]() Installing and using Amazon’s Kindle app
Installing and using Amazon’s Kindle app
![]() Finding free e-books online
Finding free e-books online
![]() Reading newspapers and magazines with the Play Newsstand app
Reading newspapers and magazines with the Play Newsstand app
With its large, bright screen, your Galaxy Note 5 is great for reading books, newspapers, and magazines. You can load an entire library and newsstand onto your Galaxy Note 5, take the device with you anywhere, and read to your heart’s content.
Reading Books with Play Books and Kindle
Books are perfect media for your Galaxy Note 5 because their file sizes are mostly small but they deliver long-lasting entertainment. Your Galaxy Note 5 might come with one or more apps for reading books; if it doesn’t, you can easily install such apps from the Play Store.
Your Galaxy Note 5 might include Google’s Play Books app, so tap the Apps button on the Home screen and see if Play Books appears on the Apps screen. The Play Books icon might appear directly on the Apps screen or in the Google folder, which may be either on the Apps screen or on the Home screen.
If the Play Books app is not already installed on your Galaxy Note 5, install it from the Play Store. Tap Play Store on the Home screen or the Apps screen, tap Apps on the Google Play screen, tap the Search icon, and type google play books. Tap the Google Play Books result and then tap Install. Review the permissions and tap Accept if you want to proceed.

Open the Play Books App and Meet Your Library
Google’s Play Books app provides straightforward reading capabilities and ties in to the Books area of Google’s Play Store, from which you can buy many books and download others for free.
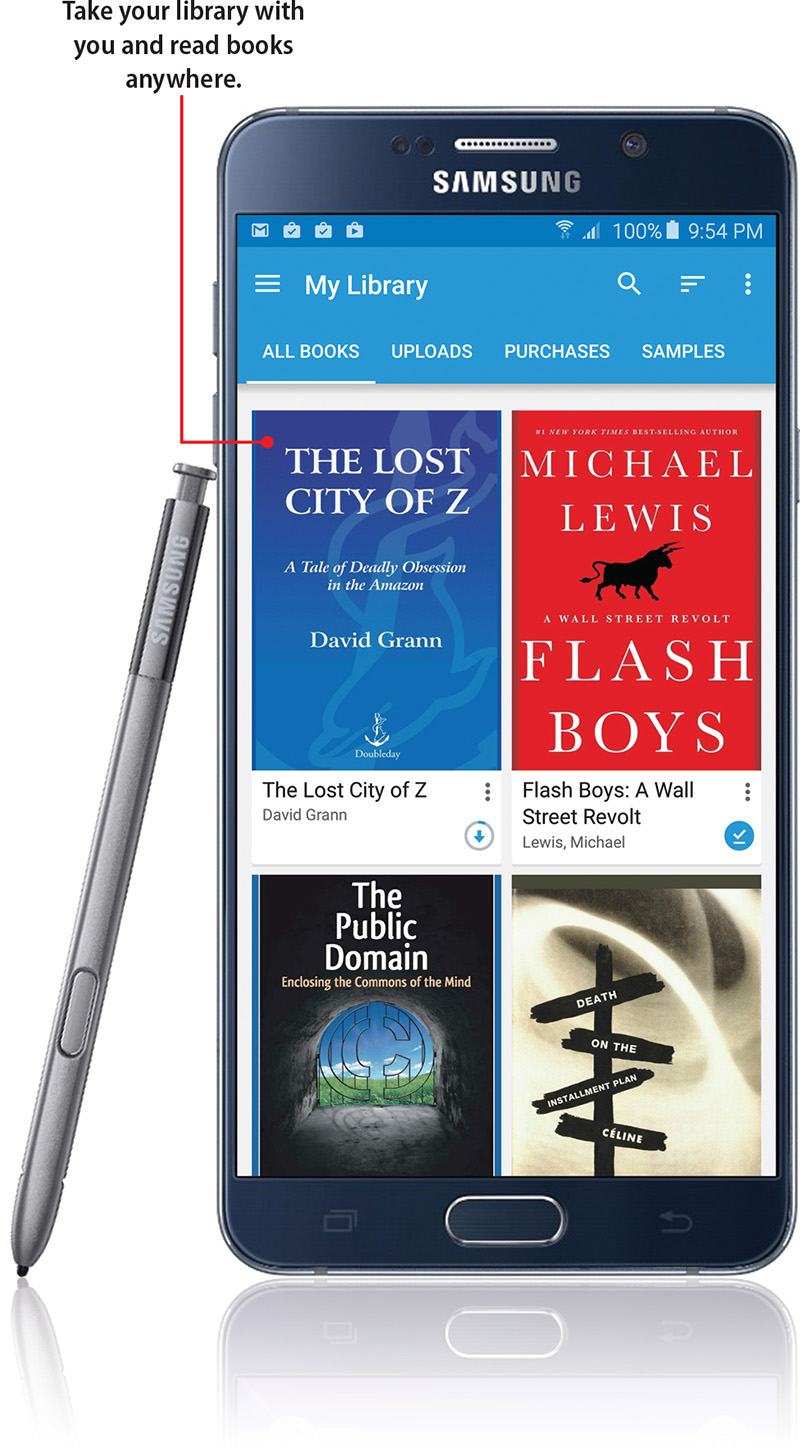
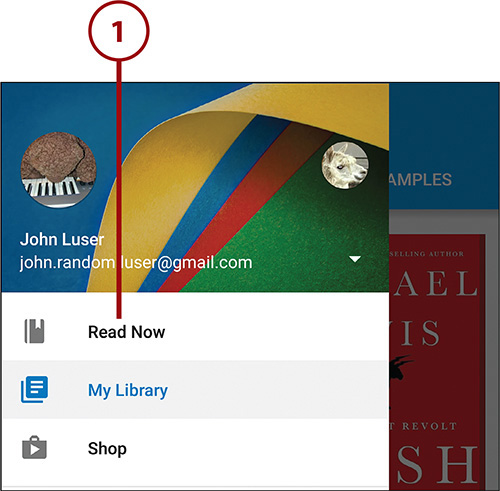
1. On the Apps screen, tap Play Books. If you don’t find the Play Books icon on the Apps screen, go to the Google folder, which is either on the Apps screen or the Home screen. Tap the Google folder and then tap Play Books. The Read Now screen usually appears at first.
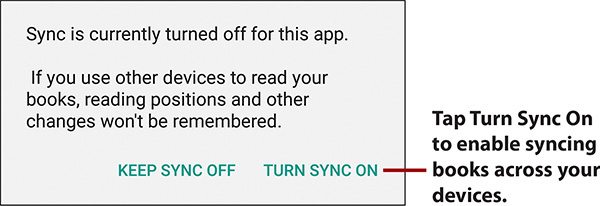
Should You Turn On Sync for Play Books?
When you launch Play Books, the app might display the Sync Is Currently Turned Off for This App dialog. If this dialog opens, tap the Turn Sync On button to enable syncing your books. With sync on, Play Books automatically updates your reading positions, so no matter which device you use to open a book, the app automatically displays your current page. Sync also synchronizes, bookmarks, notes, and other features.
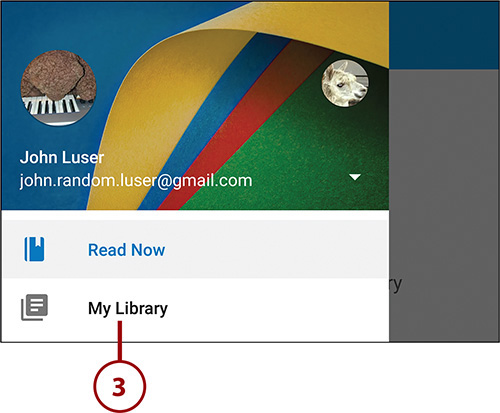
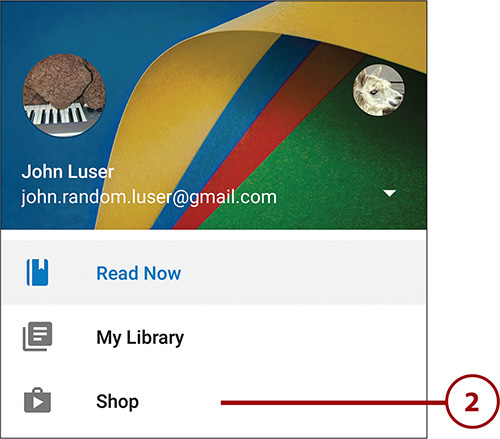
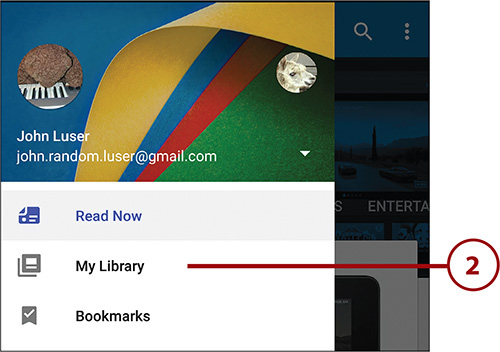
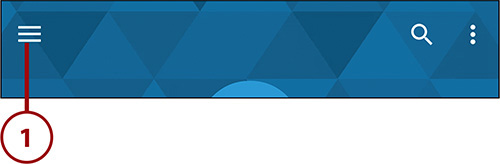
2. Tap the navigation panel button in the upper-left corner to display the navigation panel.
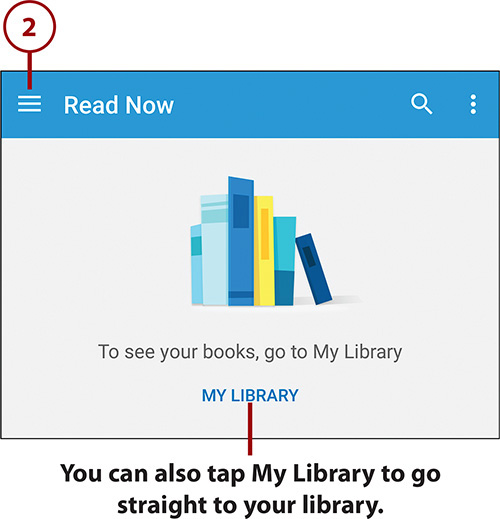
3. Tap My Library to display the books in your library.
Where to Get Books
Depending on where you bought your Galaxy Note 5, your library might include several public-domain books as samples—plus any books you have already added to your library on your Galaxy Note 5 or another Android device. If your library is empty, you can get books from the Play Store.
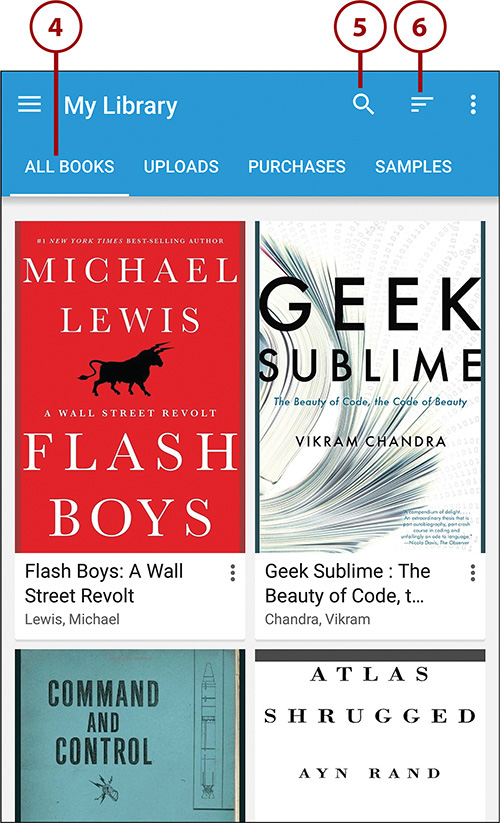
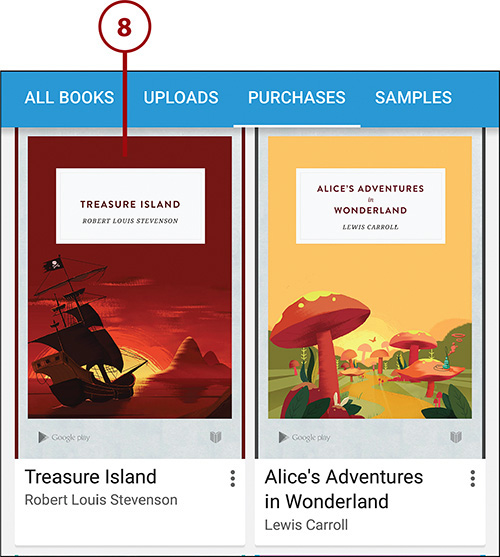
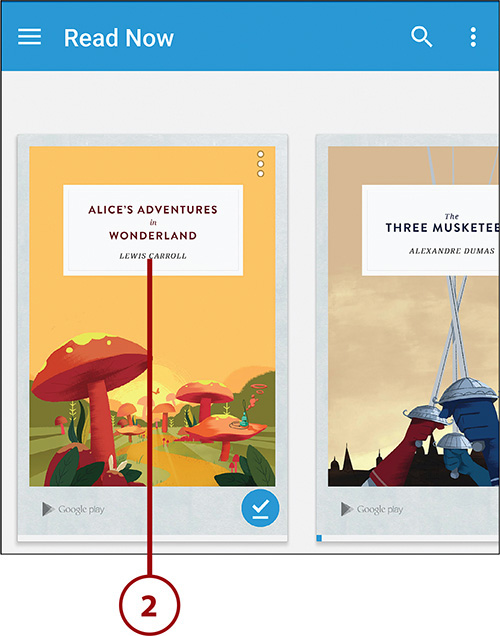
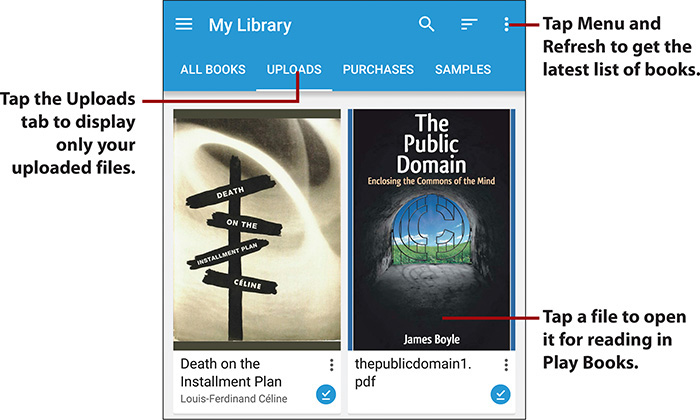
4. Tap the tab for the list of books you want to view. Your choices are All Books (which this example shows), Uploads, Purchases, and Samples. Uploads are books you have uploaded to your Google account. You find out how to upload books later in this chapter.
5. Tap the Search icon to search your library for books by keyword. Searching is useful when you have built up a large library. When your library contains only a few books, it is usually easier to browse through them.
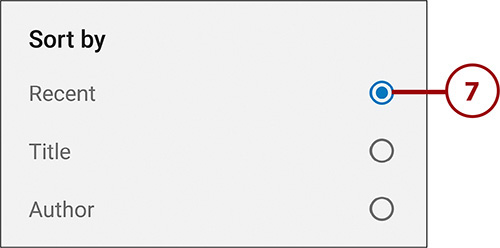
6. To control how Play Books sorts your library, tap the Sort By button. The Sort By dialog opens.
Downloading a Book to Your Galaxy Note 5
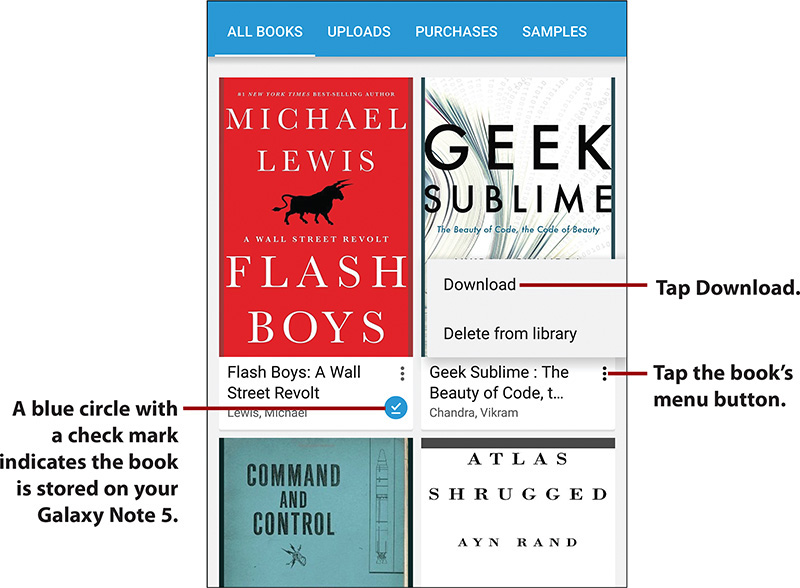
A white pushpin on a blue circle indicates the book is stored on your Galaxy Note 5, so you can read it offline. To download a book to your Galaxy Note 5, tap the book’s Menu button (the button showing three vertical dots) and then tap Keep on Device on the pop-up menu.
Refreshing Your Library
If you cannot see a book you know you have purchased, uploaded, or otherwise acquired, you might need to refresh your library by tapping the Menu button and then tapping Refresh on the menu. Refreshing makes the Play Books app sync your books from the Google Play service, so it should fill in any gaps in your library.

7. Tap the Recent radio button, the Title radio button, or the Author radio button, as needed. Play Books displays your books sorted into the order you choose.
8. Tap a book to open it. If the book is not stored on your Galaxy Note 5, Play Books downloads the book and then opens it.
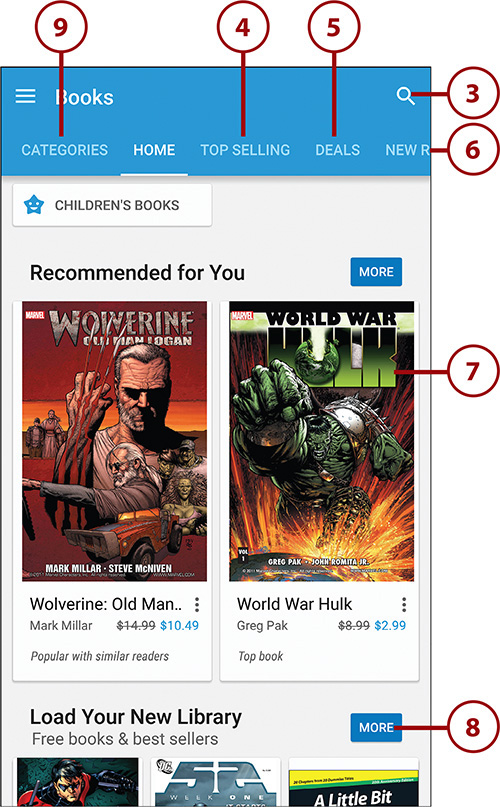
Get Books from the Play Store
The Books area of the Play Store offers a fair number of e-books for free and a much larger number of e-books for sale. You can easily access the Books area of the Play Store from the Play Books app.
1. Tap the button in the upper-left corner of the Play Books app to display the navigation panel.
2. Tap Shop to display the Books area of the Play Store. The Play Books Home screen appears first.
3. Tap the Search icon to search for books.
4. Tap the Top Selling tab or swipe left once to see the list of top-selling books.
5. Tap the Deals tab or swipe left twice to see special offers.
6. Tap the New Releases in Fiction tab or swipe left three times to see fiction books that have been newly added to the Play Store. Swipe once more (four times total) to display the New Releases in Nonfiction list; swipe one more time (five times total) to display the New Free list.
Navigate Quickly Among Tabs by Swiping
The Books area of the Play Store contains various tabs, including Categories, Home, Top Selling, New Releases in Fiction, New Releases in Nonfiction, and Top Free. You can navigate among these tabs by tapping their names on the tab bar or scrolling the tab bar as needed, but it is usually quicker to swipe left or right one or more times to change tabs.
7. Tap a featured book or a recommended book to see its details.
8. Tap the More button for a featured category to see the books it contains.
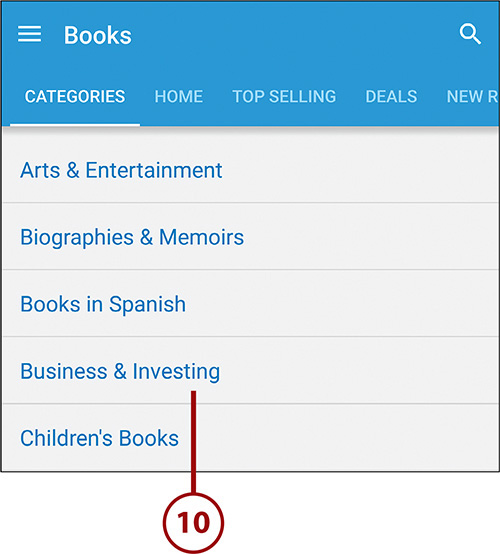
9. Tap Categories to display the list of categories. You can also swipe right once from the Home screen to display the list of categories.
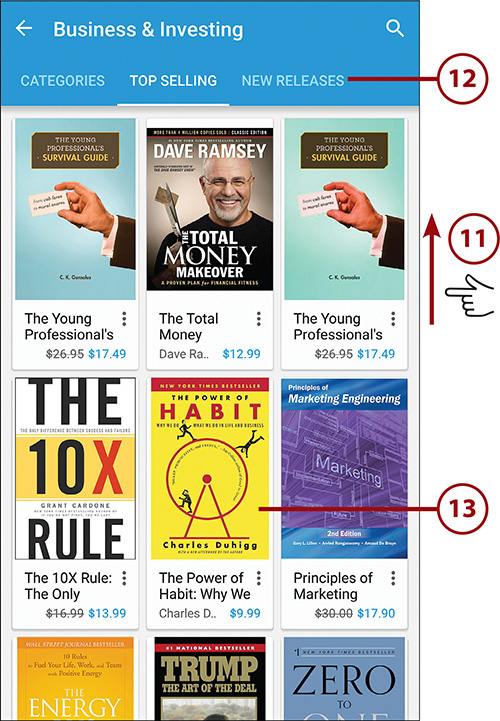
10. Tap the category you want to display. The Top Selling list for the category appears first.
11. Swipe up to see more of the list.
12. Tap the New Releases tab or swipe left to see the New Releases list for the category.
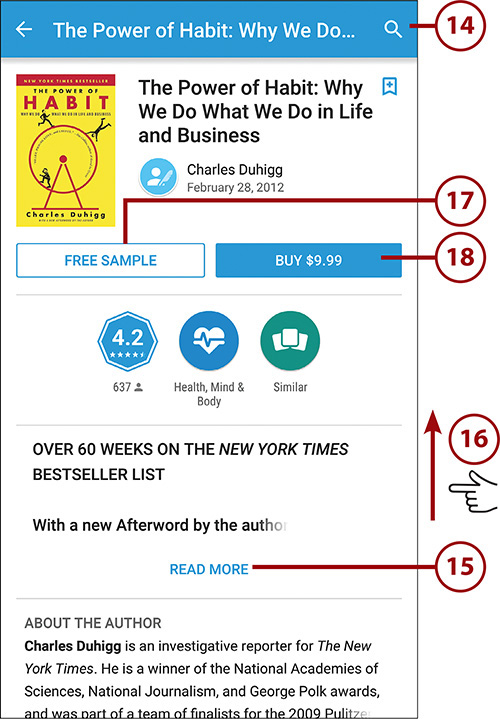
13. Tap a book to display its details.
14. Tap the blue bookmark symbol bearing a + sign to add the book to your wish list.
15. Tap Read More to expand the description.
16. Swipe up to read the reviews or to rate the book yourself (which you can do even if you haven’t yet read it), to read the About the Author blurb, and to see lists of other books by the same author and similar books.
17. Tap Free Sample to download a free sample of the book. Reading the sample can be a great way to decide whether to spend your money on the book. Android downloads the book and displays its first page in the Google Books app.
Buying Books from the Play Store
To buy a book from the Play Store, you must either add a credit card or debit card to your Google account or redeem a voucher. See Chapter 11, “Working with Android Apps,” for information on setting up Google Wallet and adding a means of payment to it.
18. Tap the price button to buy the book, and then follow through the payment process on the next screen. If the book is free, tap the Add to Library button. Android downloads the book and displays its first page in the Play Books app.
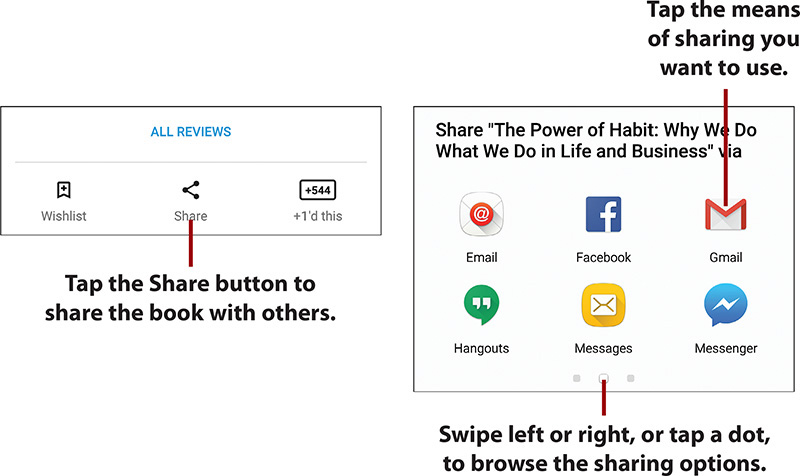
Share a Book with Other People
When you find a book you simply must tell someone about, you can do so easily from the Play Store app. Tap the Share button at the bottom of the screen to display the Share screen, tap the means of sharing you want to use, and then complete the sharing in the app that Android opens.
Finding Free E-Books Online
Apart from buying e-books online at the Play Store or other stores such as Amazon (www.amazon.com) and Barnes & Noble (www.barnesandnoble.com), you can find many free books. Most online stores offer some free e-books, especially out-of-copyright classics, so it is worth browsing the Free lists. Other good sources of free e-books include ManyBooks.net (www.manybooks.net) and Project Gutenberg (www.gutenberg.org).
Read Books with the Play Books App
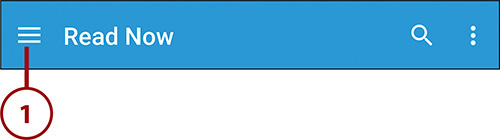
1. Tap the button in the upper-left corner to display the navigation panel, and then tap Read Now to display your Read Now screen. This screen shows the books you have been reading recently plus books you have recently bought (or downloaded for free) or uploaded to your Google account. Further down the screen is a Recommended for You section that suggests books you might be interested in based on the books you have.
2. Tap the book you want to open. The cover or default page appears if this is the first time you have opened the book. Otherwise, the page at which you last left the book appears.
3. Tap the middle of the screen to shrink the page a little and display the navigation controls at the top and bottom of the screen. The controls remain onscreen until you tap the screen again.
4. Tap the Search icon to search within the book for specific text.
5. Tap the Contents icon to display the Contents screen. From here, you can tap Chapters to display a list of the book’s chapters and major headings, and then tap the place you want to display; tap Bookmarks to display a list of the bookmarks you have created in the book, and then tap the bookmark you want to go to; or tap Notes and then tap the note you want to view.
6. Drag the slider to move quickly through the book.
7. Swipe left to move further through the book, or swipe right to move back through it.
8. Tap the middle of the screen to restore the current page to full screen, hiding the controls.
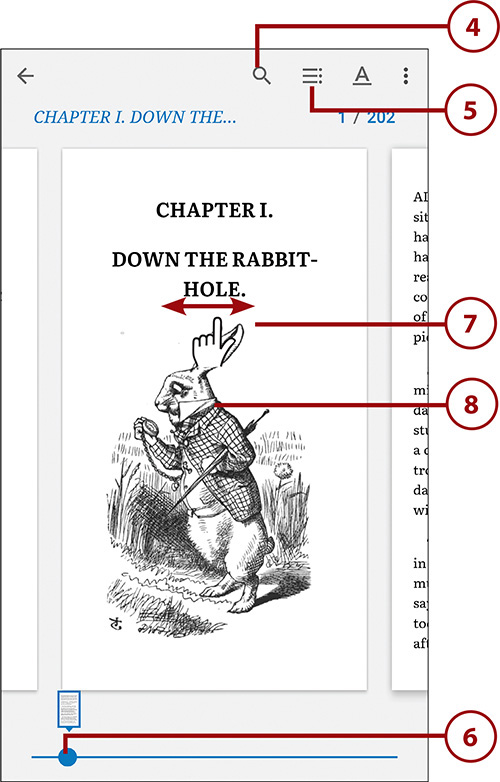
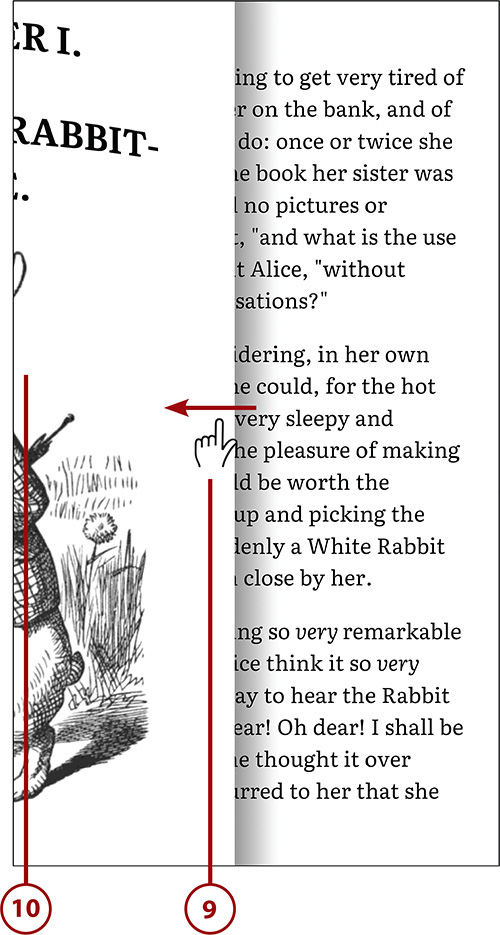
9. Tap the right side of the screen or drag left to turn the page forward. Dragging lets you turn the page partway to peek ahead.
10. Tap the left side of the screen or drag right to turn the page back.
Configure Display Options for the Play Books App
You can configure the Play Books app to display the text the way you prefer to see it. You can change the overall theme of the text display to get a background color that suits you. You can also change the font, alignment, font size, and line spacing.
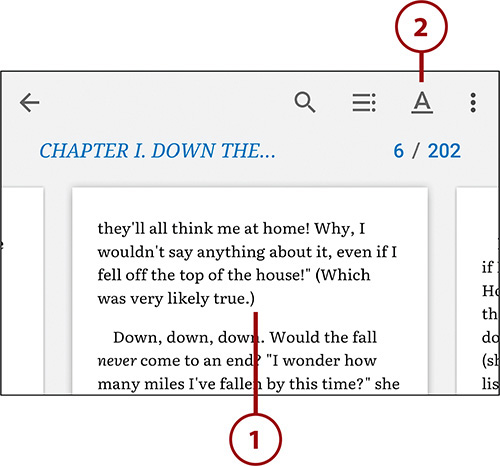
1. With the Play Books app open and active, tap the middle of the screen. The controls appear.
2. Tap Display Options. The controls disappear, the page returns to full size, and the Display Options panel opens.
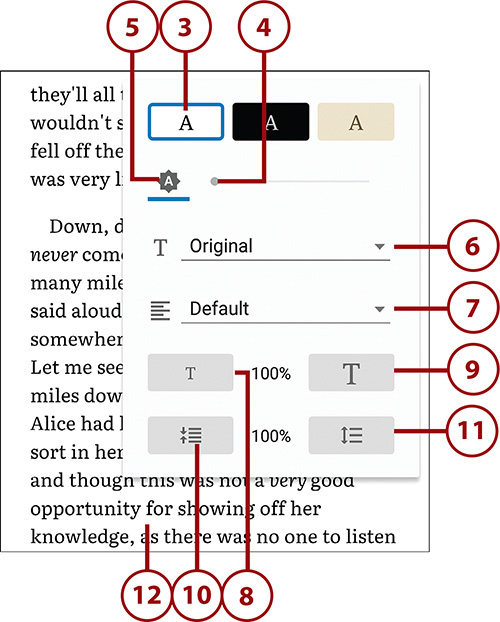
3. Tap the Day button, the Night button, or the Sepia button to set the overall theme. The Day theme uses black text on a white background, the Night theme uses white text on a black background, and the Sepia theme uses black text on a sepia background.
4. Drag the Brightness slider to adjust the brightness manually.
5. Tap the Auto button to enable or disable automatic brightness.
6. Tap the Typeface pop-up menu to change the typeface used.
7. Tap the Text Alignment pop-up menu to change the text alignment. The choices are Default, Left, and Justify.
8. Tap the small T button to decrease the font size.
9. Tap the large T button to increase the font size.
10. Tap the left Line Height button to decrease the spacing between lines.
11. Tap the right Line Height button to increase the spacing between lines.
12. Tap the book page to close the Display Options panel.
Choose Options for the Play Books App
You can configure the Play Books app to make it work your way. Options include switching between flowing text and the original pages of the book, adding bookmarks, and having your Galaxy Note 5 read aloud to you.
1. With the Play Books app open and active, tap the screen to display the controls.
2. Tap the Menu button to display the menu.
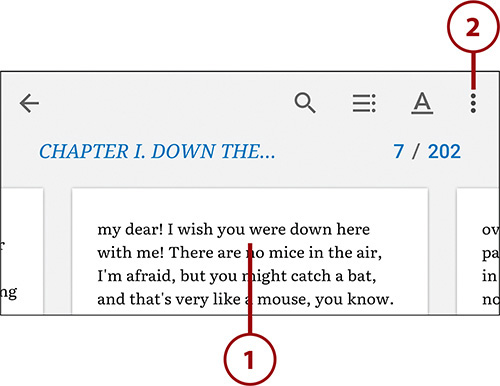
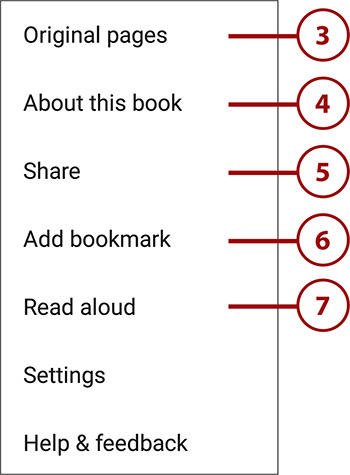
3. Tap Original Pages to display the book’s pages as they are laid out in the physical book. This option is available only for some books. Tap the Menu button again and then tap Flowing Text when you want to change the display back to flowing text.
4. Tap About This Book to display the book’s page in the Play Store. If the book is a sample, you can tap Buy on the menu to start the process of buying the book.
5. Tap Share to share the book’s URL on the Play Store via Facebook, Gmail, Twitter, or another means of sharing.
6. Tap Add Bookmark to add a bookmark to the current page. To remove the bookmark, go to the page, tap the Menu button, and then tap Remove Bookmark.
7. Tap Read Aloud to start Android reading the text out loud. To stop it, tap the Menu button and then tap Stop Reading Aloud.
8. Tap Help & Feedback to display the Help screen, from which you can access various help resources, such as Help Center, Contact Us, and Report a Problem.
9. Tap Settings to display the Settings screen.

10. Tap Auto-Rotate Screen to display the Auto-Rotate Screen dialog.
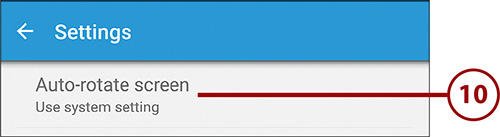
11. Tap the means of rotation you want to use. Your options are Use System Setting, Lock in Portrait, and Lock in Landscape. For example, if you prefer to read books in landscape orientation, you can tap Lock in Landscape to prevent the screen from rotating automatically as you move the Galaxy Note 5 back to a portrait orientation.

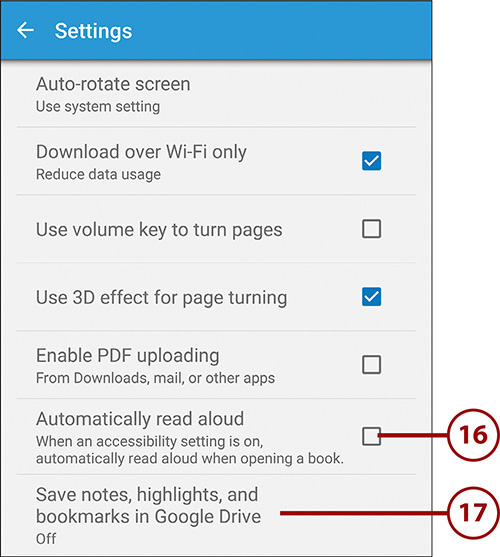
12. Check the Download over Wi-Fi Only box if you want to prevent Play Books from downloading books over a cellular network. This is a good move if your cellular plan gives you only a miserly data allowance.
13. Check the Use Volume Key to Turn Pages box if you want to use the physical volume key to turn the pages in the Play Books app. This setting can be helpful if you normally hold your Galaxy Note 5 with your fingers over the volume key.
14. Check the Use 3D Effect for Page Turning box if you want Play Books to use the 3D animation for turning pages.
15. Check the Enable PDF Uploading box if you want to be able to upload PDFs to Play Books from sources such as email and your Downloads folder.

16. Check the Automatically Read Aloud box if you want Android to start reading aloud automatically when you open a book in Play Books.
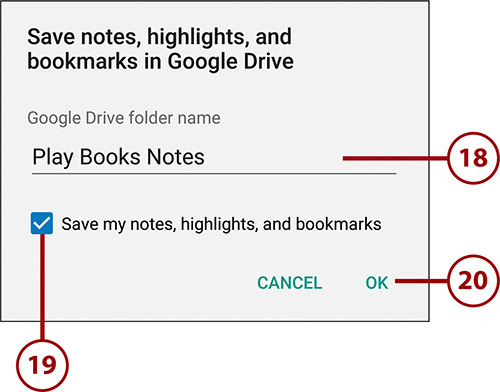
17. Tap Save Notes, Highlights, and Bookmarks in Google Drive. The Save Notes, Highlights, and Bookmarks in Google Drive dialog opens.
18. Type the name for the folder in which to save the notes, highlights, and bookmarks. You can also accept the default name—Play Books Notes.
19. Check the Save My Notes, Highlights, and Bookmarks box.
20. Tap OK to close the dialog.
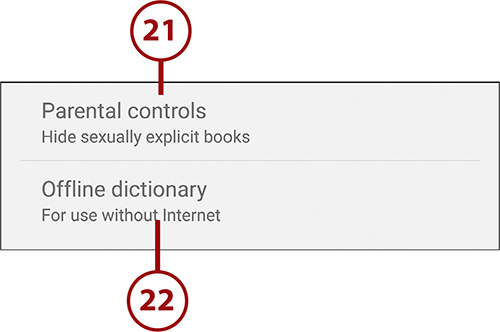
21. If you want to prevent books marked as sexually explicit from appearing in Play Books, tap Parental Controls and check the Books box. See the section “Manage Google Play Settings” in Chapter 11 for coverage of the Parental Control features.
22. If you want to be able to use the dictionary feature of Play Books offline, tap Offline Dictionary. In the Offline Dictionary dialog that opens, check the box for the language you want to use (such as English), and then tap OK to download and install the language.
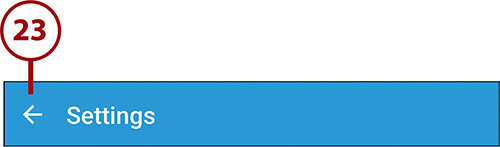
23. Tap the arrow button or the Back button to leave the Settings screen and return to the screen you were previously using in the Play Books app.
Remove or Delete a Book from Your Play Books Library
When you no longer want a particular book on your Galaxy Note 5, you can remove the download. The book remains in your library, so you can download it again if necessary, or read it on your other devices.
If you no longer want a particular book in your library, you can delete it. Deleting the book removes it from your Google Play library entirely, not just from your Galaxy Note 5 (or whichever other device you’re using), so Play Books makes you confirm the action.
1. In the My Library view in Play Books, tap the Menu button on the book’s listing.
2. Tap Delete from Library. The Delete from Library dialog opens.

3. Tap Delete.

>>>Go Further: Upload Your Documents to Google Play Books
Install the Kindle App
Google’s Play Store has a good selection of books, but if you want books in Amazon’s vast bookstore, you need to use the Kindle app. If you already own any Kindle books, installing the Kindle app gives you most of the benefits of owning a Kindle reader without having to buy or haul around an extra device.
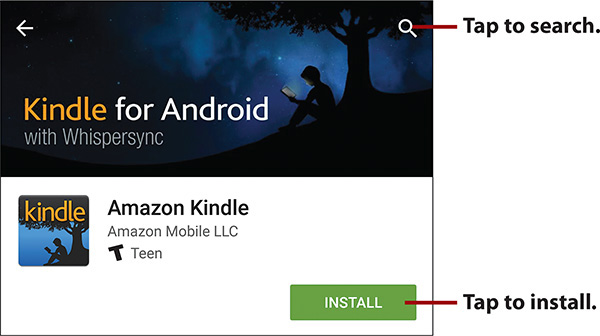
If the Kindle app is not already installed on your Galaxy Note 5, install it from the Play Store. Tap Play Store on the Apps screen, tap Apps on the Google Play screen, tap the Search icon, and type kindle. Tap the Amazon Kindle result and then tap Install. Review the permissions and tap Accept if you want to proceed.
Sign In and Navigate the Kindle App
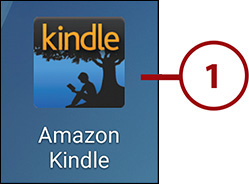
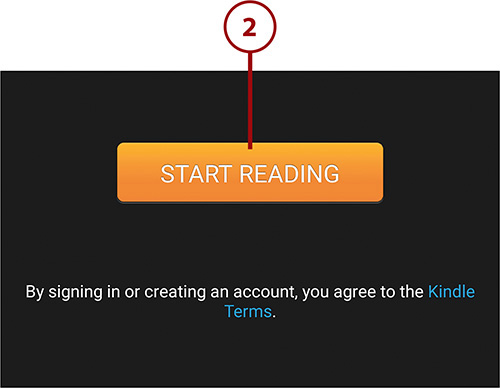
1. On the Apps screen, tap the Amazon Kindle icon. The first time you run the Kindle app, it displays the Start Reading screen.
2. Tap the Start Reading button to display the Sign In screen. This screen also appears only the first time you use the app.
3. Type your email address or mobile phone number.
Creating an Amazon Account
To buy books or download free books from Amazon, you must have an Amazon account. If you do not have one, tap the Create an Account button on the Sign In screen and then follow through the screens to create an account.
4. Type your Amazon password.
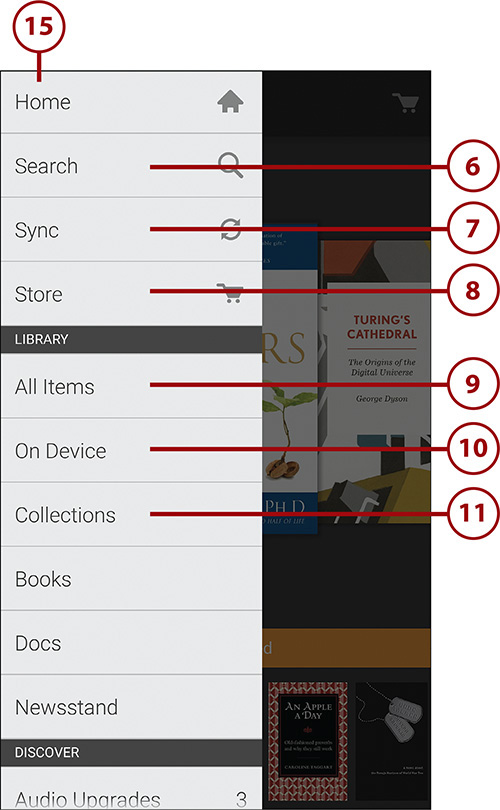
5. Tap Sign In. The Kindle app signs you in to your account and then displays its Home screen with the menu panel open.

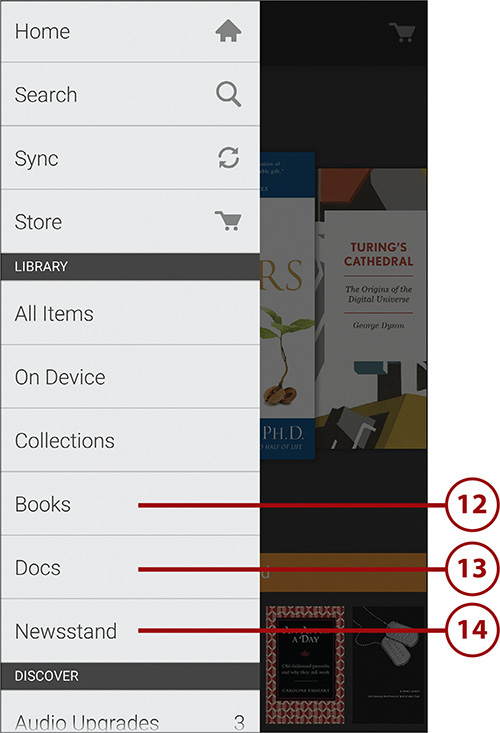
6. Tap Search to search your Kindle library for the terms you type.
7. Tap Sync to refresh the display of books. You would do this if you have just bought a book using your computer or a different device and the book hasn’t yet appeared on the Kindle app on your Galaxy Note 5.
8. Tap Store to go to the Kindle Store, where you can browse and buy books.
9. Tap All Items to display the All Items screen. This screen shows all the items in your Kindle library, whether they are on your Galaxy Note 5 or not.
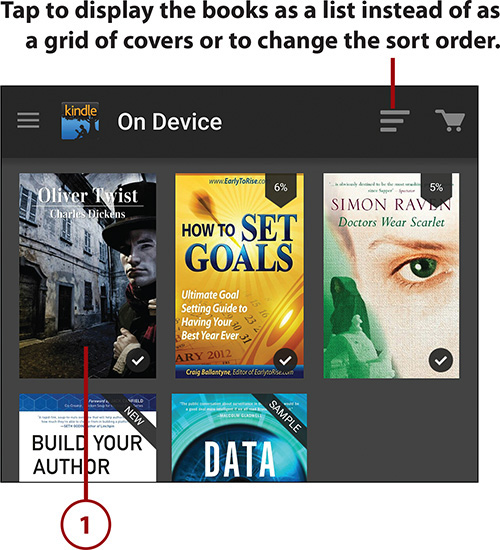
10. Tap On Device to see the list of books and other items stored on your Galaxy Note 5.
11. Tap Collections to display the Collections screen, which contains the collections you have created to organize your library.
12. Tap Books to see the list of books, rather than documents, newspapers, and magazines.
13. Tap Docs to display the documents stored in your Kindle account. These are documents you have sent via email to your Send to Kindle email address, a Kindle-only address that Amazon provides with Kindle accounts.
14. Tap Newsstand to display your Newsstand items.
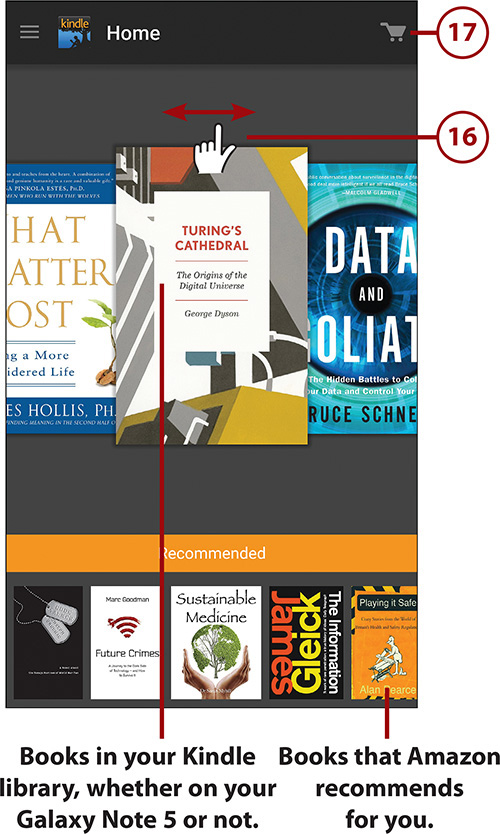
15. Tap Home to close the menu panel. The Home screen appears, showing the books in your Kindle library on a carousel.
16. Scroll left or right to find the book you want.
17. Tap the Store icon to go to the Kindle Store to browse or buy books.
Read a Book with the Kindle App
1. In the Kindle app, tap the book you want to open. This example uses the On Device screen, but you can also start from another screen, such as the Home screen or the All Items screen.
Reaching the On Device Screen from a Book
If you currently have a book open in the Kindle app, tap the Back button to go back to the main screen, tap the Menu button, and then tap On Device.
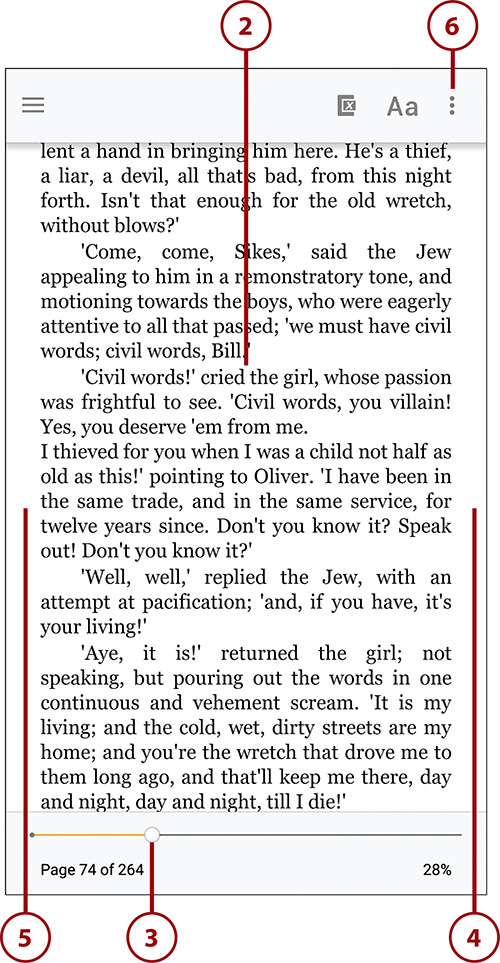
2. Tap the middle of the screen to display the controls. Tap again to hide these items.
3. Drag the slider to change the location in the book.
4. Tap the right side of the screen to display the next page. You can also display the next page by dragging or swiping left.
5. Tap the left side of the screen, or drag or swipe right, to move back a page.
6. Tap the Menu button to display the menu.
7. Tap Shop in Kindle Store to go shopping for Kindle books.
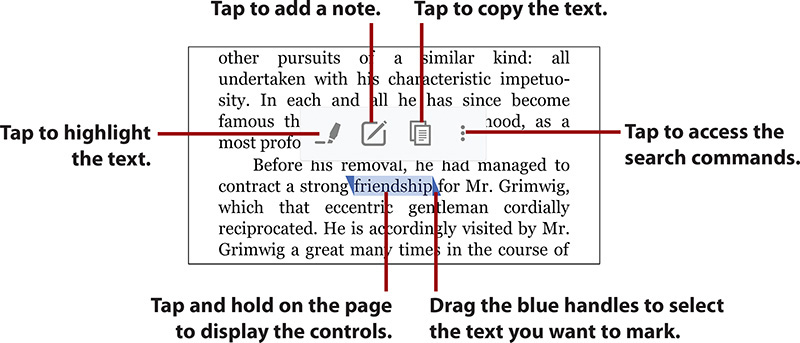
8. Tap My Notes & Marks to view the list of notes and bookmarks you have added to the current book. From there, you can tap one of your bookmarks or notes to go to its page.
9. Tap Add a Bookmark to bookmark the current page, or tap Remove Bookmark to remove a bookmark from the current page. Adding a bookmark gives you an easy way to return to a particular page by using the View My Notes & Marks command on the menu.
10. Tap Share Progress to display the Share Progress dialog, in which you can pick a way to share your reading progress. For example, you can post a link to Facebook or send an email message saying you’re 50% through the book.
11. Tap Word Wise to display the Language Learning screen, on which you can enable or disable the Word Wise feature, which displays hints above words that are considered challenging. If you enable Word Wise, you can also choose to show multiple-choice hints—when Kindle isn’t sure of the exact meaning of a word in context, it displays a list of possible meanings so that you can select the right one.
12. Tap the menu-panel button to display the menu panel.

13. Tap About This Book to display the About This Book pane, which contains brief information about the book and its author.
14. Tap the Go To button to go to a page by number or to go a location. The locations are numbered divisions of the text. You can see the number of the current location by tapping the middle of the screen and looking at the Location slider. However, unless you know the number of the location to which you want to go, this command is of little use.
15. Tap Search to search in the book. For example, you can search for a distinctive word on a page.
16. Tap Sync to go to the furthest page you’ve read in this book on any of your Kindle devices. Normally, you do this after reading the book on another device.
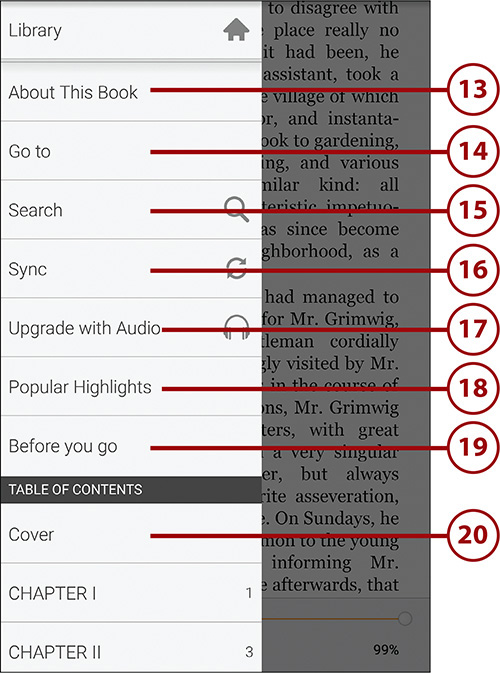
17. Tap Upgrade with Audio to see options for adding professional narration to the Kindle book.
18. Tap Popular Highlights to see a list of passages that many people have highlighted in the book.
19. Tap Before You Go to display a screen for rating the book and for exploring other books recommended to you based on this book.
20. Tap Cover or a section in the Table of Contents list to go straight to that section. Scroll down as needed to find the section you want.
Choose View Options for the Kindle App
To make your books easy to read, you can choose view options for them.
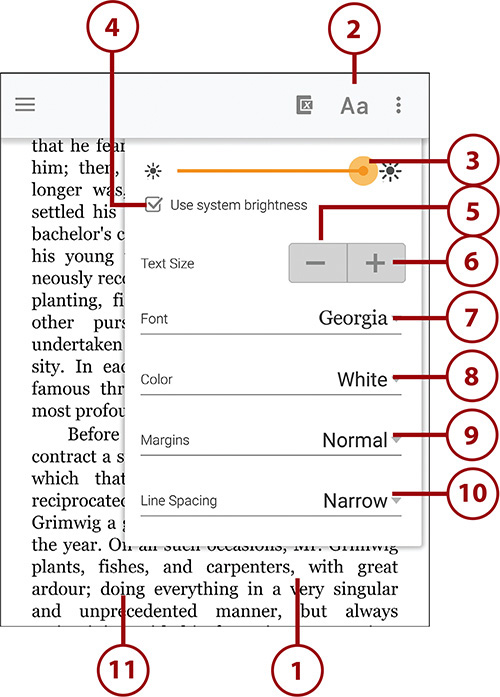
1. With a book open in the Kindle app, tap the screen to display the controls.
2. Tap the Aa icon to display the View Options panel.
3. Drag the Brightness slider to adjust the screen brightness.
4. Check the Use System Brightness box to make the Kindle app use the same brightness as the Galaxy Note 5 as a whole.
5. Tap the – icon to decrease the font size.
6. Tap the + icon to increase the font size.
7. Tap the Font pop-up menu to change the font.
8. Tap the Color pop-up menu to choose the color scheme. Your choices are White, Black, Sepia, and Green.
9. Tap the Margins pop-up menu to adjust the margin width.
10. Tap the Line Spacing pop-up menu to change the line spacing. Your choices are Narrow, Normal, and Wide.
11. Tap the document to close the View Options panel.
Reading Newspapers and Magazines with Play Newsstand
To read newspapers and magazines, you can use Google’s Play Newsstand app. Your Galaxy Note 5 might include Play Newsstand; if it doesn’t, launch the Play Store app, search for play newsstand, and install the Google Play Newsstand app.
Exploring Other News and Magazine Apps
If the Play Newsstand app does not deliver the content you need, or does not otherwise suit you, explore other news and magazine apps such as PressReader and Zinio. Both these apps are free in the Apps section of the Play Store.
Open the Play Newsstand App and Choose Your Topics
The first time you open Play Newsstand, the app prompts you to select the topics you like, so that it can show you relevant stories.
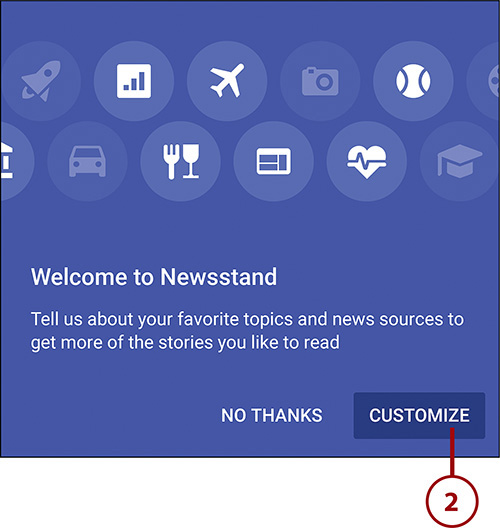
1. On the Apps screen or in the Google folder, tap Play Newsstand. The first time you open it, the app displays the Welcome to Newsstand dialog, prompting you to tell the app what you like to read.
2. Tap Customize to display the What Topics Do You Like to Read About? screen.
3. Tap an unchecked topic that you want to add. A check mark appears on the topic.
4. Tap any checked topic that you want to remove. The topic’s check mark disappears.
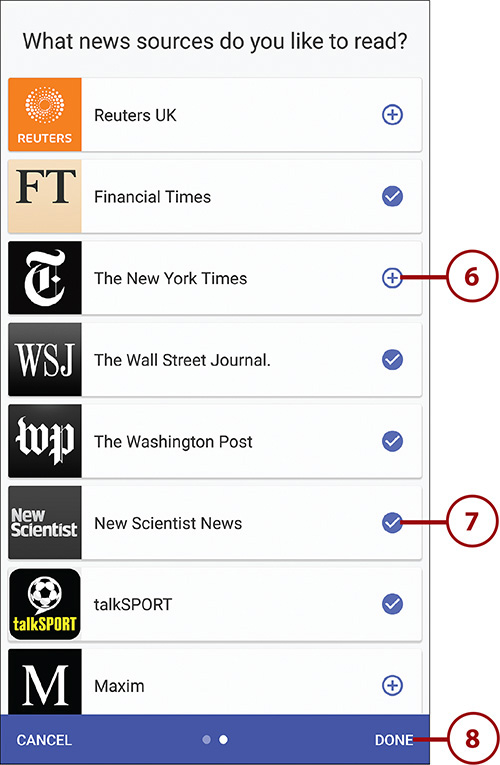
5. Tap Next. The What News Sources Do You Like to Read? screen appears.

6. Tap any unchecked news source that you want to add.
7. Tap any checked news source that you want to remove.
8. Tap Done when you finish making your choices. The news screens appear.
Adding Paid Content to Play Newsstand
After performing the initial setup on Play Newsstand, you can add other content, including paid content, at any point. To do so, tap the button in the upper-left corner of the screen to display the menu panel, and then tap Explore. On the Explore screen, tap the topic you want to browse, such as News & Politics or Science & Technology. The available content for the topic appears, and you can choose which items to add.
Any item for which you have to pay displays a price button. When you tap such an item, Android switches you to the Play Store app and displays the page for that item. You can then pay for the item using the means of payment you have set up for the Play Store.
Read News with the Read Now Feature
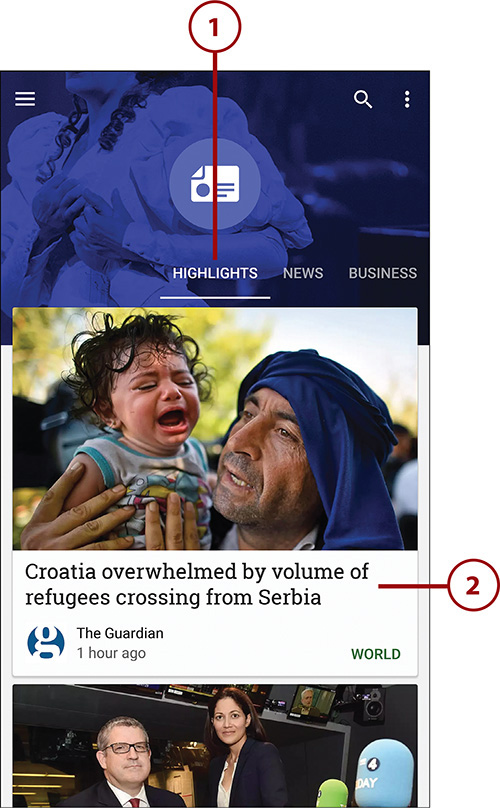
1. Tap the category of news you want to view, such as Highlights, News, Business, or Sports. You can also swipe left or right to move from one category to another.
2. Tap the story you want to display.
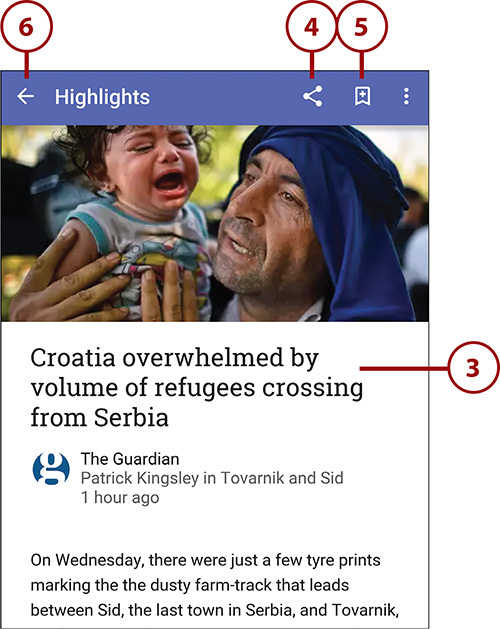
3. Tap the screen to display the controls at the top. Tap the text rather than a picture, because tapping a picture displays that picture and its caption.
4. Tap the Share icon to share the story using the means you select in the Choose an Action screen that opens. For example, you can share the story on Facebook, add it to Dropbox, or share it via email.
5. Tap Bookmark to create a bookmark for the story so that you can access it again easily.
6. Tap the arrow or the Back button to return to the previous screen so that you can browse and read other stories.
Build Your Newsstand Library
The Play Newsstand app enables you to build a library containing the publications you prefer to read.
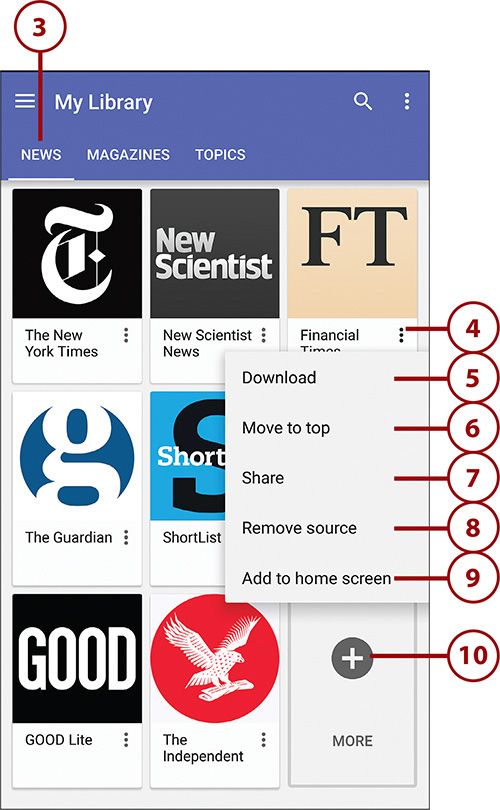
1. Tap the navigation button to display the navigation panel.

2. Tap My Library to display the My Library screen.
3. Tap News, Magazines, or Topics to display the content type you want to customize.
4. Tap the menu button on one of the items.
5. Tap Download to download the item.
6. Tap Move to Top to move the item to the top of the list.
7. Tap Share to share the item via any of the means available, such as Twitter or Email.
8. Tap Remove Source to remove this news source from your library.
9. Tap Add to Home Screen to add this news source to your Home screen.
10. Tap More to start adding another news source.
Choose Options for the Play Newsstand App
The Play Newsstand app has several settings you can choose to control when it downloads magazines and when it notifies you about new issues. You can also change the account you use to pay for Play Newsstand.
1. Tap the navigation button to display the navigation panel.
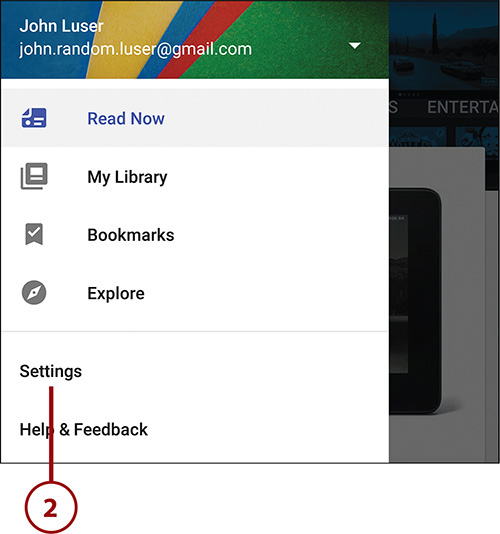
2. Tap Settings to display the Settings screen.
3. Tap Article Text Size to display the Article Text Size dialog, where you can tap the Small radio button, the Normal radio button, or the Large radio button, as needed.
4. Check the Show Notifications box if you want to receive notifications when a new issue is available of a magazine that you have added to your library.
5. Check the Download via Wi-Fi Only box if you want to restrict Play Newsstand to downloading content to when your Galaxy Note 5 has a Wi-Fi connection. Because newspaper and magazine files can be relatively large, checking this box is a good idea if your cellular data plan is limited.
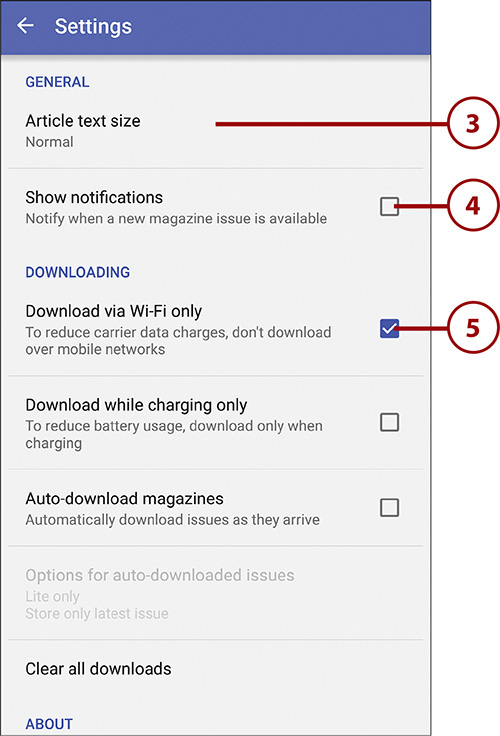
6. Check the Download While Charging Only box if you want Play Newsstand to download content only when your Galaxy Note 5 is charging. You might want to do this if your Galaxy Note 5 tends to run out of battery power.
7. Check the Auto-Download Magazines box if you want Play Newsstand to automatically download issues of magazines when they become available.
8. If you check the Auto-Download Magazines box, tap Options for Auto-Downloaded Issues to display the Auto-Download Magazines dialog, in which you can choose which issues to download and which to store. For example, you can choose to store only the latest issue to avoid running out of space on your Galaxy Note 5.
9. You can tap Clear All Downloads if you need to remove all downloaded content—for example, if you suddenly run out of space. This is a drastic action, so you have to tap OK in the Clear All downloads dialog to confirm it.
10. Tap the arrow or the Back button when you finish choosing settings.
