
This chapter deals with simple forms—not just a file converted to a PDF document; but rather a fillable form that can be completed by form recipients. In a way, a simple form as we define it here, is one that won't require much work to prepare for deployment.
Acrobat provides you with features that can help you add field objects to forms automatically. Auto field detection can be used on many documents to quickly prepare a form and make it ready for distribution.
In this chapter we cover working in the Form Editing Mode, adding field objects through Acrobat's automation features, tweaking a form, and saving it for optimum performance.
Prior to Acrobat 9, you used the Forms toolbar in Acrobat Professional to add field objects to a document. The eight form tools found in Acrobat 8 were used to create field objects on a page in the normal Viewer mode.
Acrobat 9 introduced a new user interface called Form Editing Mode. When you create field objects on a page, you enter Form Editing Mode where you can add fields, preview your work, and complete a form. When you're finished with form editing, you return to Viewer mode with the click of a button.
If you're using Acrobat Professional below version 9, you can follow much of what is contained in this chapter. The difference for you is that you need to open the Forms toolbar and stay in Viewer mode to add field objects.
One other addition was made to Acrobat 9. You can now create field objects and perform most of the form editing that was once reserved for Acrobat Pro in Acrobat Standard (Windows only) in version 9 and above. Acrobat 9 also introduced Acrobat 9 Pro Extended (Windows only). Hence, you can create PDF forms using most of what we cover in Parts I through V in any one of the commercial Acrobat 9 products. There are very few distinctions between these products when it comes to form editing. If a particular feature is implemented in only one viewer such as Acrobat Pro Extended, we make the point of clarification as you read through the chapters.
You enter Form Editing Mode via menu commands in the Forms menu. The Forms menu has two commands that take you into Form Editing Mode. At the top of the menu, Start Form Wizard appears as the first command. The second command is Add or Edit Fields. To choose this command, you must have a document open in Acrobat's Document pane.
In this section, we explain the menu commands and the differences between the two options that eventually get you into Form Editing Mode. For more detail on using one command or another, see the section "Using the wizards to create PDF forms" later in this chapter.
When you choose Forms
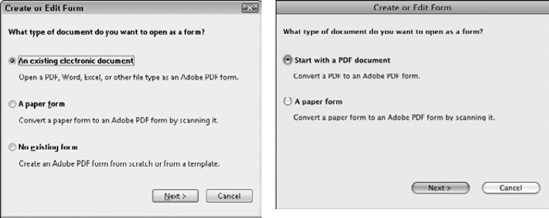
Figure 5.1. Choose Forms
An existing electronic document (Windows)/Start with a PDF Document (Macintosh): On Windows, you can choose a PDF document, a Word document, an Excel document, or many other native documents. When you open the document, Acrobat converts the file to PDF and opens the document in Form Editing Mode.
On the Macintosh, the same thing happens, but you are restricted to opening only PDF files. If you're a Mac user, you need to first convert your native files to PDF and then use the Create or Edit Form wizard.
A paper form: As you can see in Figure 5.1, a paper form is an option for both Windows and Macs. Choosing this option performs three steps. A paper form is scanned using Acrobat Scan, the form is converted to text using Acrobat's Recognize Text Using OCR (form fields are automatically applied), and the form opens in Form Editing Mode.
Note
For more information on scanning paper forms, see Chapter 6.
No existing form: This option is available only in Acrobat Pro and Pro Extended. When you choose No existing form and click Next, the Adobe LiveCycle Designer New Form Assistant wizard opens, as shown in Figure 5.2. Note that if you don't have Designer open in the background, Acrobat launches Adobe LiveCycle Designer and your computer pauses a moment while Designer opens.

To use the Forms
You can enter this mode using one of several different kinds of PDF files. Here are some examples of the files you can use to edit in Form Editing Mode:
Form designs: The most frequent use you'll have for entering Form Editing Mode is to add field objects to populate a form.
Editing a form: If you have an existing PDF form and you want to edit your form, choose Forms

Non-PDF form: Any document you convert to PDF that was not originally designed as a form can be opened in Form Editing Mode. If you want to add a series of text boxes containing a URL for your company's Web address and copy the field across multiple pages, that's a reason for using Form Editing Mode. The only way to access the Text Field tool is through Form Editing Mode.
Tip
You have one workaround available for adding different field objects while remaining in Viewer mode. You can add a Button field from the Advanced Editing toolbar and open a context menu on the button field. From the menu choose Add New Field. A submenu opens where you can choose from all the field types and add a new field while remaining in Viewer mode.
Flash videos: If you convert Adobe Flash videos to PDF, you can enter Form Editing Mode and add fields on top of the video. You might want to add text fields that appear on top of a video playing in Acrobat. If you want to add play buttons to a video file, you can remain in Viewer mode and access the Button tool in the Advanced Editing toolbar.
If you open a PDF form that contains field objects and choose Forms
Note
If you don't have a form to open in Form Editing Mode handy, open the Chapter05 folder on the CD-ROM accompanying this book and open the file globalCommitteeMembership.pdf.
Tip
Press Ctrl/
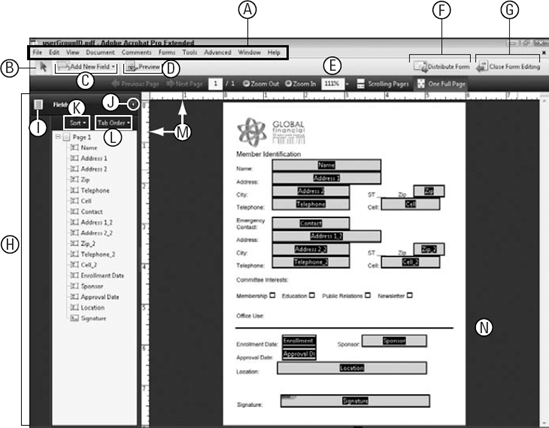
The view you see in Figure 5.3 applies to all commercial Acrobat viewers. The options include:
Note
When we talk about the commercial Acrobat viewers, we're talking about Acrobat 9 Standard, Acrobat 9 Pro, and Acrobat 9 Pro Extended. In other words, we mean the Acrobat products you need to purchase. The interface and editing features are not available in the free Adobe Reader software.
Menu bar: The same menu bar that appears in Viewer mode appears at the top of the interface. Many menu commands are not available in Form Editing Mode. For example, open the Comments menu, and most commands are grayed out.
Select Object tool: Acrobat's toolbars are not accessible in Form Editing Mode. Because the Select Object tool is frequently used when editing PDF forms, the Advanced Editing tool appears in the toolbar row.
Add New Field pull-down menu: Open the Add New Field pull-down menu, and you can select from eight forms tools. You also can choose to have the tools appear in the toolbar. Choose Show Tools on Toolbar from the menu commands, and the tools are displayed in the Form Editing toolbar, as shown in Figure 5.4. When the toolbar is expanded on the Form Editing toolbar, the Add New Field menu disappears. You can collapse the tools and display the menu again by clicking the Collapse button on the toolbar (see item J).

Figure 5.4. Open the Add New Field pull-down menu and choose Show Tools on Toolbar to display the form tools on the toolbar.
Note
For more information on the eight form tools, see Chapter 7.
Tip
If you manually add several fields of the same type on a form, such as a number of text fields, check the Keep tool selected box and the tool remains selected until you click another tool.
Preview: Click the Preview tool, and the display in Form Editing Mode changes to preview your form. While in Form Editing Mode, you cannot edit fields and test them for data entry. The Preview button enables you to remain in Form Editing Mode, but the editing options disappear, and you can add field data to your forms and test buttons and JavaScripts.
Viewing toolbar: Following the form tools are several tools used for viewing a form while remaining in Form Editing Mode, including:
Previous Page: Click Previous Page to view the previous page on a multi-page form.
Next Page: Click Next Page to view the next page on a multi-page form.
[1]/1: The number denotes the page number (of x pages) on a form that's in view in the Document pane. In multi-page forms, you see the current page number followed by the total number of pages in the document. The first value is editable. For example, if you have a ten-page document and you want to open page 5, type 5 in the text box and press the Enter key to move to that page.
Zoom Out: Click to zoom out at fixed zoom levels.
Zoom In: Click to zoom in at fixed zoom levels.
Magnification: Type a value in the text box and press Enter to zoom to a percentage value. Adjacent to the text box is a pull-down menu with fixed page magnifications.
Scrolling Pages: Click the tool to display a form in a continuous view. When you scroll pages, you can see the bottom of one page as the top of the next page comes into view.
One Full Page: One Full Page displays a whole page in view in the Document pane (see item N). As you drag the scroll bar, a mini page thumbnail displays the current page in view, as shown in Figure 5.5. The page thumbnail appears because as you scroll pages swiftly in Acrobat, the page view in the Document pane doesn't change. You see the thumbnail as you scroll pages and when you arrive at the page you want to edit, release the mouse button and the page snaps into place in the Document pane. This interface design enables you to scroll through long documents swiftly because each page in the document pane isn't refreshed on your monitor as you scroll the pages.
Distribute Form: Click the Distribute Form button, and the Distribute Form wizard opens. In the wizard, you make a choice for how you want to distribute a form.
Note
For more information on distributing forms, see Chapter 15.
Close Form Editing: Click this button to return to Viewer mode. All the menu commands are available when you return to Viewer mode.
Fields panel: In Acrobat 8 and below, the Fields panel is available in Viewer mode and can be docked in the Navigation pane. In Acrobat 9 and above, the Fields panel is available only in Form Editing Mode. As you add fields to a form, the panel dynamically updates to display the field objects added to a form.
Collapse/Expand Fields panel: Click the Fields panel icon, and you collapse the Fields panel, but the icon remains in view. Click the icon again, and the panel is expanded.
Collapse: This button also collapses the Fields panel. The same button appears in the Toolbar when the form tools are in view (refer to item C). Click the button, and the form tools disappear.
Sort pull-down menu: Open the pull-down menu, and you find two options for sorting fields in the Fields panel. Choose Alphabetical Order to display the fields alphabetically by field name. When you sort alphabetically, the Tab Order (see item L) disappears. Choose the Tab Order menu command from the Sort pull-down menu, and the fields are sorted according to tab order.
Tip
Fields in the Fields panel can be moved to rearrange the field tab order. Click a field and drag up or down to reorder the fields.
Tab Order pull-down menu: The Tab Order pull-down menu provides several commands for setting the field tab order.
Note
For more information on setting tab orders, see Chapter 7.
Rulers: By default, rulers appear in the Document pane. You can hide the rulers using the keyboard shortcut Ctrl/

Document pane: The space where your form pages appear is the Form Editing Mode Document pane.

Getting in and out of Form Editing Mode and changing views are common tasks you'll perform as a forms author. It's important to commit to memory how you navigate the different interfaces when you edit forms.
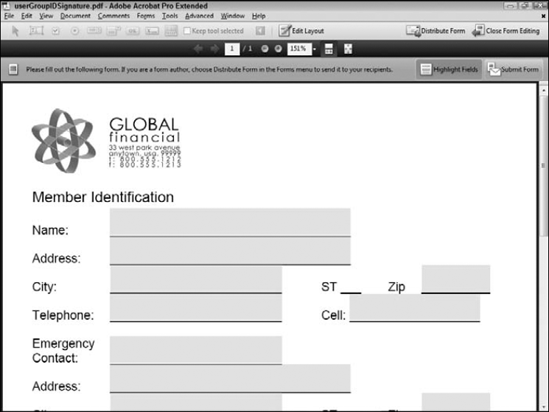
In Preview mode, you see the Acrobat Message Bar. On the Message Bar, you find some tools not available when in Edit mode. The Highlight Fields tool, which is selected in Figure 5.6, highlights the fields on the form with a light blue highlight. Adjacent to the Highlight Fields button is the Submit Form button. This button appears on forms designed in Acrobat 9 and above.
Note
For more information on creating Submit Form buttons, see Chapter 15.
Tip
How you work as a forms author is a matter of personal taste. There are some things you must do, such as enter Form Editing Mode when adding fields to a form. After fields have been added, you can either choose to stay in Form Editing Mode or return to Viewer mode. In both modes, you have access to the Select Object tool. Using this tool, you can select fields, manage fields, and open field Properties dialog boxes, and you have full access to the menu commands for adding JavaScripts. Therefore, your workflow for editing fields is a matter of personal taste.
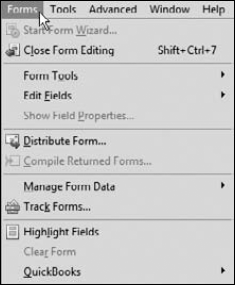
When you examine the Forms menu in both Form Editing Mode and Viewer mode, you will notice that some commands are not accessible when in Form Editing Mode. In Figure 5.7, the Forms menu commands are shown when opening the menu in Viewer mode. Some of the commands do not appear in the Forms menu when you open the same menu in Form Editing Mode.
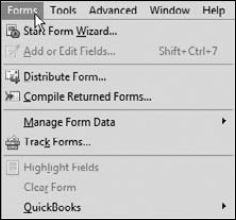
The commands not available to you while working in Form Editing Mode include:
Start Form Wizard: Why this command is not available in Form Editing Mode should be obvious. If you're in an edit mode, choosing this command takes you to the Create or Edit Form wizard that eventually takes you to Form Editing Mode. Likewise, the Add or Edit Fields command is not available in Form Editing Mode because you're already in the mode.
Compile Returned Forms: This command is used to aggregate form data in a PDF Responses file from forms that have been e-mailed to you. The command is not available when in Form Editing Mode.
Note
For more information on compiling returned forms, see Chapter 15. For more information on forms and PDF Responses files, see Chapter 13.
Manage Form Data: The Forms
Note
For more information on working with form data, see Chapter 15.
QuickBooks: You can integrate data with Intuit QuickBooks and have several menu commands for preparing and editing QuickBooks templates. These commands are available only when working in Viewer mode.
When in Form Editing Mode, you find a few additional menu commands not available in Viewer mode. In Form Editing Mode, open the Forms menu and you find the commands shown in Figure 5.8. Commands not available in Viewer mode include:
Form Tools: This menu lists all the Form tools. Because you need to be in Form Editing Mode to use the tools, the command and submenu choices are not available in Viewer mode.
Edit Fields: The Edit Fields submenu items include Duplicate, Place Multiple Fields, Show Tab Numbers, and Set Field Calculation Order. The menu is not available in Viewer mode, but the Duplicate and Place Multiple Fields commands are accessible in Viewer mode via a context menu.
Note
For more information on managing, duplicating, and placing multiple fields, see Chapter 7.
A few other menu commands that are used frequently by forms authors appear in the Advanced menu. For a summary of what's available in one mode or the other and the Advanced menu commands that are accessible according to the interface mode, look over Table 5.1.
Table 5.1. Menu Commands Accessible According to Interface Mode
Menu Commands | Viewer Mode | Form Editing Mode |
|---|---|---|
Start Form Wizard | X | |
Add or Edit Fields | X | |
Close Form Editing | X | |
Distribute Form | X | X |
Compile Returned Forms | X | |
Form Tools | X | |
X | ||
Show Field Properties | X | X |
Manage Form Data (submenu commands) | X | |
Track Forms | X | X |
Highlight Fields | X | X |
Clear Form | X | X |
QuickBooks (submenu commands)[b] | X | |
X | ||
Advanced Menu (JavaScript commands) | X | X |
Advanced Menu (page templates) | X | |
[a] The Button tool is available in the Advanced Editing toolbar in Viewer mode. [b] The QuickBooks submenu is available in the English version only. | ||
Note
For more information on enabling Adobe Reader features, see Chapter 10. For more information on page templates, see Chapter 19. For more information on JavaScript, see Part V.
As we stated earlier in the section "Toggling views", you can choose to edit fields in either Form Editing Mode or Viewer mode. To edit fields in Viewer mode, you first need to open the Advanced Editing toolbar. This toolbar should be loaded in the Acrobat Toolbar Well when you are engaged in a form editing session in Acrobat.
To open the Advanced Editing toolbar, open a context menu on the Toolbar Well and choose Advanced Editing from the menu commands. Alternately, you can choose Tools

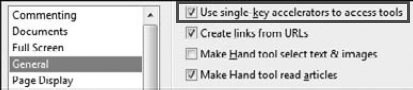
Additionally, you can select the Select Object tool by using a keyboard shortcut. Before you use keyboard shortcuts in Acrobat, you need to adjust one preference setting. Open the Preferences dialog box by pressing Ctrl/
In the Preferences dialog box, click General in the left pane, as shown in Figure 5.10. In the right pane, check the box beside Use single-key accelerators to access tools. Click OK in the Preferences dialog box, and Acrobat is set up for you to strike keys on your keyboard to access tools. The preference change is dynamic, and you don't need to quit Acrobat to use keyboard shortcuts.
Tip
When in Form Editing Mode, you can access the Form tools using a keyboard shortcut. Press F on your keyboard and Shift+F to toggle the form tools. Pressing F in Viewer mode accesses the Button tool.
After you have the Select Object tool as your active tool, you can click form fields to select them in Viewer mode. Click a field and open a context menu, and you find a number of commands that aren't available from the Forms menu for editing fields, as shown in Figure 5.11.
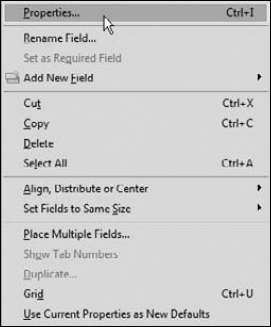
Figure 5.11. Click the Select Object tool in Viewer mode and open a context menu to see additional options, features, and commands.
If you choose Properties from the menu commands, you have access to all field properties where you can change field names, edit appearances, edit options, change field formatting, and add actions. In other words, you don't need to work in Form Editing Mode to handle all the properties changes you want to make on fields.
Thus far in this chapter, we've talked about starting with a populated form and looking at options we have for making edits on forms. The area of focus so far has been for us to point out the differences you have between the Viewer mode, which is the default view when you open a PDF document in Acrobat, and Form Editing Mode, which is used for adding fields to a form. You should be clear on the differences of the two modes and what can and cannot be accomplished in one mode versus another.
Assuming you're clear on the different modes and the editing tasks you can complete in each mode, it's now time to look at creating forms in Acrobat. As we said in the introduction of this chapter, our emphasis is on creating simple forms where you don't have to perform lots of editing, such as adding calculations, JavaScripts, and special field formatting.
If you're a Mac user, you need to first convert native documents to PDF, and then open the PDF document in Acrobat and choose Forms
Tip
For Mac users, if you work with Adobe InDesign you can convert InDesign files directly to PDF files from within Acrobat.
In addition to converting native files to PDF, Windows users can apply a one-step operation to convert to PDF and open the PDF document, run Acrobat's auto field detection, and open the form in From Editing Mode. To see how to convert a native document to PDF on Windows, do the following.
Note
To follow the steps below, use the seminarGlobal.doc file in the Chapter 5 folder on the book's CD-ROM.
STEPS: Converting a Native Microsoft Word Document to a PDF Form on Windows
Choose Forms
Start Forms Wizard. You don't need a file open in Acrobat to access this menu command. The Create or Edit Form wizard opens.Select the An existing electronic document radio button. Choose the first radio button option in the Create or Edit Form wizard and click the Next button.
Import a file. Click the Import a file from file system radio button. The Browse button becomes active. Click the Browse button and locate a native Microsoft Office document. In our example we use the seminarGlobal.doc file from the book's CD-ROM. Click the filename and click Next in the Create or Edit Form wizard.
Click OK in the Welcome to Form Editing Mode dialog box. The document is automatically converted to PDF, Acrobat automatically detects fields, and the Welcome to Form Editing Mode dialog box opens. Click OK and you can make any necessary edits to the field objects.
Tip
For a quick look into file formats supported by Acrobat for PDF conversion, open the Preferences dialog box (Ctrl/
If you're a Mac user and you want to populate a form, you need to first convert the native document to a PDF file. On Windows, you may have several MS Office files that you want to convert to PDF and later add field objects. To convert a PDF file to a PDF form with field objects on either platform, do the following.
Note
To follow the steps below use the seminarGlobal.pdf file from the Chapter 5 folder on the book's CD-ROM.
STEPS: Converting a Microsoft Word Document to a PDF Form
Open a PDF file in Acrobat. Click the Open tool or choose File
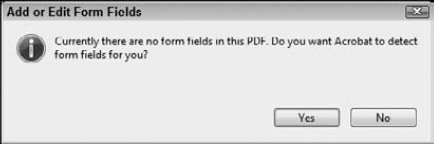
Choose Forms Add or Edit Fields. Acrobat opens a dialog box asking you if you want to run auto field detection. Click Yes and the form opens in Form Editing Mode.
Review the Welcome to Form Editing Mode window. When you use auto field detection, Acrobat recognizes locations for field objects and creates the fields.
Note
Acrobat recognizes fields on a form through a field recognition algorithm that was introduced in Acrobat 8. For more information on using auto field detection, see the sidebar "Using Auto Field Detection" later in this chapter.
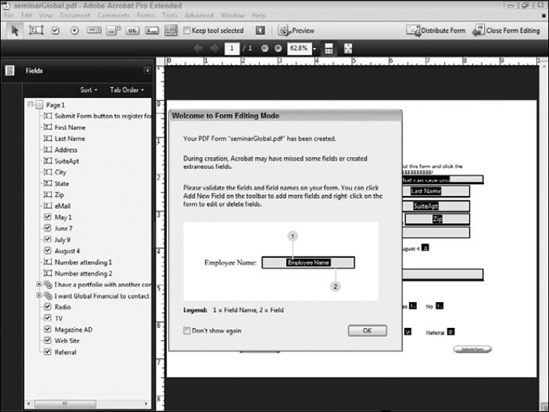
When you enter Form Editing Mode, a help Welcome window appears, as shown in Figure 5.12. In this window, you find some helpful hints concerning form editing. Look over the information to learn how Acrobat identifies a field name and a field object. Click OK, and you see the form in Form Editing Mode populated with field objects.
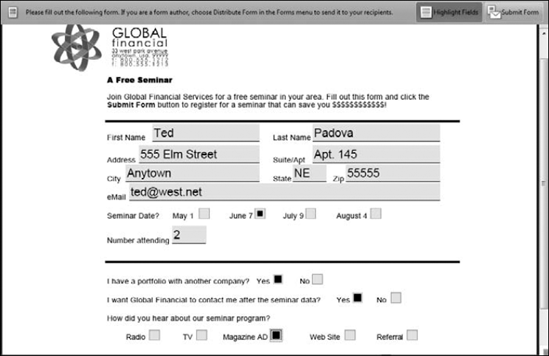
Review the form. Our form has a few extra fields that are not supposed to be on the form. Acrobat looked over the document and created two fields over separator lines we used as design elements in the file. These two extra fields need to be deleted. To delete a field, click the field in question and press the Delete/Del key.
Preview the form. Click the Preview button, and click the Highlight Fields button when you switch to Preview mode. Look over the fields on the form to be certain that all fields appear per the form design.
Test the fields. Fill in the form as a form recipient would complete your form. In our example form, Acrobat did an excellent job of recognizing the form fields. The only problem we have on this form is that the check boxes are not designed as mutually exclusive fields, so that a form recipient can make only a single choice in a row of common fields. For the moment, we'll leave the form as it appears in Figure 5.13.
Note
For more information on working with mutually exclusive radio buttons and check boxes, see Chapter 8.
Return to Form Editing Mode. After testing the fields, click the Edit Layout tool in the Form Editing toolbar and you return to Form Editing Mode.
Clear the form. Open the Forms menu and choose Clear Form. You'll find this menu command handy when creating forms and testing the fields. For the final file, you'll want to clear all data before saving the form.
Tip
If you forget to clear fields on a form and use the Distribute Form button in Acrobat, you are warned that the fields are not cleared. Acrobat offers you a choice to clear fields in a warning dialog box. Click Yes and the fields are all cleared before the form is deployed. For more information on deploying forms, see Chapter 14.
Save the form. If you converted an authoring application document to PDF, a Save As dialog box opens. Type a name for you file, and click Save to save the form.
Using Auto Field Detection
Adobe added a very impressive feature called Run Form Field Recognition to Acrobat 8. Quite often we refer to the feature simply as auto field detection. In Acrobat 8, you visited the Forms menu and chose Run Form Field Recognition. Acrobat inspected your form, detected areas where fields belonged, and added the fields automatically to the form.
Acrobat 9 has the same feature, but it's much improved; however, there is no separate menu command to use RFFR. When you choose Forms
When Acrobat creates fields using auto field detection, it picks up caption text and adds the caption text for a field name. On some forms, you may find using auto field detection undesirable because you may want to add your own field names. If you need to manually name fields, you can choose to use auto field detection and later change the field names, or click No in the Add or Edit Fields dialog box and manually add fields using the Form tools.
Tip
Open the MS Word file seminarGlobal.doc on the CD-ROM in the Chapter05 folder in Microsoft Word and examine it. You'll notice that the boxes on the form are not type characters. In order for Acrobat to accurately identify check boxes as form fields, you may need to draw geometric shapes. In some cases certain characters from the Wingdings and Zapf Dingbats fonts work fine for check boxes and radio buttons and some characters won't work. To be safe, you can use geometric shapes for more reliability. If using Acrobat 8, you must use geometric shapes. Acrobat 8 doesn't recognize any text characters for radio buttons and check box fields.
The form used in the steps here is a rather simple form. However, you can see that converting a number of forms—especially forms designed for HR departments and in-house use—can be accomplished easily with little or no editing.
If you use tools such as the PDFMaker in MS Office programs and convert to PDF or you're a Macintosh user working with PDF documents, you can use auto field detection on the PDF files. When you open a file in Acrobat and choose Add or Edit Fields, Acrobat opens the Add or Edit Form Fields dialog box. If you click Yes, then auto field detection populates your form with field objects in the areas where Acrobat recognizes the location for a potential form field.
Not all your designs can successfully be populated with fields using auto field detection. Form designs with gradients and field locations not clearly identified with lines and boxes that appear with stroke values are often a problem for auto field detection. Figure 5.14 is a form designed in Adobe Illustrator. When we select Forms
Field Properties appear in a particular field type's Properties dialog box. When you click a field with the Select Object tool in either Form Editing Mode or Viewer mode and choose Properties from a context menu, double-click a field with the Select Object tool, or select a field in Form Editing Mode and choose Forms
Tip
The easiest method for opening a field's Properties dialog box is to click the Select Object tool in either Form Editing Mode or Viewer mode and double-click the field object. Using this method enables you to open the field's Properties dialog box in either mode during an editing session.

Figure 5.14. Auto field detection can't recognize field objects on a form that doesn't have design elements such as lines and boxes with stroke values.
Each field type has different properties that can be assigned to fields. With text fields, you have options for calculating fields; with buttons you have options for adding button face images; with combo and list box fields, you can add lists of items for user-selected choices. Some properties are common to all the field types, such as naming fields, setting appearances, and assigning actions, as well as the unique choices according to the field type you use.
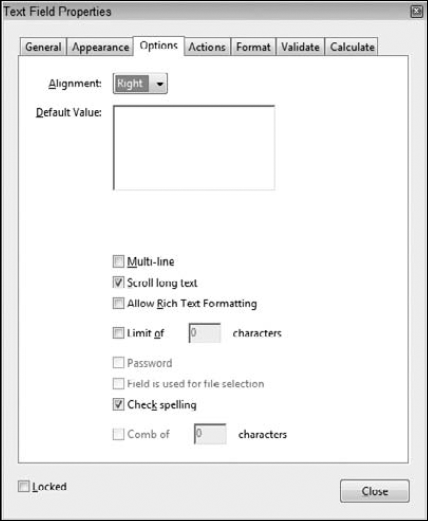
Figure 5.15 shows the Text Field Properties dialog box, with the Options tab selected. On our sample form created in the section "Converting a native file to a PDF form", we might want to right-align the text field for the Number attending field. To do so, we open the field's Properties dialog box, click Options, and choose Right from the Alignment pull-down menu.
As you browse through different properties, many options choices are self-explanatory. In other cases, you may need help deciphering the choices. For now, we want to introduce the Properties dialog box. Later in Chapter 7, we cover all you need to know about field properties.
You'll eventually need to add a field to a form. When fields are added, you typically need to open the field properties to customize some attribute settings. In some cases, you'll need to create some essential fields that aren't part of the original form design.
You use the Form tools in Form Editing Mode to add fields to a form. If you use auto field detection and populate a form, you may want additional fields on your form. Certainly if you create fields manually, you'll need to use the Form tools to add fields.
For a brief look at adding a field to a form, follow these steps.
Note
For these steps we use the file seminarGlobalPopulated.pdf found in the Chapter05 folder on the book's CD-ROM.
STEPS: Adding a Field to a Form
Open a form in Acrobat. For this example, we use the seminarGlobalPopulated.pdf form. This form has been populated with fields using auto field detection.
Open the form in Form Editing Mode. Choose Forms
Select the Text Field tool. Open the Add New Field pull-down menu, and select Text Field. (If you chose to show the tools on the Form Editing Toolbar, you can click the Text Field tool.)
Click the cursor on the form page. In this example, we add a text field to the top-right corner of the page. We'll use this field to add a form number to the form.
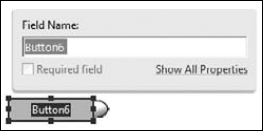
Name the field. When the field is added to the form, a help window opens as shown in Figure 5.16. Type a name for the field. In our example, we use formNumber for the name.
Note
There are some considerations to take into account regarding naming fields. Look over Chapter 7 for some important issues related to field naming conventions.
Open the Properties dialog box. Click the blue text where you see Show All Properties, and the Text Field Properties dialog box opens.
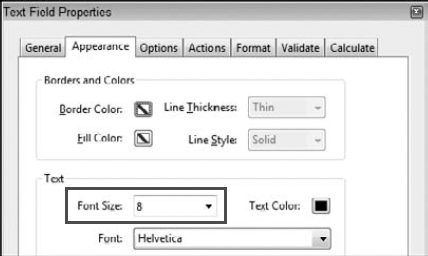
Set the text point size. Click the Appearance tab in the Text Field Properties dialog box, and change the Font Size from the default Auto to 8 point, as shown in Figure 5.17. Note that you can choose a font size from the Font Size pull-down menu or type a value in the Font Size text box.
Set the Alignment. For this text box, we want the text to be right-aligned. Click the Options tab, and choose Right from the Alignment pull-down menu.
Close the Text Field Properties dialog box. Click the Close button, and all the attribute choices you made are applied to the field.
Type a value in the text box. Click the Preview button, and type text in the new text field. In our example, we typed GL-101 to create a form number.
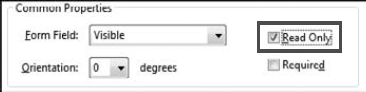
Set the field to Read Only. This field contains data that we don't want edited on the form. Therefore, we'll lock out the possibility for a form recipient to inadvertently type text in the text field. Click the Edit Layout button, and double-click the field to open the Text Field Properties dialog box. In the General tab, check the Read Only check box, as shown in Figure 5.18. When a field is marked for Read Only, the field cannot be edited unless a user opens the Text Field Properties dialog box and removes the Read Only check mark.
Click Close. When you close the Text Field Properties, all changes are assigned to the field properties.

Many forms have two essential buttons that you prepare for form recipients. One button is used to clear a form. Although Acrobat users have a menu command to clear a form, Adobe Reader users do not have such a command. Having a button on a form designed for clearing the form data is great for a user who wants to start over. This type of button is optional when creating forms, but is usually added to help form recipients complete your forms.
Another button that you need on many forms is a submit button. If your forms are distributed to using the Distribute Form button, a Submit Form button automatically is added to the forms Document Message Bar. If you e-mail a form or someone downloads a form from your Web site, you'll need a Submit Form button so the form recipient can return the form to you.
Note
For more information on Acrobat.com and distributing forms, see Chapter 15.
Buttons are often used to execute an action on a form. For clearing form data, we use a button field and assign an action to reset the form. Here's how it's done.
STEPS: Creating a Reset Form Button
Open a form in Form Editing Mode. We'll continue with the form we used earlier in this chapter. While the form remains in Viewer mode, you can add buttons to your form. There is no need to enter Form Editing Mode.
Open the Advanced Editing toolbar. If the toolbar is not open, choose Tools
Select the Button tool. Click the Button tool in the Advanced Editing toolbar.
Click in the document where you want the button placed. Our form has some graphic objects identifying the Reset Form button and the Submit Form button. We clicked the Button cursor over the Reset Form graphic image, as shown in Figure 5.19.
Note
See the sidebar later in this chapter, "Using Loaded Cursors," to understand the meaning of terms such as Button cursor.
Resize the field. Drag any one of the eight handles on the rectangle to reshape the object.
Type a name. Type a name for the field in the Field Name text box. In our example, we use resetForm for the field name.
Click Properties to open the Button Field Properties.
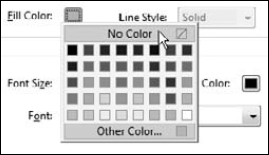
Change the appearance. By default Buttons have a dark gray fill. Since we have a graphic on the page that clearly identifies the existence of a button, we want our button field to appear transparent. When the button field object is transparent, the background graphic is not obstructed from view. In the Appearance tab, click the Fill Color swatch and choose No Color in the palette, as shown in Figure 5.20.
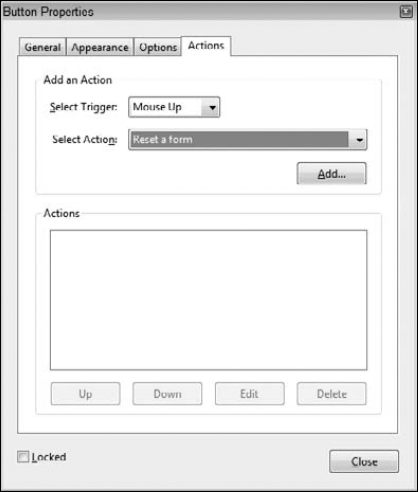
Open the Actions tab. Click the Actions tab in the Button Properties dialog box. Open the Select Action pull-down menu, and choose Reset a form, as shown in Figure 5.21.
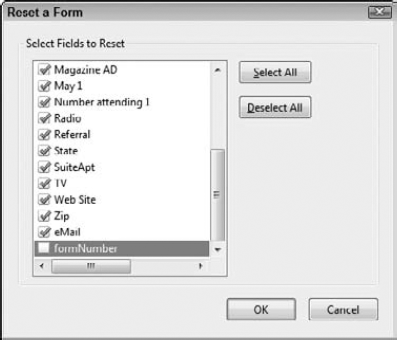
Add the action. After choosing the option you want from the Select Action pull-down menu, click the Add button in the Actions tab to add the action. When adding the Reset a form action, the Reset a Form dialog box opens, as shown in Figure 5.22.
Select the Fields to Reset. In our example, we created a field in the section "Adding fields" earlier in this chapter that was added to the form so we could add a form number. After we added the form number, we marked it as Read Only. That field isn't one we want to clear. If we reset all fields on our form, the form number will disappear. Therefore, when the Reset a Form dialog box opens, we scroll down to the field we don't want cleared and deselect the check box. By default, all boxes are checked, so you need to remove check marks from those boxes for fields you don't want cleared of data.
Set new defaults. Click OK in the Reset a Form dialog box, and click Close in the Button Properties dialog box; you return to the Document page. At this point, your field is set for clearing data on the form. If you want to add more buttons to a form, you may want to use the new appearance settings you adjusted for a button field to become a new default. When you create additional buttons, you won't need to bother with the Appearance tab.
To set the current appearance as a new default, open a context menu on the button field and choose Use Current Properties as New Defaults.
Test the button. If you're in Viewer mode, click the Hand tool and add data to the form. If you're in Form Editing Mode, click Preview and add data. After adding data to the fields, click the Reset button (in Viewer mode or Preview mode). All data but the Read Only field is cleared on the form.
Using Loaded Cursors
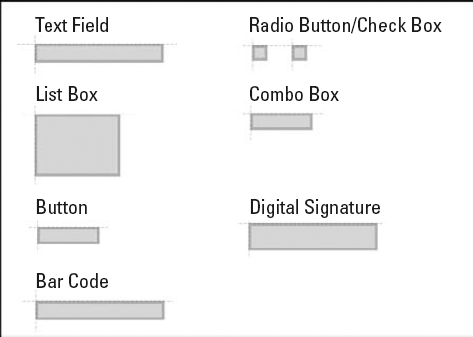
When you choose any one of the eight field types from the Add New Field pull-down menu, the cursor changes to reflect a visual of the type of field you have selected. We refer to the cursor as being loaded with the field type after you select a field from the Add New Field pull-down menu. A loaded Text Field cursor, therefore, is one that contains the Text Field object.
When you select a tool from the Add New Field menu, the cursor remains loaded until you click the mouse button. You can move the cursor around a form page, and the cursor displays guidelines to help you position the field in the right location before clicking the mouse button.
When you click the mouse button, the field drops down on your form. Precise alignment is not necessary because you can click and drag a field after it has been dropped on the form.
You also can click and drag a rectangle to shape a form field before dropping the field on the form page. In this manner, you can estimate a size for a field before actually creating the field.
Submit Form buttons are used to submit forms and/or form data to you or a location you identify when setting up the button properties. To create a Submit Form button, follow these steps.
STEPS: Creating a Submit Form Button
Open a form in Acrobat. In this example we'll continue with the form to which we added a Reset Form button.
Add a button field. We can create a new button using the Button tool, or we can use an easier method: duplicating the Reset Form button and changing the properties. To duplicate a field, press the Ctrl/Option key and click+drag with the Select Object tool. Drag the new button to position on the form.
Note
For more information on duplicating fields, see Chapter 7.
Rename the field. At this point, we have a duplicate of the Reset Form button. To rename the field, double-click the duplicate button with the Select Object tool to open the General tab in the Button Properties dialog box. Type a new name in the Name text box.
Delete the action. Click the Actions tab. The current action is to reset the form. Click the Mouse Up text in the actions list, and click the Delete button to remove the action.
Add a new action. Open the Select Action pull-down menu, and choose Submit a form. Click the Add button, and the Submit Form Selections dialog box opens, as shown in Figure 5.23.
Add a URL link. In our example, we want the form e-mailed back to us. Type mailto:<your email address> in the Enter a URL for this link text box, as shown in Figure 5.23.
Choose an export format. For our example, we want the complete PDF document sent back to us, so we click the PDF The complete document radio button.
Click OK in the Submit Form Selection dialog box, and click Close in the Button Properties dialog box. Your form is now set up with a submit form button.
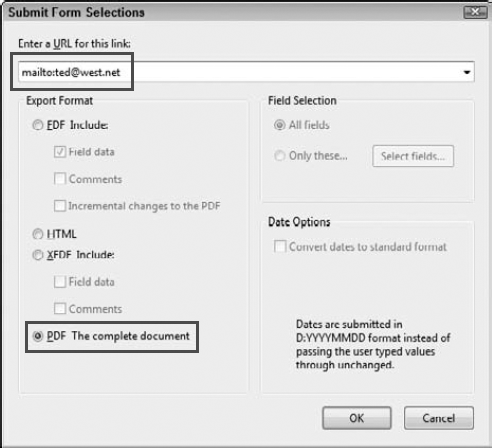
Figure 5.23. Type mailto: followed by your e-mail address in the Enter a URL for this link text box, and click the PDF The complete document radio button.
Warning
If you intend to have Adobe Reader users fill in the form and send it back to you, you must enable the form with Adobe Reader usage rights. For more information on enabling forms with Adobe Reader usage rights, see Chapter 10.
There may be times when fields should be auto-detected, but it doesn't happen. You look at a form seeing a clear indication where field objects should be placed, but when you choose Forms
Some forms just don't work because of design issues, forms that have been enabled with Adobe Reader usage rights, and forms that have security applied that prevent editing the PDF file. These conditions are logical, and we can easily understand why Acrobat can't auto-detect fields.
Note
For more information on enabling forms for Adobe Reader users, see Chapter 10. For more information on securing forms, see Chapter 12.
If you already have at least one form field on the document, auto field detection won't work. If you want to use auto field detection, you must delete all fields, save the form, and open it in Form Editing Mode. You should be prompted by Acrobat to auto-detect fields on the modified form.
Sometimes, you may have a form with no fields, and Acrobat still doesn't prompt you to auto-detect fields. Look at Figure 5.24 as an example. This form seems like a good candidate for Acrobat to prompt us to auto-detect fields when opening the form in Form Editing Mode. When using this form and opening it in Form Editing Mode, the form opens without Acrobat auto-detecting any fields.
Some files may have certain metadata or something in the document structure that prevents Acrobat from auto-detecting fields. Even if you use the PDF Optimizer and optimize the document, strip away metadata, and change the Acrobat compatibility, Acrobat may still not be able to auto-detect fields.
Note
For more information on using the PDF Optimizer, see Chapter 13.
Note
To examine a form where auto field detection doesn't work, look at the employeeApplicationExtract.pdf document in the Chapter05 folder on the book's CD-ROM.

Figure 5.24. Although this form has some color in the design, field locations are clearly identified and we would presume by looking at the form that Acrobat should be able to auto-detect fields.
As a workaround, try extracting a form page. You can use the Document
We're certain you intuitively know how to save documents from Acrobat and other applications. The Save commands are found under the File menu in most applications. In Microsoft Office 2007, the Save command is found under the Office menu.
As you work on a form in Acrobat, you should plan on saving frequently. Opening Properties dialog boxes can, on occasion, cause a hiccup in the program, and you might experience a program crash. This is particularly true of applications when first released. When we see maintenance upgrades appear like 9.1, 9.05, 9.2, and so on, the programs tend to be more stable.
After you complete a form, your last step should be choosing File
Form fields are added in Form Editing Mode in Acrobat 9.
All commercial Acrobat viewers in version 9 support creating PDF forms, including Acrobat 9 Standard (Windows).
Forms can be tested and filled in while in Form Editing Mode by clicking the Preview button.
While in Form Editing Mode, you do not have access to many Acrobat tools. You need to click the Close Form Editing button to return to Viewer mode to access all of Acrobat's tools and menu commands.
The Fields panel is available only while in Form Editing Mode. The Fields panel cannot be opened when in Viewer mode.
A field's Properties dialog box can be opened in both Form Editing Mode and Viewer mode. The easiest way to open a field's Properties dialog box is to click the Select Object tool and double-click a field object.
Native file formats can be opened in Windows directly from within Acrobat. When a native file designed as a form is opened in Acrobat, the file is converted to PDF, automatic field detection is performed, and the form opens in Form Editing Mode.
When opening a file in Form Editing Mode, you are prompted to use auto field detection. If you click Yes, Acrobat makes its best effort to automatically populate a form with field objects.
Two frequently used buttons on forms are reset form and submit form buttons.
Forms need to be enabled with Adobe Reader usage rights in order for an Adobe Reader user to return a PDF form to a form author.
If auto field detection doesn't work on a form, use the Document
As a last step in creating forms, you should use the Save As command to rewrite the file. Rewriting a file optimizes it and reduces the file size.