PowerPoint makes it easy to create consistent, attractive slides that use standard preset layouts. You just choose the layout that you want for a particular slide and then fill in its placeholders with text, graphics, or other content.
In this chapter, you'll learn how to build a simple text-based presentation by creating new slides and entering text on them. You'll learn how to import content from other programs, and how to create, size, and position text boxes to hold the text for your presentation.
Different templates start a presentation with different numbers and types of slides. A blank presentation has only a single slide, and you must create any others that you want.
There are several ways to create new slides. For example, you can type new text in the outline and then promote it to slide status, or you can add slides with the New Slide button that is on the Insert tab. You can also copy existing slides, either within the same presentation or from other sources. The following sections outline these procedures in more detail.
As discussed in Chapter 1, the Outline pane shows the text from the presentations slides in a hierarchical tree, with the slide titles at the top level (the slide level) and the various levels of bulleted lists on the slides displaying as subordinate levels. Text that you type in the Outline pane appears on the slide, and vice versa, as shown in figure 4.1.
Note
The Outline pane doesn't actually show all of the text in all cases; see "Creating Text Boxes Manually" later in this chapter to find out why text in some text boxes does not appear in the Outline pane.
Follow these steps to create a new slide from the Outline pane:
Switch to Normal view.
Right-click the existing line on the Outline pane that the new slide should follow.
Click New Slide. A new line appears in the Outline pane, with a slide symbol to its left.
Type the title for the new slide. The title appears both in the Outline pane and on the slide.

Figure 4.1. When you type text into the Outline pane, it automatically appears on the current slide.
You can also create a new slide by starting a new line in the Outline pane and then promoting it to slide level by pressing Shift+Tab. Follow these steps to insert a new slide in this way:
Position the insertion point at the end of the last line of the slide that the new slide should follow, and press Enter to start a new line.
Press Shift+Tab to promote the new line to the highest level (press it multiple times if needed), so that a slide icon appears to its left.
Type the title for the new slide. The title appears both in the Outline pane and on the slide.
After creating the slide, you can continue creating its content directly in the Outline pane. Press Enter to start a new line, and then use Tab to demote, or Shift+Tab to promote, the line to the desired level. You can also right-click the text and choose Promote or Demote. Promoting a line all the way to the top level changes the line to a new slide title.
Here's a very quick method for creating a new slide, based on the default layout. It doesn't get much easier than this:
In Normal view, in the Slides pane, click the slide that the new slide should follow.
Press Enter. A new slide appears using the Title and Content layout.
The drawback to this method is that you cannot specify the layout. To choose a layout other than the default one, see the next section.
A slide layout is a layout guide that tells PowerPoint what placeholder boxes to use on a particular slide and where to position them. Although slide layouts can contain placeholders for text, they also contain graphics, charts, tables, and other useful elements. After you create a new slide with placeholders, you can click a placeholder to open whatever controls you need to insert that type of object.
Note
See the section, "Using Content Placeholders" for more information on inserting objects.
When you create new slides using the outline method described in the preceding section, the new slides use the Title and Content layout, which consists of a slide title and a single, large placeholder box for content. If you want to use another layout, such as a slide with two adjacent but separate frames of content, you must either switch the slide to a different layout after its creation (using the Layout menu on the Home tab), or you must specify a different layout when you initially create the slide.
To specify a certain layout as you are creating a slide, follow these steps:
In Normal or Slide Sorter view, select or display the slide that the new one should follow.
You can select a slide by clicking its thumbnail image in Slide Sorter view or on the Slides pane in Normal view. You can also move the insertion point to the slides text in the Outline pane.
On either the Home tab, do one of the following:
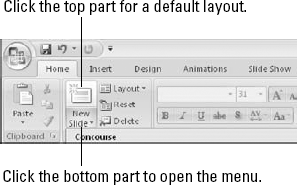
To add a new slide using the default Title and Content layout, click the top (graphical) portion of the New Slide button.
To add a new slide using another layout, click the bottom (text) portion of the New Slide button and then select the desired layout from the menu, as shown in figure 4.2.
Tip
The layouts that appear on the menu come from the slide master. To customize these layouts, click Slide Master on the View tab. You will learn more about the slide master and about changing layouts in Chapter 5.
Another way to create a new slide is to copy an existing one in the same presentation. This is especially useful when you are using multiple slides to create a progression because one slide is typically identical to the next slide in a sequence, except for a small change. (You can also build effects within a single slide using PowerPoint's animation effects, as you will learn in Chapter 18.)
There are several ways to copy one or more slides. One way is to use the Windows Clipboard, as in the following steps:
Select the slide or slides that you want to copy. See "Selecting Slides" later in this chapter for more information about selecting slides.
Press Ctrl+C. You can also click the Copy button on the Home tab, or right-click the selection and click Copy.
Select the slide that the pasted slide or slides should follow. Alternately in the Outline pane, click to place the insertion point where you want the insertion.
Press Ctrl+V. You can also click the Paste button on the Home tab, or right-click the destination and click Paste.
PowerPoint also has a Duplicate Slides command that does the same thing as a copy-and-paste command. Although it may be a little faster, it gives you less control as to where the pasted copies will appear:
Select the slide or slides to be duplicated.
On the Home tab, click the bottom part of the New Slide button to open its menu.
Click Duplicate Selected Slides.
PowerPoint pastes the slides immediately after the last slide in the selection. For example, if you selected slides 1, 3, and 6, then the copies are placed after slide 6.
Many people find that they can save a lot of time by copying text or slides from other programs or from other PowerPoint presentations to form the basis of a new presentation. There's no need to reinvent the wheel each time! The following sections look at various ways to bring in content from external sources.
There are several ways to copy slides from other presentations. You can:
Open the presentation, save it under a different name, and then delete the slides that you don't want, leaving a new presentation with the desired slides ready for customization.
Open two PowerPoint windows side-by-side and drag-and-drop slides between them.
Open two PowerPoint presentations, copy slides from one of them to the Clipboard (Ctrl+C), and then paste them into the other presentation (Ctrl+V).
Use the Reuse Slides feature in PowerPoint, as described next.
To reuse slides from other presentations with the Reuse Slides feature, follow these steps:
On the Home tab, click the lower portion of the New Slide button to open its menu.
Click Reuse Slides. The Reuse Slides pane appears.
Click Open a PowerPoint File.
OR
Click the Browse button and then click Browse File.
In the Browse dialog box, select the presentation from which you want to copy slides, and click Open. Thumbnail images of the slides in the presentation appear in the Reuse Slides pane, as shown in figure 4.3.
(Optional) If you want to keep the source formatting when copying slides, select the Keep Source Formatting check box at the bottom of the task pane.
(Optional) You can move the cursor over a slide to see an enlarged image of it.
To insert a single slide, click it.
To insert all slides at once, right-click any slide and choose Insert All Slides.
To copy only the theme (not the content), right-click any slide and choose Apply Theme to All Slides, or Apply Theme to Selected Slides.

Warning
Copying the theme with the Apply Theme to All Slides or Apply Theme to Selected Slides command does not copy the background graphics, layouts, or anything else other than the three elements that are included in a theme: font choices, color choices, and effect choices. If you want to copy all of the formatting, select the Keep Source Formatting check box (step 5) and insert one or more slides.
All of the Microsoft Office applications work well together, and so it's easy to move content between them. For example, you can create an outline for a presentation in Microsoft Word and then import it into PowerPoint. PowerPoint uses the heading styles that you assigned in Word to decide which items are slide titles and which items are slide content. The top-level headings (Heading 1) form the slide titles.
To try this out, open Word, switch to Outline view (from the View tab), and then type a short outline of a presentation. Press Tab to demote, or Shift+Tab to promote, a selected line. Then save your work, go back to PowerPoint, and follow these steps to import it:
On the Home tab, click the lower portion of the New Slide button to open its menu.
Click Slides from Outline. The Insert Outline dialog box opens.
Select the file containing the outline text that you want to import.
Click Insert. PowerPoint imports the outline.
If there were already existing slides in the presentation, they remain untouched. (This includes any blank slides, and so you might need to delete the blank slide at the beginning of the presentation after importing.) All of the Heading 1 lines from the outline become separate slide titles, and all of the subordinate headings become bullet points in the slides.
Although PowerPoint can import any text from any Word document, you may not always get the results that you want or expect. For example, you may have a document that consists of a series of paragraphs with no heading styles applied. When you import this document into PowerPoint, it might look something like figure 4.4.

Figure 4.4. A Word document consisting mainly of plain paragraphs makes for an unattractive presentation.
figure 4.4 is a prime example of what happens if you don't prepare a document before you import it into PowerPoint. PowerPoint makes each paragraph its own slide. It can't tell which ones are actual headings and which ones aren't because there are no heading styles in use. The paragraphs are too long to fit on slides, and so they are truncated off the tops of the slides. Extra blank lines are interpreted as blank slides. Quite a train wreck, isn't it? figure 4.4 also illustrates an important point to remember: regular paragraph text does not work very well in PowerPoint. PowerPoint text is all about short, snappy bulleted lists and headings. The better that you prepare the outline before importing it, the less cleanup you will need to do after importing. Here are some tips:
Non-headings in Word do not import into PowerPoint unless you use no heading styles at all in the document (as in figure 4.4). Apply heading styles to the text that you want to import.
Stick with basic styles only in the outline: for example, just Heading 1, Heading 2, and so on.
Delete all blank lines above the first heading. If you don't, you will have blank slides at the beginning of your presentation.
Strip off as much manual formatting as possible from the Word text, so that the text picks up its formatting from PowerPoint. To strip off formatting in Word, select the text and press Ctrl+spacebar.
Do not leave blank lines between paragraphs. These will translate into blank slides or blank bulleted items in PowerPoint.
Delete any graphic elements, such as clip art, pictures, charts, and so on. They will not transfer to PowerPoint anyway and may confuse the import utility.
In addition to Word, PowerPoint also imports from plain-text files, from WordPerfect (5.x or 6.x), from Microsoft Works, and from Web pages. The procedure is the same as in the preceding steps. If the file does not appear in the Insert Outline dialog box, change the file type to the desired file type.
If you are setting up a plain-text file for import, you obviously won't have the outlining tools from Word at your disposal. Instead, you must rely on tabs. Each line that should be a title slide should start at the left margin; first-level bullet paragraphs should be preceded by a single tab; second-level bullets should be preceded by two tabs, and so on.
After importing text from an outline, there will probably be a few minor corrections that you need to make. Run through this checklist:
The first slide in the presentation might be blank. If it is, then delete it.
The Title Slide layout may not be applied to the first slide; apply that layout, if necessary. (You can use the Layout list on the Home tab.)
A theme may not be applied; choose one from the Design tab, if necessary.
Note
See Chapter 5 for more information on working with themes.
Some of the text might contain manual formatting that interferes with the theme formatting and creates inconsistency. Remove any manual formatting that you notice. (One way to do this is to select all of the text in the Outline pane by pressing Ctrl+A and then stripping off the manual formatting by pressing Ctrl+spacebar.)
If some of the text is too long to fit comfortably on a slide, change to a different slide layout, such as a two-column list, if necessary. You might also need to split the content into two or more slides.
There might be some blank bullet points on some slides (if you missed deleting all of the extra paragraph breaks before the import). Delete these bullet points.
Instead of importing slides from a Word document or other text-based document, as described in the preceding section, you can simply open the Word document in PowerPoint. PowerPoint starts a new presentation file to hold the imported text. This saves some time if you are starting a new presentation anyway, and you don't have any existing slides to merge with the incoming content.
To open a Word document in PowerPoint, follow these steps:
Choose Office

Change the file type to All Outlines.
Select the document.
Click Open. The document outline becomes a PowerPoint presentation, with all Heading 1 paragraphs becoming title slides.
Warning
You can't open or insert a Word outline in PowerPoint if it is currently open in Word. This limitation is an issue only for Word files, not plain text or other formats.
PowerPoint accepts imported text from several Web-page formats, including HTML and MHTML (Single File Web Page). It is helpful if the data is in an orderly outline format, or if it was originally created from a PowerPoint file, because there will be less cleanup needed.
There are several ways to import from a Web page:
Open a Web-page file as you would an outline (see the preceding section), but set the file type to All Web Pages.
Insert the text from the Web page as you would a Word outline (in the Home tab, click New Slide
Reuse slides from a Web presentation as you would from any other presentation (in the Home tab, click New Slide
Warning
You should use one of the above methods rather than pasting HTML text directly into PowerPoint. This is because when you paste HTML text, you might get additional HTML tags that you don't want, including cross-references that might cause your presentation to try to log onto a Web server every time you open it.
When importing from a Web page, don't expect the content to appear formatted the same way that it was on the Web page. We're talking strictly about text import here. The formatting on the Web page comes from HTML tags or from a style sheet, neither of which you can import. If you want an exact duplicate of the Web page's appearance, take a picture of the page with the Shift+PrintScreen command, and then paste it into PowerPoint (Ctrl+V) as a graphic.
If you are importing an outline from an MHTML-format Web page that contains pictures, the pictures are also imported into PowerPoint. If importing from a regular HTML file, you cannot import the pictures.
Tip
If you need to show a live Web page from within PowerPoint, try Shyam Pillai's free Live Web add-in, found at www.mvps.org/skp/liveweb.htm.
After inserting a few slides into a presentation, and perhaps building some content on them, you might decide to make some changes, such as rearranging, deleting, and so on. The following sections explain how to manage and manipulate the slides in a presentation.
Before you can issue a command that acts upon a slide or a group of slides, you must select the slides that you want to affect. You can do this from either Normal or Slide Sorter view, but Slide Sorter view makes it easier because you can see more slides at once. From Slide Sorter view, or from the Slides pane in Normal view, you can use any of these techniques to select slides:
To select a single slide, click it.
To select multiple slides, hold down the Ctrl key as you click each one. figure 4.5 shows slides 1, 3, and 6 selected, as indicated by the shaded border around the slides.
To select a contiguous group of slides (for example, slides 1, 2, and 3), click the first slide, and then hold down the Shift key as you click the last one. All of the slides in between are selected as well.

To cancel the selection of multiple slides, click anywhere outside of the selected slides.
To select slides from the Outline pane in Normal view, click the slide icon to the left of the slides title; this selects the entire slide, as shown in figure 4.6. It's important to select the entire slide and not just part of its content before issuing a command such as Delete, because otherwise, the command only affects the portion that you selected.

You may want to get rid of some of the slides, especially if you created your presentation using a template that contained a lot of sample content. For example, the sample presentation may be longer than you need, or you may have inserted your own slides instead.
Select the slide or slides that you want to delete, and then do any of the following:
On the Home tab, click Delete.
Right-click the selection and choose Delete Slide.
Press the Delete key on the keyboard.
Here's a command that can help you in almost all of the other chapters in this book: undoing. The Undo command allows you to reverse past actions. For example, you can use it to reverse all of the deletions that you made to your presentation in the preceding section. The easiest way to undo a single action is to click the Undo button on the Quick Access toolbar or press Ctrl+Z. You can click it as many times as you like; each time you click it, you undo one action.
Tip
By default, the maximum number of Undo operations is 20, but you can change this. Choose Office
You can undo multiple actions at once by opening the Undo buttons drop-down list, as shown in figure 4.7. Just drag the mouse across the actions that you want to undo (you don't need to hold down the mouse button). Click when the desired actions are selected, and presto, they are all reversed. You can select multiple actions to undo, but you can't skip around. For example, to undo the fourth item, you must undo the first, second, and third ones, as well.

Figure 4.7. Use the Undo button to undo your mistakes and the Redo button to reverse an Undo operation.
The Redo command is the opposite of Undo. If you make a mistake with the Undo button, you can fix the problem by clicking the Redo button. Like the Undo button, it has a drop-down list, and so you can redo multiple actions at once.
The Redo command is available only immediately after you use the Undo command. If Redo isn't available, a Repeat button appears in its place. The Repeat command enables you to repeat the last action that you performed (and it doesn't have to be an Undo operation). For example, you can repeat some typing, or some formatting. figure 4.8 shows the Repeat button.

The best way to rearrange slides is to do so in Slide Sorter view. In this view, the slides in your presentation appear in thumbnail view, and you can move them around on the screen to different positions, just as you would manually rearrange pasted-up artwork on a table. Although you can also do this from the Slides pane in Normal view, you are able to see fewer slides at once. As a result, it can be more challenging to move slides around, for example, from one end of the presentation to another. To rearrange slides, use the following steps:
Switch to Slide Sorter view.
Select the slide that you want to move. You can move multiple slides at once if you like.
Drag the selected slide to the new location. The mouse pointer changes to a little rectangle next to the pointer arrow as you drag. A vertical line also appears where the slide will go if you release the mouse button at that point, as shown in figure 4.9.
Release the mouse button. The slide moves to the new location.

You can also rearrange slides in the Outline pane in Normal view. This is not quite as easy as using Slide Sorter view, but it's more versatile. Not only can you drag entire slides from place to place, but you can also move individual bullets from one slide to another.
Follow these steps to move content in the Outline pane:
Switch to Normal view and display the Outline pane.
Position the mouse pointer over the slides icon. The mouse pointer changes to a four-headed arrow.
Click on the icon. PowerPoint selects all of the text in that slide.
Drag the slides icon to a new position in the outline. As you drag, a horizontal line appears to indicate where the slide will go, as shown in figure 4.10.
Release the mouse button when the horizontal line is in the right place. All of the slides text moves with it to the new location.

There are also keyboard shortcuts for moving a slide up or down in the Outline pane that may be faster than clicking the toolbar buttons. You can press the Alt+Shift+Up arrow keys to move a slide up, and the Alt+Shift+Down arrow keys to move the slide down.
These shortcuts work equally well with single bullets from a slide. Just click to the left of a single line to select it, instead of clicking the Slide icon in step 3.
Now that you know something about inserting and managing entire slides, let's take a closer look at the content within a slide. The default placeholder type is a multi-purpose content placeholder, as shown in figure 4.11.

To type text into a content placeholder, click inside the placeholder box and start typing. You can enter and edit text as you would in any word-processing program. To insert any other type of content into a placeholder, click one of the icons shown in figure 4.12. A dialog box opens to help you select and insert that content type.
Note
Chapters 6 and 7 cover the various formatting that you can apply to text on a slide. You will learn about these various content types later in the book:
Tables: Chapter 9
SmartArt: Chapter 11
Clip art: Chapter 12
Pictures (from files): Chapter 13
Charts: Chapter 14
Movies: Chapter 17
A content placeholder can hold only one type of content at a time. If you click in the placeholder and type some text, the icons for the other content types disappear. To access them again, you must delete all of the text from the placeholder.
You can insert content on a slide independently of a placeholder by using the Insert tab's buttons and menus. This technique allows you to insert an item in its own separate frame on any slide, to coexist with any placeholder content. You can learn how to insert each content type in the chapters in which they are covered (see the preceding list).
The difference between a placeholder-inserted object and a manually inserted one is most significant with text boxes. Although you might think that a text box would create consistent results, there are actually some significant differences between placeholder text boxes and manually inserted ones.
Here are some of the characteristics of a text placeholder:
You cannot create new text placeholder boxes on your own, except in Slide Master view.
Note
You learn how to use Slide Master view to create your own layouts that contain custom text placeholders in Chapter 5.
If you delete all of the text from a text placeholder, the placeholder instructions return (in Normal view).
A text placeholder box has a fixed size on the slide, regardless of the amount or size of text that it contains. You can resize it manually, but if you reapply the layout, the placeholder box snaps back to the original size.
AutoFit is turned on by default in a text placeholder, so that if you type more text than will fit, or resize the frame so that the existing text no longer fits, the text shrinks in size.
The text that you type in a text placeholder box appears in the Outline pane.
A manual text box, on the other hand, is one that you create yourself using the Text Box tool on the Insert tab. Here are some characteristics of a manual text box:
You can create a manual text box anywhere, and you can create as many as you like, regardless of the layout.
If you delete all of the text from a manual text box, the text box remains empty or disappears completely. No placeholder instructions appear.
A manual text box starts out small vertically, and expands as you type more text into it.
A manual text box does not use AutoFit by default; the text box simply becomes larger to make room for more text.
You cannot resize a manual text box so that the text that it contains no longer fits; PowerPoint refuses to make the text box shorter vertically until you delete some text from it. (However, you can decrease its horizontal width.)
Text typed in a manual text box does not appear in the Outline pane.
figure 4.12 shows two text placeholders (one empty) and a text box. Notice that the empty placeholder contains filler text to help you remember that it is there. Notice also that only the text from the placeholder appears in the Outline pane; the text-box text does not. Empty text boxes and placeholders do not show up in Slide Show view, so you do not have to worry about deleting any unneeded ones.
Graphical content such as photos and charts can work well either in placeholders or as manually inserted objects. However, when it comes to text, you should stick with placeholders as often as possible. Placeholder text appears in the Outline pane, whereas text in a manually inserted text box does not. When the bulk of a presentations text is in manually created text boxes, the outline becomes less useful because it doesn't contain the presentation text. In addition, when you change to a different formatting theme that includes different positioning for placeholders — for example, to accommodate a graphic on one side — the manual text boxes do not shift. As a result, they might end up overlapping the new background graphic with unattractive results. In a case such as this, you would need to manually go through each slide and adjust the positioning of each text box.
However, there are times when a manually created text box is preferable or even necessary. For example, suppose that you have a schematic diagram of a machine and you need to label some of the parts. Manually placed text boxes are perfect for these little snippets of text that are scattered over the surface of the picture. Manual text boxes are also useful for warnings, tips, and any other information that is tangential to the main discussion. Finally, if you want to vary the placement of the text on each slide (consciously circumventing the consistency provided by layouts), and you want to precisely position each box, then manual text boxes work well because they do not shift their position when you apply different themes or templates to the presentation.

Tip
If you insert text in a placeholder and then change the slide's layout so that the slide no longer contains that placeholder (for example, if you switch to Title Only or Blank layout), the text remains on the slide, but it becomes an orphan. If you delete the text box, then it simply disappears; a placeholder does not reappear. However, it does not become a manual text box, because its content still appears in the Outline pane, while a manual text box's content does not.
To manually place a text box on a slide, follow these steps:
If necessary, reposition the existing placeholders or objects on the slide to make room for the new text box.
On the Insert tab, click Text Box. The mouse pointer turns into a vertical line.
Do either of the following:
To create a text box that automatically enlarges itself horizontally as you type more text, but does not automatically wrap text to the next line, click once where you want the text to start, and begin typing.
To create a text box with a width that you specify, and that automatically wraps text to the next line and grows in height as needed, click and drag to draw a box where you want the text box to be. Its height will initially snap back to a single line's height, regardless of the height that you initially draw; however, it will grow in height as you type text into it.
Type the text that you want to appear in the text box.
Text boxes (either placeholder or manual) form the basis of most presentations. Now that you know how to create them, and how to place text in them, let's take a look at how to manipulate the boxes themselves.
Note
Are you looking for information about formatting text boxes — perhaps to apply a background color or a border to one? See the formatting text boxes discussion in Chapter 7.
On the surface, this topic might seem like a no-brainer. Just click it, right? Well, almost. A text box has two possible "selected" states. One state is that the box itself is selected, and the other is that the insertion point is within the box. The difference is subtle, but it becomes clearer when you issue certain commands. For example, if the insertion point is in the text box and you press Delete, PowerPoint deletes the single character to the right of the insertion point. However, if you select the entire text box and press Delete, PowerPoint deletes the entire text box and everything in it.
To select the entire text box, click its border. You can tell that it is selected because the border appears as a solid line. To move the insertion point within the text box, click inside the text box. You can tell that the insertion point is there because you can see it flashing inside, and also because the box's border now consists of a dashed line. figure 4.13 shows the difference between the two borders.
Figure 4.13. The border of a text box is different when the box itself is selected (left) and when the insertion point is in the box (right).
In the rest of this book, when you see the phrase "select the text box," it means in the first way; the box itself should be selected, and the insertion point should not appear in it. For most of the upcoming sections it does not make any difference, although in a few cases it does.
Tip
When the insertion point is flashing in a text box, you can press Esc to select the text box itself.
You can select more than one text box at once by holding down the Shift key as you click additional text boxes. This technique is useful when you want to select more than one text box, for example, so that you can format them in the same way, or so that you can resize them by the same amount.
The basic techniques for sizing text boxes in PowerPoint are the same for every object type (for that matter, they are also the same as in other Office applications). To resize a text box, or any object, follow these steps:
Position the mouse pointer over a selection handle for the object. The mouse pointer changes to a double-headed arrow.
If you want to resize proportionally, make sure that you use a corner selection handle, and hold down the Shift key as you drag.
(Optional) To resize proportionally, hold down the Shift key.
Click and drag the selection handle to resize the objects border.
Warning
Allowing PowerPoint to manage placeholder size and position through layouts ensures consistency among your slides. When you start changing the sizes and positions of placeholders on individual slides, you can end up creating consistency problems, such as headings that aren't in the same spot from slide to slide, or company logos that shift between slides.
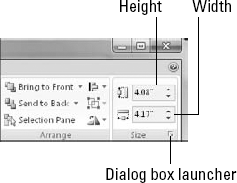
You can also set a text box's size from the Size group on the Drawing Tools Format tab. When the text box is selected, its current dimensions appear in the Height and Width boxes, as shown in figure 4.14. You can change the dimensions within these boxes.
You can also set the size of a text box from the Size and Position dialog box:
Click the dialog box launcher in the Size group on the Drawing Tools Format tab, as shown in figure 4.14. The Size and Position dialog box opens.
On the Size tab, set the height and width for the text box, as shown in figure 4.15.
To keep the size proportional, select the Lock Aspect Ratio check box in the Scale section before you start adjusting the height or width.
Click Close to close the dialog box.

Tip
The Size and Position dialog box is non-modal. This means that you can leave it open and continue to work on your presentation. It also means that any changes that you make in this dialog box are applied immediately; there is no Cancel button in the dialog box to cancel your changes. To reverse a change, you can use the Undo command (Ctrl+Z).
To move an object, simply drag it by any part of its border other than a selection handle. Select the object, and then position the mouse pointer over a border so that the pointer turns into a four-headed arrow. Then drag the object to a new position. With a text box, you must position the mouse pointer over a border and not over the inside of the frame; with all other object types, you don't have to be that precise; you can move an object by dragging anywhere within it.
To set an exact position, use the Size and Position dialog box:
Click the dialog box launcher in the Size group on the Drawing Tools Format tab, as shown in figure 4.14. The Size and Position dialog box opens.
On the Position tab, shown in figure 4.16, set the horizontal and vertical position, and the point from which it is measured. By default, measurements are from the top-left corner of the slide.
Click Close to close the dialog box.

When there is too much text to fit in a text box, there are three things that may happen:
Do Not AutoFit: The text and the box can continue at their default sizes, and the text can overflow out of the box or be truncated.
Shrink Text on Overflow: The text can shrink its font size to fit in the text box. This is the default setting for placeholder text boxes.
Resize Shape to Fit Text: The text box can enlarge to the size needed to contain the text. This is the default setting for manual text boxes.
Whenever there is too much text in a placeholder box, the AutoFit icon appears in the bottom-left corner. Click that icon to display a menu, as shown in figure 4.17. From that menu, you can turn AutoFit on or off.

With a manual text box, the AutoFit icon does not appear, and so you must adjust the AutoFit behavior in the text box's properties. The following method works for both manual and placeholder boxes:
Right-click the border of the text box and choose Format Shape.
Click Text Box.
In the Autofit section, choose one of the Autofit options, as shown in figure 4.18.
Click Close.

One other setting that also affects AutoFit behavior is the Wrap Text in Shape option. This on/off toggle enables text to automatically wrap to the next line when it reaches the right edge of the text box. By default, this setting is On for placeholder text boxes and for manual text boxes that you create by dragging. However, it is Off by default for manual text boxes that you create by clicking. You can change the setting by displaying the text box's properties, as shown in figure 4.18, and selecting or deselecting the Wrap Text in Shape check box.
Table 4.1 summarizes the various AutoFit behaviors and how they interact with one another.
Table 4.1. AutoFit and Resize Shape to Fit Text Behaviors
Setting | Default For | When Wrap Text in Shape Is On | When Wrap Text in Shape Is Off |
|---|---|---|---|
Do Not Autofit | n/a | Text overflows at bottom of text box only | Text overflows at right and bottom of text box |
Shrink Text on Overflow | Placeholders | Text shrinks to fit | Text shrinks to fit |
Resize Shape to Fit Text | Manual text boxes | Text box expands vertically only (default for manual text box that you create by dragging) | Text box expands vertically and horizontally (default for manual text box that you create by clicking). However, if you clicked to create the text box initially, the width keeps expanding until you press Enter. |
In this chapter, you learned how to create new slides, either from scratch or from outside sources. You learned how to select, rearrange, and delete slides, and how to place content on a slide. Along the way, you learned the difference between a content placeholder and a manually inserted object, and how to create your own text boxes, move and resize objects, and find or replace text. These are all very basic skills, and perhaps not as interesting as some of the more exciting topics to come, but mastering them will serve you well as you build your presentation.
In the next chapter, you'll learn about themes and layouts, two of the innovative features in PowerPoint 2007 that make it such an improvement over earlier versions. You'll find out how a theme differs from a template and how it applies font, color, and effect formatting to a presentation. You will then apply layouts and create your own custom layouts and themes.