PowerPoint 2007 is a member of the Microsoft Office 2007 suite of programs. A suite is a group of programs designed by a single manufacturer to work well together. Like its siblings Word (the word processor), Excel (the spreadsheet), Outlook (the personal organizer and e-mail manager), and Access (the database), PowerPoint has a well-defined role. It creates materials for presentations.
A presentation is any kind of interaction between a speaker and audience, but it usually involves one or more of the following visual aids: 35mm slides, overhead transparencies, computer-based slides (either local or at a Web site or other network location), hard-copy handouts, and speaker notes. PowerPoint can create all of these types of visual aids, plus many other types that you learn about as we go along.
Because PowerPoint is so tightly integrated with the other Microsoft Office 2007 components, you can easily share information among them. For example, if you have created a graph in Excel, you can use that graph on a PowerPoint slide. It goes the other way, too. You can, for example, take the outline from your PowerPoint presentation and copy it into Word, where you can dress it up with Word's powerful document formatting commands. Virtually any piece of data in any Office program can be linked to any other Office program, so you never have to worry about your data being in the wrong format.
In this chapter you'll get a big-picture introduction to PowerPoint 2007, and then we'll fire up the program and poke around a bit to help you get familiar with the interface. You'll find out how to use the tabs and panes, and how to get help and updates from Microsoft.
PowerPoint is a popular tool for people who give presentations as part of their jobs, and also for their support staff. With PowerPoint, you can create visual aids that help get the message across to an audience, whatever that message may be and whatever format it may be presented in. Although the traditional kind of presentation is a live speech presented at a podium, advances in technology have made it possible to give several other kinds of presentations, and PowerPoint has kept pace nicely. The following list outlines the most common PowerPoint formats:
Podium: For live presentations, PowerPoint helps the lecturer emphasize key points through the use of overhead transparencies, 35mm slides, or computer-based shows.
Kiosk shows: These are self-running presentations that provide information in an unattended location. You have probably seen such presentations listing meeting times and rooms in hotel lobbies and giving sales presentations at trade show booths.
Internet formats: You can use PowerPoint to create a show that you can present live over a network or the Internet with a program such as Microsoft NetMeeting, while each participant watches from his or her own computer. You can even store a self-running or interactive presentation on a Web site and make it available for the public to download and run on the PC.
When you start your first PowerPoint presentation, you may not be sure which delivery method you will use. However, it's best to decide the presentation format before you invest too much work in your materials, because the audiences needs are different for each medium.
Note
You learn a lot more about planning your presentation in Chapter 2.
Most people associate PowerPoint with sales presentations, but PowerPoint is useful for people in many other lines of work as well. The following sections present a sampling of how real people just like you are using PowerPoint in their daily jobs.
More people use PowerPoint for selling goods and services than for any other reason. Armed with a laptop computer and a PowerPoint presentation, a salesperson can make a good impression on a client anywhere in the world. figure 1-1 shows a slide from a sample sales presentation.
Sales possibilities with PowerPoint include the following:
Live presentations in front of clients with the salesperson present and running the show. This is the traditional kind of sales pitch that most people are familiar with.
Self-running presentations that flip through the slides at specified intervals so that passersby can read them or ignore them as they wish. These types of presentations are great for grabbing peoples attention at trade show booths.
User-interactive product information demos distributed on CD or disk that potential customers can view at their leisure on their own PCs. This method is very inexpensive, because you can create a single presentation and distribute it by mail to multiple customers.

Figure 1.1. PowerPoint offers unparalleled flexibility for presenting information to potential customers.
Note
See Chapter 20 to learn about controlling a live presentation. You create a self-running presentation show in Chapter 21. You learn how to create a user-interactive show in Chapter 22.
The distinction between sales and marketing can be rather blurred at times, but marketing generally refers to the positioning of a product in the media rather than its presentation to a particular company or individual. Marketing representatives are often called upon to write advertising copy generate camera-ready layouts for print advertisements, design marketing flyers and shelf displays, and produce other creative selling materials.
PowerPoint is not a drawing program per se, and it can't substitute for one except in a crude way. However, by combining the Office 2007 clip art collection and drawing tools with some well-chosen fonts and borders, a marketing person can come up with some very usable designs in PowerPoint. figure 1-2 shows an example. You learn about clip art in Chapter 12.

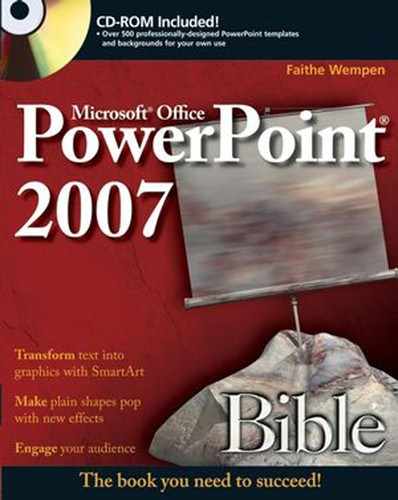
Human resources personnel often find themselves giving presentations to new employees to explain the policies and benefits of the company. A well-designed, attractive presentation gives the new folks a positive impression of the company they have signed up with, starting them off on the right foot.
One of the most helpful features in PowerPoint for the human resources professional is the Organization Chart tool. With it, you can easily diagram the structure of the company and make changes whenever necessary with a few mouse clicks. figure 1-3 shows an organization chart on a PowerPoint slide. You can also create a variety of other diagram types. Organization charts and other diagrams are covered in Chapter 11.
Most training courses include a lecture section in which the instructor outlines the general procedures and policies. This part of the training is usually followed up with individual, hands-on instruction. PowerPoint can't help much with the latter, but it can help make the lecture portion of the class go smoothly.
Using a third-party scanning program, or the Scanner and Camera Wizard in Windows, you can scan in diagrams and drawings of the objects you are teaching the students to use. You can also use computer-generated images, such as screen captures, to teach people about software.
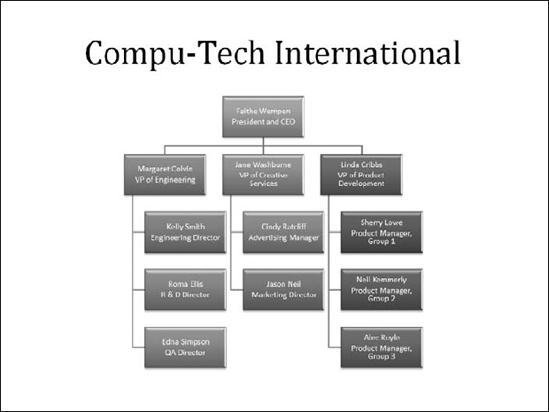
PowerPoint's interactive controls even let you create quizzes that each student can take on-screen to gauge his or her progress. Depending on the button the student clicks, you can set up the quiz to display a "Yes, you are correct!" or "Sorry, try again" slide. See figure 1-4. I explain this procedure in more detail in Chapter 21 and in Lab 4 in the Project Labs section at the end of the book.
Service organizations such as hotels and restaurants often need to inform their customers of various facts but need to do so unobtrusively so that the information will not be obvious except to those looking for it. For example, a convention center hotel might provide a list of the meetings taking place in its meeting rooms, or a restaurant might show pictures of the day's specials on a video screen in the waiting area.
In such unattended situations, a self-running (kiosk) presentation works best. Typically the computer box and keyboard are hidden from the passersby and the monitor displays the information.
Note
You learn more about kiosk setups in Chapter 21.
Many nonprofit clubs and organizations, such as churches and youth centers, operate much the same way as for-profit businesses and need sales, marketing, and informational materials. But clubs and organizations often have special needs too, such as the need to recognize volunteers for a job well done. PowerPoint provides a Certificate template that's ideal for this purpose. figure 1-5 shows a certificate generated in PowerPoint.

Like other programs in the Office 2007 suite, PowerPoint 2007 takes a radical and innovative new approach to its user interface. Although it's very convenient to use once you master it, even experienced users of earlier versions might need some help getting started. Here's a quick summary of the new features you'll encounter.
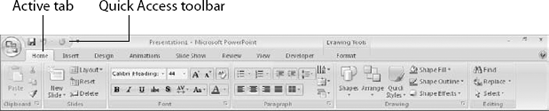
Instead of using a complex menu system, PowerPoint 2007 relies on a graphical Ribbon with multiple tabbed pages (referred to as tabs). Each tab is like a toolbar, with buttons and lists you can select or open.
Tabs are not easily customizable as toolbars were in earlier versions, but the Quick Access Toolbar provides a home for any custom buttons or shortcuts you would like to keep readily available. You can add almost any button or command to the Quick Access Toolbar by right-clicking it and choosing Add to Quick Access Toolbar. See figure 1-6.
One menu remains: the Microsoft Office menu (abbreviated in this book as Office menu). You can access it by clicking the Microsoft Office button (again, abbreviated in this book as Office button), the big round button in the top-left corner of the screen. See figure 1-7.

Figure 1.7. The Office button opens a menu of commands similar to those that were on the File menu in previous versions of PowerPoint.
The commands on the Office menu are for working with the file itself: saving, printing, opening, closing, and so on. These commands were on the File menu in earlier PowerPoint versions (and in fact, some people actually still call the Office menu the "File menu").
If you've worked with Microsoft Word, you are probably familiar with the concept of styles. A style is a saved formatting specification that you can apply to multiple blocks of text in Word, to ensure consistency. For example, to ensure that all of your headings are formatted the same way, apply a Heading style to each one.
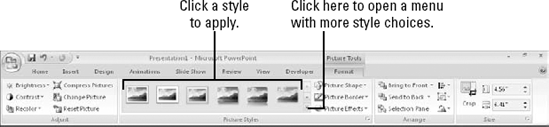
PowerPoint 2007 extends the concept of styles to cover graphic objects such as pictures, drawn lines, and shapes as well as text. For example, suppose you want each photo to have a beveled edge effect; you can simply apply a picture style that contains the desired edge type to each picture. No more manual formatting of multiple graphic objects!
Styles are found in various parts of PowerPoint, depending on the object type. For example, figure 1-8 shows the Picture Styles section of the Format tab, available when a picture is selected. Shape Styles (for drawn lines and shapes) and WordArt Styles (for text) are also available.
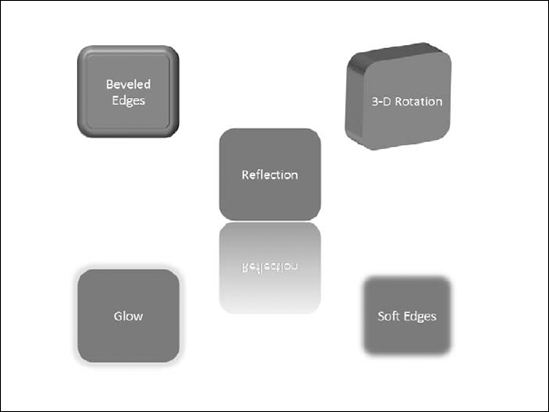
Drawn objects (formerly called AutoShapes, now called Office Art graphics) are much improved in PowerPoint 2007. You can not only apply basic colors and fills to them, but you can add shadows, glows, surfaces, and 3-D tilt and rotation. In earlier versions, the 3-D option simply enabled you to extend perspective to create "sides" on a flat object. In PowerPoint 2007, the 3-D option now enables you to tilt the entire object. figure 1-9 shows examples of some of the new effects.
All of the new effects for drawn objects can also be applied to the borders of other graphics, such as imported pictures. There are also some new tools for working with photos, including applying a tint to a picture and changing the shape of the photo frame.
PowerPoint 2007 adds several new text formatting capabilities to help users further polish their work. For example, you can now control character spacing and kerning, use different underline styles and colors, and make all characters in a line equal height.
Perhaps the most significant improvement in text formatting, however, is the ability to format any text using the full range of WordArt formatting tools. WordArt (a.k.a. shaped text) has been around in Office programs for years, but there has always been a strict differentiation between regular text and WordArt. Regular text (that is, text appearing in the presentation outline) could not receive WordArt formatting such as reshaping, stretching, and distortion.
PowerPoint 2007 loses the differentiation between WordArt text and regular text, so the full gamut of formatting features is available to all text, regardless of position or usage. You can format individual words as separate pieces of WordArt, or entire text boxes by using a common WordArt style. In figure 1-10, the slide title "Green Hill Shelties" is regular text and appears on the presentation outline, but it also benefits from WordArt formatting effects.

Styles can automate the formatting of individual objects, but you can also apply overall themes to the entire presentation to change all of the formatting at once. A theme is a set of formatting specifications that are applied to objects and text consistently throughout the presentation (except in cases where an object has manual formatting applied that overrides the theme).
There are three elements to a theme: the colors, the fonts, and the effects. Colors are applied via a set of placeholders, as they were in PowerPoint 2003, but now you can apply tints or shades of a color much more easily. Whenever you open a list or menu that contains a color picker, you select from a palette like the one in figure 1-11. The top row contains swatches for the colors in the current theme, and beneath them are various tints (lighter versions) and shades (darker versions) of the colors. By applying theme colors instead of fixed colors, you enable objects to change color automatically when you switch to a different theme.
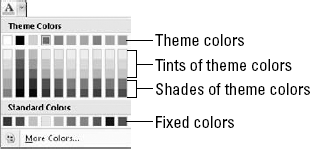
Figure 1.11. Choose colors for text and graphic objects from a color picker that focuses on theme-based color choices.
Font themes apply one font for headings and another for body text. In PowerPoint 2007 it is usually best not to apply a specific font to any text, but instead to apply either (Body) or (Heading) to it. Then you can let the font theme dictate the font choices, so that they will update automatically when you chose a different theme. On the Font drop-down list, the top choices are now (Body) and (Heading), as shown in figure 1-12. The font listed next to them is the font that happens to be applied with the current theme.

Figure 1.12. When you apply (Body) and (Heading) as the font choices rather than a specific font, you enable formatting via font themes.
Effect themes apply shadows and 3-D effects to graphic objects. PowerPoint 2007s new gallery of effects are impressive and can make plain lines and shapes appear to pop off the screen with textures that simulate glass, metal, or other surfaces.
Note
For more on font themes, see Chapter 5.
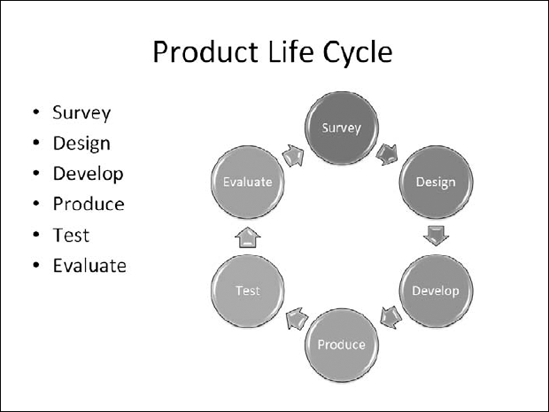
SmartArt uses groups of lines and shapes to present text information in a graphical, conceptually meaningful way. Experts have been saying for years that people respond better to information when it is presented graphically, but the difficulty in constructing attractive diagrams has meant that most people used plain bulleted lists for everything. SmartArt can convert a bulleted list into a conceptual diagram in just a few clicks.
figure 1-13 shows a plain bulleted list (left) and a SmartArt diagram constructed from it. The SmartArt is not only more interesting to look at, but it also conveys additional information — it shows that the product life cycle repeats continuously.
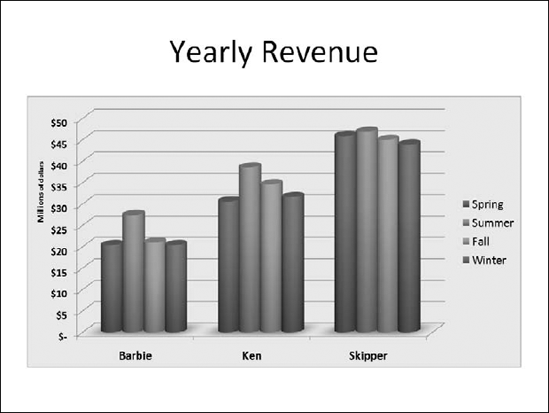
In earlier Office versions, Excel had a great charting feature, but the other applications suffered along with an inferior tool called Microsoft Graph. PowerPoint 2007 includes a great, all-new charting tool, the same one that's in Excel 2007. Like SmartArt, it is integrated with the new Escher 2.0 graphics engine, and you can format the charts with a variety of theme effects. figure 1-14 shows a typical chart.
In earlier versions of PowerPoint, you were stuck with the slide layouts that came with PowerPoint. In PowerPoint 2007, you can create your own slide layouts, complete with content placeholders, and apply them as easily as you can apply the built-in ones. This makes it easy to reuse complex layouts without having to resort to manually created text frames each time. Custom layouts are configured from within the expanded and improved Slide Master view.
Now that you have seen some of the potential uses for PowerPoint, and toured the new features, let's get started using the program.
PowerPoint is one of the easiest and most powerful presentation programs available. You can knock out a passable presentation in a shockingly short time by skimming through the chapters in Parts I and II of the book, or you can spend some time with PowerPoint's advanced features to make a complex presentation that looks, reads, and works exactly the way you want.
You can start PowerPoint just like any other program in Windows: from the Start menu. Follow these steps:
Click the Start button. The Start menu opens.
Click All Programs.
Click Microsoft Office.
Click Microsoft Office PowerPoint 2007. The program starts.
If you have opened PowerPoint before, a shortcut to it might appear in the Recently Used Programs list, which is directly above the All Programs command on the Start menu. See figure 1-15. If you use other applications more frequently than PowerPoint, PowerPoint may scroll off this list and you therefore have to access it via the All Programs menu.
Tip
If you don't want to worry about PowerPoint scrolling off the list of the most frequently used programs on the Start menu, right-click PowerPoint's name on the Start menu and choose Pin to Start Menu. PowerPoint will then appear on the list at the top of the left column of the Start menu. To remove it from there later, right-click it and choose Unpin from Start Menu.
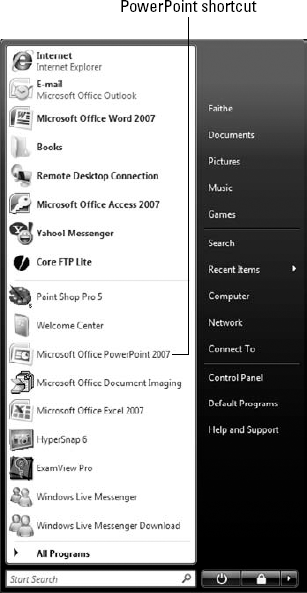
Figure 1.15. A shortcut to PowerPoint might appear on the top level of the Start menu. PowerPoint shortcut
When you are ready to leave PowerPoint, select Office
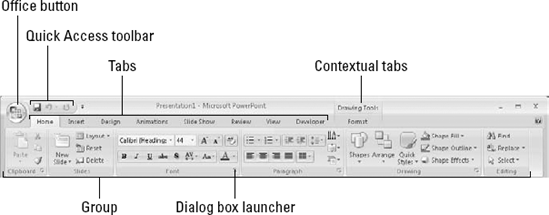
PowerPoint's interface is typical of any Windows program in many ways, but as you learned earlier in the chapter it also has some special Office 2007 specific features as well. The PowerPoint window contains these elements, pointed out in figure 1-16:
Title bar: Identifies the program running (PowerPoint) and the name of the active presentation. If the window is not maximized, you can move the window by dragging the title bar.
Ribbon: Functions as a combination of menu bar and toolbar, offering tabbed "pages" of buttons, lists, and commands.
Office button: Opens the Office menu, from which you can open, save, print, and start new presentations.
Quick Access Toolbar: Contains shortcuts for some of the most common commands. You can add your own favorites here as well.
Minimize button: Shrinks the application window to a bar on the taskbar; you click its button on the taskbar to reopen it.
Maximize/Restore button: If the window is maximized (full screen), changes it to windowed (not full screen). If the window is not maximized, clicking here maximizes it.
Close button: Closes the application. You may be prompted to save your changes, if you made any.
Work area: Where active PowerPoint slide(s) appear. figure 1-17 shows it in Normal view, but other views are available that make the work area appear differently.
Note
See the section "Changing the View" later in this chapter for details.
Status bar: Reports information about the presentation and provides shortcuts for changing the view and the zoom.
Note
I don't dwell on the Windows controls in detail because this isn't a Windows book, but if you're interested in learning more about Windows-based programs in general, pick up Windows Vista For Dummies or The Windows Vista Bible, also published by Wiley.
As mentioned earlier in the chapter, PowerPoint 2007s user interface is based on the Ribbon, which is a bar across the top of the window that contains tabbed pages of commands and buttons. Rather than opening a menu and selecting a command, you click a tab and then click a button or open a list on that tab.

Figure 1.16. The PowerPoint window is a combination of usual Windows features and unique Office 2007 elements.
Here are some important terms you need to know when working with tabs:
Office button: A button that opens an Office menu, from which you can choose to start a new presentation, save, print, and perform other file-related activities. See figure 1-7 for this buttons location.
Quick Access Toolbar: A small toolbar adjacent to the Office button from which you can select commonly used commands.
Tip
To add a command to the Quick Access Toolbar, right-click it and choose Add to Quick Access Toolbar. To remove the command from there, right-click it and choose Remove from Quick Access Toolbar.
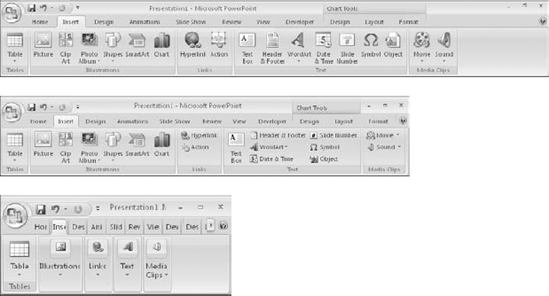
Tab: A tabbed page of the Ribbon. figure 1-17 shows the Home tab, for example.
Contextual tab: A tab that appears only when certain content is selected, such as a graphic or a chart. The context name appears above the tab name. In figure 1-17, Drawing Tools is the context name for the Format tab.
Group: A section of a tab. The Home tab shown in figure 1-17 has the following groups: Clipboard, Slides, Font, Paragraph, WordArt Styles, and Editing.
Dialog box launcher: A small icon in the bottom-right corner of a group, from which you can open a dialog box related to that group.
Note
To find out what a toolbar button does, point the mouse at it. A ScreenTip pops up explaining it.
Within a tab, groups can expand or collapse depending on the width of the PowerPoint window. When the window is large enough (somewhere around 1100 pixels), everything within each group is fully expanded, so that each item has its own button. When the window is smaller, groups start collapsing so that all groups remain visible. At first, large buttons get smaller and stack vertically; if that's not enough, then groups collapse into single large buttons with drop-down lists from which you can select the individual commands. figure 1-18 shows the same tab in three different widths for comparison.
Warning
Because of the Ribbon's collapsing ability, the exact steps for performing certain procedures depend on the active PowerPoint window's width. A small window may require an extra step of opening a button's menu to select a command, for example. For a large window, each command appears directly on the tab. This book assumes an average window size of 1024 x 768 pixels; if you run PowerPoint at a smaller resolution, you may occasionally have an extra step to access a command.
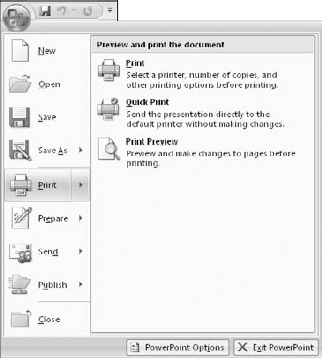
On the Office menu, some of the commands have arrows next to them. Clicking one of these arrows opens a submenu in the right side of the Office menu with additional choices. For example, figure 1-19 shows the submenu for Print.
Notice in figure 1-19 that the arrow next to the Print command on the Office menu is actually a separate button from Print itself. The Print command can also be individually clicked to open the Print dialog box, without opening the submenu. The Save As command has the same functionality; you can either select Save As directly from the first level, or you can open its submenu.
Not all of the arrows are like that, though. The Finish, Send, and Publish commands do not have separate top-level functions; clicking any of those simply opens their submenu.
Dialog boxes are PowerPoint's (and Windows') way of prompting you for more information. When you issue a command that can have many possible variations, a dialog box appears so you can specify the particulars.
The Print dialog box (File
Check box: These are individual on/off switches for particular features. Click to toggle them on or off.
Option buttons: Each section of the dialog box can have only one option button chosen at once. When you select one, the previously selected one becomes deselected, like on a car radio. Click the one you want.
Text box: Click in a text box to place an insertion point (a vertical line) there, and then type.
Increment buttons: Placed next to a text box, these buttons allow you to increment the number in the box up or down by one digit per click.
Drop-down list: Click the down arrow next to one of these to open the list, and then click your selection from the menu that appears.
Command button: Click one of these big rectangular buttons to jump to a different dialog box. OK and Cancel are also command buttons; OK accepts your changes and Cancel rejects them.
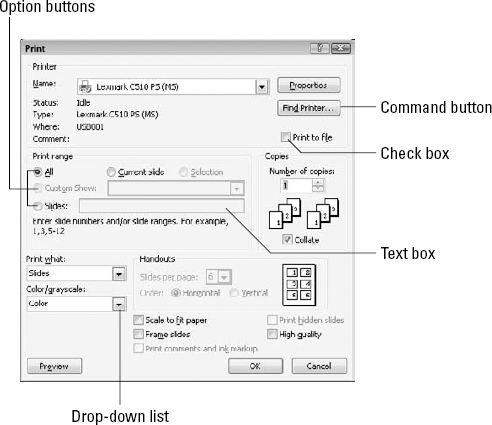
You might also sometimes see tabs at the top of a dialog box; this occurs when the dialog box has more controls than will fit on one screen. To move to a tabbed page, click the tab.
Note
Dialog boxes that open or save files have some special controls and icons all their own, but you learn about those in more detail in Chapter 3, where you also learn to open and save your files.
A view is a way of displaying your presentation on-screen. PowerPoint comes with several views because at different times during the creation process, it is helpful to look at the presentation in different ways. For example, when you add a graphic to a slide, you need to work closely with that slide, but when you rearrange the slide order, you need to see the presentation as a whole.
PowerPoint offers the following views:
Normal: A combination of several resizable panes, so you can see the presentation in multiple ways at once. Normal is the default view.
Slide Sorter: A light-table-type overhead view of all the slides in your presentation, laid out in rows, suitable for big-picture rearranging.
Notes Page: A view with the slide at the top of the page and a text box below it for typed notes. (You can print these notes pages to use during your speech.)
Slide Show: The view you use to show the presentation on-screen. Each slide fills the entire screen in its turn.
Note
This chapter covers only the four regular views. The Master views are discussed in Chapter 5.
There are two ways to change a view: click a button on the View tab, or click one of the view buttons in the bottom-right corner of the screen. See figure 1-21. All of the views are available in both places except Notes Page, which you can access only from the View tab.
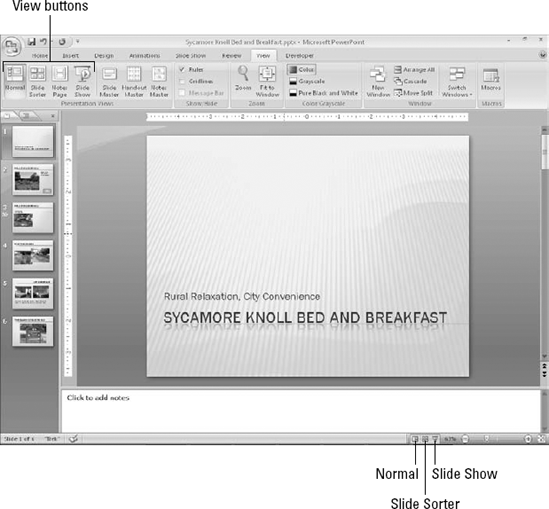
Figure 1.21. Select a view from the View tab or from the viewing controls in the bottom-right corner of the screen.
Tip
When you save, close, and reopen a file, PowerPoint opens the same view in which you left the file. To have the files always open in a particular view, choose Office
Normal view, shown in figure 1-22, is a very flexible view that contains a little of everything. In the center is the active slide, below it is a Notes pane, and to its left is a dual-use pane with two tabs: Outline and Slides. (figure 1-21 shows Slides, and figure 1-22 shows Outline.) When the Outline tab is selected, the text from the slides appears in an outline form. When the Slides tab is selected, thumbnail images of all the slides appear (somewhat like Slide Sorter view, which you will see later in this chapter).
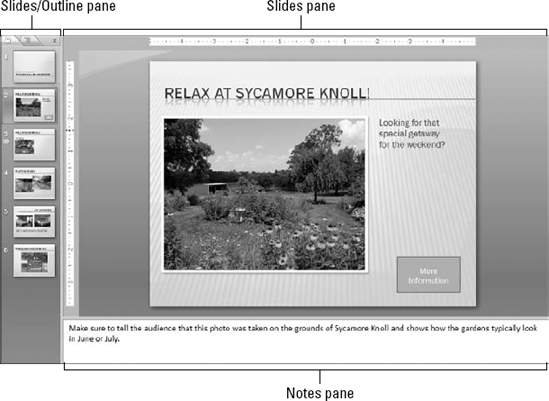
Figure 1.22. Normal view, the default, offers access to the outline, the slide, and the notes all at once.
Each of the panes in Normal view has its own scroll bar, so you can move around in the outline, the slide, and the notes independently of the other panes. You can resize the panes by dragging the dividers between the panes. For example, to give the notes area more room, point the mouse pointer at the divider line between it and the slide area so that the mouse pointer becomes a double-headed arrow, and then hold down the left mouse button as you drag the line up to a new spot.
The Slides/Outline pane is useful because it lets you jump quickly to a specific slide by clicking on it. For example, in figure 1-21 you can click on any of the slide thumbnails on the Slides tab to display it in the Slide pane. Or in figure 1-22 you can click some text anywhere in the outline to jump to the slide containing that text.
Tip
In earlier versions of PowerPoint, an Outlining toolbar was available when working with the Outline tab. In PowerPoint 2007, you can right-click anywhere in the outline to access some of those same tools on a context menu.
You can turn the Slides/Outline pane off completely by clicking the X button in its top-right corner. This gives maximum room to the Slides pane. When you turn it off, the Notes pane disappears too; they cannot be turned on/off separately. To get the extra panes back, reapply Normal view.
If you have ever worked with 35mm slides, you know that it can be helpful to lay the slides out on a big table and plan the order in which to show them. You rearrange them, moving this one here, that one there, until the order is perfect. You might even start a pile of backups that you will not show in the main presentation, but will hold back in case someone asks a pertinent question. That's exactly what you can do with Slide Sorter view, shown in figure 1-23. It lays out the slides in miniature, so you can see the big picture. You can drag the slides around and place them in the perfect order. You can also return to Normal view to work on a slide by double-clicking the slide.
When it's time to rehearse the presentation, nothing shows you the finished product quite as clearly as Slide Show view does. In Slide Show view, the slide fills the entire screen. You can move from slide to slide by pressing the Page Up or Page Down keys, or by using one of the other movement methods available.
Note
You learn about these other movement methods in Chapter 20.
You can right-click in Slide Show view to display a menu that enables you to control the show without leaving it. To leave the slide show, choose End Show from the menu or just press the Esc key.
Tip
When entering Slide Show view, the method you use determines which slide you start on. If you use the Slide Show View button in the bottom-right corner of the screen, the presentation will start with whatever slide you have selected. (You can also press Shift+F5 to do this, or choose Slide Show


When you give a presentation, your props usually include more than just your brain and your slides. You typically have all kinds of notes and backup material for each slide — figures on last quarters sales, sources to cite if someone questions your data, and so on. In the old days of framed overhead transparencies, people used to attach sticky notes to the slide frames for this purpose and hope that nobody asked any questions that required diving into the four-inch-thick stack of statistics they brought.
Today, you can type your notes and supporting facts directly in PowerPoint. As you saw earlier, you can type them directly into the Notes pane below the slide in Normal view. However, if you have a lot of notes to type, you might find it easier to work with Notes Page view instead.
Notes Page view is accessible only from the View tab. In this view, you see a single slide (uneditable) with a text area, called the notes placeholder, below it for your notes. See figure 1-25. You can refer to these notes as you give an on-screen presentation, or you can print notes pages to stack neatly on the lectern next to you during the big event. If you have trouble seeing the text you're typing, zoom in on it, as described in the next section.

If you need a closer look at your presentation, you can zoom the view in or out to accommodate almost any situation. For example, if you have trouble placing a graphic exactly at the same vertical level as some text in a box next to it, you can zoom in for more precision. You can view your work at various magnifications on-screen without changing the size of the surrounding tools or the size of the print on the printout.
In Normal view, each of the panes has its own individual zoom. To set the zoom for the Slides/Outline pane only, for example, select it first; then choose a zoom level. Or to zoom only in the Slide pane, click it first. In a single-pane view like Notes Page or Slide Sorter, a single zoom setting affects the entire work area.
The larger the zoom number, the larger the details on the display. A zoom of 10% would make a slide so tiny that you couldn't read it. A zoom of 400% would make a few letters on a slide so big they would fill the entire pane.
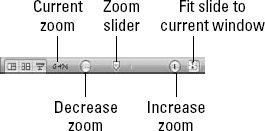
The easiest way to set the zoom level is to drag the Zoom slider in the bottom-right corner of the PowerPoint window, or click its plus or minus buttons in increment the zoom level. See figure 1-26.
To resize the current slide so that it is as large as possible while still fitting completely in the Slides pane, click the Fit Slide to Current Window button, or click the Fit to Window button in the Zoom group on the View tab.
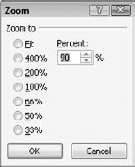
Another way to control the zoom is with the Zoom dialog box. On the View tab, in the Zoom group, click the Zoom button. (You can also open that dialog box by clicking the % next to the Zoom slider.) Make your selection, as shown in figure 1-27, by clicking the appropriate button, and then click OK. Notice that you can type a precise zoom percentage in the Percent text box. You can specify any percentage you like, but some panes and views will not go higher than 100%.
PowerPoint has a lot of optional screen elements that you may (or may not) find useful, depending on what you're up to at the moment. The following sections describe them.
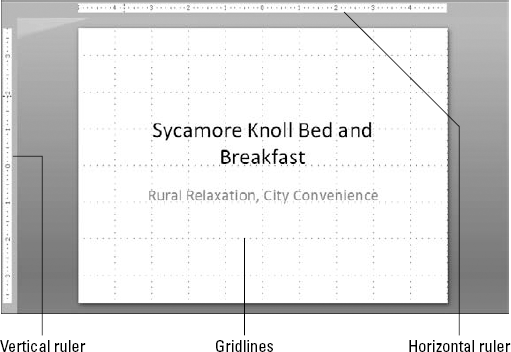
Vertical and horizontal rulers around the slide pane can help you place objects more precisely. To toggle them on or off, mark or clear the Ruler check box on the View tab. Rulers are available only in Normal and Notes Page views.
The rulers help with positioning no matter what content type you are working with, but when you are editing text in a text frame they have an additional purpose as well. The horizontal ruler shows the frame's paragraph indents and any custom tab stops, and you can drag the indent markers on the ruler just like you can in Word.
Note
The ruler's unit of measure is controlled from the Regional Settings in the Control Panel in Windows.
Tip
The vertical ruler is optional. To disable it while retaining the horizontal ruler, choose Office
Gridlines are non-printing dotted lines at regularly spaced intervals that can help you line up objects on a slide. figure 1-28 shows gridlines (and the ruler) enabled.
To turn gridlines on or off, use any of these methods:
There are many options you can set for the gridlines, including whether objects snap to it, whether the grid is visible, and what the spacing should be between the gridlines. To set grid options, follow these steps:
On the Home tab, in the Drawing group, choose Arrange

In the Snap To section, mark or clear these check boxes:
Snap Objects to Grid: Specifies whether or not objects will shift automatically align with the grid.
Snap Object to Other Objects: Specifies whether or not objects will automatically align with other objects.
In the Grid Settings section, enter the amount of space between gridlines desired.
Mark or clear the Display Grid On Screen check box to display or hide the grid. (Note that you can make objects snap to the grid without the grid being displayed.)

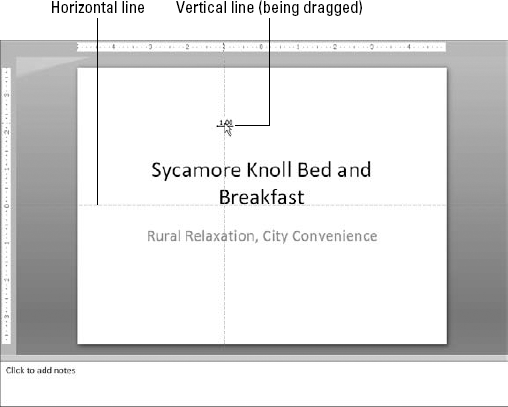
Guides are like gridlines except they are individual lines, rather than a grid of lines, and you can drag them to different positions on the slide. As you drag a guide, a numeric indicator appears to let you know the ruler position. See figure 1-30. Use the Grid and Guides dialog box shown in figure 1-29 to turn guides on/off, or press Alt+F9.
You can create additional sets of guide lines by holding down the Ctrl key while dragging a guide (to copy it). You can have up to eight horizontal and vertical guides, all at positions you specify
Most of the time you will work with your presentation in color. However, if you plan to print the presentation in black and white or grayscale (for example, on overhead transparencies or black-and-white handouts), you should check to see what it will look like without color.
Tip
This Color/Grayscale/Pure Black and White option is especially useful when you are preparing slides that will eventually be faxed, because a fax is pure black and white in most cases. Something that looks great on a color screen could look like a shapeless blob on a black-and-white fax. It doesn't hurt to check.
Click the Grayscale or the Pure Black and White button on the View tab to switch to one of those views. When you do so, a Grayscale or Black and White tab becomes available, as shown in figure 1-31. From its Setting group, you can fine-tune the grayscale or black-and-white preview. Choose one that shows the object to best advantage; PowerPoint will remember that setting when printing or outputting the presentation to a grayscale or black-and-white source.
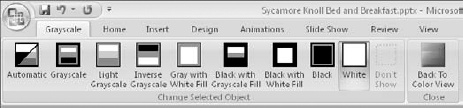
When you are finished, click the Back to Color View button on the Grayscale tab. Changing the Black and White or Grayscale settings doesn't affect the colors on the slides; it only affects how the slides will look and print in black and white or grayscale.
Have you ever wished you could be in two places at once? Well, in PowerPoint, you actually can. PowerPoint provides a way to view two spots in the presentation at the same time by opening a new window.
To display a new window, display the View tab and click New Window in the Window group. Then use Arrange All or Cascade to view both windows at once.
You can use any view with any window, so you can have two slides in Normal view at once, or Slide Sorter and Notes Pages view, or any other combination. Both windows contain the same presentation, so any changes you make in one window are reflected in the other window.
When you have two or more windows open, whether they are for the same presentation or different ones, you need to arrange them for optimal viewing. You saw earlier in this chapter how to resize a window, but did you know that PowerPoint can do some of the arranging for you?
When you want to arrange the open windows, do one of the following:
Tile: On the View tab, click Arrange All to tile the open windows so there is no overlap.
Cascade: On the View tab, click Cascade to arrange the open windows so the title bars cascade from upper-left to lower-right on the screen. Click a title bar to activate a window.
These commands do not apply to minimized windows. If you want to include a window in the arrangement, make sure you restore it from its minimized state first.
If you have more than one window open and can see at least a corner of the window you want, click it to bring it to the front. If you have one of the windows maximized, on the other hand, or if another window is obscuring the one you want, click Switch Windows (on the View tab) and select the window you want to view.
The PowerPoint Help system is like a huge instruction book in electronic format. You can look up almost any PowerPoint task you can imagine and get step-by-step instructions for performing it.
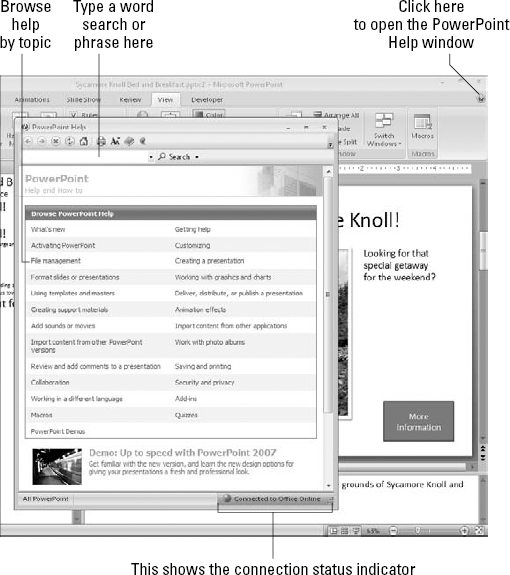
To open the PowerPoint Help window, press F1 or click the Help icon (the question mark) in the upper-right corner of the PowerPoint window. See figure 1-32.
To look up information in the Help system, you can:
Click one of the topics on the default Browse PowerPoint 2007 Help page shown in figure 1-32, and then keep clicking subtopics to narrow down the search until you arrive at what you want.
Type a keyword or phrase in the Search box, and then click Search or press Enter to find all help articles that contain it.
Tip
Much of the Office 2007 Help system relies on an Internet connection. By default, Office 2007 applications automatically connect to Microsoft's servers online to gather additional Help information. If you have a slow Internet connection, and find that searches are slow, try disabling online Help so that PowerPoint just uses the Help files installed on your PC. To do this, from the PowerPoint Help window, click the connection status indicator (see figure 1-32), and from the menu that appears, choose Show Content Only From This Computer.
When you browse or search the Help system, a list of articles matching the topic or search term appears. Click an article to read it. figure 1-33 shows an article on saving files, for example.
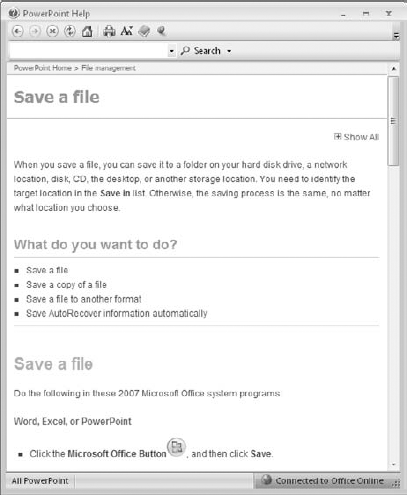
Figure 1.33. A typical article in the Help system contains some background information and step-by-step instructions.
The PowerPoint Help windows toolbar contains the buttons shown in Table 1-1.
Table 1.1. Help Toolbar Buttons
Button(s) | Name | Description |
|---|---|---|
Back and Forward | These are just like in Internet Explorer; Back goes back to a previously viewed topic and Forward goes forward again afterward. | |
Stop | Stops Web content from loading. Useful if it is loading very slowly and you want to give up. | |
Refresh | Reloads content from the Web. | |
Returns to the default list of topics (figure 1-32). | ||
Prints the currently displayed article. | ||
Change Font Size | Opens a menu from which you can select the size of the text that appears in the Help system. This setting also affects text in Internet Explorer. | |
Show Table of Contents | Toggles an extra pane to the left of the main Help window that contains the top-level list of topics. | |
Keep on Top | Keeps the Help window on top of all other windows. |
Microsoft provides a variety of support tools for PowerPoint in addition to the Help system. You can diagnose problems with your PowerPoint installation, for example, download update, register your copy of PowerPoint, and more.
To access these tools, follow these steps:
Click the Office button, and then click PowerPoint Options.
Click Resources. A list of resource topics appears, as in figure 1-34.
Click the button for the type of help you need. Each of these options is described in Table 1-2.
Table 1.2. PowerPoint Resources
Resource | Description |
|---|---|
Get Updates | Connects to the Office Web site, runs a utility that evaluates the dates on your current Office files, and downloads and installs updates if available. |
Office Diagnostics | Runs a utility that checks Office files and reinstalls any that have become corrupted or changed. |
Contact Us | Opens a Web page listing contact information for Microsoft. |
Activate Microsoft Office | Opens a utility that activates your copy of PowerPoint. (See the following section for details.) |
Description | |
Register for Online Services | Opens a window that enables you to send your contact information to Microsoft and receive free online services in return |
About Microsoft Office PowerPoint 2007 | Provides version information for your copy of PowerPoint. |
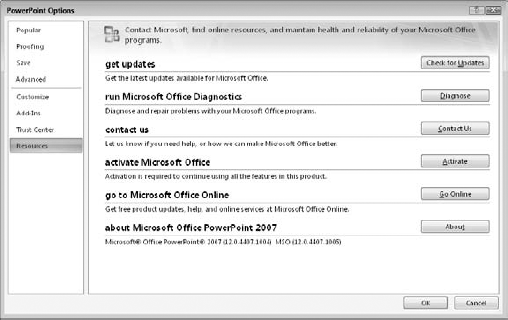
Figure 1.34. Support tools for PowerPoint appear in the Resources section of the PowerPoint Options dialog box.
All Office 2007 products must be activated after a certain number of days or a certain number of uses. This is a simple matter if you have an Internet connection. Every time you start an Office 2007 application, a reminder to activate appears. Follow the prompts to activate it. You do not have to give any personal information.
So what is this activation, and why is it required? Activation locks your copy of Office (or PowerPoint, if you bought it separately) to the hardware configuration in your computer, so that it can't be installed on any other PC.
The activation utility surveys a sampling of your PCs hardware (around a dozen different components), and based on their models, serial numbers, and so on, it comes up with a number. Then it combines that number mathematically with the 24-digit installation key code you entered when you installed the software, to produce a unique number that represents that particular copy of Office combined with that particular PC. It then sends that number off to an activation database at Microsoft, along with the original installation key code.
So how does this prevent illegal software copying? Two ways. One is that the installation key code is locked to that hardware ID, so that if you install the same copy on a different PC, it can't be activated there. (This is not the case for some corporate and volume-licensed copies.) The other is that it prevents you from radically changing the hardware in the PC without contacting Microsoft for reactivation authorization. For example, you could not take the hard disk out of the PC and put it in another PC without reactivating Office.
It is this second point that has been an issue of conflict between Microsoft and users, because many users like to tinker with their hardware and they do not want to have to contact Microsoft every time they make hardware changes. According to Microsoft documentation, the change of one or two pieces of hardware will not trigger the need for reactivation, but your experience may differ.
There are two situations in which you might not have to activate:
When you buy a new PC with Office preinstalled. Office will already have been activated, so you do not have to go through the process.
If you work for a company or attend a school that has a licensing agreement with Microsoft for a certain number of copies. You might have a version of Office that does not contain the activation requirement.
When you go through the activation process, you are also asked whether you want to register your copy of the software. Activation by itself sends no identifying information about you or your PC to Microsoft; if you want to be on the Microsoft mailing list for update information, you must go through the additional process of registration.
In some situations, it is advantageous for your copy of PowerPoint to communicate with Microsoft over the Internet. For example, when you use the Help system, you get better results if you are connected, and when inserting clip art, you have more images to choose from if you are connected.
It's a two-way street: your copy of PowerPoint can also help Microsoft by sending information to the company about your usage habits. For example, when Microsoft is developing a new version of PowerPoint, they look at usage data to determine which features of the program people are using the most and the least. This program for gathering user data is the Customer Experience Improvement Program, and participation in it is optional.
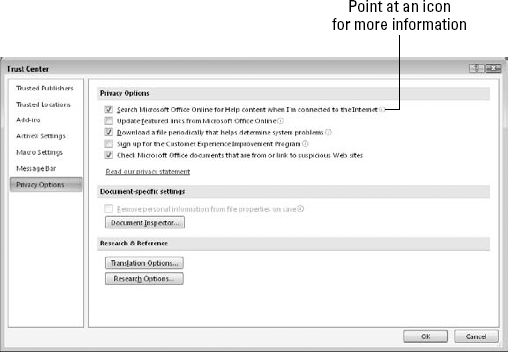
To control whether — and how — your copy of PowerPoint interacts online with Microsoft, follow these steps to configure Privacy Options:
Choose Office
Click Trust Center, and then click the Trust Center Settings button. The Trust Center dialog box opens.
Click Privacy Options, and then mark or clear any of the check boxes in the Privacy Options section. See figure 1-35. To get information about each of the options, point to the "i" symbol to its right.
Click OK, and then OK again to close all open dialog boxes.
This chapter provided an introduction to PowerPoint. You learned about PowerPoint 2007s new features, how to navigate the new user interface, how to control the view of the PowerPoint window, and how to get help and support. In the next chapter, you'll learn about the "soft skills" involved in planning and executing a successful presentation.