PowerPoint creates complete multimedia presentations, which means that not only can you include pictures and sounds but also movies and animations. In this chapter, you'll learn how to select the appropriate video type, how to insert clips, and how to control when they will play
Let's begin at an obvious starting point: figuring out how you are going to get a hold of the videos you need. Not all videos are live-action recordings; some are digitally created cartoons (either 2-D or 3-D). PowerPoint can show both kinds. The difference is not that important once you get clips into PowerPoint, but when you are determining how you will acquire them, it is helpful to make the distinction. The following sections discuss the types of videos that PowerPoint supports.
When is a video not really a video? When it's an animated GIF.
As you may already know, GIF is a file format for static graphics files. One of the advantages of it over other graphic file formats is that you can create animated versions. These are not really videos in the traditional sense; they are a collection of still graphics stored in a single file under one name. When the file is displayed — on a presentation slide, a Web page, or some other place — it cycles through the still graphics at a certain speed, making a very rudimentary animation. You cannot control the animation of an animated GIF through PowerPoint, nor can you set it up to repeat a certain number of times. That information is contained within the GIF file itself. PowerPoint simply reads that information and plays the GIF accordingly.
PowerPoint's Clip Organizer comes with many animated GIFs that have simple conceptual plots, such as time passing, gears turning, and computers passing data between them. They are more like animated clip art than real movies or real animated clips, but they do add an active element to an otherwise static slide.
Tip
It is possible to convert an animated GIF to a "true" video format such as AVI. However, you can't do it using PowerPoint alone; you need a conversion utility. Corel Animation Shop will do this (www.corel.com), as will many GIF-editing programs.
Now you get to learn about the "real videos." Recorded videos have a live origin. Someone went out with a video camera and pointed at something in the world. You can get live-action videos from the Internet, but in most cases for business presentations you will want to record it yourself with a camera to suit your purpose. You might use recorded video to present a message from someone who could not be present in person, show how a product functions, or provide a tour of a facility, for example.
There are two kinds of video cameras: digital and non-digital. It is important to know which kind you have because they hook up to the PC differently to transfer the video. A digital video camera hooks up directly to the PC via USB or FireWire port, whereas a regular (analog) video camera requires a conversion box or an adapter card that converts analog to digital.
If you are not sure what type of video camera you have, look at how it stores the video. If it stores it on VHS or some other kind of tape, it's analog. If it stores it on a disk or cartridge that says "digital" on it, it's digital. Also look at its interfaces. If it's digital, it will have either a USB or FireWire plug that fits into your PC; the end of the cable that fits into the video camera will be smaller and more square.
You don't usually import videos directly from the camera into PowerPoint because they are too rough and may contain extraneous footage, unwanted sounds, or awkward jerks or transitions. Instead you want to polish up your videos in a video-editing program. Windows Movie Maker, which comes with Windows XP and Vista, is a decent low-end choice. If you bought an analog-to-digital video converter box or card, it may have come with video-editing software as well. Video editing can be very time-consuming, so allow plenty of time to do this work before assembling your presentation in PowerPoint.
Tip
Don't assume that you have to record every bit of live-action footage with your own camera. As long as you are diligent about obeying copyright restrictions, you can safely download tons of great footage from the Internet. For example, the Internet Archive at www.archive.org contains links to huge repositories of footage on all subjects, mostly pre-1964 material on which the copyright has expired. Warning — you can easily get sucked in here and waste several days browsing!
Digital animation does not have a live origin — it's a simulation of life. Simple animations appear cartoonish, but there are animation applications that, in the right hands, can create extremely realistic 3-D simulations. Digital animation is useful when you are showing things that either don't exist yet or are unavailable for live filming. For example, you could show how a planned product will be manufactured or how it will work. Simple cartoons can also add a whimsical touch or lighten the mood.
To create your own animations, turn to a separate animation application; PowerPoint doesn't have any capability for doing it. If you want high-end, high-quality 3-D animations, use a professional-quality application like Adobe After Effects.
The video capture and video-editing program you use to create or acquire your video clips will determine the file's format and specs. PowerPoint can accept videos with the following file formats:
Motion Picture Experts Group (.mpg, .mpeg, .m1v, .mp2, .mpa, and .mpe)
Microsoft streaming format (.asf and .asx)
Microsoft Windows Media Video (.wmv)
Audio Video Interleave (.avi)
QuickTime (.mov or .qt) versions 1 and 2.x
Warning
Versions of QuickTime 3 and higher will not work as an inserted movie in PowerPoint. You would need to either insert a later-format QuickTime file as an object (Object button on the Insert tab) or convert it to a supported format such as AVI using a third-party utility.
You may not have a choice in the settings used for the recording of live video or the file format. If you do have a choice, AVI is among the best formats for use in PowerPoint because of its near-universal compatibility. There may be compatibility issues with video in some MPEG variants, such as MPEG-2 and MPEG-4, such that you might need to install a separate DVD-playing utility or a specific codec to handle those formats.
Note
See the "Troubleshooting Movies That Won't Play" section later in this chapter for more information on MPEG variants.
On the theory that Microsoft-to-Microsoft always works, the Windows Media Video format (.wmv) is also a good choice. Because Windows Movie Maker creates its movies in this format by default, it's a good bet that they will work well in PowerPoint.
If you have a choice in quality, you should balance file size against quality. This is usually measured either in frames per second (fps), which is anywhere from 15 (low) to 30 (high), or in kilobits per second, which is anywhere from 38 kbps to 2.1 mbps. You might experiment with different settings to find one with acceptable quality for the task at hand with the minimum of file size. For example, with Windows Movie Maker, a wide variety of quality settings are available.
Not sure where to find video clips? Here are some places to start:
Your own video camera. You can connect a digital video camera directly to your PC, or connect an analog video camera to an adapter board that digitizes its input.
The Clip Organizer. When you're connected to the Internet, you get the whole collection as you browse.
The Internet in general. There are millions of interesting video clips on every imaginable subject. Use the search term video clips plus a few keywords that describe the type of clips you are looking for. Yahoo! is a good place to start looking (
www.yahoo.com). Some clips are copyrighted or have usage limitations, but others can be used freely; check the usage information provided with the clip.Warning
Whenever you get a video clip from the Internet, make sure you carefully read any restrictions or usage agreements to avoid copyright violations. If you create a presentation using copyrighted material in an unauthorized way, you or your company could potentially get sued.
Commercial collections of video clips and animated GIFs. Many of these companies advertise on the Internet and provide free samples for downloading. Several such companies have included samples on the CD that accompanies this book.
The Internet Archive. (
www.archive.org). This site contains links to huge repositories of public domain footage on all subjects, mostly pre-1964 material on which the copyright has expired. Warning — you can easily get sucked in here and waste several days browsing!
Your first step is to place the movie on the slide. After that, you can worry about position, size, and playing options. Just as with audio clips, you can place a video clip on a slide using the Clip Organizer, or do so directly by inserting from a file or pasting from another application.
Warning
Video clips are linked, not embedded, in the presentation. If you move the presentation file to another location, make sure you move the movie clips too. For this reason, inserting videos from the Clip Organizer may not be a good idea; it's linked from the original location and difficult to move. You can get around this by using the Office
Just as with sounds and graphics, you can organize movie files with the Clip Organizer. I don't go into it in detail here, because the Clip Organizer is discussed in detail in Chapter 12. Most of the clips that come with the Clip Organizer are animations rather than recorded videos. To select a movie from the Clip Organizer, follow these steps:
Make sure your Internet connection is established (for the best selection of clips).
Display the slide on which you want to place the movie.
On the Insert tab, click the down arrow on the Movie button, and choose Movie from Clip Organizer. The Clip Organizer task pane appears, showing the available movie clips. Thumbnails of each clip appear, showing the first frame of the clip. You can tell that each is an animation or movie rather than a static graphic because of the little star icon in the bottom-right corner of each thumbnail image. See figure 17.1.
(Optional) If you want to preview the clip, open its menu (the down arrow to its right) and choose Preview/Properties. The clip plays in a dialog box; when you're done watching it, click Close.
Click the clip you want to insert. A box may appear asking when you want it to play. (This box won't appear when you insert an animated GIF, because they play automatically.)
Click either Automatically or When Clicked. The clip appears on the slide.
Close the Clip Organizer, and then move the clip as needed. It won't play in Normal view, but you can switch to Slide Show view to test it if desired.

Warning
Be careful when resizing the video, because it can compromise quality; it's usually better to resize the video in your video-editing software.
To test the movie, enter Slide Show view and click it to play it (if it does not play automatically). You can control when and how the clip plays; you learn to do that later in this chapter.
Tip
Many interesting clips are available through the Clip Organizer if you are connected to the Internet so you can access the Microsoft site. Unlike with artwork, it is not obvious what a clip does just by looking at its name and the first frame (which is what appears as its thumbnail image). Take some time to insert a lot of clips and try them out to see what you have to choose from.
Remember that you can add your own video clips to the Clip Organizer, as you learned in Chapter 12, and you can categorize them, add keywords, and everything else that you can do to artwork.
If you find some video clips in the Clip Organizer that you want to have available later, you can add them to the local collection of clips on your hard disk. That way, if your Internet connection is not available later, you can still access them. To make a clip available offline, do the following:
Make sure your Internet connection is established.
On the Insert tab, click the down arrow on the Movie button and choose Movie from Clip Organizer. The Clip Organizer task pane appears, showing the available movie clips. The clips that are on the Web have a little globe icon in their bottom-left corner.
Open the menu of the clip that you want (the arrow to its right) and choose Make Available Offline. The Copy to Collection dialog box opens as shown in figure 17.2. If the Make Available Offline command is not present, it means that this clip is already on your local hard disk.
Select the collection in which you want to place the clip. (Or click New to create a new collection.) Then click OK.
If the movie that you want is not in the Clip Organizer (and you don't want to bother with placing it there), you can place it directly on the slide, just like any other object. For example, you might have video of your CEO's last speech saved on your hard drive.
Warning
If you plan on moving the presentation to another location later, place the movie clip in the same folder as the presentation itself before you insert the movie clip into the presentation. That way the path to it stored in the presentation file will be relative, and the link will still work after you move the presentation and movie clip.
To insert a video clip from a file, follow these steps:
Display the slide on which the movie should appear.
On the Insert tab, click Movie. You don't need to open the button's menu because the option that you want, Movie from File, is the default.
In the Insert Movie dialog box, locate the clip you want. Select the clip and click OK.
A box appears asking when you want it to play. Choose Automatically or When Clicked. The movie clip appears on the slide.
Move the clip as desired. Again, be careful when resizing the clip.
Video clips are a lot like sounds in terms of what you can do with them. You can specify that they should play when you point at them or click them, or you can make them play automatically at a certain time.
Warning
If you are using an animated GIF, it plays the number of times specified in its header. That could be infinite looping (0), or it could be a specified number of times. You can't set it to do otherwise. (You can, however, delay its appearance with custom animation. See Chapter 18 for details.) Other movies, such as your own recorded video clips (AVI, WMV, and MPEG format), have more settings you can control.
The default setting for a video clip is to play when you click it with the mouse. To set it to play when you point to it, or not to play in response to the mouse, follow these steps:
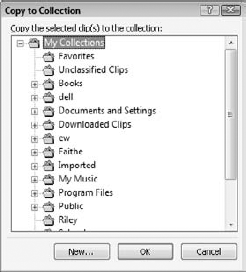
Select the clip, and then on the Insert tab, click Action. The Action Settings dialog box opens. See figure 17.3.
On the Mouse Click and Mouse Over tabs, click the Squf button if you want no action, or click the Object Action button if you want it to play in either case.
Click OK.
If you are working with a real video clip (not an animated GIF), you can also edit the Movie objects controls. These controls enable you to specify whether the video plays in a continuous loop or not, and which frame of the movie remains on the screen when it is finished (the first or the last). You can also control whether any clip controls appear on the slide. Chapter 16 goes into clip controls for sounds, but they are even more appropriate here for videos because you are more likely to want to pause, rewind, and fast-forward a video clip.
There are two ways to set the clip's volume and appearance; you can do so using the Movie Tools Options tab (figure 17.4), or you can click the dialog box launcher in the Movie Options group there and set the same options up via a dialog box similar to the one from PowerPoint 2003 (shown in figure 17.5) that controls those features. There is only one difference between the two methods, and it is minor — the volume for the clip, when set from the Options tab, has only four settings: Low, Medium, High, or Mute. When set via the dialog box, a continuously variable slider is available. Table 17.1 lists the available settings and the controls for each one using the Options tab and dialog box methods.


Tip
Some of the same controls in the Movie Options dialog box (see figure 17.4) are also accessible while you are working on Custom Animation (covered in the following section). From the Custom Animation task pane, open the menu for the clip and choose Effect Options; then click the Movie Settings tab.
Table 17.1. Setting Sound and Appearance Options via Options Tab or Movie Options Dialog Box
Action | Movie Tools Options Tab | Movie Options Dialog Box |
|---|---|---|
Play movie when clicked or automatically | Play Movie drop-down list | n/a |
Hide the clip when it is not playing | Hide During Show check box | Hide While Not Playing check box |
Play the clip full-screen, temporarily obscuring the rest of the slide | Play Full Screen check box | Zoom to Full Screen check box |
Repeat the clip until another animation event stops it or until the next slide appears | Loop Until Stopped check box | Loop Until Stopped check box |
Return the movie to its first frame after playing | Rewind Movie After Playing check box | Rewind Movie When Done Playing check box |
Adjust sound volume for clip in relation to overall volume for presentation | Slide Show Volume drop-down list | Sound Volume button (opens slider) |
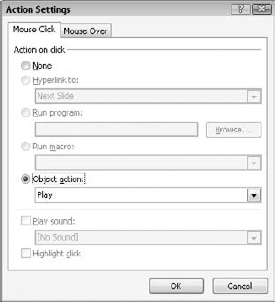
When you place a movie clip on a slide, an entry for it is created on the Custom Animation task pane, as shown in figure 17.6.
Warning
If you choose to set the clip to play automatically when you insert the clip initially, two entries appear in the Custom Animation task pane: one for Play and one for Pause. If you choose to set the clip to play on click, only the Pause entry appears. Changing the behavior later does not affect the presence/absence of the Play entry, and you need the Play entry to do some of the things in the upcoming sections. If you inserted it to play On Click initially, you might want to delete it and reinsert it and choose Automatically so you get both of those custom animation entries. That way you can more easily follow along in the next section.
You can control the play timing for real video clips (not animated GIFs) through the Custom Animation task pane and the Options tab. These settings enable you to specify whether the video should play automatically when the slide appears and whether there should be a delay before it.
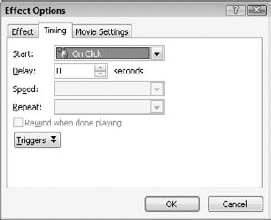
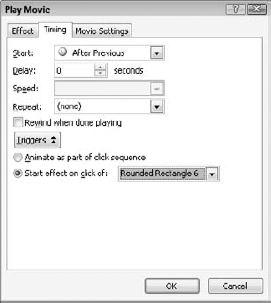
To set this up, you need to display the Start and Delay controls for the clip. Be careful, though, because different dialog boxes appear—with different options — depending on what you select before you issue the command to open the dialog box. For example, in figure 17.5, you saw that a single clip can have two entries in the Custom Animation task pane: Pause (triggered on click) and Play (occurring automatically). If you open the menu for the Pause entry and choose Timing, you get a Pause Movie dialog box. In this dialog box, a trigger has been set to start the effect on click of the movie. If you open the menu for Play and choose Timing, you get a Play Movie dialog box. And if you select the clip on the slide directly, and then right-click either the pause or the play entry and choose Timing, you get an entirely different dialog box called Effect Options. figures 17.7 through 17-9 shows these dialog boxes, respectively, so that you can see how they are different.


Figure 17.8. Timing options for playing the movie. Notice that Repeat and Rewind are available (unlike in Figure 17.7).
Follow these steps to control the clip timing:
From the Animations tab, click Custom Animation to display the Custom Animation task pane if needed.
Open the menu for the video clip (either the clip as a whole or just the Pause or Play animation) and choose Timing. A dialog box opens.
Note
Instead of opening the menu, you can just double-click the desired animation effect in the task pane and the dialog box opens. Then you can click the tab you want (in this case, Timing).
Set the timing options (as available in the dialog boxes that appear in figures 17.7 through 17.9):
Start: Your choices are On Click, With Previous, or After Previous. These are movie actions that can also be added via custom animation.
Delay: This is the delay in seconds between the previous animation event and this one.
Speed: For animation effects, this controls the speed; for a movie clip, it is unavailable because you cannot change the speed at which the movie plays.
Repeat: Choose how many times you want the clip to repeat before it stops. This is available only for Play Movie (see figure 17.8).
Rewind When Done Playing: If you want the last frame of the movie to remain onscreen after it completes, leave this check box unmarked. If you want the first frame to reappear, mark this check box. This is available only for Play Movie (see figure 17.8).
Click OK.
All three dialog boxes (see figures 17.7 through 17.9) have a Triggers button that displays or hides the extra triggers options, shown in figure 17.10. Triggers specify when the action should occur. They enable you to trigger an event as a result of clicking the event object or something other than the event object. For example, you can place a sound icon on a slide, but then have it triggered to start playing when someone clicks on a graphic. In the case of a video, the default setting for the Pause Movie animation event is triggered when you click the clip itself. For example, you can potentially have the Play triggered by one button on your slide and the Pause triggered by another.
Just like with sounds, you can set up a video clip to play from some point other than the beginning, and continue through a certain number of slides and then stop. Because you probably do not want a clip to continue to play after you have moved past its slide, the stopping portion is less useful for videos than for sounds. However, the Start feature can be very helpful in trimming off any portion of the beginning of the clip that you don't want.
Note
To set the start point for the clip, you must have the Play portion of the custom animation selected — not the Pause portion or the clip as a whole. If you don't have a Play animation for the clip, the easiest way to get one is to reinsert the clip and choose Automatically when you are asked when it should play. You can also create a new Play Movie animation, as you learn in Chapter 18.
To set the start and stop points for a movie clip, follow these steps:
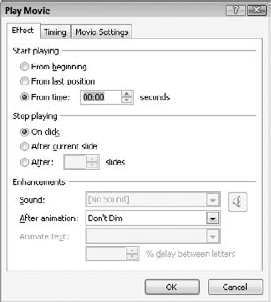
In the Custom Animation task pane, click the animation event for the clip that represents Play (with the Play triangle to the left of the name), so that only that item is selected.
Open the clip's menu and choose Effect Options. The Play Movie dialog box opens with the Effect tab on top as shown in figure 17.11.
Warning
If you get the Effect Options dialog box or the Pause Movie dialog box in step 2, you have selected the wrong option; click Cancel and go back to step 1 to try again.
In the Start Playing section, choose the desired start point:
From Beginning: Starts the clip from its beginning (default setting).
From Last Position: Starts from whatever point the clip was paused or stopped earlier. If it was not paused or stopped earlier, this is the beginning.
From Time: Starts at a certain number of seconds into the clip. (Then specify the number of seconds in the Seconds drop-down list.)
(Optional) In the Stop Playing section, if desired, set up the video to stop on click, after the current slide, or after a specified number of slides.
Click OK.
You can resize a video clip's window just like any other object. Simply drag its selection handles. Be careful, however, that you do not distort the image by resizing in only one dimension. Make sure you drag a corner selection handle, not one on a single side of the object.
Also be aware that when you enlarge a video clip's window, the quality of the clip suffers. If you make the clip large and are unhappy with its quality, you can reset it to its original size by following these steps:
Right-click the clip and choose Size and Position.
Click Reset.
Click Close.
Shockwave Flash is an animation format by a company called Macromedia. PowerPoint and this format do not naturally go together smoothly, but you can insert Shockwave content on a slide as an ActiveX control in a pinch. Similarly Macromedia Director content (another multimedia format by the same company) can also be inserted via ActiveX.
Warning
Shockwave and Director content will not play using the PowerPoint Viewer because the viewer does not support ActiveX content.
To insert Shockwave or Director content, first turn on the Developer tab (Office
On the Developer tab, in the Controls group, click More Controls. (It's the icon that looks like a hammer and wrench.) The More Controls dialog box opens.
Select Shockwave Flash Object (for Shockwave) or Shockwave ActiveX Control (for Director). The mouse pointer turns into a crosshair.
Note
If you do not have those formats listed in the More Controls dialog box, you'll need to exit PowerPoint and then open up Internet Explorer to install the ActiveX control. You can do so by going to
www.adobe.com/shockwave/download/index.cgi?.Drag on the slide to create a boxed area where the content should appear.
With the new box selected, click the Properties button on the Developer tab. A Properties box appears for the object.
For Shockwave content: Click Custom (the top row). A button with an ellipsis on it (...) appears to the right of that row. Click the ellipsis button to open the Property Pages dialog box. In the Movie URL box, type the path or URL to the file. Mark the Embed Movie check box, and click OK.
For Director content: Click the SRC line, and type the Director file's name (and path if it is not in the same folder as the presentation itself). Director files are not embedded (but rather, linked), so it's a good idea to put them in the same folder as the presentation file itself before adding them.
Close all open dialog boxes.
Tip
A tutorial and more information about inserting Director content are available at www.indezine.com/products/powerpoint/ppdirector.html. This information was written for earlier versions of PowerPoint, but most of it still applies except for the step-by-step walkthrough.
PowerPoint's handling of movie files is not always optimal because it uses the antiquated MCI Media player to play video. For more information about PowerPoint and video, see http://www.pfcmedia.com/multimediatutorial.htm. There are some workarounds available for most of the common problems, however, and the following sections explain some of them.
For problems with movies that won't play, explore one or more of these possible fixes:
Play it in Windows Media Player: If your movie won't play in PowerPoint, try Media Player. (Go to
www.microsoft.comand download the latest version of Media Player if you don't have it.) If it plays there, you can insert the clip as an object with the Insert tab's Object button, as you learned in Chapter 15. You can't set any of the normal PowerPoint options for the clip; you play it through Windows Media Player instead during the presentation.Download a codec: If your movie won't play anywhere, not in PowerPoint or in any of your players, perhaps your system does not have the needed codec, which is a compression/decompression driver; different formats need different ones. When you play a video clip in Windows Media Player for which you do not have the proper codec, it tries to connect to Microsoft's servers to download one automatically. If that fails, you can try manually searching the Web for suitable codecs for that file format. You can also try downloading the latest official set of codecs for Windows Media Player from
www.microsoft.com/windows/windowsmedia/format/codecdownload.aspx.Still doesn't work? Try a different player: Windows Media Player does not support all video formats, but you can find a different player that will. If you do, you can install it, and then embed the movie as an object associated with that program, as you embedded objects in Chapter 15. To do this, you need to set the new program as the default for handling that file extension. In Windows XP, choose Tools

Troubles with DVDs: DVD movie clips are a special case. Windows Media Player may attempt to play them but fail, and you get an unhelpful generic error message. This is usually caused by not having a DVD hardware or software-based encoder/decoder. If your PC plays DVD movies, then you already have one. If not, there are many good ones. See if your PC originally came with a DVD movie player application, and if so, reinstall it — that's the cheap option. Otherwise, you can try WinDVD; a free trial is available at
www.intervideo.com. You can then use the Object button on the Insert tab to insert the clip and let it play with WinDVD or whatever player you are using.Convert to WMV format: PowerPoint easily handles Windows Media Video (WMV) format clips. You can import a video clip into Windows Movie Maker (free with Windows XP and Windows Vista) and then export it to WMV format from there.
Use a third-party utility: PlaysForCertain (PFC) is a utility that converts and prepares video files to work within PowerPoint. A free 14-day trial is available from
www.pfcme-dia.com. You might find it easier to simply get this utility than to spend a lot of time messing with various file formats.
Tip
If you record video with your own video camera, and it won't play in PowerPoint, it's probably because your camera uses a proprietary codec. Use the software that comes with the camera to re-render it using a more common codec. Some of the most popular standard codecs are Cinepak and Indeo Video Codec. A utility called gspot, available at www.headbands.com/gspot, can identify what codecs are being used in your video files.
Tip
This may seem hard to believe, but it works. If you get an error message when you try to drag and drop an AVI video clip into your presentation or if you try to insert it and PowerPoint simply ignores you, try renaming the file extension from .avi to .mpg. This often will fix it.
Be aware that slower, older computers, especially those with a meager amount of RAM, may not present your video clip to its best advantage. The sound may not match the video, the video may be jerky, and a host of other little annoying performance glitches may occur. On such PCs, it is best to limit the live-action video that you use and rely more on animated GIFs, simple WMV animations, and other less system-taxing video clips.
When you are constructing a presentation, keep in mind that you may be showing it on a lesser computer than the one on which you are creating it, and therefore performance problems may crop up during the presentation that you did not anticipate. Here are some ideas for at least partially remediating the situation:
Make sure you test the presentation on the actual computer on which you are going to show it, especially if you need a nonstandard codec.
Copy the entire presentation and all of its support files to the fastest hard disk on the system instead of running it from a CD. Hard disks have much faster access time. Use Package for CD to collect the needed files instead of manually copying them through Windows, to ensure that you get all of the files and properly resolve their links.
Run the entire presentation on the playback PC from start to finish beforehand. If there are delays, jerks, and lack of synchronization, just let it play itself out. Then try the whole presentation again, and it will usually be much better the second time. This happens because the system caches some of the data, and it's faster to read it from the cache than from the disk.
Make sure the playback PC is in the best shape it can be in. If feasible, upgrade its RAM. Run Disk Defragmenter and Disk Cleanup on it, and make sure its video driver is up to date.
Work with the original media clips to decrease their complexity, and then reimport them into PowerPoint. For example, use video-editing software to lower the frames per second of video clips, and use image-editing software to lower the dots per inch of any large graphics.
If possible, spread out the more complex slides in the presentation so that they are not adjacent to one another. Have an intervening slide that is just simple text.
If all else fails, transfer the presentation to videotape or digital video from the original PC (where presumably it plays correctly). This is covered later in the chapter.
When you are recording your own video clips with a video camera or other device, it is easy to overshoot. Video clips take up a huge amount of disk space.
Movie files are linked to the PowerPoint file, rather than embedded, so they do not dramatically increase the size of the PowerPoint file. However, because the linked movie file is required when you show the presentation, having a movie does greatly increase the amount of disk space required for storing the whole presentation package.
Depending on the amount of space available on your computer's hard disk, and whether you need to transfer your PowerPoint file to another PC, you may want to keep the number of seconds of recorded video to a minimum to ensure that the file size stays manageable. On the other hand, if you have a powerful computer with plenty of hard disk space and a lot of cool video clips to show, go for it!
While not normally considered an optimal presentation method, sometimes VHS video is the only format that will do for a presentation, for one reason or another.
If you have a video card with TV/Video out capability, the process is very straightforward. Hook the video card to the VCR with a compatible cable (S-video if possible because it's the highest quality), press Record on the VCR, and start the presentation on the PC. It doesn't get much easier than that.
If you don't have a video card like that, consider buying one; they're not that expensive and you will save yourself a tremendous amount of grief and headache. Otherwise you will need to buy a scan converter, which is an external box that converts between PC and TV/VCR, and a decent one of these will cost more than the video card with TV/Video out.
Note
If you are determined not to buy a video card with TV/Video out, see the tutorial produced by Austin Myers at www.soniacoleman.com/Tutorials/PowerPoint/recordvhs.htm, which provides much more thorough coverage of the topic.
But wait — you'll want to do some testing before recording your presentation to VHS in its entirety. TV screens, especially the old-time picture tube types (not so much with the newer plasma ones), show colors and shapes differently than PC monitors do, and what looks good on a PC may not look so good on a TV. Before doing the final recording, hook up a TV to the VCR and do a test recording. You might decide you need to adjust some colors or change the slide dimensions.
In this chapter, you learned how to place video clips on your slides and how to set them up to play when you want them to. You learned about the differences between various video formats, and how to set up clips to play when you display the slide and/or when you click them. You learned how to set a clip's volume and appearance, and how to make it play at different starting points and stop at different ending points. Finally, you learned how to incorporate Shockwave and Director content and how to output a presentation to videotape.
In the next chapter, you learn about transitions and object animation. With a transition, you can create special effects for the movement from one slide to another. With object animation, you can control the entry and exit of individual objects on a slide. You can make them fly in with special effects or build them dramatically one paragraph, bar, or shape at a time.