As you have already seen, PowerPoint contains an assortment of tools for creating various types of objects: charts, WordArt, SmartArt diagrams, clip art, and so on. You have also learned how to place graphics into PowerPoint from a saved file, how to embed Excel charts on slides, and how to borrow slides from other PowerPoint presentations and outlines from Word or other text editors.
However, a lot of other objects don't fall into any of these categories, so PowerPoint doesn't have a special command for bringing in exactly that type of object. Examples include a flow chart from a program like Microsoft Visio, a slide from a different presentation application, some records from a database, or a map from a mapping program.
This chapter looks at the various ways to import and create content from other applications in PowerPoint, as well as how to export PowerPoint objects for use in other programs.
There are several ways to bring content from other programs into your presentation. The method you choose depends on how you want the content to behave once it arrives. You can make the inserted content a full citizen of the presentation — that is, with no ties to its native application or data file — or you can help it retain a connection to its original application (called embedding) or to its original data file (called linking).
The simplest way to import content into PowerPoint is to use the Copy and Paste commands. For text-type data from most applications, this results in the incoming data integrating itself with PowerPoint without retaining any connection to the source. For example, you can select some cells from an Excel worksheet, and then click Copy on the Home tab to copy them to the Clipboard. Then in PowerPoint you can paste them by clicking Paste, and the Excel cells become a PowerPoint table. You can also do the same thing with drag-and-drop from one application to the other.
Warning
Not all data types exhibit the behavior described here. With some source data types, especially types that are more graphical than text-based, copy-and-paste results in an embedded object that will open its native application for editing. For example, when you copy and paste a chart from Excel, it is by default linked.
Another choice is to embed the data. You can do this for existing or new data. Embedding it maintains the relationship between that data and its native application, so that you can double-click it to edit it with that native application later. To embed existing data, you copy the data to the Clipboard, use the Paste buttons menu to select Paste Special, and then choose the appropriate data type from the list. For example, suppose you want to be able to edit the pasted cells in Excel later. You can use Paste Special and choose Microsoft Excel Worksheet Object as the type. (More on this shortly.)
To embed new data, you use the Object button on the Insert tab, and then choose to create a new embedded object of the desired type. (More on this shortly too.) For example, suppose you have a favorite program for creating organization charts. You can start a new embedded organization chart on a PowerPoint slide instead of using PowerPoint's own SmartArt hierarchy chart. That organization chart is then stored only within your PowerPoint file, not separately.
Yet another choice is to link the data from its original source file. When you do this, PowerPoint maintains information about the name and location of the original, and each time you open the presentation file it rechecks the original to see if any changes have been made to the original data file. If so, PowerPoint updates its copy of the object to the latest version. For example, suppose you want to include data from an Excel workbook that a coworker is creating. He warns you that his data is not final yet, but you want to create the presentation anyway. By creating a link to his data, rather than pasting a static copy of it, you ensure that you will always have the latest data no matter how many times he changes it.
You can create a link to an entire file or to a specific part of a file. For example, you can link to the entire Excel workbook, or just to a certain range of cells on a certain sheet. The procedures are different — for the entire file you use Object (Insert tab), but for a portion of the file you use Paste Special (Home tab). Both methods create a link to the entire Excel workbook, but Object automatically displays the entire first sheet of the workbook in your PowerPoint file, whereas Paste Special displays only the cells that you've selected.
Let's assume for the moment that you don't need any special linking or embedding. You just want the content from some other program to be placed on a PowerPoint slide. You have two choices: Use the Clipboard, or use drag-and-drop.
The easiest way to place something into PowerPoint is to use the Windows Clipboard. Because almost all Windows-based programs employ the Clipboard, you can move data from any program to almost any other with a minimum of fuss. Follow these steps:
Create the data in its native program or open a file that contains it.
Select the data you want, and click Copy on the Home tab, or if it is not an Office program, open the Edit menu and choose Copy.
Note
Ctrl+C always works to copy to the Clipboard, so use that if you can't find the copy command in the application.
Switch to PowerPoint, and display the slide on which you want to place the content.
Click Paste on the Home tab. The content appears on the slide. PowerPoint makes its best guess as to the correct formatting. For example, if you paste Excel worksheet cells, it attempts to convert them to a table because that's the closest match among the native PowerPoint layouts.
Move or resize the new content as necessary on the slide.
Note
Don't forget that there are many alternative methods for using the Copy and Paste commands. The shortcut keys are among the fastest: Ctrl+C for copy and Ctrl+V for paste.
PowerPoint, like all Office 2007 applications, has an enhanced version of the Clipboard that is available when both the source and destination locations are Microsoft Office applications. It enables you to copy more than one item at a time to the Clipboard, and then choose among them when pasting. When pasting to a non-Office application, however, only the last item copied to the Clipboard is available.
When you copy twice in a row without pasting while in an Office application, the Clipboard task pane appears, with each copied clip separately listed. You can also open this Clipboard task pane by clicking the dialog box launcher in the Clipboard group on the Home tab.
Tip
If pressing Ctrl+C twice doesn't open the clipboard, open the task pane the other way (by clicking the dialog box launcher in the Clipboard group on the Home tab) and then click the Options button and click Show Office Clipboard When Ctrl+C Pressed Twice.
You can then open the destination and click the clip you want to paste. Or you can click the down arrow next to a clip and choose Delete to delete it. See figure 15.1.
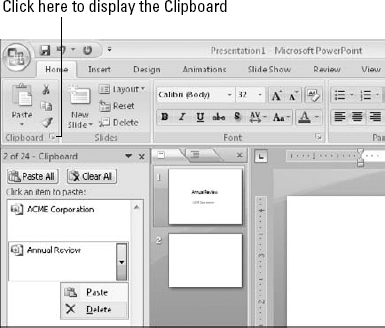
Figure 15.1. Using the Office 2007 Clipboard task pane enables you to copy more than one clip to the Clipboard.
Tip
Fine-tune the way the Clipboard works in Office 2007 applications by clicking the Options button at the bottom of the Clipboard task pane. This opens a menu from which you can specify when and how the Clipboard task pane appears. For example, you can set it to show a Clipboard icon in the taskbar.
As mentioned earlier, when you are copying and pasting some types of content, especially graphical types, PowerPoint embeds the content by default rather than simply pasting it.
Embedding the content tends to increase the size of the PowerPoint presentation file, so avoid doing it unless you think you will need that capability. (More on embedding later in the chapter.) You can tell whether content has been embedded by double-clicking it. If it's embedded, its native application will open within PowerPoint (or in a separate window). If it's not embedded, a PowerPoint dialog box will open for the content. To avoid embedding content that PowerPoint wants to embed by default, follow these steps:
Copy the data to the Clipboard in its native application.
In PowerPoint, on the Home tab, open the Paste button's menu and click Paste Special.
Choose a different format for the paste, such as Bitmap. Do not choose the format that ends with "Object" or you will get an embedded copy.
Click OK.
In some cases, you can also use drag and drop to move an object from some other application (or from a file management window) to PowerPoint. Not all Windows programs support this feature though. If you're not sure whether a program supports it, try it and see. Here's how to drag and drop something:
Create the object in its native program or open the file that contains it. The object can be a single unit such as an entire graphic, or it can be a small piece of a larger document or image such as a few cells selected from a large worksheet.
Open PowerPoint and display the slide on which you want to place the data.
Resize both applications' windows so that both the data and its destination are visible onscreen.
Select the data in its native program.
If you want to copy, rather than move, hold down the Ctrl key.
Drag the content to the PowerPoint slide. See figure 15.2. An outline appears on the PowerPoint slide showing where the data will go.
Release the mouse button. The data is moved or copied.

Figure 15.2. You can drag data from one application to another. Hold down the Ctrl key to copy rather than move.
Warning
When dragging-and-dropping from Excel, data arrives in PowerPoint in a plain text box, with columns and rows separated by spaces. If you want to retain the original tabular format from Excel, use Copy and Paste, not drag and drop.
As with copying and pasting, not all content gets the "plain paste" treatment when you drag and drop. Generally speaking, text-based data will drag without embedding, but graphic-based data will usually embed. (There are exceptions.) Use the Paste Special method described earlier rather than drag and drop if you run into this situation.
When you use copy-and-paste or drag and drop to insert content from a graphics-based application, as mentioned in the preceding section, PowerPoint embeds by default. This makes the file size larger than necessary for the PowerPoint presentation, however, so it's better to use the Picture button (Insert tab) when you insert graphics. This inserts a plain-old copy of the picture, without embedding, and keeps the PowerPoint file size more manageable.
The abbreviation OLE stands for Object Linking and Embedding. It enables Windows-based applications that support it to share information dynamically. That means that the object remembers where it came from and has special abilities based on that memory. Even though the name OLE is a little scary (it ranks right up there with SQL in my book!), the concept is very elementary, and anyone can understand and use it.
You already understand the term object in the PowerPoint sense, and the term is similar to that in the case of OLE. An object is any bit of data (or a whole file) that you want to use in another program. You can paste it in with no connection to its source, or you can link or embed it.
Two actions are involved in OLE: linking and embedding. Here are quick definitions of each:
Linking creates a connection between the original file and the copy in your presentation, so that the copy is always updated.
Embedding creates a connection between the object in the presentation and the application that originally created it, so that you can edit the object in that original application at any time from within PowerPoint.
The key difference is that linking connects to the source data file, whereas embedding connects to the source application.
For a link to be updatable, linked objects must already exist independently of the PowerPoint presentation. For example, if you want to link an Excel chart, you must first create that chart in Excel and save your work in an Excel file. That way, PowerPoint has a filename to refer to when updating the link.
Warning
Links can slow down your presentation's loading and editing performance. Therefore, you should create links last, after you have finished adding content and polishing the formatting.
Linking and embedding are not appropriate for every insertion. If you want to use content (such as cells from an Excel worksheet or a picture from a graphics program) that will not change, it's best to copy it normally For the Excel data cells or text from a Word document, use regular Copy/Paste; for the graphic image, use Picture (on the Insert tab). Reserve linking for objects that will change and that you will always need the most recent version of. Reserve embedding for objects that you plan to edit later and require the native applications editing tools to do so.
Here are some ideas of when linking or embedding might be useful:
If you have to give the same presentation every month that shows the monthly sales statistics, link to your Excel worksheet where you track them during the month. Your presentation will always contain the most current data.
If you want to draw a picture in Paint (a program that comes with Windows) or some other graphics program, embed the picture in PowerPoint. That way, you don't have to open Paint (or the other program) separately every time you want to work on the picture while you're fine-tuning your presentation. You can just double-click the picture in PowerPoint. You can always break the link when you finalize the presentation if you want to cut down on the file size.
If you know that a coworker is still finalizing a chart or drawing, link to her working file on the network. Then whenever changes are made to it, your copy will also be updated. (Beware, however, that once you take your presentation away from the computer that has network access, you can no longer update the link.)
As I mentioned earlier, you can link or embed either a part of an existing file or the whole file. If you need only a part of an existing file, such as a few cells from a worksheet, an individual chart, or a few paragraphs of text, you use the following procedure:
In its native application, create or open the file containing the data you want to copy.
If you have just created the file, save it. The file should have a name before you go any further if you are linking; this is not necessary for embedding, but it won't hurt anything.
Select the data you want.
On the Home tab, click Copy, or press Ctrl+C.
Switch to PowerPoint and display the slide on which you want to paste the data.
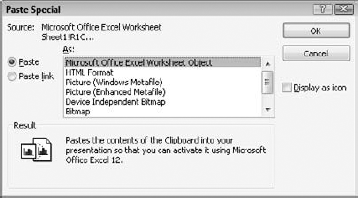
On the Home tab, open the Paste button's menu and click Paste Special. The Paste Special dialog box opens. See figure 15.3.
If you want to embed, leave Paste selected. If you want to link, click Paste Link.
Choose the format from the As list. Because you want to link or embed, choose a type that ends with the word object.
If you want the pasted object to appear as an icon instead of as itself, mark the Display as Icon check box. This check box might be unavailable if the object type you chose in step 8 does not support it.
Click OK. The object is placed in your presentation.
If you link the object, each time you open your PowerPoint presentation, PowerPoint checks the source file for an updated version. If you embed the object, you can double-click it at any time to open it in its native application for editing.
Perhaps you are wondering about the other data types. If you chose Paste in step 7 (rather than Paste Link), you will see other formats on the list. All of these are non-linkable, non-embeddable formats. The choices depend on the type of data, but include some of the following:
Formatted Text (RTF). This data type formats text as it is formatted in the original file. For example, if the text is formatted as underlined in the original file, it is pasted as underlined text in PowerPoint.
Unformatted Text. This option ignores the formatting from the native file and formats the text as the default PowerPoint font you've specified.
Picture (Windows Metafile). The object appears as a 16-bit WMF-format graphic.
Picture (Enhanced Metafile). The object appears as a 32-bit EMF-format graphic.
Device Independent Bitmap. The object comes in as a bitmap picture, like a Windows Paint image.
Tip
Enhanced Metafile is, as the name implies, an updated and improved file format from Windows Metafile. It is a 32-bit format, whereas Windows Metafile is a 16-bit format. Enhanced metafile graphics cannot be used in MS-DOS or 16-bit Windows applications. If that backward-compatibility is important to use, use Windows Metafile. You can get more information about Windows metafiles at multivac.fatburen.org/localdoc/libwmf/caolan/ora-wmf.html.
Sometimes you might want to place an entire file on a PowerPoint slide — for example, if the file is small and contains only the object that you want to display like a picture. To create this connection, you use the Object button (on the Insert tab), which is handier than the procedure you just learned because you do not have to open the other application.
In PowerPoint, display the slide on which you want to place the file.
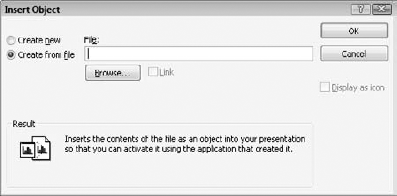
On the Insert tab, click Object. The Insert Object dialog box opens.
Click the Create from File button. The controls change to those shown in figure 15.4.
Click Browse, and use the Browse dialog box to locate the file you want. Then click OK to accept the filename.
(Optional) If you want to link instead of embed the file, mark the Link check box.
Warning
Do not link to a file housed on a disk that might not always be available during your presentation. For example, don't link to a floppy unless you are also storing the presentation file on the same floppy. And don't link to a network drive unless you know the network will be available at show time from the computer on which you will present.
Click OK. The file is inserted on your PowerPoint slide.
You can tell that the file is embedded, rather than simply copied, because when you double-click it, it opens in its native application. In contrast, when you double-click an item that is copied without embedding, its Properties box or some other PowerPoint-specific dialog box opens in PowerPoint. If you choose to link the object, you need to edit it in the native application.
If you want to embed a foreign object, but you haven't created that object yet, a really easy way to do so is to embed it on the fly. When you do this, the controls for the program open within PowerPoint (or in a separate application window, depending on the application) and you can create your object. Then, your work is saved within PowerPoint rather than as a separate file.
Open PowerPoint and display the slide on which you want to put the new object.
Choose Insert

Click Create New. A list of available object types appears. See figure 15.5.
Click the object type you want and then click OK. The application opens.
Depending on the application, additional dialog boxes might appear. For example, if you are creating a new graphic object, a box might appear asking you about the size and color depth. Respond to any dialog boxes that appear for creating the new object.
Create the object using the program's controls. The program might be in a separate window from PowerPoint, or it might be contained within the PowerPoint window as in figure 15.6.
When you are finished, if the program was opened within PowerPoint, click anywhere on the slide outside of that objects frame. Or, if the application was in a separate window, choose File
Tip
If you are prompted to save the object in a file and you choose Yes, the application creates a copy of the object that exists outside of PowerPoint. The copy is not linked to PowerPoint.
If you are asked whether you want to update the object in filename before proceeding, you should choose Yes. This prompt occurs in many of the applications that open in separate windows.
Resize and move the object on the slide as necessary.


Because you are creating a file that doesn't have a name or saved location separate from the PowerPoint presentation, there is no need to link it to anything. Embedding is the only option.
Now that you have a linked or embedded object, what can you do with it? Many things. You can edit an embedded object by double-clicking it, of course. And you can update, change, and even break the links associated with a linked object. The following sections provide some details.
When you select an embedded object in PowerPoint and then right-click the object, you can choose datatype Object where datatype is the object type. (Its exact name depends on the object type, for example, Worksheet Object.) From the submenu you can choose:
Edit: Opens the object for editing within PowerPoint (if possible). Some applications can work from within PowerPoint, such as the Excel example in figure 15.6. If the object is related to an application that can't do this, the object opens for editing in a separate window for that application.
Open: Opens the object for editing in a separate window for the application with which it is associated.
Convert: Opens a dialog box that enables you to convert the object to some other type (if possible). This sounds great in theory, but in practice there are usually very few alternatives to choose from.
Tip
Although convert options also appear for linked objects, you cannot convert them; you must break the link first. That's because a linked object must have a certain object type
To edit a linked or embedded object, follow these steps:
Display the slide containing the linked or embedded object.
Double-click the object. The objects program's controls appear. They might be integrated into the PowerPoint window, like the ones for Excel that you saw in figure 15.6, or they might appear in a separate window.
Edit the object as needed.
Return to PowerPoint by doing one of the following:
If the object is embedded (not linked), click the slide behind the object to return to PowerPoint.
If the object is linked, choose File
You can also edit a linked object directly in its original application, independently from PowerPoint. Close your PowerPoint presentation and open the original application. Do your editing, and save your work. Then, reopen your PowerPoint presentation and the object will reflect the changes.
OLE links are automatically updated each time you open your PowerPoint file. However, updating these links slows down the file opening considerably, so if you open and close the file frequently, you might want to set the link updating to Manual. That way, the links are updated only when you issue a command to update them. To set a link to update manually, follow these steps:
Open the PowerPoint presentation that contains the linked object(s).
Choose Office
Note
If you don't see Edit Links to Files, scroll down on the Prepare submenu. Click the down arrow at the bottom of it to move down.
Click the link that you want to change.
Click the Manual button.
If you want to change any other links, repeat steps 3 and 4. You can also use the Shift and Ctrl keys to select more than one link at once.
If you want to update a link now, select it and click the Update Now button.
Click OK.
Choose Office

When you set a link to manual, you have to open the Links dialog box and click Update Now, as in step 6, each time you want to update it. Or, you can right-click the object and choose Update Link from its shortcut menu.
When you break a link, the object remains in the presentation, but it becomes an ordinary object, just like any other picture or other object you might have placed there. You can't double-click it to edit it anymore, and it doesn't update when the source changes. To break a link, reopen the Links dialog box shown in figure 15-7 (Office
When you break a link, embedding information disappears, too. For example, if you have a linked Excel chart and you break the link, the result is a simple pasted image of the chart with no ties to the Excel application. To reestablish a link, simply recreate it as you did originally.
If you move files around on your hard disk, or move them to other disks, you might need to change the link location reference. For example, perhaps you are moving the presentation file to a floppy disk and you want to place all of the linked files needed for the presentation in a separate folder on the floppy disk. To change a link reference, do the following:
Copy or move the files where you want them. For example, if you want to transfer the presentation and linked files to a floppy, do that first.
Open the PowerPoint presentation that contains the linked object(s) to change. If you copied the presentation to some new location, make sure you open the copy that you want to change.
Choose Office
Click the link you want to change.
Click Change Source. A Change Source dialog box opens. It is just like the normal Open dialog boxes you have worked with many times.
Select the file to be linked from its new location, and click Open. The link is updated.
In the Links dialog box, click Close.
Warning
If you change the location of a link to a different file, depending on the object type, the link may change to refer to the entire file, as if you had inserted it with Insert
You can copy any object in your PowerPoint presentation to another program, either linked or unlinked. For example, perhaps you created a chart using the PowerPoint charting tools for one of your PowerPoint slides, and now you want to use that chart in a Microsoft Word document. To use a PowerPoint object in another program, you do the same basic things that you've learned in this chapter, but you start with PowerPoint. Here are some examples:
To copy an object from PowerPoint, select it in PowerPoint and copy it to the Clipboard (Ctrl+C). Then switch to the other program and Paste (Ctrl+V).
To embed (or optionally link) an object from a PowerPoint presentation into another program's document, choose it in PowerPoint and copy it (Ctrl+C). Then, switch to the other program and use Paste Special. (In programs other than Office 2007, the command is usually Edit
To embed or link an entire PowerPoint presentation in another program's document, use the Object command in that other program (probably on an Insert tab or menu), and choose your PowerPoint file as the source.
You can also save individual slides as various types of graphics with the Office
In this chapter, you learned the mysteries of OLE, a term you have probably heard bandied about but were never quite sure what it meant. You can now use objects freely between PowerPoint and other programs, and include links and embedding for them whenever appropriate.
In the next chapter, you learn how to add sound effects, music, and soundtracks to a presentation.