clip art is pre-drawn art that comes with PowerPoint or that is available from other sources (such as through the Internet). There are thousands of images that you can use royalty-free in your work, without having to draw your own. For example, suppose you are creating a presentation about snow skiing equipment. Rather than hiring an artist to draw a picture of a skier, you can use one of PowerPoint's stock drawings of skiers and save yourself a bundle.
Being an owner of a Microsoft Office product entitles you to the use of the huge clip art collection that Microsoft maintains on its Web site, and if you are connected to the Internet while you are using PowerPoint, PowerPoint can automatically pull clips from that collection as easily as it can from your own hard drive. You can also use the Clip Organizer to catalog and organize artwork in a variety of other formats, including photos that you scan, photos that you take with your digital camera, and drawings and pictures that you acquire from the Internet and from other people.
In this chapter you learn how to select and insert clip art in your presentations, how to integrate photos and images from other sources into the Clip Organizer, and how to organize your clips for easy access.
Don't just use any old image! You must never use clip art simply because you can; it must be a well-thought-out decision. Here are some reasons for using clip art, and ways to make it look good:
If your message is very serious, or you are conveying bad news, don't use clip art. It looks frivolous in these situations.
Use cartoonish images only if you specifically want to impart a lighthearted, fun feel to your presentation.
The clip art included with Office has many styles of drawings, ranging from simple black-and-white shapes to very complex, shaded color drawings and photographs. Try to stick with one type of image rather than bouncing among several drawing styles.
Use only one piece of clip art on each slide. Also, do not use clip art on every slide, or it becomes overpowering.
Don't repeat the same clip art on more than one slide in the presentation unless you have a specific reason to do so.
If you can't find clip art that is exactly right for the slide, then don't use any. It is better to have squf than to have an inappropriate image.
If clip art is important, and Office doesn't have what you want, you can buy more. Don't try to struggle along with the clips that come with Office if it isn't meeting your needs; impressive clip art collections are available at reasonable prices at your local computer store, as well as online.
The Clip Organizer is a Microsoft utility that you access from within an Office application such as PowerPoint. It organizes and catalogs artwork of various types. The primary type is clip art, but it can also hold sounds, videos, and photos. All of the Microsoft-provided clip art is automatically included in the Clip Organizer, including links to online Microsoft clip art; you can also add your own clips from your hard disk. Most of the Microsoft clip art is online, rather than stored locally, so you will need Internet access to use it.
The Clip Organizer has two main interfaces. When you use the Clip Art command on the Insert tab, you work with the Clip Art task pane, and clips that you select are inserted onto the active slide, as shown in the section "Inserting Clip Art on a Slide." When you use the Clip Organizer utility separately, you must copy and paste the clip art into the presentation using the Clipboard.
Depending on what you are inserting, you might also encounter other interfaces that access the Clip Organizer, such as interfaces for choosing custom bullet characters, which are also stored as clip art.
You can insert clip art on a slide either with or without a content placeholder. If you use a content placeholder, PowerPoint inserts the clip art wherever the placeholder is; if you don't, PowerPoint inserts the clip art at the center of the slide. (You can move it afterwards, of course.)
Tip
Most clip art files in Microsoft Office applications have a .wmf extension, which stands for Windows Metafile. WMF is a vector graphic format, which means that it is composed of mathematical formulas rather than individual pixels. This allows you to resize it without distortion and keeps the file size very small. Some other clip art files are Enhanced Metafile (.emf) files, which are like WMF files but with some improvements. The Clip Organizer can also organize bitmap graphic files (that is, graphics composed of individual pixels of color), as you see later in this chapter. However, there are some editing activities through PowerPoint that you can perform only on WMF and EMF files.
To find and insert a piece of clip art, follow these steps:
(Recommended) If you want to include Web collections when searching for clip art, make sure that you are connected to the Internet. Otherwise, you are limited to the clip art on your local hard disk.
On the Insert tab, click Clip Art. The Clip Art pane appears. Alternatively, you can click the Clip Art icon in a content placeholder.
In the Search For text box, type the subject keyword that you want to search for.
(Optional) Narrow down where you want to search, using the Search In list, and the type of results that you want, using the Results Should Be list.
Click Go. The matching clip art appears, as shown in figure 12.1.
Click the clip art that you want to insert. It appears on the slide.
Edit the image, for example, by resizing or moving it, as explained later in this chapter.

Now that you've seen the basic process for searching for a clip by keyword, let's look at some ways to fine-tune those results so that you can more easily find what you want.
If you enter multiple keywords in the Search For text box of the Clip Art pane, only clips that contain all of the entered keywords appear in the search results. You can simply type the words separated by spaces; you do not have to use any special symbols or punctuation in order to use multiple keywords.
Clip art is stored in collections, which are logical groupings of artwork arranged by subject or location. There are three main collections:
Office Collections: These are the clips that came with Microsoft Office 2007.
My Collections: These include any clips that you have marked as favorites, as well as any uncategorized clips. They also include any clips that you have added through the Clip Organizer, any downloaded clips, and any clips shared from a network drive.
Web Collections: These are clip collections that are available online via Microsoft. This is by far the largest collection, but you must be connected to the Internet in order to access it. All of the clips from this collection appear with a little globe icon in the corner when you preview them in the task pane.
Within each of these large collections are multiple smaller collections (like subfolders within folders) that are based on subject. For example, Office Collections has sub-collections for Academic, Agriculture, Animals, and so on.
Note
The physical location of the Office Collections clips is Program FilesMicrosoft OfficeMEDIACAGCAT10. However, users don't normally need to know this because PowerPoint manages the locations of the clip art automatically.
When you search for clips that contain certain keywords using the Clip Art pane, you have the option to specify which collections you want to look in. If you are working on a PC that uses a dial-up connection, or that has sporadic or no Web access, you might want to exclude the Web Collections from the search to avoid the delay while PowerPoint looks for and fails to find the Internet connection. You can also exclude certain categories to avoid having too many results to wade through.
To narrow the list of collections in which to search, follow these steps:
From the Clip Art pane, open the Search In drop-down list. A list of collections appears.
Deselect the check box for any collection that you want to exclude. You can also click the plus sign next to the collection to see its individual sub-collections, and then deselect the check box for one or more of these sub-collections, as shown in figure 12.2.
Continue the clip search as you normally would.

Besides true clip art (WMF and EMF files), you can also find movies, sounds, and pictures using the Clip Art pane. You can learn more about each of these media types in later chapters, but let's take a quick look here at how to include them in searches. To filter results by media type (or to enable additional media types), follow these steps:
From the Clip Art pane, open the Results Should Be drop-down list. A list of media types appears.
Select or deselect check boxes for media types that you want to include or exclude, respectively. You can also click the plus sign next to a media type to see its individual subtypes, and then deselect the check box for one or more of these subtypes, as shown in figure 12.3.

Figure 12.3. Narrow the search for a clip to certain file types by only selecting check boxes for the media types that you want.
Note
Notice in figure 12.3 that the Clip Art pane is wider than in figure 12.2. It is widened to show that you can view more of the descriptions of each file type. To widen this pane, click-and-drag its left edge to the left.
The Clip Organizer is a utility that manages the clips from various collections. You can use the Clip Organizer to browse entire clip collections by subject, regardless of keyword. It also manages clips of other types, including bitmap images (such as scanned photos), sounds, and video clips. In the following sections, you learn how to browse, categorize, and organize clips in the Clip Organizer, as well as how to add clips to it.
To open the Clip Organizer, click the Organize Clips link at the bottom of the Clip Art pane. The Collection List pane lists the three default groups: My Collections, Office Collections, and Web Collections. Within each of these collections are nested folders, or sub-collections, containing clips. To expand or collapse a folder, double-click it, or click the plus or minus sign to its left, as shown in figure 12.4.
The My Collections group contains two collections by default:
Favorites: This is where clips are placed when you make them available offline. (This is covered in the section "Making Clips Available Offline.")
Unclassified Clips: This is where clips are placed when they are manually added to the Clip Organizer. (This is covered in the section "Working with Clip Keywords and Information.")
You can add more collections to the My Collections group, as well as more clips. It is the only group that you can modify. The Office Collections group contains collections that Microsoft provides and stores on your hard disk. The Web Collections group contains collections that you access through the Internet.
As you saw at the beginning of this chapter, when you insert clip art from the Clip Art pane, you cannot browse for it. You can only search based on keywords. If you would rather peruse the available clip art in a more leisurely fashion, you can open the Clip Organizer to do so.
The Clip Organizer is not really designed for easy insertion of clips into a presentation, but it is possible to do this using the Clipboard. To select a clip from the Clip Organizer for insertion in your presentation, do the following:
From the Clip Art pane, click Organize Clips. The Clip Organizer window opens.
Make sure that Collection List, and not Search, is selected on the toolbar. Click Collection List, if necessary.
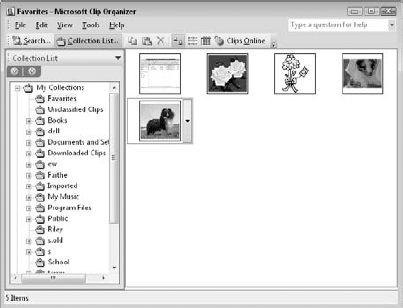
Click the collection that you want to browse. The Clip Organizer displays the available clips. When you find the clip that you want to insert, right-click it and choose Copy.
Close or minimize the Clip Organizer. Display the slide in PowerPoint on which you want to place the clip, and then right-click and choose Paste. Alternatively, you can drag and drop clips from the Clip Organizer window onto a PowerPoint slide.
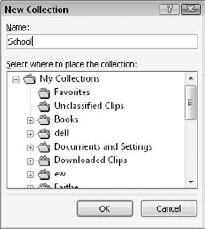
Each folder in the Clip Organizer represents a collection (or a sub-collection within a collection). The folders that you create are placed in the My Collections group, and you can place clips into a collection or sub-collection by dragging and dropping them into the desired folder. To create a folder in the Clip Organizer, follow these steps:
Choose File

In the Name text box, type a name for the new collection.
To create a top-level collection, click My Collections. To create a folder within a collection, click that collection within My Collections.
Click OK. The Clip Organizer creates the new folder.
To delete a folder, right-click it and choose Delete foldername, where foldername is the name of the folder.
A clip can exist in multiple collections simultaneously; only one copy actually exists on your hard disk, but pointers to it can appear in multiple places. When you drag a clip from one collection to another, you are actually making a copy of its pointer to thenew location. The shortcut to the clip is not removed from the original collection. You can delete a clip from a collection by right-clicking it and choosing Delete, or pressingthe Delete key.
There are probably images elsewhere on your PC that you would like to use in PowerPoint besides the Microsoft Office clip art collection. For example, perhaps you have some scanned photos or some clip art that you have downloaded from a Web site that offers free clips. If you need to use this downloaded clip art only once or twice, you can simply insert it with the Picture button on the Insert tab. However, if you want to use the clip art more often, you can add it to your Clip Organizer.
You can include images in all image formats in the Clip Organizer, not just the default format that PowerPoint's clip art uses. The image formats that PowerPoint supports are shown in Table 12.1.
Table 12.1. PowerPoint Image Formats
BMP | EPS | PCX |
CDR | FPX | PNG |
CGM | GIF | RLE |
DIB | JPG/JPEG/JPE/JFIF | TGA |
DRW | MIX | TIF/TIFF |
DXF | PCD | WMF |
EMF | PCT/PICT | WPG |
The Clip Organizer is not only for clip art, but also for scanned and digital camera photos, video clips, and sound clips. It can accept many sound and video formats.
Note
You will work with the clip organizer further in Chapters 16 and 17, which deal with sound and video.
Adding a clip to the Clip Organizer does not physically move the clip; it simply creates a link to it in the Clip Organizer so that the clip is included when you search or browse for clips.
Note
Any clips that you add are placed in My Collections; you cannot add clips to the Office Collections or Web Collections categories. This is the case whether you add them automatically or manually.
The quickest way to catalog the clips on your hard disk is to allow the Clip Organizer to import the clips automatically To automatically catalog your clips, follow these steps:
From the Clip Organizer, choose File
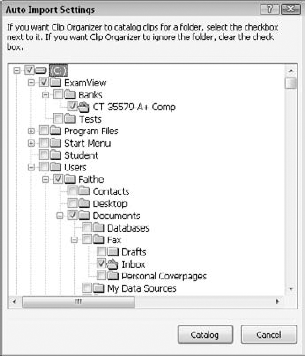
(Optional) In the dialog box that appears, click the Options button to open the Auto Import Settings dialog box. You can then select or deselect check boxes for various locations that you want to include in the automatic cataloging, as shown in figure 12.6. The first time you open this dialog box, the utility scans the hard disk for clips, and you must wait for a minute or so while it does this.
If you performed step 2, click Catalog to perform the search for clips. If you did not perform step 2, click OK to perform the search.
Wait for the Clip Organizer to catalog the clips. This process takes several minutes and includes several steps, including creating the collections, adding the clips, and adding keywords to them.
Not all clips are picked up automatically during the cataloging process, and so you might need to manually add some clips. For example, the automatic cataloging process only looks for clips on your local hard disks, and you might want to catalog some clips in a network location.
Warning
Some earlier versions of Office stored the local collection of clip art in a different place. For example, Office XP stored this collection in Program FilesCommon Files Microsoft SharedClipartCatcat50. By default, the clip art in this old location does not appear in the collections for Office 2003 or 2007 applications. In addition, it is not detected by the automatic cataloging process. The only way to import it into the Clip Organizer is by manually cataloging it, as described here.
To manually add one or more clips, do the following:
From the Clip Organizer window, choose File
Navigate to the clips that you want to add. They can be in a local, network, or Internet location.
Select the clips. To select more than one clip, hold down the Shift key to select a contiguous group or the Ctrl key to select a non-contiguous group.
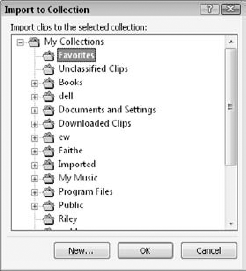
Click the Add To button. A list of the existing collections in the Clip Organizer appears, as shown in figure 12.7.
Select the collection in which you want to place the new clips, and click OK. If you would rather create a new clip collection, click My Collections and then click New. Type a name for the new collection and click OK. Then select the new folder on the list and click OK.
Click the Add button. The Clip Organizer adds the clips to the specified collection.
Occasionally, you might encounter a file that claims to be clip art but that has a .cil or .mpf extension. Both of these are clip art "package" formats that Microsoft has used to bundle and transfer clip art at one time or another. MPF is the newer format, for Office XP and higher; CIL is the older format, for Office 97 and 2000.
These packages are executable, which means that executing them copies the art to the Clip Organizer. When you find one of these files, you can choose to run it rather than save it to immediately extract its clips, or you can download the file and then double-click it to extract the clip art from it later.
After the automatic cataloging process (and possibly after the manual one), you might end up with some clip collections within My Collections that you don't want. The automatic cataloging process sometimes identifies files that are not really useful as clip art — for example, little graphics that are part of some other applications operation.
To remove a graphic—or even an entire folder — from your Clip Organizer, right-click it and choose Delete. figure 12.8 shows a situation where the Clip Organizer has cataloged the clips from of a folder labeled i386; this folder is actually used for installing Windows. In the example, you can right-click the i386 folder in the folder tree and choose Delete "i386" to get rid of it. This does not delete the pictures or the folder from the hard disk; it simply removes its reference from the Clip Organizer. You can also delete individual clips in the same way.

If you have a scanner or digital camera, you can use it from within the Clip Organizer to scan a picture and store it there. In PowerPoint 2007, this is the only way of accessing the Scanner and Camera Wizard, because that functionality is no longer in the main PowerPoint application. To scan a picture into the Clip Organizer, do the following:
Make sure your scanner is ready. Place the picture that you want to scan on the scanner glass.
From the Clip Organizer, choose File
Select the scanner from the Device list.
Choose a quality, such as Web quality (low) or Print quality (high).
To scan using default settings, click Insert. To adjust the settings further, click Custom Insert, change the settings, and then click Scan.
The scanned clip appears in the My Collections collection, in a folder with the same name as the device (in this case, the scanners make and model). From there, you can assign keywords to the clip to make it easier to find, as explained in the next section.
Tip
On a Windows Vista system, the scanned file is located in the PicturesMicrosoft Clip Organizer folder on your hard disk, in case you want to use it in some other application that does not support the Clip Organizer. It is assigned a filename that begins with mso (for example, mso414611), and it is saved in JPEG format. Under Windows XP, it is located in My PicturesMicrosoft Clip Organizer.
Warning
Good-quality scanners can scan at 300 dpi or more, but for use in PowerPoint, an image needs to have a resolution no higher than 96 dpi, the resolution of a monitor. Excessive resolution when scanning is one reason why graphics take up so much space. If you want to use an image in PowerPoint that has already been scanned and has a high resolution, consider opening it in a graphics program and reducing its resolution before importing it into PowerPoint.
Most of the clips that appear in the Clip Organizer are not on your local hard disk; they are online. This means that you do not have access to them when you are not connected to the Internet. If you find some clip art in the Clip Organizer that you want to have available offline, you can add the clip to your local hard disk, as follows:
In the Clip Organizer or the Clip Art pane, open the menu of the clip that you want (the arrow to its right) and choose Make Available Offline. The Copy to Collection dialog box opens.
If the Make Available Offline command is not present, it means that this clip is already on your local hard disk.
Select the collection in which you want to place the clip. (You can also click New to create a new collection.) Then click OK.
To use the Clip Organizer most effectively, you need to put some thought into how you want to structure your collections. When you select File
By location: This is how the automatic cataloging sets up your collection. Pros: you can browse all of the clips in a location at once. Cons: the clips are not grouped logically according to content.
By topic: You can create folders for various subjects, such as agriculture, animals, business, and so on, similar to the Office Collections and Web Collections. Pros: it is easy to find clips for a certain subject. Cons: there is no differentiation between media types.
By media type: You can create folders for various media types, such as clip art, pictures, sounds, and videos. Pros: you do not have to wade through a lot of clips of the wrong file type to find what you want. For example, you do not have to look through clip art to find sounds, and vice versa. Cons: when creating a presentation, you usually have a topic in mind before a media type.
Tip
Perhaps the best solution if you have a lot of clips is to combine the topic and mediatype methods. You can organize first by topic, and then within topic into separate folders by media type, or you can organize first by media type and then by topic within those folders.
To change the organization method of your Clip Organizer window from location-based to topic-or type-based, you can create new folders and then drag clips into the new folders. The Clip Organizer only copies the shortcuts there — it does not move them there — and so they remain in their location-based folders, as well. You can either leave these location-based folders in place for extra flexibility, or you can delete them.
After creating an automatic catalog, you will probably end up with a lot of clips in the Unclassified Clips collection. You can delete any you don't want. The remaining ones must be assigned keywords so they will show up when you do a search by keyword in the Clip Art pane.
You can edit the keywords and information only for clips stored on your own hard disk, not for clips stored online. That's because the online collection is shared by all Office users. If you want to re-keyword an online clip, copy it to your hard disk first and then work with that copy.
Automatically cataloged clips have several keywords pre-assigned, based on their filename and location. For example, suppose that the clip Blue Hills.jpg is cataloged from the Documents and SettingsAll UsersDocumentsMy PicturesSample Pictures folder. (This is where Windows XP stores its sample pictures, and that picture came with Windows XP.) It will have the following keywords pre-assigned: Blue Hills, Documents and Settings, All Users,
Documents, My Pictures, and Sample Pictures. However, these keywords are not very helpful when you want to locate the clip by subject, and so you will want to add some content-based keywords, as well.
To modify a clip's keywords and information, do the following:
From the Clip Organizer, right-click the clip (or click the down arrow to its right) and choose Edit Keywords.
The default caption for the clip is the filename. You can change it to a more meaningful caption in the Caption text box. This caption will appear in some views as well as anywhere that an application automatically pulls a caption.
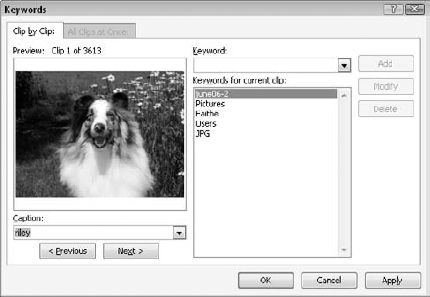
To add a keyword for the clip, type the new keywords in the Keyword text box and click Add, as shown in figure 12.9.
To remove a keyword, click the keyword on the list and click Delete.
When you finish changing the clip's keywords and caption, click OK to close the dialog box, or click the Previous or Next button to move to a different clip in the same folder.
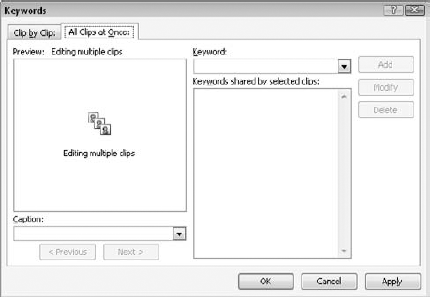
You can modify multiple clips at once by selecting multiple clips before you right-click (step 1 in the preceding steps). When you select multiple clips, the All Clips at Once tab becomes available in the Keywords dialog box. From there, you can add keywords that apply to all of the selected clips. For example, in figure 12.10, you can add the keyword "landscapes" to all of the selected clips.
When you browse for clip art while connected to the Internet, the Office Online clip art automatically appears. However, you can also visit the Office Online Web site to browse the clip art directly.
To open a Web browser window for the Office Online clip art gallery, do one of the following:
From the Clip Art pane, click the Clip art on Office Online link.
From the Clip Organizer window, click the Clips Online toolbar button.
Either way, the same Web page displays (provided you have Internet access). It contains information about clip art, links to art collections, featured clips, and more. It is constantly changing, but figure 12.11 shows how it looked on the day I visited.
If you have a full-time Internet connection, there is little reason to download clips to your hard disk from the Office Online Web site because your clip art search by keyword will always include this Web site. However, if your Internet connection is not always active, you might want to download the clips you need in advance so that they will be available when you need them.

To copy clips from the Office Online Web site to your hard disk for later use, follow these steps:
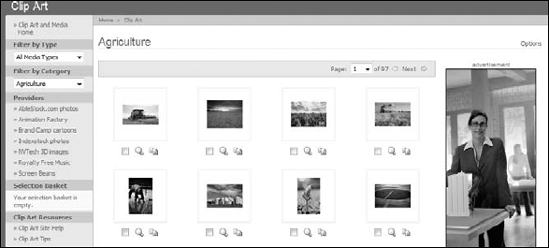
From the Office Online clip art Web page, scroll down to the Browse Clip Art and Media Categories list and click a category to display it.
In the list of clips, select the check boxes for the clips that you want, as shown in figure 12.12. You may find multiple pages of clips in that category; click the Next arrow to go to the next page.
When you finish making selections, click the Download hyperlink at the left. For example, in figure 12-12, the link is labeled "Download 5 items" because I have chosen five items.
If this is the first time that you have used the service, a Terms of Use screen appears. Scroll down to the bottom and click Accept to continue.
Click Download Now.
A dialog box appears, saying that it is downloading the file Clipart.mpf, and asking whether you want to save or open it. Choose Open.
Note
MPF stands for Media Package File. When downloading one of these files, you should choose to open it rather than save it, because opening it integrates its content automatically with the Clip Organizer. Saving the file stores it somewhere on your hard disk without adding the clips to the Clip Organizer. However, you might need to do this if you download clips that you want to use on another PC; in this case, you can transfer the MPF file to the other PC before double-clicking to open it.
Warning
When an MPF file unpacks, it uses the Temporary Internet File folder to do so. If this folder is too full (indicating that there is insufficient space remaining on the hard disk), the clips may not import into Clip Organizer.
The selected clips appear in the Clip Organizer, in the Downloaded Clips folder under My Collections. They are now ready for you to use.
Most of the modifications that you will learn about in Chapter 13 apply to both photographs and clip art. For example, you can increase or decrease brightness and contrast, crop, rotate, and so on. However, there are also some special modifications that apply only to clip art and other vector images.
One of the top complaints about clip art is that the colors are wrong. For example, you may have the perfect drawing, but its colors clash with your presentation design. In earlier versions of PowerPoint, you could change an individual color within a clip art image. PowerPoint 2007 doesn't offer this capability, but you can recolor individual parts of a clip by changing it to a Microsoft Drawing object and then selecting and coloring individual lines or shapes. For more information, see the section "Deconstructing and Editing a Clip," later in this chapter.
On a more basic level, PowerPoint 2007 provides a Recolor option that enables you to apply a single-color wash to the image, based on any of the themes colors or any fixed color. To apply a color wash to a clip, follow these steps:
Select the clip that you want to recolor. The Format tab becomes available.
On the Format tab, click Recolor to open the menu shown in figure 12.13.
Click the color wash that you want to apply, or click More Variations to choose another color.

The colors on the Recolor menu are grouped as follows:
Color Modes: These are like the color modes from PowerPoint 2003 and earlier: Grayscale, Washout, and Black-and-White, plus one addition: Sepia.
Dark Variations: These are deep color washes of the theme colors.
Light Variations: These are light color washes of the theme colors.
More Variations: This opens a Theme Colors palette, from which you can select light and dark tints of the themes or standard (fixed) colors. You can also choose More Colors to open a Color dialog box for more fixed colors.
Some clips enable you to redefine one of the colors as see-through, so that anything behind it shows through. This doesn't work on all clips because most clips already have a color defined as transparent: the background. This is why a clip art image appears to float directly on a colored background rather than being locked into a rectangle. However, for clips that do not have a transparent color already defined, you can define one.
Warning
Setting a transparent color works best on clip art; in a photograph, an area that looks at first glance like a single color is often actually dozens of different shades of the same overall tint, and setting the transparent color sets only one of those many shades to be transparent.
To set a transparent color, open the Recolor menu, as in the preceding section (figure 12.13). Then choose Set Transparent Color, and click a color in the image.
Have you ever wished that you could open a clip art image in an image-editing program and make some small change to it? Well, you can. And what's more, you can do it without leaving PowerPoint.
Because clip art is composed of vector-graphic lines and fills, you can literally take it apart piece by piece. Not only can you apply certain colors (as in the preceding section), but you can also choose individual lines and shapes from it to recolor, move, and otherwise modify.
To deconstruct a piece of clip art, follow these steps:
Right-click the clip and choose Edit Picture. A message appears, telling you that it is an imported picture, and asking whether you want to convert it to a Microsoft Office drawing object.
Warning
Ungrouping a recolored clip resets the color adjustments you have made.
Click Yes. Each individual shape and line in the clip is now a separate object that you can select individually.
To recolor an individual line or shape, follow these steps:
Select the line or shape. Selection handles appear around it.
On the Format tab, click Shape Fill and select a fill color.
Click Shape Outline and select an outline color.
To move the pieces of the clip around, follow these steps:
Right-click the clip and choose Group
Note
In some cases you do not have to ungroup in order to move an individual piece; you c try moving a piece without performing step 1 and see if that works for you.
Click away from the selected shapes to deselect them all, and then click the individual shape that you want to move. Hold down the Ctrl key and click multiple shapes, if needed.
Drag the shape where you want it.
In this chapter, you learned how to insert and manage clip art and how to modify it in PowerPoint. You learned how to organize your clips in the Clip Organizer and how to find more clips online. You learned how to recolor a clip, and even how to break it down into individual pieces and modify each piece. In the next chapter, you learn how to work with photographic images, which present their own set of challenges in terms of file size, resolution, cropping, and more.