It's show time! Well, actually I hope for your sake that it is not time for the show this very instant, because things will go much more smoothly, if you can practice using PowerPoint's slide-show controls before you have to go live.
Presenting the show can be as simple or as complex as you make it. At the most basic level, you can start the show, move through it slide-by-slide with simple mouse-clicks or key presses, and then end the show. However, to take advantage of PowerPoint's extra slide-show features, you should spend a little time studying the following sections.
Note
The first part of this chapter assumes that you are showing your presentation on a PC that has PowerPoint 2007 installed; sections later in this chapter discuss other situations.
To start a show, do any of the following:
Click the Slide Show View button in the bottom-right corner of the screen.
On the View tab, click Slide Show.
Press F5.
Press Shift+F5
These methods are not all exactly alike. For example, if you click the Slide Show View button in the bottom-right corner, or press Shift+F5, the first slide to appear is the currently selected one in PowerPoint. If you click the Slide Show button on the View tab or press F5, it starts with the first slide in the presentation, regardless of which slide was selected.
Once the show is underway you can control the movement from slide to slide as described in the section, "Moving from Slide to Slide."
To end the show, do any of the following:
Right-click and choose End Show.
Press Esc, - (minus), or Ctrl+Break.
If you want to temporarily pause the show while you have a discussion, you can blank the screen by pressing W or, (comma) for a white screen, or B or. (period) for a black screen. To resume the show, press any key.
Tip
If you set up the slide transitions to occur automatically at a certain time, you can stop or restart the show by pressing S or + (plus sign). However, this is more of an issue for self-running shows, which are discussed in Chapter 21.
When you display a slide show, the mouse pointer and show controls are hidden. To make them appear, you can move the mouse. When you do this, very faint buttons appear in the bottom-left corner of the slide show, as shown in figure 20.1, and the mouse pointer also appears. You can toggle the pointer and these buttons on and off by pressing A or = (equals). Ctrl+H hides the pointer and buttons. When you toggle this feature on, the following buttons appear:
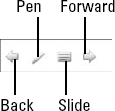
Figure 20.1. Buttons appear in the bottom-left corner of a slide in Slide Show view. The third button opens a menu that controls navigation between slides.
Back, the leftmost button, takes you back to the previous slide, or to the previous animation event if the present slide contains animation.
Pen, next to Back, opens a menu for controlling the appearance of the pen or pointer. (I discuss this feature later in this chapter.)
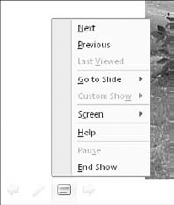
Slide, which displays a box icon, opens a menu for navigating between slides. You can also open the navigation menu, shown in figure 20.2, by right-clicking anywhere on the slide.
Tip
You can set up your show to move backwards when you click the right-mouse button. Choose Office

Forward, the rightmost button, moves you to the next slide. Normally, you can just click to go to the next slide, but if you are using the pen (covered later in this chapter), then clicking it causes it to draw, rather than advance the presentation. In this situation, you can use the Forward button.
Note
Because the slide navigation menu that appears is identical whether you click the Slide button or right-click anywhere on the slide, this chapter only mentions the right-click method whenever you need to choose something from this menu. However, keep in mind that you can also click the Slide button if you prefer.
There are a lot of shortcut keys to remember when working in Slide Show view, and so PowerPoint provides a handy summary of these keys. To see them, right-click and choose Help, or press F1. The Slide Show Help dialog box appears, as shown in figure 20.3. Click OK to close this dialog box when you are done.
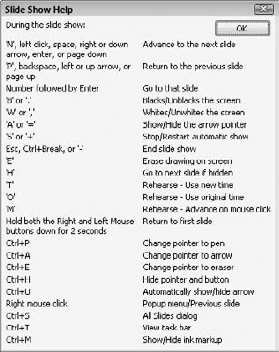
Figure 20.3. The Slide Show Help dialog box provides a quick summary of the shortcut keys that are available during a presentation.
The simplest way to move through a presentation is to move to the next slide. To do so, you can use any of these methods:
Press any of these keys: N, Spacebar, right arrow, down arrow, Enter, or Page Down.
Click the left-mouse button.
Right-click and then choose Next.
Click the right-pointing arrow button in the bottom-left corner of the slide.
If you have animated any elements on a slide, these methods advance the animation, and do not necessarily move to the next slide. For example, if you have animated your bulleted list so that the bullets appear one at a time, then any of the actions in this list make the next bullet appear, rather than making the next slide appear. Only after all of the objects on the current slide have displayed does PowerPoint advance to the next slide. If you need to immediately advance to the next slide, you can use the instructions in the section, "Jumping to Specific Slides," later in this chapter.
To back up to the previous slide, use any of these methods:
Press any of these keys: P, Backspace, left arrow, up arrow, or Page Up.
Click the left-pointing arrow button on the bottom-left corner of the slide.
Right-click and then choose Previous.
You can also go back to the last slide that you viewed. To do this, right-click and choose Last Viewed. Although you would think that the last slide viewed would be the same as the previous slide, this is not always the case. For example, if you jump around in the slide show — such as to a hidden slide — then the last slide viewed is not the previous slide in the show but the hidden slide that you have just viewed.
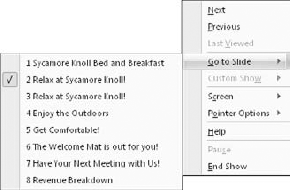
There are several ways to jump to a particular slide. One of the easiest ways is to select the slide by its title. To do so, follow these steps:
During the slide show, right-click to display the shortcut menu.
Select Go to Slide. A submenu appears, listing the titles of all of the slides in the presentation, as shown in figure 20.4. Parentheses around the slide numbers indicate hidden slides.
Click the slide title to which you want to jump.
Tip
The slide titles in this list come from title placeholders. If you want to show text on the list here but you don't want it to appear on the slide, type it in a title placeholder and then drag the placeholder off the edge of the slide, so it doesn't show in Slide Show view.
You can also jump to a certain slide number by typing this number and pressing Enter. For example, to go to the third slide, you would type 3 and then press Enter. Another way is to press Ctrl+S to open an All Slides dialog box listing the titles of all of the slides in the presentation. You can click a slide to select it and then click Go To, as shown in figure 20.5.
To jump back to the first slide in the presentation, hold down both the left- and right-mouse buttons for two seconds (or type 1 and press Enter).

Sometimes during a live presentation there may be a delay. Whether it is a chatty audience member with a complicated question, a fire drill, or just an intermission, you will want to pause the show.
If you have the slides set for manual transition, then whichever slide you stopped on remains on the screen until you resume. However, you may not want this. For example, it may be distracting to the audience, especially if the pause is to allow someone to get up and speak in front of the screen. A solution is to turn the screen into a blank expanse of black or white. To do so, type W or a comma (for white), or B or a period (for black). To return to the presentation, you can press the same key, or press any key on the keyboard.
Tip
While the screen is completely black or white, you can draw on it with the Pen tool so that it becomes a convenient "scratch pad." Any annotations that you make with the pen on the blank screen are not saved; when you resume the presentation, they are gone forever.
Have you ever seen a coach in a locker room drawing out football plays on a chalkboard? Well, you can do the same thing in PowerPoint. You can have impromptu discussions of concepts that are illustrated on slides, and punctuate the discussion with your own circles, arrows, and lines. Perhaps during the discussion portion of your presentation, you may decide that one point on the slide is not important. In this case, you can use the pen to cross it out. Conversely, a certain point may become really important during a discussion so that you want to emphasize it. In this case, you can circle it or underline it with the pen cursor.
You can choose your pen color as follows:
Move the mouse or press A to make the buttons appear.
Click the Pointers button (the one that looks like a pen). A menu appears.
Select Ink Color and then click the color you want, as shown in figure 20-6.

Tip
To change the default pen color for the show, so that you do not always have to manually select the color you want, click Set Up Show on the Slide Show tab. Then, in the Pen Color drop-down list, choose the color you want.
You can turn on the type of pen that you want, as follows:
Click the Pointers button again.
Click the type of pen that you want:
Ballpoint: A thin line
Felt Tip Pen: A thicker line
Highlighter: A thick, semi-transparent line
Note
The on-screen buttons in the slide show continue to work while you have a pen enabled, but you have to click them twice to activate them — once to tell PowerPoint to temporarily switch out of the Pen mode, and then again to open the menu.
You can also turn on the default pen type (Felt Tip) by pressing Ctrl+P, and then return to the arrow again by pressing Ctrl+A or Esc.
After enabling a pen, just drag-and-draw on the slide to make your mark. You should practice drawing lines, arrows, and other shapes because it takes a while to master. figure 20.7 shows an example of using the pen.

Warning
As you can see from figure 20.7, the on-screen pen is not very attractive. If you know in advance that you are going to emphasize certain points, then you may prefer to build the emphasis into the presentation by making these points larger, bolder, or in different colors. You can also circle the points using an oval shape with a 1-spoke wheel animation.
To erase your lines and try again, press E (for Erase), or open the Pointer menu and choose Erase All Ink On Slide. To erase just a part of the ink, open the Pointer menu, choose Eraser, and then use the mouse pointer to erase individual lines.
Note
Unlike in some earlier versions of PowerPoint, drawings stay with a slide, even when you move to another slide.
When you exit Slide Show view after drawing on slides, a dialog box appears, asking whether you want to keep or discard your annotations. If you choose Keep, the annotations become drawn objects on the slides, which you can then move or delete, similar to an AutoShape.
To change the pen back to a pointer again, open the Pointer menu and choose Arrow, press Ctrl+A, or press Esc. The pen remains a pen when you advance from slide to slide. In earlier versions of PowerPoint, it reverted back to an arrow automatically when you changed slides.
You may not always want to show every slide that you have prepared. Sometimes it pays to prepare extra data in anticipation of a question that you think someone might ask, or to hold back certain data unless someone specifically requests it.
By hiding a slide, you keep it filed in reserve, without making it a part of the main slide show. Then, at any time during the presentation when (or if) it becomes appropriate, you can display that slide. Hiding refers only to whether the slide is a part of the main presentations flow; it has no effect in any other view.
Tip
If you have only a handful of slides to hide, go ahead and hide them. However, if you have a large group of related slides to hide, consider creating a custom show for them instead.
A good way to hide and unhide slides is in Slide Sorter view because an indicator appears below each slide to show whether it is hidden. This way, you can easily determine which slides are part of the main presentation. In the slide thumbnail pane in Normal view, hidden slides appear ghosted out.
Follow these steps to hide a slide:
Switch to Slide Sorter view.
Select the slide or slides that you want to hide. Remember, to select more than one slide, hold down the Ctrl key as you click the ones that you want.
Click the Hide Slide button on the Slide Show toolbar. A gray box appears around the slide number and a diagonal line crosses through it, indicating that it is hidden.
To unhide a slide, select the slide and click the Hide Slide button again. The slides number returns to normal. You can also right-click a slide and choose Hide Slide or Unhide Slide to toggle the hidden attribute on and off.
Tip
To quickly unhide all slides, select all of the slides (press Ctrl+A) and then click the Hide Slides button twice. The first click hides all of the remaining slides that were not already hidden, and the second click unhides them all.
Showing a Hidden Slide During a Presentation
When you advance from one slide to the next during a show, hidden slides do not appear. (This is what being hidden is about, after all.) If you need to display one of the hidden slides, follow these steps:
In Slide Show view, open the Screen menu, either by clicking the Screen icon or by right-clicking anywhere in the screen.
Choose Go to Slide, and then choose the slide to which you want to jump. Hidden slides show their slide numbers in parentheses, but you can access them like any other slide, as shown in figure 20.8.
Tip
If you already know the number of the hidden slide, then you can simply type the number on the keyboard and press Enter to display it. This also works with slides that are not hidden.
Once you display a hidden slide, you can easily return to it later. When you move backwards through the presentation (using the Backspace key, the left- or up-arrow key, or the on-screen Back button), any hidden slides that you displayed previously are included in the slides that PowerPoint scrolls back through. However, when you move forward through the presentation, the hidden slide does not reappear, regardless of when you viewed it previously. You can always jump back to it again using the preceding steps.
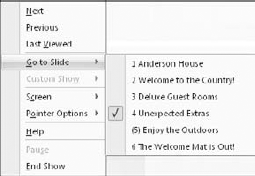
Figure 20.8. You can jump to a hidden slide just as you would to any other slide.
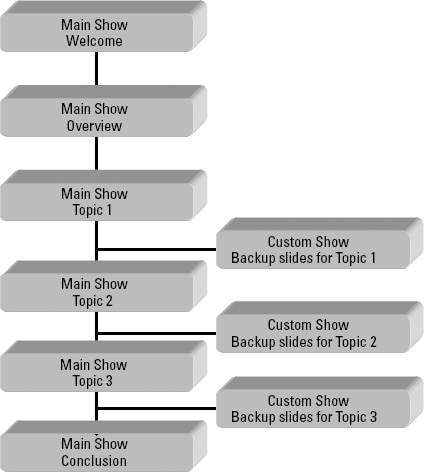
Many slide shows have a linear flow: First you show slide one, and then slide two, and so on, until you have completed the entire presentation. This format is suitable for situations where you are presenting clear-cut information with few variables, such as a presentation about a new insurance plan for a group of employees. However, when the situation becomes more complex, a single-path slide show may not suffice. This is especially true when you are presenting a persuasive message to decision-makers; you want to anticipate their questions and needs for more information and have many backup slides, or even entire backup slide shows that are prepared in case questions arise. figure 20.9 shows a flow chart for this kind of presentation.
Note
If you simply want to hide a few slides for backup use, then you do not need to create a custom show. Instead, you can just hide the slides.
Another great use for custom shows is to set aside a group of slides for a specific audience. For example, you might need to present essentially the same information to employees at two different sites. In this case, you could create two custom shows within the main show, where each show includes slides that they both have in common, as well as slides that are appropriate for only one audience or the other. figure 20.10 shows a flow chart for this kind of presentation.
Notice in figure 20.10 that although some of the slides in the two custom shows are the same, they repeat in each custom show rather than jumping back to the main presentation. This is because it is much easier to jump to the custom show once and stay there, than it is to keep jumping into and out of the show.
Slides in a custom show remain a part of the main presentation. Placing a slide in a custom show does not exclude it from the regular presentation flow. However, you may decide that you no longer want to show the main presentation in its present form; you may just want to use it as a resource pool from which you can select slides for other custom shows. To learn how to set up PowerPoint so that a custom show starts rather than the main presentation when you enter Slide Show view, see the section, "Using a Custom Show as the Main Presentation," later in this chapter.

Figure 20.10. You can create custom shows that allow you to use the same presentation for multiple audiences.
Here are some ideas to start you thinking about how and why you might want to include some custom shows in your presentation files:
Avoiding duplication: If you have several shows that use about 50 percent of the same slides and 50 percent different ones, then you can create all of the shows as custom shows within a single presentation file. This way the presentations can share the 50 percent of the slides that they have in common.
Managing change: By creating a single presentation file with custom shows, you make it easy to manage changes. If any changes occur in your company that affect any of the common slides, then making the change once in your presentation file makes the change to each of the custom shows immediately.
Overcoming objections: You can anticipate client objections to your sales pitch and prepare several custom shows, each of which addresses a particular objection. Then, whatever reason your potential customer gives for not buying your product, you have a counteractive argument at hand.
Covering your backside: If you think that you may be asked for specific figures or other information during a speech, you can have this information ready in a custom show (or on a few simple hidden slides, if there is not a lot of information) to display if needed. No more going through the embarrassment of having to say, "I'm not sure, but let me get back to you on that."
To create a custom show, first create all of the slides that should go into it. Start with all of the slides in the main presentation. Then follow these steps:
On the Slide Show tab, click Custom Slide Show, and then click Custom Shows. The Custom Shows dialog box opens.
Note
If no custom shows are defined yet, the Custom Shows command is the only item that appears on this menu. Otherwise, your existing custom shows appear on the menu, and you can run them from here.
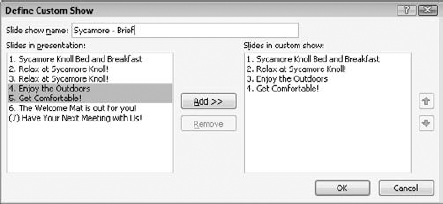
Type a name for your custom show in the Slide Show Name text box, replacing the default name.
In the Slides in Presentation pane, click the first slide that you want to appear in the custom show.
Tip
You can select multiple slides in step 4 by holding down the Ctrl key as you click each one. However, be aware that if you do this, the slides move to the Slides in Custom Show pane in the order that they originally appeared. If you want them in a different order, copy each slide over separately, in the order that you want, or rearrange the order as described in step 7.
Click Add to copy the slide to the Slides in Custom Show pane, as shown in figure 20.11.
Repeat steps 4 and 5 for each slide that you want to include in the custom show.
If you need to rearrange the slides in the custom show, click the slide that you want to move in the Slides in Custom Show pane and then click the up- or down-arrow button to change its position.
When you are finished building your custom show, click OK. The new show appears in the Custom Shows dialog box.
(Optional.) To test your custom show, click the Show button. Otherwise, click Close to close the Custom Shows dialog box.
You can manage your custom shows from the Custom Shows dialog box, the same place in which you created them. This includes editing, deleting, or making a copy of a show. To change which slides appear in a custom show, and in what order, follow these steps:
On the Slide Show tab, click Custom Slide Show and then click Custom Shows. The Custom Shows dialog box appears, as shown in figure 20.12.
If you have more than one custom show, then click the one that you want to edit.
Click Edit. The Define Custom Show dialog box reappears, as shown in figure 20.11.
Add or remove slides, as needed. To add a slide, select it in the left pane and click Add. To remove a slide, select it in the right pane and click Remove.
Note
Removing a slide from a custom show does not remove it from the overall presentation.
Rearrange slides as needed with the up- and down-arrow buttons.
(Optional). You can change the custom show's name in the Slide Show Name text box.
Click OK. PowerPoint saves your changes.
Click Close to close the Custom Shows dialog box.

A good way to create several similar custom shows is to create the first one and then copy it. You can then make small changes to the copies as necessary To copy a custom show, follow these steps:
On the Slide Show tab, click Custom Slide Show and then click Custom Shows. The Custom Shows dialog box appears, as shown in figure 20.12.
If you have more than one custom show, then select the show that you want to copy.
Click Copy. A copy of the show appears in the dialog box. The filename includes the words Copy of so that you can distinguish it from the original.
Edit the copy, as explained in the preceding section, to change its name and content.
When you are finished, click Close to close the Custom Shows dialog box.
It is not necessary to delete a custom show when you do not want it anymore; it does not do any harm remaining in your presentation. Because custom shows do not display unless you call for them, you can simply choose not to display it. However, if you want to make your presentation more orderly, you can delete a custom show that you no longer want. Follow these steps:
On the Slide Show tab, click Custom Slide Show and then click Custom Shows. The Custom Shows dialog box appears, as shown in figure 20.12.
Select the show that you want to delete.
Click Remove. The show disappears from the list.
Click Close to close the Custom Shows dialog box.
To start your presentation with a custom show, on the Slide Show tab, click Custom Slide Show and then click the name of the custom show on the drop-down menu. The custom show runs.
You can also call up the custom show at any time during your main presentation. There are two ways to do this: you can navigate to the custom show with PowerPoint's regular presentation controls, or you can create a hyperlink to the custom show on your slide.
During a presentation, you can jump to any of your custom shows by following these steps:
Open the shortcut menu in Slide Show view by right-clicking or by clicking the navigation button.
Choose Custom Show and then select the custom show that you want, as shown in figure 20.13. The custom show starts.

When you start a custom show, you are no longer in the main presentation. To verify this, open the shortcut menu again, choose Go to Slide, and check out the list of slides. This list shows only the slides that belong to the custom show.
To return to the main show, follow these steps:
Press Ctrl+S to open the All Slides dialog box.
Open the Show drop-down list and choose All Slides.
Select the slide that you want to go to. You can choose from all of the slides in the entire presentation, as shown in figure 20.14.
Click Go To.
Tip
To avoid having to click Ctrl+S to return to the main show, you can create a hyperlink or action button for a specific slide in your main show.

Although you learn a lot about hyperlinks in upcoming chapters, here is a preview. Hyperlinks are hot links that you place on your slides. When you click a hyperlink, you jump the display to some other location. This is why they are called hot. A hyperlink can jump to an Internet location, a different spot in your presentation, an external file (such as a Word document), or just about anywhere else.
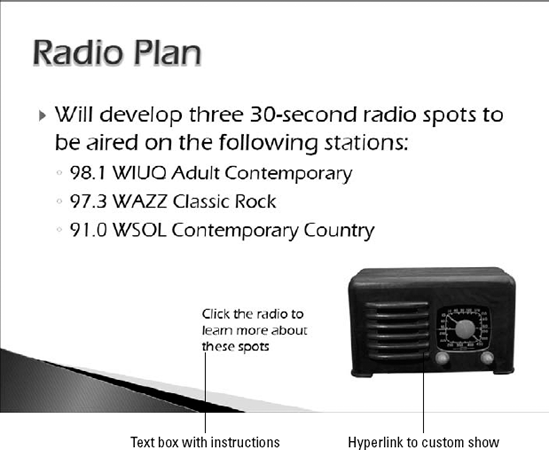
One way to gain quick access to your custom shows in a presentation is to create hyperlinks for them on certain key slides that act as jumping-points. You can insert a text hyperlink into any text box, and its text becomes the marker that you click. For example, if you insert a hyperlink for a custom show called Radio Spots, then the hyperlink text could read Radio Spots. If you want to get fancier, you can select some existing text or an existing graphic object, and then attach the hyperlink to it. For example, in figure 20.15, I have inserted a clip-art image of a radio and set it up to be a hyperlink to the custom show that provides details about the radio spots.
Follow these steps:
If you are attaching the hyperlink to another object (such as the radio in figure 20.15) or some text, then select the object or text.
On the Insert tab, click Hyperlink. The Insert Hyperlink dialog box appears.
Click the Place in This Document icon along the left side of the screen.
In the Select a Place in This Document pane, scroll down to the Custom Shows list.
Click the custom show that you want to jump to with this hyperlink, as shown in figure 20-16.
(Optional). If you want to return to the same spot that you left in the main presentation after viewing this custom show, then select the Show and Return check box. If you do not select this option, the presentation will simply end when the custom show ends.
(Optional) If you want to specify a ScreenTip for the hyperlink, click the ScreenTip button to create one.
Click OK.

Figure 20.16. Choose one of your custom shows as the place to jump to when the user clicks the hyperlink.
If you are using text for the hyperlink, the text now appears underlined and in a different color. This color is controlled by the color theme of your presentation (specifically the Hyperlink and Followed Hyperlink colors). If you are using a graphic, its appearance does not change. However, when you are in Slide Show view and you move the mouse pointer over the object, the pointer changes to a pointing hand, indicating that the object is a hyperlink.
Tip
If you do not want your linked text to be underlined or to change colors upon return, you can put an AutoShape rectangle with no line and no fill over the top of the text and link to the AutoShape instead. Because this shape is on top of the text, you click it instead of the text. Keep in mind that you should probably create your link before changing the line and fill to no color!
Another way to use hyperlinks for custom shows is to set up the first few slides generically for all audiences, and then to branch off into one custom show or another, based on user input. The diagram in figure 20-9 is an example of this type of presentation. After the first two slides, you could set up a "decision" slide that contains two hyperlinks — one for Digital Products and one for Audio Products. The user would then click the hyperlink they want.
Tip
You can also create hyperlinks to custom shows by using action buttons. Action buttons are a special type of AutoShape that is designed specifically for creating hyperlinks within a presentation.
If you have a complete show contained in one of your custom shows, you may sometimes want to show it as the default presentation. To do this, you must tell PowerPoint that you want to bypass the main presentation and start with the custom show.
The easiest way to show a custom show is to select it from the Custom Slide Show drop-down menu on the Slide Show tab. However, you can also set up a custom show to be the default show for the presentation by following these steps:
On the Slide Show tab, click Set Up Slide Show. The Set Up Show dialog box appears.
Open the Custom Show drop-down list and choose the show that you want to use, as shown in figure 20.17.
Click OK. Now, when you start the show, the custom show runs.
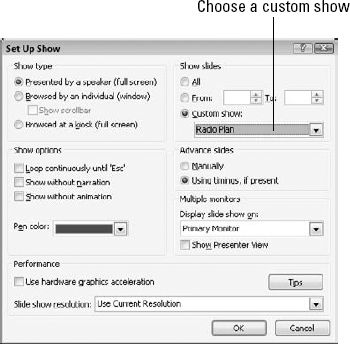
Figure 20.17. Use the Set Up Show dialog box to control which of your custom shows runs when you start the show.
Tip
You do not have to set up a custom show to narrow down the list of slides that appear when you run your presentation. You can choose which slides you want to show by using the From and To text boxes in the Show Slides section, as shown in figure 20.17. For example, to show slides 5 to 10, you would type 5 in the From text box and 10 in the To text box.
The computer on which you create a presentation is usually not the same computer that you will use to show it. For example, you may be doing the bulk of your work on your desktop computer in your office in Los Angeles, but you need to use your laptop computer to give the presentation in Phoenix.
One way to transfer a presentation to another computer is simply to copy the PowerPoint file (the file with the .pptx extension) using a floppy disk or other removable media. However, this method is imperfect because it assumes that the other computer has all of the fonts, sounds, and other elements that you need for every part of the show. This can be a dangerous assumption. For example, suppose that your presentation contains a link to some Excel data. If you do not also copy the Excel file, then you cannot update the data when you are on the road.
A better way to ensure that you are taking everything you need while traveling is to use the Package for CD feature in PowerPoint. This feature reads all of the linked files and associated objects and ensures that they are transferred along with the main presentation. You do not actually need to copy the presentation to a writeable CD, and you do not need a CD-R or CD-RW drive to use this feature. You can copy the presentation to anywhere you want, such as to a ZIP drive or a network location.
If you have a CD-R or CD-RW drive, then copying the presentation to CD is an attractive choice. It produces a self-running disc that contains a PowerPoint Viewer application, the presentation file, and any linked files.
By default, a packaged CD includes the PowerPoint Viewer, and the presentation file is in PowerPoint 2003 format. PowerPoint automatically saves 2007-version files back to 2003 format before it burns them to CD. However, you can override this behavior, as you will see later in this chapter in "Setting Copy Options."
Tip
You can copy many presentation files onto a single CD, not just the currently active one. The only limit is the size of the disc (usually 650MB to 700MB). By default, the currently active presentation is included, although the following steps show you how to add other presentations. You can also set up these presentations to run automatically one after another, or you can specify that a menu appears so that the user can choose the presentation that they want to view.
Here is the basic procedure, which is elaborated on in the following sections:
Place a blank CD-R or CD-RW disc in your writeable CD drive.
Finalize the presentation in PowerPoint. If you are using a CD-R disc, keep in mind that this disc type is not rewriteable, and so you should ensure that the presentation is exactly as you want it.
Choose Office
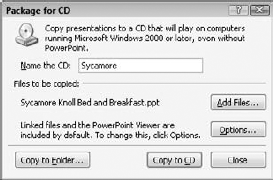
A warning appears about updating file formats; click OK. The Package for CD dialog box opens, as shown in figure 20.18.
Type a name for the CD; this is similar to adding a volume label for the disc.
(Optional). Add more files to the CD if you want. See the next section, "Creating a CD Containing Multiple Presentation Files," for more details.
(Optional). Set any options that you want. See the section, "Setting Copy Options," later in this chapter, for more details.
Click Copy to CD. The CD-writing process may take several minutes, depending on the writing speed of your CD drive and the size of the presentation files that you are placing on it.
A message appears when the files are successfully copied to the CD, asking whether you want to copy the same files to another CD. Click Yes or No. If you choose No, then you must also click Close to close the Package for CD dialog box.
The resulting CD automatically plays the presentations when you insert it in any computer. You can also browse the CD's contents to open the PowerPoint Viewer separately and use it to play specific presentations.
Warning
File corruption can occur on a CD drive during the writing process. After burning a CD, test it thoroughly by running the complete presentation from CD before you rely on the CD copy as the version that you take with you while traveling.
By default, the active presentation is included on the CD, but you can also add others, up to the capacity of your disc. For example, if you have several versions of the same presentation for different audiences, then a single CD can contain all of them. As you are preparing to copy the files using the Package for CD dialog box, shown in Figure 20.18, follow these steps to add more files:
Click Add Files. An Add dialog box opens, similar to the Open dialog box that you use to open PowerPoint files.
Select the additional files that you want to include, and click Add to return to the Package for CD dialog box. The list of files now appears as shown in Figure 20/19, with extra controls.
Note
You can select multiple files from the same location by holding down the Ctrl key as you click the ones you want. To include multiple files from different locations, repeat steps 1 and 2 for each location.
If you set up the CD to play the presentations automatically (as shown in the next section), the order in which they appear on the list becomes significant. You can rearrange the list by clicking a presentation and then clicking the Up- or Down-arrow buttons to the left of the list.
If you need to remove a presentation from the list, click it and then click Remove.
Continue making the CD as you normally would.

The default copy options are suitable in most situations. However, you may sometimes want to modify them. To do this, open the Package for CD dialog box, and follow these steps:
Click Options. The Options dialog box open, as shown in figure 20.20.
Select a package type. You can choose Viewer Package, which includes the PowerPoint Viewer and saves the file in 2003 format, or you can choose Archive Package, which does not update the file format and does not include the viewer on the CD.
The Linked Files check box is selected by default; this option tells PowerPoint to include the full copies of all linked files. You can deselect this option if you want; a static copy of the linked data will remain in the presentation, but the link will not work. You should leave this option selected if you have sounds or multimedia files in your presentation, because these files are always linked (with the exception of some WAV files).
The Embedded TrueType Fonts check box is deselected by default. If you think that the destination computer may not contain all of the fonts that are used in the presentation, then select this option. This makes the presentation file slightly larger. Remember, not all fonts can be embedded; this depends on the level of embedding allowed by the font's manufacturer.
If you want to add passwords for the presentations, do so in the Enhance Security and Privacy section. There are separate text boxes for open and modify passwords.
If you want to check the presentation for private information, such as your name or any comments, select the Inspect Presentations for Inappropriate or Private Information check box.
Click OK, and then write the CD as you normally would.

Although it is not well known, you can also use the Package for CD feature to copy presentation files and their associated support files to any location you want. For example, you can transfer files to another computer on a network, or place them on a floppy or ZIP disc. To do so, follow these steps:
In the Package for CD dialog box, set up the package exactly the way you want it, including all of the presentation files and options. See the preceding sections for more information.
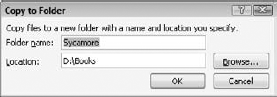
Click Copy to Folder. A Copy to Folder dialog box appears.
Type a name for the new folder to be created in the Name the Folder text box.
Type a path for the folder in the Choose Location text box, as shown in figure 20.21.
Click OK.
If a warning appears about linked files, then click Yes or No as appropriate. PowerPoint copies the files to that location.
If a warning appears about comments or ink annotations, click Continue.
Click Close to close the Package for CD dialog box.
The first part of this chapter assumed that you were using a computer with a single monitor to show your presentation, but this may not always be the case. This section looks at the entire range of audio-visual options from which you can choose. There are many models of projection equipment in conference rooms all across the world, but most of them fall into one of these categories:
Noncomputerized equipment: This can include an overhead transparency viewer, a 35mm slide projector, or other older technology. You face two challenges if you need to work with this category of equipment: one is figuring out how the equipment works because every model is different, and the other is producing attractive versions of your slides to work with them. There are companies that can produce 35mm slides from your PowerPoint files, or you can invest in a slide-making machine yourself. For transparencies, you simply print your slides on transparency film that is designed for your type of printer.
Single computer with a single monitor: If there is a computer with a monitor in the meeting room, then you can run your presentation on that computer. You can do this with the Publish to CD feature that is discussed in the preceding sections, and then run the presentation directly from the CD.
Single computer with a dual-monitor system: On systems with dual monitors, one monitor is shown to the audience and the other is for your own use. This is useful when you want to display your speaker notes on the monitor that the audience does not see. However, you might need to set up multi-monitor support in Windows so that you can view different displays on each monitor.
Projection system (LCD) or large monitor without a computer: If the meeting room has a large monitor but no computer, you will need to bring your own laptop computer and connect it to the monitor. Most of these systems use a standard VGA plug and cable.
The following sections look at some of these options in more detail.
If you have two monitors — either your laptop computer screen and an external monitor, or two external monitors hooked up to the same computer — you can display the presentation on one of them and your own notes on the other one. This is a very handy setup!
Warning
To use two screens, you need the full version of PowerPoint on your laptop, not just the PowerPoint Viewer. You also need compatible hardware. For example, your laptop must have an external VGA port and a built-in video card that supports DualView in your version of Windows. If you have a desktop computer, you must have two separate video cards or a video card with two separate video ports.
First, you need to prepare your hardware. On a laptop computer, this means enabling both the built-in and the external monitor ports and connecting an external monitor. Some laptops toggle between internal, external, and dual monitors with an Fn key combination; refer to your laptops documentation.
On a desktop computer, install a second video card and monitor, and then do the following to set them up in Windows:
When Windows restarts after you install the second video card, right-click the desktop and choose Personalize (Windows Vista) or Properties (Windows XP).
Click Display Settings (Windows Vista), or click the Settings tab (Windows XP).
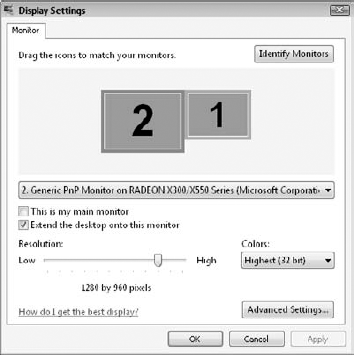
A sample area displays two monitors, as shown in figure 20.22.
The monitor that you use most of the time should be monitor 1, and the other one should be monitor 2. To determine which is which, click Identify Monitors (or the Identify button if you are using Windows XP); large numbers appear briefly on each screen.
If you need to swap the numbering of the monitors, click the one that should be the primary monitor and then select the This is My Main Monitor check box (Windows Vista) or the Use This Device as the Primary Monitor check box (Windows XP). This option will be unavailable if the currently selected monitor is already set to be the primary one.
Select the secondary monitor, and then select the Extend my Desktop onto This Monitor check box (Windows Vista) or Extend the Desktop Onto This Monitor check box (Windows XP).
(Optional) If the monitors are not arranged in the sample area in the way that they are physically positioned on your desk, you can drag the icons for the monitors to where you want them.
(Optional) You can click a monitor in the sample area to adjust its display settings.
Tip
You can also adjust the refresh rate for each monitor. To do this, make sure that you have selected the video card to which the monitor is attached, and then click the Advanced Settings button (Windows Vista) or the Advanced button (Windows XP). On the Monitor tab in the dialog box that appears, change the refresh rate. A higher refresh rate reduces screen flicker, but if you exceed the monitor's maximum supported rate, the display may appear distorted and the screen may be damaged.
Click OK. You are now ready to work with the two monitors in PowerPoint.
You can now drag items from your primary monitor to your secondary one! This can also be useful outside of PowerPoint as well. For example, you can have two applications open at once, each in its own monitor window.
If you have two monitors available, and configured as described in the preceding section, you can use the following steps to help PowerPoint recognize and take advantage of these monitors:
Open the presentation in PowerPoint.
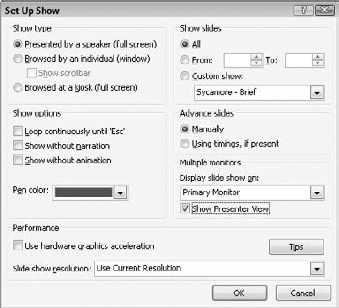
On the Slide Show tab, click Set Up Slide Show. The Set Up Show dialog box opens, as shown in figure 20.23.
In the Multiple Monitors section, open the Display Slide Show On drop-down list and choose the monitor that the audience will see.
Select the Show Presenter View check box. This will give you a separate, very useful control panel on the other monitor during the show, as described in the next section.
Click OK. You are now ready to show the presentation using two separate displays — one for you and one for the audience.
Presenter View is a special view of the presentation that is available only on systems with more than one monitor, and only where you have selected the Show Presenter View check box in the Set Up Show dialog box, as described in the preceding section. This view provides many useful tools for managing the show behind-the-scenes, as shown in figure 20.24. It appears automatically on the non-audience monitor when you enter Slide Show view, and includes the following features:
At the bottom of the screen is a pane containing thumbnail images of each slide. You can jump to a slide by selecting it here. You can also move between slides by using the large left- and right-arrow buttons.
The speaker notes for each slide appear in the right pane. You cannot edit them from here, however. Zoom buttons appear below the speaker notes pane, so you can zoom in and out on the notes.
A Time and Duration display appears below the current slide. It tells you the current time and how long you have been talking.
The panes are adjustable by dragging the dividers between them, so you can have larger thumbnails, a smaller slide display, more or less room for notes, and so on.
Presenter View does not have all of the features that you have learned about so far in Slide Show view. However, keep in mind that the audiences monitor is still active and available for your use! Because you extended the desktop onto the second monitor, you can simply move the mouse pointer onto the audiences display and then use the buttons in the corner (or the right-click menu) as you normally would.

In this chapter, you learned how to prepare for a big presentation. You now know how to package a presentation and move it to another computer, how to set up single and multi-screen audio-visual equipment to work with your laptop, and how to control a presentation on-screen using your computer. You also know how to jump to different slides, how to take notes during a meeting, and how to assign action items. You're all set! All you need now is a nice starched shirt and a shoeshine.
In the next chapter, you learn about designing presentations that are user-interactive or self-running. You can do this by creating easy-to-use action buttons for situations where you cannot be there to press the buttons yourself.