Most presentations consist of multiple slides, so you'll need a way of ensuring consistency among them. Not only will you want each slide (in most cases) to have the same background, fonts, and text positioning, but you will also want a way of ensuring that any changes you make to those settings later automatically populate across all your slides.
To accomplish these goals, PowerPoint offers layouts, themes, and masters. Layouts determine the positioning of placeholders; themes assign color, font, and background choices; and masters transfer theme settings to the slides and provide an opportunity for repeated content, such as a logo, on each slide. In this chapter you learn how to use layouts, themes, and masters to create a presentation that is attractive, consistent, and easy to manage.
As you learned in Chapter 4, a layout is a positioning template. The layout used for a slide determines what content placeholders will appear and how they will be arranged. For example, the default layout, called Title and Content, contains a placeholder for a title across the top of the slide and a multipurpose placeholder for body content in the center.
A theme is a group of design settings. It includes color settings, font choices, object effect settings, and in some cases also a background graphic. In figure 5.1 later in the chapter, the theme applied is called Concourse, and it is responsible for the colored swoop in the corner, the color of that swoop, and the fonts used on the slide. A theme is applied to a slide master, which is a sample slide and not part of the regular presentation, existing only behind-the-scenes to provide its settings to the real slides. It holds the formatting that you want to be consistent among all the slides in the presentation (or at least a group of them, because a presentation can have multiple slide masters). Technically, you do not apply a theme to a slide; you apply a theme to a slide master, and then you apply a slide master to a slide. That's because a slide master can actually contain some additional elements besides the formatting of the theme such as extra graphics, dates, footer text, and so on.
PowerPoint 2007 handles themes, layouts, and slide masters very differently from earlier versions, and this can take some getting used to if you're upgrading.
In PowerPoint 2003, you applied a design template (not a theme) to the slide master. A design template was a regular PowerPoint template file (.pot extension) with color choices, font choices, and background graphics. You could have multiple slide masters in a single presentation, so you could base some slides on a different design template than others. PowerPoint 2007 still uses templates, but its primary means of changing the presentation's look and feel is to apply different themes to the slide master rather than different templates to the presentation as a whole.
A PowerPoint 2007 template contains at least one slide master, and that slide master has a theme applied to it, so technically every template contains at least one theme. A template with multiple slide masters can therefore carry multiple themes. However, when you apply a template to an existing presentation, only the theme associated with its default (first) slide master is applied. If you start a new presentation based on that template, though, and the template contains more than one theme, you have access to all the stored themes within it.
A theme is both simpler than and more complex than a template. It is simpler in that it cannot hold some of the things a real template can hold. A theme can provide only font, color, effect, and background settings to the presentation. (It can in some cases also provide slide layouts, but let's postpone that discussion for a bit.) And a theme can contain only one set of settings, whereas a template that has multiple slide masters can contain multiple sets of settings. On the other hand, a theme can also do more than a PowerPoint template; you can apply a theme saved as a separate file to other Office applications, so you can share its color, font, and effect settings with Word or Excel, for example.
A theme is an XML file (or a snippet of XML code embedded in a presentation or template file). A theme can come from any of these sources:
Built-in: Some themes are embedded in PowerPoint itself and are available from the Themes gallery on the Design tab regardless of the template in use.
Custom (automatically loaded): The default storage location for theme files in Windows Vista is C:UsersusernameAppDataRoamingMicrosoftTemplatesDocument Themes. For Windows XP, it is C:Documents and SettingsusernameApplication DataMicrosoftTemplatesDocument Themes. All themes (and templates containing themes) stored here are automatically displayed among the gallery of theme choices on the Design tab, in a Custom category
Inherited from starting template: If you start a presentation using a template other than the default blank one, that template might have one or more themes included in it.
Stored in current presentation: If you modify a theme in Slide Master view while you are working on a presentation, the modified code for the theme is embedded in that presentation file.
Stored in a separate file: If you save a theme (using any of a variety of methods you'll learn later in this chapter), you create a separate theme file with a .thmx extension. These files can be shared among other Office applications, so you can standardize settings such as font and color choices across applications. (Some of the unique PowerPoint portions of the theme are ignored when you use the theme in other applications.)
In PowerPoint 2003, slide layouts were almost completely separate from slide masters and were completely separate from design templates. PowerPoint 2003 provided noncustomizable layouts you could apply to change the placeholder types and positions, and these layouts were largely unaffected by the design applied to the slider master. The slide master consisted of a single slide defining generic placement for all the title and content placeholders, with an optional second slide to separately define the placement for title slides.
In PowerPoint 2007, the slide master has separate layout masters for each layout, and you can customize and create new layouts. For example, figure 5.1 shows Slide Master view (View
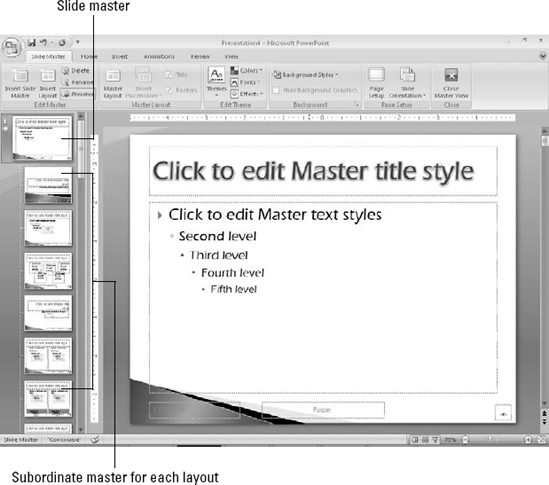
A master is a set of specifications that govern formatting and appearance. PowerPoint actually has three masters: the Slide Master (for slides), the Handout Master (for handouts), and the Notes Master (for speaker notes). This chapter deals only with the Slide Master.
Note
For more on the Handout and Notes Masters, see Chapter 19.
The slide master holds the settings from a theme and applies them to one or more slides in your presentation. A slide master is not exactly the same thing as a theme because the theme can also be external to PowerPoint and used in other programs, but there's a rough equivalency there. A slide master is the representation of a particular theme applied to a particular presentation.
Note
Which themes appear in Slide Master view?: the ones you have applied to at least one slide in the presentation, plus any custom themes copied from another presentation (see the section "Copying a Theme from Another Presentation" for more details) and any themes inherited from the template used to create the presentation. The built-in themes do not show up here unless they are in use.
When you make changes to a slide master, those changes trickle down to the individual layout masters associated with it. When you make changes to an individual layout master, those changes are confined to that layout in that master only
To enter Slide Master view, choose View
Although earlier versions of PowerPoint had many different layouts, they were all mostly the same but with different types of content placeholders. In PowerPoint 2007, there are fewer layouts, but the placeholders on them are much more accommodating to different types of content. For example, the default layout, called Title and Content, has placeholders for a slide title plus a single type of content — text, a table, a chart, a picture, a piece of clip art, a SmartArt diagram, or a movie. That's a big improvement because now you can choose based on the layout you want and not the type of content you might decide to put into it.
When you change the layout, you change the type and/or positioning of the placeholders on it. If the previous placeholders had content in them, that content shifts to a new location on the slide to reflect the different positioning for that placeholder type. If the new layout does not contain a placeholder appropriate for that content, the content remains on the slide but becomes orphaned. That means it is a free-floating object, outside of the layout. You need to manually position an orphaned object if it's not in the right spot. However, if you later apply a different layout that does contain a placeholder for the orphaned object, it snaps back into that placeholder.
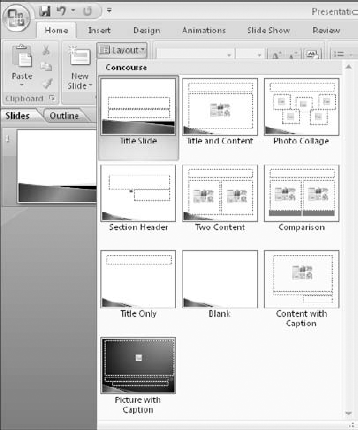
To switch a slide to a different layout, follow these steps:
Select the slide(s) to affect.
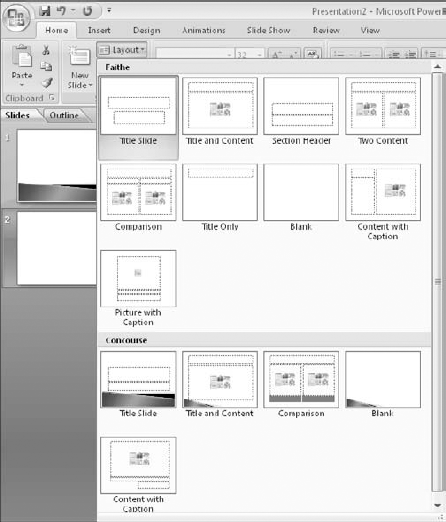
On the Home tab, click Layout. A menu of layouts appears. See figure 5.2.
Click the desired layout.
Note
If you want to modify a built-in layout, or create your own layouts, see "Customizing and Creating Layouts" later in this chapter.
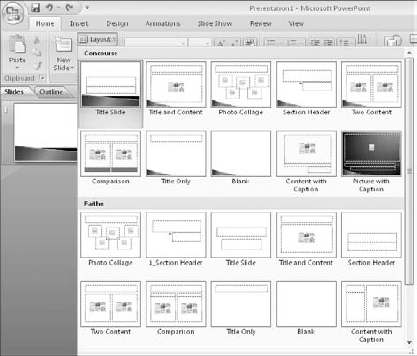
When a presentation has more than one slide master defined, separate layouts appear for each of the slide master themes. figure 5.3 shows the Layout menu for a presentation that has two slide masters.
As you learned in "Understanding Layouts and Themes" at the beginning of this chapter, themes are the PowerPoint 2007 way of applying different designs to the presentation. A theme includes a background graphic (usually), color and font choices, and graphic effect settings. A theme can also include custom layouts, although these are not available when you apply the theme to an existing presentation. (More on that quandary later in the chapter.)
The method for applying a theme depends on whether that theme is already available in the current presentation or not. Some themes are built into PowerPoint so that they are always available; other themes are available only when you use certain templates, or when you specifically apply them from an external file. The following sections explain each of those possibilities.
Note
Themes, also called design themes, contain a combination of colors, fonts, effects, back-grounds, and layouts. There are also more specialized themes: color themes, font themes, and effect themes. When this book uses the term "theme" alone, it's referring to a design theme. Where there is potential for confusion, the book calls it a design theme to help differentiate it from the lesser types of themes.
A gallery in PowerPoint is a menu of samples from which you can choose. The Themes gallery is a menu of all of the built-in themes plus any additional themes available from the current template or presentation file.
To select a theme from the gallery, follow these steps:
(Optional) If you want to affect only certain slides, select them. (Slide Sorter view works well for this.)
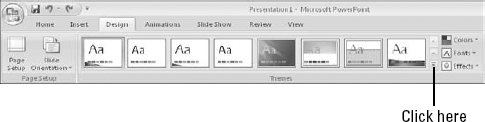
On the Design tab, in the Themes group, if the theme you want appears, click it, and skip the rest of these steps. If the theme you want does not appear, you will need to open the gallery. To do so, click the down arrow with the line over it, as shown in figure 5.4.
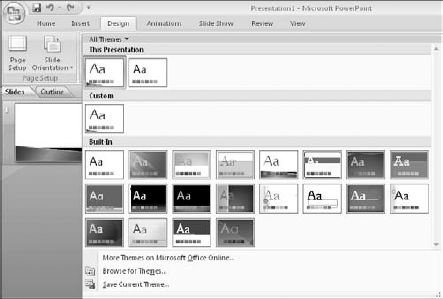
The Themes gallery opens, as you see in figure 5.5. The gallery is divided into sections based upon the source of the theme. Themes stored in the current presentation appear at the top; custom themes you have added appear next. Built-in themes appear at the bottom.
Click the theme you want to apply.
If you selected multiple slides in step 1, the theme is applied only to them.
If you selected a single slide in step 1, the theme is applied to the entire presentation.
Tip
To override the default behavior in step 3, so that you can apply a different theme to a single slide, right-click instead of clicking in step 3 and choose Apply to Selected Slide(s) from the shortcut menu.
You can open and use externally saved theme files in any Office application. This makes it possible to share color, font, and other settings between applications to create consistency between documents of various types. You can also save and load themes from templates.
Note
To create your own theme files, see "Creating a New Theme" later in this chapter.
To apply a theme to the presentation from a theme or template file, follow these steps:
On the Design tab, open the Themes gallery (see figure 5.5) and click Browse for Themes. The Choose Theme or Themed Document dialog box opens.
Click Apply.
Note
Any custom themes you might have previously saved are located by default in C:UsersusernameAppDataRoamingMicrosoftTemplatesDocument Themes (in Windows Vista) or C:Documents and SettingsusernameApplication DataMicrosoftTemplates Document Themes (in Windows XP). However, you don't need to navigate to that location to open a theme file because all themes stored here are automatically included in the gallery already.
A theme file contains only one theme, but a template file can potentially contain multiple themes. So how does PowerPoint know which one you want to apply if you apply from a template? If the template file contains any slides, the theme that the first slide uses is applied. Otherwise the first theme in the template (as determined by the order in Slide Master view) is applied.
Applying a theme from a theme or template file to an existing presentation, as in the preceding section, applies only the formatting; it does not copy any custom slide layouts you might have created. To copy the custom layouts, you must start a new presentation based on the theme.
To start a new presentation based on the theme, follow these steps:
Choose Office

Open the File Type list and choose Office Themes.
Navigate to the location containing the theme and select it. Custom themes are stored by default in C:UsersusernameAppDataRoamingMicrosoft
TemplatesDocument Themes for Windows Vista or C:Documents and Settingsuser-nameApplication DataMicrosoftTemplatesDocument Themes for Windows XP.
Click Open. PowerPoint starts a new presentation based on that theme and any custom layouts that the theme includes.
Note
To copy a theme from one presentation to another — including all its custom layouts, if any — see the section "Managing Themes" later in this chapter.
In addition to overall themes, which govern several types of formatting, PowerPoint also provides many built-in color, font, and effect themes that you can apply separately from your choice of overall theme. So, for example, you can apply a theme that contains a background design you like, and then change the colors and fonts for it.
In the following sections, you'll learn how to apply some of these built-in color, font, and effect settings to a presentation without changing the overall theme. Then later in the chapter you will learn how to save these customized settings as new themes and even how to create your own custom color and font settings in a theme.
To understand how PowerPoint changes colors via a theme, you must know something about how it handles color placeholders in general. PowerPoint uses a set of color placeholders for the bulk of its color formatting. Because each item's color is defined by a placeholder, and not as a fixed color, you can easily change the colors by switching to a different color theme. That way if you decide, for example, that you want all the slide titles to be blue rather than green, you make the change once and it is applied to all slides automatically.
A group of colors assigned to preset placeholders is a color theme. PowerPoint contains 20+ built-in color themes that are available regardless of the overall theme applied to the presentation. Because most design themes use placeholders to define their colors, you can apply the desired design theme to the presentation and then fine-tune the colors afterward by experimenting with the built-in color themes.
How many color placeholders are there in a color theme? There are actually 12, but sometimes not all of them are available to be applied to individual objects. When you choose a color theme (Design

After applying the overall theme you want, you might want to apply different colors. To switch to a different color theme, follow these steps:
(Optional) To apply a different color theme to a slide master other than the default one, open Slide Master view (View
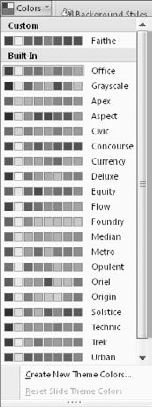
On the Design tab (or the Slide Master tab if in Slide Master view), click Colors. A gallery of color themes opens.
(Optional) Point to a color theme and observe the preview on the slide behind the list.
Click the desired color theme. See figure 5.7.
Note
You can also create custom color themes; see the section "Creating a Custom Color Theme" later in this chapter for details.
By default in most themes and templates, text box fonts are not set to a specific font, but to one of two designations: Heading or Body. Then a font theme defines what specific fonts to use. To change the fonts across the entire presentation, all you have to do is apply a different font theme.
A font theme is an XML-based specification that defines a pair of fonts: one for headings and one for body text. Then that font is applied to the text boxes in the presentation based on their statuses of Heading or Body. For example, all of the slide titles are usually set to Heading, and all of the content placeholders and manual text boxes are usually set to Body.
In a blank presentation (default blank template), when you click inside a slide title placeholder box, you see Calibri (Headings) in the Font group on the Home tab. figure 5.8 shows that the current font is Calibri, but that it is being used only because the font theme specifies it. You could change the font theme to Verdana/Verdana, for example, and then the font designation for that box would appear as Verdana (Headings).
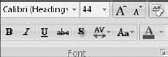
Figure 5.8. When some text is using a font placeholder rather than a fixed font, (Headings) or (Body) appears after its name in the Font group on the Home tab.
In some font themes, the same font is used for both headings and body. In a default blank presentation both fonts are Calibri, for example, and the Verdana/Verdana set is an additional example. In many other font themes, though, the heading and body fonts are different.
After applying an overall theme, you might decide you want to use different fonts in the presentation. To switch to a different font theme, follow these steps:
(Optional) To apply a different font theme to a slide master other than the default one, open Slide Master view (View
On the Design tab (or Slide Master tab, if in Slide Master view), click Fonts. A gallery of font themes opens.
(Optional) Point to a font theme and observe the change on the slide behind the list.
Click the desired font theme. See figure 5.9.
Effect themes apply to several types of drawings that PowerPoint can construct, including SmartArt, charts, and drawn lines and shapes. They make the surfaces of objects formatted with 3-D attributes look like different textures (more or less shiny-looking, colors more or less deep, and so on).
To change the effect theme, follow these steps:
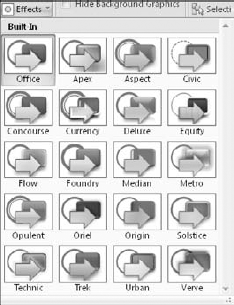
On the Design tab, click Effects. A gallery of effect themes opens.
(Optional) Point to a theme and observe the change on the slide behind the list. (This works only if you have an object on that slide that is affected by the effect theme; see the sidebar "Setting Up a Graphic on Which to Test Effect Themes" to set up such an object.)
Click the desired effect theme. See figure 5.10.

You can define your own custom color themes and font themes, and save them for reuse in other presentations. By default these are saved in the personal folders for the logged-in user on the local PC, and they remain available to that user regardless of the theme or template in use.
These custom color and font themes are also included if you save the overall theme as a separate theme file (.thmx), as you will learn to do later in this chapter, so that you can take those settings to another PC or send them to some other user.
A custom color theme defines specific colors for each of the 12 color placeholders (including the 2 that you can't directly use — the ones for hyperlinks). To create a custom color theme, first apply a theme to the current presentation that is as close as possible to the theme you want. This makes it easier because you have to redefine fewer placeholders. Then follow these steps:
On the Design tab, open the Colors list and choose Create New Theme Colors. The Create New Theme Colors dialog box opens.
Type a name for the new color theme in the Name box, replacing the default name (Custom 1, or other number if there is already a Custom 1).
Click a color placeholder and open its menu. See figure 5.11.
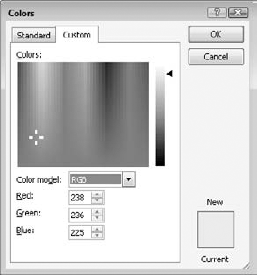
Click a color. Alternatively, you can click More Colors, select a color from the Colors dialog box (figure 5.12), and click OK. The Colors dialog box has two tabs: The Standard tab has color swatches, and the Custom tab enables you to define a color numerically by its RGB (Red Green Blue) or HSL (Hue Saturation Lightness).
(Optional) Click the Preview button to see the effect of the change on the current slide.
Redefine any other colors as needed.
Click Save. The color scheme is saved, and now appears at the top of the Colors gallery, in the Custom area.

A custom color scheme is available only to the currently logged-in user on the PC on which it is created. If you want to share it with another user on the same PC, you can copy it into his or her user folder:
In Windows Vista:
C:UsersusernameAppDataRoamingMicrosoftTemplatesDocument ThemesTheme Colors
where username is that user's login name.
In Windows XP:
C:Documents and SettingsusernameApplication DataMicrosoftTemplatesDocument ThemesTheme Colors.
The default color themes are located in:
C:Program FilesMicrosoftOfficeDocument Themes 12Theme Colors regardless of the operating system version.
Another way to share a custom color theme is to create the new color theme and then save the (overall) theme to a theme file (.thmx). See "Creating a New Theme" later in this chapter. The resulting theme file will contain the custom colors, as well as the usual theme content.
A custom color theme remains until you delete it from the Theme Colors folder for your user profile. To delete a theme color, use Windows Explorer to navigate to this folder:
C:UsersusernameAppDataRoamingMicrosoftTemplatesDocument ThemesTheme Colors
where username is your login name, and you'll find an .xml file for each of your custom color themes. Delete the files for the color themes that you want to delete. You can also right-click the color theme in the Gallery, click Edit, and then click the Delete button in the Edit Theme Colors dialog box.
Tip
If you don't want to delete a custom color theme, but you also don't want it showing up on your Colors menu in PowerPoint all the time, move the file to a folder outside of the Document Themes folder hierarchy. For example, create an Unused Themes folder on your hard disk and move it there until you need it. When you want to use the custom color theme again, move the file back to its original location
If you don't want to leave PowerPoint to delete the color theme, you can take advantage of the fact that you can use most dialog boxes in PowerPoint that save or open files to manage files in general. Follow these steps:
Open any dialog box that saves or opens files. For example, on the Design tab, open the Themes gallery and choose Browse for Themes.
Navigate to the location of the color themes:
C:UsersusernameAppDataRoamingMicrosoftTemplatesDocument ThemesTheme Colors
Open the File Type list and choose All Files so that all of the files appear.
Select the file for the color theme that you want to delete and press the Delete key on the keyboard.
Click Cancel to close the dialog box.
You can create your own custom font themes, which are then available in all presentations. A custom font theme defines two fonts: one for headings and one for body text. To create a custom font theme, follow these steps:
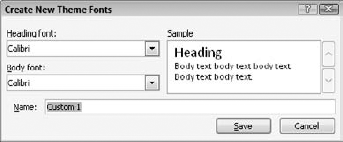
On the Design tab, open the Fonts list and choose Create New Theme Fonts. The Create New Theme Fonts dialog box opens, as shown in figure 5.13.
Type a name for the new font theme in the Name box, replacing the default text there.
Open the Heading Font drop-down list and select the desired font for headings.
Open the Body Font drop-down list and select the desired font for body text.
Click Save. The font theme is saved, and now appears at the top of the Fonts list, in the Custom area.
A custom font theme is available only to the currently logged-in user on the PC on which it is created. If you want to share it with another user on the same PC, you can copy it into his or her user folder:
In Windows Vista:
C:UsersusernameAppDataRoamingMicrosoftTemplatesDocument ThemesTheme Fonts
where username is that user's login name.
In Windows XP:
C:Documents and SettingsusernameApplication DataMicrosoftTemplatesDocument ThemesTheme Fonts
You can also share a custom font theme by creating it and then saving the (overall) theme as a new theme (.thmx) file. Then you can share that theme file with others via e-mail, disk, or other distribution methods.
Note
To save your theme as a new theme, see the section "Creating a New Theme."
A custom font theme remains until you delete it from the Theme Fonts folder for your user profile. To delete a font theme, use Windows Explorer to navigate to this folder:
In Windows Vista:
C:UsersusernameAppDataRoamingMicrosoftTemplatesDocument ThemesTheme Fonts
In Windows XP:
C:Documents and SettingsusernameApplication DataMicrosoftTemplatesDocument ThemesTheme Fonts
where username is your login name, and you'll find an .xml file for each of your custom font themes. Delete the files for the font themes that you want to delete.
You can also delete it from within PowerPoint by browsing for the file with any dialog box that saves or opens files, or by right-clicking the font theme in the Gallery, clicking Edit, and then clicking Delete in the Edit Theme Fonts dialog box.
Note
Deleting a custom font theme from a dialog box is essentially the same as deleting a custom color theme. See the section "Deleting a Custom Color Theme" for more details.
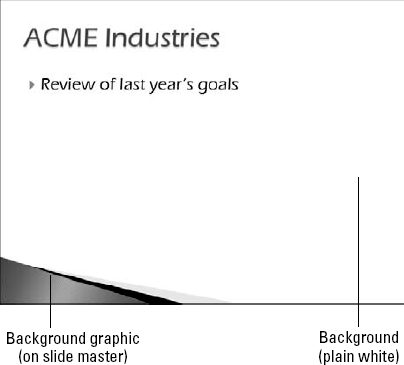
The background is the color, texture, pattern, or image that is applied to the entire slide (or slide master), on which everything else sits. By its very definition, it applies to the entire surface of the slide; you cannot have a partial background. However, you can have a background graphic overlaid on top of the background. A background graphic is a graphic image placed on the slide master that complements and works with the background.
It's important to understand the distinction between a background and a background graphic because even though most themes contain both, they are set up differently, and making the change you want to the overall appearance of your slides often involves changing both. For example, figure 5.15 shows the Concourse theme applied to a slide master. The slide background is pure white, and a blue and black background graphic is overlaid on it.
Most themes consist of both background formatting (even if it is just a solid color) and a background graphic. The background graphics included in the built-in themes in PowerPoint are unique to those themes, and not available as separate graphics outside of them. So, for example, if you want the colored swoop shown in figure 5.14, the only way to get it is to apply the Concourse theme. Because the decorative background graphics are unique to each theme, many people choose a theme based on the desired background graphic, and then customize the slide masters appearance to modify the theme as needed.
Tip
EXPERT TIP To use a background graphic from one template with the look-and-feel of another, apply the first theme to a slide, and then in Slide Master view copy the background graphic to the Clipboard. Then apply the second theme and paste the graphic from the clipboard into the slide master.
Background styles are preset background formats that come with the built-in themes in PowerPoint. Depending on the theme you apply, different background styles are available. These background styles all use the color placeholders from the theme, so their color offerings change depending on the color theme applied.
To apply a background style, follow these steps:
(Optional) To affect only certain slides, select them.
On the Design tab, click Background Styles. A gallery of styles appears. See figure 5.15.
Click the desired style to apply it to the entire presentation. Alternatively, you can right-click the desired style and choose Apply to Selected Slides.
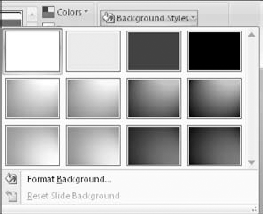
You cannot customize background styles or add your own custom background styles; there are always 12 of them, and they are always determined by the theme. If you need a different background, you can choose Format Backgrounds and then customize the background settings as described in the following sections.
A custom background fill can include solid colors, gradients, textures, or graphics. Because Chapter 10 covers these in more detail, this section covers how to specify your own background fill, which involves the following steps:
On the Design tab, click Background Styles. The Background Styles gallery opens.
Click Format Background. The Format Background dialog box opens.
Choose the option button that best describes the type of fill you want. See figure 5.16.
Set the options for the fill type that you chose. For example, in figure 5.16, click the Color button and choose a solid color. The changes you make apply immediately.
Note
See Chapter 10 for details about these fill types and how to configure their options.
(Optional) To apply the change to all slides, click Apply to All. Otherwise the change will apply only to the slides you selected in step 1.
(Optional) To apply a different background to some other slides, select them and repeat steps 4 and 5. The Format Background dialog box is nonmodal, so its changes are applied immediately and you can select things in the presentation file without closing it.
Click Close to exit the dialog box.

In the preceding steps, one of the fill types you could choose was Picture or Texture Fill. This type of fill covers the entire background with the picture or texture that you specify.
This is not a background graphic, however. A background graphic is an object or a picture overlaid on top of the background on the slide master. It complements the background, and it might or might not cover the entire background.
Note
Some theme-provided background graphics actually consist of multiple shapes grouped together. You can ungroup them, as shown in Chapter 10, so that you can modify or remove only a portion of the background graphic.
Sometimes a background graphic can get in the way of the slides content. For example, on a slide that contains a large chart or diagram, a background graphic around the border of the slide can overlap the content. You don't have to delete the background graphic entirely to solve this problem; you can turn it off for individual slides. To hide the background graphics on one or more slides, follow these steps:
Select the slide(s) to affect.
On the Design tab, mark the Hide Background Graphics check box.
Clear the check box to redisplay the background graphics later as needed.
The background graphics reside on the slide master, so to remove one, you must use Slide Master view. Follow these steps:
On the View tab, click Slide Master. Slide Master view opens.
Select the slide master or layout master that contains the graphic to delete.
Click the background graphic to select it.
Press the Delete key on the keyboard.
Tip
Some background graphics are on the slide master itself, and others are on individual layout masters. The background graphics on the slide master trickle down to each of its layout masters, but can't be selected/deleted from the individual layout masters.
To use a background graphic only on certain layouts, cut it from the slide master to the Clipboard (Ctrl+X), and then paste it individually onto each layout master desired (Ctrl+V). Alternatively, turn on the background graphic for the slide master and then use Hide Background Graphics on individual layout masters that should not contain it.
You can add your own background graphics, either to the slide master or to individual layout masters. This works just like adding any other graphic to a slide (see Chapter 13) except you add it to the master instead of to an individual slide.
Inserting pictures is covered in greater detail in Chapter 13, but here are the basic steps for adding a background graphic:
Display the slide master or layout master on which you want to place the background graphic.
Do any of the following:
On the Insert tab, click Picture. Select a picture to insert and click Open.
On the Insert tab, click Clip Art. Search for a piece of clip art to use, and insert it on the master.
In any application (including PowerPoint), copy any graphic to the Clipboard by pressing Ctrl+C; then display the master and paste the graphic by pressing Ctrl+V.
Tip
Most of the background graphics that come with the built-in themes are either semi-transparent or use one of the placeholder colors for their fill. Therefore changing the color theme also changes the color of the background graphic. Keep that in mind if you are creating your own background graphics; it's better to use theme colors or transparency than to use fixed colors that might clash with a color theme that you later apply.
As a review, to enter Slide Master view, display the View tab and click Slide Master. One or more slide masters appear in the left pane, with its own subordinate layout masters. A slide master has five preset placeholders that you can individually remove or move around. figure 5.18 points them out on a slide master with the Concourse theme applied, but they might be in different locations in other themes:
These elements are all enabled by default, but the Footer is empty by default so it is not visible on individual slides unless you type some text into it in Slide Master view or add text to it using Insert Header and Footer. Each of these elements trickles down to the layout masters beneath it, so formatting, moving, or deleting one of these elements from the slide master also changes it on each of the layouts. See figure 5.17 for an example of the various placeholders.

You can format the text in each of the placeholders on the slide master just like any regular text, and that formatting carries over to all slides and layouts based on it. For example, if you format the code in the Slide Number box with a certain font and size, it will appear that way on every slide that uses that slide master. You can also format the placeholder boxes just like any other text boxes. For example, you can add a border around the page numbers box, and/or fill its background with color.
Tip
If you want to make all the text in a heading all-caps or small-caps, use the Font dialog box. From the Home tab, click the dialog box launcher in the Font group and mark the Small Caps or All Caps check box there.
Note
See Chapters 6 and 7 to learn how to format text. See Chapter 7 for more information about formatting text boxes.
You can move each of the placeholders on the slide master or an individual layout master. For example, you might decide you want the Footer box at the top of the slide rather than the bottom, or that you want to center the slide number at the bottom of the slide. To move a placeholder, click it to select it and then drag its border, just as you did with text boxes in Chapter 4.
To delete one of the placeholders on the slide master, select its box and press the Delete key on the keyboard. Deleting it from the slide master deletes it from all of the associated layouts as well.
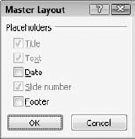
To restore deleted placeholders on the slide master, follow these steps:
In Slide Master view, select the slide master (not a layout).
On the Slide Master tab, click Slide Layout. The Master Layout dialog box opens. Check boxes for already displayed elements are marked and unavailable. Check boxes for previously deleted elements are available as shown in figure 5.18.
Mark the check boxes for the elements that you want to restore.
Click OK.
Warning
Restored placeholders might not appear in the same spots as they did originally; you might need to move them. To put the placeholders back to their original locations, reapply the theme from the Themes button on the Slide Master tab.
Here are some more details you should remember about deleting and restoring:
On an individual layout master, you can quickly delete and restore the Title and Footer placeholders by marking or clearing the Title and Footers check boxes on the Slide Master tab. The "footer" that this check box refers to is actually all three of the bottom-of-the-slide elements: the actual footer, the date box, and the slide number box.
You can also individually delete the placeholders from a layout master, the same as on a slide master. Just select a placeholder box and press the Delete key.
You can restore all of the placeholders, except Text, by marking the aforementioned check boxes on the Slide Master tab. Whenever any of the three footer boxes are missing, the Footers check box becomes cleared, and you can restore the missing box(es) by re-selecting the check box.
You cannot restore the Text placeholder, however, on an individual layout master. You must recreate it with the Insert Placeholder command.
Note
For more on the Insert Placeholder command, see the section, "Customizing and Creating Layouts."
Even though the placeholders for Date, Number, and Footer might appear on the slide master, they do not appear on the actual slides in the presentation unless you enable them. This might seem counterintuitive at first, but it's actually a benefit. PowerPoint enables you to turn the date, number, and footer on and off without having to delete, recreate, or reformat their placeholders. You can decide at the last minute whether you want them to display or not, and you can choose differently for different audiences and situations.
All three areas are controlled from the Header and Footer dialog box. To open it, from the Insert tab click Header and Footer. (Clicking Date and Time or clicking Number opens the same dialog box.) Then on the Slide tab, mark the check boxes for each of the three elements you want to use. See figure 5.19.

You can set Date and Time either to Update Automatically or to Fixed:
Update Automatically pulls the current date from the computer's clock and formats it in whatever format you choose from the drop-down list. You can also select a language and a Calendar Type (although unless you are presenting in some other country than the one for which your version of PowerPoint was developed, this is probably not an issue.)
Fixed prints whatever you enter in the Fixed text box. When Fixed is enabled, it defaults to today's date in the m/dd/yyyy format.
Tip
I In addition to (or instead of) placing the date on each slide, you can insert an individual instance of the current date or time on a slide, perhaps as part of a sentence. To do so, position the insertion point inside a text box or placeholder and then on the Insert tab, click Date and Time. Select the format you want from the dialog box that appears and click OK.
This option shows the slide number on each slide, wherever the Number placeholder is positioned. You can format the Number placeholder on the master slide with the desired font, size, and other text attributes
Note
See Chapter 6 for more on formatting.
By default, slide numbering starts with 1. You can start with some other number if you like by following these steps:
Close Slide Master view if it is open. To do so, click the Close button on the Slide Master tab.
On the Design tab, click the dialog box launcher in the Page Setup group. The Page Setup dialog box opens.
In the Number Slides From box, increment the number to the desired starting number.
Click OK.
Tip
You can insert the slide number on an individual slide, either instead of or in addition to the numbering on the Slide Master. Position the insertion point, and then on the Insert tab, click Slide Number. If you are in Slide master view, this places a code on the Slide Master for the slide number that looks like this: <#>. If you are on an individual slide, it inserts the same code but the code itself is hidden and the actual number appears.
The footer is blank by default. Mark the Footer check box, and then enter the desired text in the Footer box. You can then format the footer text from the slide master as you would any other text (see Chapter 6). You can also enter the footer text in the Header and Footer dialog box's Footer text box.
This check box in the Header and Footer dialog box suppresses the date/time, page number, and footer on slides that use the Title Slide layout. Many people like to hide those elements on title slides for a cleaner look and to avoid repeated information (for example, if the current date appears in the subtitle box on the title slide).
In addition to customizing the slide master (including working with its preset placeholder boxes, as you just learned), you can fully customize the individual layout masters. This very useful capability is brand new in PowerPoint 2007.
A layout master takes some of its settings from the slide master with which it is associated. For example, by default it takes its background, fonts, color scheme, and preset placeholder positioning from the slide master. But it also can be individually customized; you can override the slide master's choices for background, colors, and fonts, and you can create, modify, and delete various types of content placeholders.
There are seven basic types of content you can insert on a PowerPoint slide: Text, Picture, Chart, Table, Diagram, Media (video or sound), and Clip Art. A placeholder on a slide master or layout master can specify one of these types of content that it will accept, or you can designate it as a Content placeholder, such that it will accept any of the seven types. Most of the layouts that PowerPoint generates automatically for its themes use the Content placeholder type because it offers the most flexibility. By making all placeholders Content, PowerPoint can get by with fewer separate layout masters because users will choose the desired layout based on the positioning of the placeholders, not their types.
A Content placeholder appears as a text placeholder with a small palette of icons in the center, one for each of the content types. Each content placeholder can hold only one type of content at a time, so as soon as the user types some text into the content placeholder or clicks one of the icons in the palette and inserts some content, the placeholder becomes locked into that one type of content until the content is deleted from it.
Note
On a slide that contains a placeholder that contains some content (any type), selecting the placeholder and pressing Delete removes the content. To remove the placeholder itself from the layout, select the empty placeholder and press Delete. If you then want to restore the placeholder, reapply the slide layout to the slide.
You can move and resize a placeholder on a layout master as you would any other object. Drag a selection handle on the frame to resize it, or drag the border of the frame (not on a selection handle) to move it.
Note
The Content placeholders were identified back in Chapter 4 in figure 4.12. You can also see Chapter 4 for more on moving and resizing an object.
You can add a placeholder to either the slide master or to an individual layout master. If you add it to the slide master, it will repeat on every layout master, it's more common to add placeholders to individual layouts.
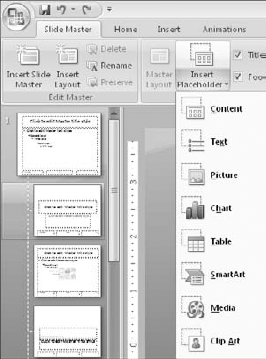
To add a placeholder, follow these steps:
In Slide Master view, select the layout master (or slide master) to affect.
On the Slide Master tab, click the bottom part of the Insert Placeholder button to open its menu.
Click Content to insert a generic placeholder, or click one of the specific content types. See figure 5.20. The mouse pointer becomes a cross-hair.
Drag on the slide to draw the placeholder box of the size and position desired. A blue box appears showing where the placeholder box will go. When you release the mouse button, the new placeholder appears on the slide.
To delete a custom placeholder, select it and press the Delete key, just as you learned to do earlier with the preset placeholders.
The difference between custom and preset placeholders is not in the deleting, but rather in the restoring. You can immediately undo a deletion with Ctrl+Z, but you cannot otherwise restore a deleted custom placeholder from a layout master. PowerPoint retains no memory of the content placeholders on individual layouts. Therefore, you must recreate any content placeholders that you have accidentally deleted.
Tip
To restore one of the built-in layouts, copy it from another slide master. See the sections "Duplicating and Deleting Layouts," and "Copying Layouts Between Slide Masters" later in this chapter.
You can apply formatting to a layout in almost exactly the same ways as you apply formatting to a regular slide or to a slide master. Only a few things are off-limits:
You cannot apply a different theme to one layout. To use a different theme for some slides, create a whole new slide master (covered later in this chapter).
You cannot apply a different font, color, or effect theme, because these are related to the main theme and the slide master. If you need different fonts or colors on a certain layout, specify fixed font formatting for the text placeholders in that layout, or specify fixed color choices for objects.
Note
For more on slide masters, see the section "Managing Slide Masters." For more on formatting text placeholders, see Chapter 6. For more on specifying colors for objects, see Chapter 10.
You cannot delete a background graphic that is inherited from the slide master; if you want it only on certain layouts, delete it from the slide master, and then paste it individually onto each layout desired, or select Hide Background Graphics from the Slide Master tab and then deselect Hide Background Graphics from certain layouts.
You cannot change the slide orientation (portrait or landscape) or the slide size.
So what can you do to an individual layout, then? Plenty. You can do the following:
Apply a different background.
Reposition, resize, or delete preset placeholders inherited from the slide master.
Apply fixed formatting to text placeholders, including different fonts, sizes, colors, attributes, indents, and alignment.
Apply fixed formatting to any placeholder box, including different fill and border styles and colors.
Create manual text boxes and type any text you like into them. You might do this to include an explanatory note on certain slide layouts, for example.
Insert pictures or clip art that should repeat on each slide that uses a certain layout.
In addition to modifying the existing layouts, you can create your own brand-new layouts, defining the exact placeholders you want. To create a new layout, follow these steps:
From Slide Master view, click the slide master with which to associate the new layout.
Click Insert Layout. A new layout appears. Each new layout you create starts with preset placeholders inherited from the slide master for Title, Footer, Date, and Slide Number.
(Optional) Delete any of the preset placeholders that you don't want.
Insert new placeholders as needed.
(Optional) Name the layout.
Note
To insert a placeholder, see the section "Adding a Custom Placeholder" earlier in the chapter. To name the layout, see the next section "Renaming a Layout."
Note
The new layout is part of the slide master, but not part of the theme. The theme is applied to the slide master, but at this point their relationship ends; and changes that you make to the slide master do not affect the theme. To save your custom layout(s), you have two choices: You can save the presentation as a template, or you can save the theme as a separate file. You learn more about saving themes in "Managing Themes" later in this chapter.
Layout names can help you determine the purpose of a layout if it is not obvious from viewing its thumbnail image.
To change the name of a layout, or to assign a name to a new layout you've created, follow these steps:
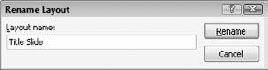
In Slide Master view, right-click the layout and choose Rename Layout. The Rename Layout dialog box opens.
Type a new name for the layout, replacing the existing name. See figure 5.21.
Click Rename.
You might want to copy a layout to get a head start on creating a new one. To copy a layout, right-click the layout in Slide Master view and choose Duplicate Layout. A copy of the layout appears below the original.
If you are never going to use a certain layout, you might as well delete it; every layout you can delete makes the file a little bit smaller. To delete a layout, right-click the layout in Slide Master view and choose Delete Layout.
When you create additional slide masters in the presentation, any custom layouts you've created for the existing slide masters do not carry over. You must manually copy them to the new slide master.
To copy a layout from one slide master to another, follow these steps:
In Slide Master view, select the layout to be copied.
Press Ctrl+C.
Select the slide master under which you want to place the copy.
Press Ctrl+V
You can also copy layouts between slide masters in different presentations. To do so, open both presentation files, and then perform the above steps. The only difference is that after step 2, you must switch to the other presentations Slide Master view.
Lets review the relationship one more time between slide masters and themes. A theme is a set of formatting specs. Themes are not applied directly to slides — they are applied to slide masters, which are then in turn applied to slides. The slide masters exist within the presentation file itself. You can change them by applying different themes, but they are essentially "built in" to the presentation file.
When you change to a different theme for all of the slides in the presentation, your slide master changes its appearance. You can tweak that appearance in Slide Master view. As long as all of the slides in the presentation use the same theme, you need only one slide master. However, if you apply a different theme to some of your slides, you need another master, because a master can have only one theme applied to it at a time. PowerPoint automatically creates the additional master(s) for you, and they are all available for editing in Slide Master view.
If you later reapply a single theme to all of the slides in the presentation, you do not need multiple masters anymore, so the unused one is automatically deleted. In addition to all this automatic creation and deletion of slide masters, you can also manually create and delete slide masters on your own. Any slide masters that you create manually are automatically preserved, even if they aren't always in use. You must manually delete them if you don't want them anymore.
In the following sections, you learn how to create and delete slide masters manually, and how to rename them. You also learn how to lock one of the automatically created slide masters so that PowerPoint does not delete it if it falls out of use.
To create another slide master, click Insert Slide Master on the Slide Master tab. It appears below the existing slide master(s) in the left pane of Slide Master view. From there, just start customizing it. You can apply a theme to it, modify its layouts and placeholders, and all the usual things you can do to a slide master. Another way to create a new slide master is to duplicate an existing one. To do this, right-click the slide master and choose Duplicate Master.
To delete a slide master, select it in Slide Master view (make sure you select the slide master itself, not just one of its layouts) and press the Delete key. If any of that slide masters layouts were applied to any slides in the presentation, those slides automatically convert to the default slide master's equivalent layout. If no exact layout match is found, PowerPoint does its best: It uses its default Title and Content layout and includes any extra content as orphaned items.
Slide master names appear as category headings on the Layout list as you are selecting layouts. For example, in figure 5.22, the slide master names are Faithe and Concourse.
To rename a slide master, follow these steps:
In Slide Master view, right-click the slide master and choose Rename Master. The Rename Master dialog box opens.
Type a new name for the master, replacing the existing name.
Click Rename.
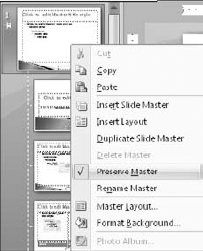
Unless you have created the slide master yourself, it is temporary. Slide masters come and go as needed, as you format slides with various themes. To lock a slide master so that it doesn't disappear when no slides are using it, right-click the slide master and choose Preserve Master. A check mark appears next to Preserve Master on its right-click menu, indicating it is saved. To unpreserve it, select the command again to toggle the check mark off. See figure 5.23.
As you learned earlier in the chapter, themes are applied to slide masters to create the background, color, font, and effect formatting for a presentation. Some themes are built into PowerPoint, and you can also create and save your own themes as separate files and apply them to other presentations or even to other Office documents, such as in Word and Excel. In this section you learn how to create new themes, manage theme files, and apply themes across multiple presentations.
To create a new theme, first format a slide master exactly the way you want, including any custom layouts, backgrounds, colors, and font themes. Then save the slide masters formatting as a new theme by following these steps:
On the Slide Master or the Design tab, click Themes, and click Save Current Theme. The Save Current Theme dialog box opens.
The default location shown in the Save Current Theme dialog box under Windows Vista is C:UsersusernameAppDataRoamingMicrosoftTemplatesDocument Themes.
For Windows XP, it is C:Documents and SettingsusernameApplication DataMicrosoftTemplatesDocument Themes.
Type a name for the theme file in the File Name text box.
Click Save. The new theme is saved to your hard disk.
The new theme is now available from the Themes buttons menu in all presentations you create while logged in as the same user on the same PC. All of its formatting is available, including any custom color or font themes it includes.
Tip
As noted earlier, if the saved theme includes any custom layouts, PowerPoint does not make them available automatically when you apply the theme to an existing presentation. If you start a new presentation based on the theme, though, they are available. To start a new presentation based on a theme, open the theme file (Office
You can rename a theme file by renaming the .thmx file from Windows Explorer, outside of PowerPoint. You can also rename a theme file from inside PowerPoint by using any dialog box that saves or opens files. For example, to use the Choose Theme or Themed Document dialog box to rename a theme, follow these steps:
From the Design or Slide Master tab, click Themes, and choose Browse for Themes. The Choose Theme or Themed Document dialog box opens.
Navigate to the folder containing the theme file to rename.
By default, theme files are stored under Windows Vista in: C:UsersusernameAppDataRoamingMicrosoftTemplatesDocument Themes.
For Windows XP, it is C:Documents and SettingsusernameApplication DataMicrosoft TemplatesDocument Themes.
Type the new name for the theme and press Enter.
Click Cancel to close the dialog box.
A custom theme file continues appearing on the Themes buttons menu indefinitely. If you want to remove it from there, you must delete it from the Document Themes folder, or move it to some other location for storage. To delete a theme, follow these steps:
From the Design or Slide Master tab, click Themes, and choose Browse for Themes. The Choose Theme or Themed Document dialog box opens.
Navigate to the folder containing the theme files:
In Windows Vista:
C:UsersusernameAppDataRoamingMicrosoftTemplatesDocument Themes.
In Windows XP: C:Documents and SettingsusernameApplication DataMicrosoftTemplatesDocument Themes.
Right-click the theme file and choose Delete.
At the Delete File confirmation box, click Yes.
Click Cancel to close the dialog box.
A presentation file "contains" themes in that the themes are applied to its slide masters. (That's how a template contains themes too.) As you learned earlier, you can preserve a slide master in Slide Master view so that it doesn't get deleted automatically when there are no slides based on it; by creating new slide masters, applying themes to them, and then preserving them, you can create a whole library of themes in a single presentation or template file. Then to make this library of themes available in another presentation, you simply base the new presentation on that existing presentation (or template).
However, if you did not initially base the new presentation on the template or presentation that contains the theme you want, you can apply the theme from it after-the-fact. One way to do this is to copy-and-paste (or drag-and-drop) the slide master from one file's Slide Master view to the other's.
Follow these steps to copy a slide master (and thereby copy its theme) to another presentation:
Open both presentations.
In the presentation that contains the theme, enter Slide Master view (View
Select the slide master (top slide in the left pane) and press Ctrl+C to copy it.
Switch to the other presentation (View
Enter Slide Master view (View
Press Ctrl+V to paste the slide master (and its associated theme and layouts).
In this chapter you learned how themes and slide masters make it easy to apply consistent formatting in a presentation, and how layout masters are associated with slide masters and provide consistent layouts for the slides based on them. You learned how to create, edit, rename, and delete themes and layouts, and how to copy themes between presentations.
Now that you know how to format entire presentations using themes, you're ready to start learning how to make exceptions to the formatting rules that the themes impose. In the next chapter you will learn how to format text in PowerPoint, and apply different fonts, sizes, attributes, and special effects. You can use this knowledge to make strategic changes to the text placeholders on slide masters to further customize your themes, or you can make changes to text on individual slides on a case-by-case basis to make certain slides stand out from the rest.