Whether you're putting together a slide show to display your vacation photos or adding photos of industrial products to a business presentation, PowerPoint has the tools and capabilities you need. And with the new Picture Styles feature in PowerPoint 2007, it has never been easier to give those photos professional-looking frames, shadows, and other effects.
In this chapter you'll learn the ins and outs of using photographs in a PowerPoint presentation, including tips and tricks for preparing them beforehand, compressing them so they take up less disk space, and exporting pictures out of PowerPoint so you can save them separately.
There are two kinds of graphics in the computer world: vector and raster. As you learned earlier in the book, vector graphics (clip art, drawn lines and shapes, and so on) are created with mathematical formulas. Some of the advantages of vector graphics are their small file size and the fact that they can be resized without losing any quality. The main disadvantage of a vector graphic is that it doesn't look "real." Even when an expert artist draws a vector graphic, you can still tell that it's a drawing, not a photograph. For example, perhaps you've seenthe game The Sims? Those characters and objects are 3-D vector graphics. They look pretty good but there's no way you would mistake them for real people and objects.
In this chapter, you'll be working with raster graphics. A raster graphic is made up of a very fine grid of individual colored pixels (dots). The grid is sometimes called a bitmap. Each pixel has a unique numeric value representing its color. figure 13.1 shows a close-up of a raster image. You can create raster graphics from scratch with a "paint" program on a computer, but a more common way to acquire a raster graphic is by using a scanner or digital camera as an input device.
Note
The term bitmap is sometimes used to refer generically to any raster graphic, but it is also a specific file format for raster graphics, with a BMP extension. This is the default format for the Paint program that comes with Windows XP and Windows XP desktop wallpaper.
Because there are so many individual pixels and each one must be represented numerically raster graphics are much larger than vector graphics. They take longer to load into the PC's memory take up more space when you store them as separate files on disk, and make your PowerPoint presentation file much larger. You can compress a raster graphic so that it takes up less space on disk, but the quality may suffer. Therefore, it's best to use vector graphics when you want simple lines, shapes, or cartoons and reserve raster graphics for situations where you need photographic quality.
The following sections explain some of the technical specifications behind raster graphics; you'll need this information to make the right decisions about the way you capture the images with your scanner or digital camera, and the way you use them in PowerPoint.
The term resolution has two subtly different meanings. One is the size of an image, expressed in the number of pixels of width and height, such as 800x600. The other meaning is the number of pixels per inch when the image is printed, such as 100 dots per inch (dpi). The former meaning is used mostly when referring to images of fixed physical size, such as the display resolution of a monitor. In this book, the later meaning is mostly used.
If you know the resolution of the picture (that is, the number of pixels in it), and the resolution of the printer on which you will print it (for example, 300 dpi), you can figure out how large the picture will be in inches when you print it at its native size. Suppose you have a picture that is 900 pixels square, and you print it on a 300 dpi printer. This makes it 3 inches square on the printout.
When you acquire an image file from an outside source, such as downloading it from a Web site or getting it from a CD of artwork, its resolution has already been determined. Whoever created the file originally made that decision. For example, if the image was originally scanned on a scanner, whoever scanned it chose the scan resolution — that is, the dpi setting. That determined how many individual pixels each inch of the original picture would be carved up into. At a 100 dpi scan, each inch of the picture is represented by 100 pixels vertically and horizontally. At 300 dpi, each inch of the picture is broken down into three times that many.
If you want to make a graphic take up less disk space, you can use an image-editing program to change the image size, and/or you can crop off one or more sides of the image.
Warning
If you crop or decrease the size of an image in an image-editing program, save the changes under a different filename. Maintain the original image in case you ever need it for some other purpose. Decreasing the image resolution decreases its dpi setting, which decreases its quality. You might not notice any quality degradation on-screen, but you will probably notice a difference when you are printing the image at a large size. That's because the average monitor displays only 96 dpi, but the average printer prints at 600 dpi or higher.
PowerPoint slides do not usually need to be printed at a professional-quality resolution, so image quality on a PowerPoint printout is not usually an issue. However, if you use the picture for something else later, such as printing it as a full-page color image on photo paper, then a high dpi file can make a difference.
When you create an image file yourself by using a scanner, you choose the resolution, expressed in dpi, through the scanner software. For example, suppose you scan a 4-inch by 6-inch photo at 100 dpi. The scanner will break down each 1-inch section of the photo horizontally and vertically into 100 separate pieces and decide on a numeric value that best represents the color of each piece. The result is a total number of pixels of 4 x 100 x 6 x 100, or 240,000 pixels. Assuming each pixel requires 3 bytes of storage, the fill becomes approximately 720KB in size. The actual size varies slightly depending on the file format.
Now, suppose you scan the same photo at 200 dpi. The scanner breaks down each 1-inch section of the photo into 200 pieces, so that the result is 4 x 200 x 6 x 200, or 960,000 pixels. Assuming again that 1 pixel required 3 bytes for storage (24 bits), the file will be approximately 2.9MB in size. That's a big difference.
The higher the resolution in which you scan, the larger the file becomes, but the details of the scan also become finer. However, unless you are zooming in on the photo, you cannot tell a difference between 100 dpi and a higher resolution. That's because most computer monitors display at 96 dpi, so any resolution higher than that does not improve the output.
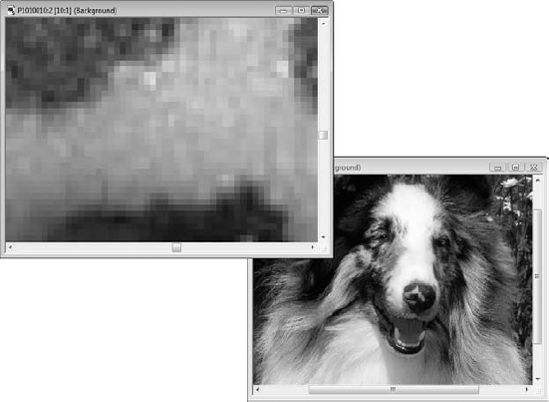
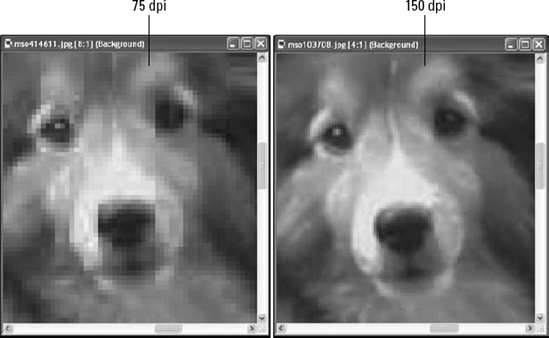
Let's look at an example. In figure 13.2 you can see two copies of an image open in a graphics program. The same photo was scanned at 75 dpi (left) and 150 dpi (right). However, the difference between them is not significant when the two images are placed on a PowerPoint slide, as shown in figure 13.3. The lower resolution image is at the top left, but there is no observable difference in the size at which they are being used.

Top-quality digital cameras today take very high resolution pictures, and are much higher than you will need for an on-screen PowerPoint presentation. At a typical size andmagnification, a high-resolution graphic file is overkill; it wastes disk space needlessly. Therefore, you may want to adjust the cameras image size so that it takes lower-resolution pictures for your PowerPoint show.
If you think you might want to use those same pictures for some other purpose in the future, such as printing them in a magazine or newsletter, then go ahead and take them with the cameras highest setting, but you should compress them in PowerPoint or resize them in a third-party image editing program. See the section "Compressing Images" later in this chapter to learn how.
Color depth is the number of bits required to describe the color of a single pixel in the image. For example, in 1-bit color, a single binary digit represents each pixel. Each pixel is either black (1) or white (0). In 4-bit color, there are 16 possible colors because there are 16 combinations of 1s and 0s in a four-digit binary number. In 8-bit color there are 256 combinations.
For most file formats, the highest number of colors you can have in an image is 16.7 million colors, which is 24-bit color (also called true color). It uses 8 bits each for Red, Green, and Blue.
There is also 32-bit color, which has the same number of colors as 24-bit, but adds 8 more bits for an Alpha channel. The Alpha channel describes the amount of transparency for each pixel. This is not so much an issue for single-layer graphics, but in multi-layer graphics, such as the ones you can create in high-end graphics programs like Photoshop, the extent to which a lower layer shows through an upper one is important.
Tip
For a great article on alpha channel usage in PowerPoint by Geetesh Bajaj, go to www.indezine.com/products/powerpoint/ppalpha.html.
A color depth of 48-bit is fairly new, and it's just like 24-bit color except it uses 16 rather than 8 bits to define each of the three channels: Red, Green, and Blue. It does not have an Alpha channel bit. Forty-eight-bit color depth is not really necessary, because the human eye cannot detect the small differences it introduces. Of the graphics formats that PowerPoint supports, only PNG and TIFF support 48-bit color depth.
Normally, you should not decrease the color depth of a photo to less than 24-bit unless there is a major issue with lack of disk space that you cannot resolve any other way. To decrease the color depth, you would need to open the graphic file in a third-party image-editing program, and use the command in that program for decreasing the number of colors. Before going through that, try compressing the images in the presentation (see the section "Compressing Images" later in the chapter) to see if that solves the problem.
Many scanners scan in JPEG format by default, but most also support TIF, and some also support other formats. Images you acquire from a digital camera are almost always JPEG. Images from other sources may be any of dozens of graphics formats, including PCX, BMP, GIF, or PNG.
Different graphic formats can vary tremendously in the size and quality of the image they produce. The main differentiators between formats are the color depth they support and the type of compression they use (which determines the file size).
Remember earlier how I explained that each pixel in a 24-bit image requires 3 bytes? (That's derived by dividing 24 by 8 because there are 8 bits in a byte.) Then you multiply that by the height, and then by the width, to determine the image size. Well, that formula was not completely accurate because it does not include compression. Compression is an algorithm (basically a math formula) that decreases the amount of space that the file takes up on the disk by storing the data about the pixels more compactly. A file format will have one of these three states in regard to compression:
No compression: The image is not compressed.
Lossless compression: The image is compressed, but the algorithm for doing so does not throw out any pixels so there is no loss of image quality when you resize the image.
Lossy compression: The image is compressed by recording less data about the pixels, so that when you resize the image there may be a loss of image quality.
Table 13.1 provides a brief guide to some of the most common graphics formats. Generally speaking, for most on-screen presentations JPEG should be your preferred choice for graphics because it is compact and Web-accessible (although PNG is also a good choice and uses lossless compression).
Table 13.1. Popular Graphics Formats
Extension | Pronunciation | Compression | Notes |
|---|---|---|---|
JPEG or JPG | "Jay-peg" | Yes | Stands for Joint Photographic Experts Group. Very small image size. Uses lossy compression. Common on the Web. Up to 24-bit. |
GIF | "gif" or "jif" | Yes | Stands for Graphic Interchange Format. Limited to 8-bit (256 color). Uses proprietary compression algorithm. Allows animated graphics, which are useful on the web. Color depth limitation makes this format unsuitable for photos. |
PNG | "ping" | Yes | Stands for Portable Network Graphic. An improvement on GIF. Up to 48-bit color depth. Lossless compression, but smaller file sizes than TIF. Public domain format. |
BMP | "B-M-P" or "bump" or "bitmap" | No | Default image type for Windows XP. Up to 24-bit color. Used for some Windows wallpaper and other Windows graphics. |
PCX | "P-C-X" | Yes | There are three versions: 0, 2, and 5. Use version 5 for 24-bit support. Originally introduced by a company called ZSoft; sometimes called ZSoft Paintbrush format. |
TIF or TIFF | "tiff" | Optional | Stands for Tagged Image Format. Supported by most scanners and some digital cameras. Up to 48-bit color. Uses lossless compression. Large file size but high quality. |
Tip
If you are not sure what format you will eventually use for an image, scan it in TIF format and keep the TIF copy on your hard disk. You can always save a copy in JPEG or other formats when you need them for specific projects. The TIF format's compression is lossless, so it results in a high-quality image.
Most of the choices you make regarding a raster image's resolution, color depth, and file type are done outside of PowerPoint. Consequently, by the time you're ready to put them into PowerPoint, the hard part is over.
Assuming you have already acquired the image, use the following steps to insert it into PowerPoint.
Display the slide on which you want to place the image.
If the slide has a content placeholder for Insert Picture from File, as in figure 13.4, click it. Otherwise, click Picture on the Insert tab. The Insert Picture dialog box opens.
Select the picture to import. See figure 13.5. You can switch the view by using the View (or Views) button in the dialog box to see thumbnails or details if either is effective in helping you determine which file is which.


Tip
If you have a lot of graphics in different formats, consider narrowing down the list that appears by selecting a specific file type from the file type list. By default it is set to All Pictures, as in figure 13.5.
If you have a sharp eye, you may have noticed that the Insert button in figure 13.5 has a dropdown list associated with it. That list has these choices:
Insert: The default, inserts the graphic but maintains no connection.
Link to File: Creates an OLE link to the file, but does not maintain a local copy of it in PowerPoint.
Insert and Link: Creates a link to the file, and also inserts a local copy of its current state, so if the linked copy is not available in the future, the local copy will still appear.
Use Link to File whenever you want to insert a pointer rather than the original. When the presentation opens, it pulls in the graphic from the disk. If the graphic is not available, it displays an empty frame with a red X in the corner in the graphics place. Using Link to File keeps the size of the original PowerPoint file very small because it doesn't actually contain the graphics — only links to them. However, if you move or delete the graphic, PowerPoint won't be able to find it anymore.
The important thing to know about this link in the Link to File feature is that it is not the same thing as an OLE link. This is not a dynamic link that you can manage. It is a much simpler link and much less flexible. You can't change the file location to which it is linked, for example; if the location of the graphic changes, you must delete it from PowerPoint and reinsert it.
Tip
If you are building a graphic-heavy presentation on an older computer, you might find that it takes a long time to move between slides and for each graphic to appear. You can take some of the hassle away by using Link to File instead of inserting the graphics. Then temporarily move the graphic files to a subfolder so PowerPoint can't find them. It displays the placeholders for the graphics on the appropriate slides, and the presentation file is much faster to page through and edit. Then when you are ready to finish up, close PowerPoint and move the graphics files back to their original locations so PowerPoint can find them again when you reopen the presentation file.
If you have a compatible scanner attached to your PC, you can scan a picture directly into the Clip Organizer (which you learned about in Chapter 12), and from there import it into PowerPoint. You can also use the scanners interface from outside of PowerPoint (and outside of the Clip Organizer).
Note
Earlier versions of PowerPoint had direct access to the Scanner and Camera Wizard in Windows from the Insert menu, but PowerPoint 2007 does not have this. The only way to access the Scanner and Camera Wizard in Office 2007 applications is via the Clip Organizer.
To scan an image from the Clip Organizer, follow these steps:
On the Insert tab, click Clip Art. The Clip Art task pane opens.
Click Organize Clips. The Clip Organizer window opens.
Choose File

Choose the scanner from the Device list, as shown in figure 13.6.
Choose a resolution: Web (low) or Print (high). Lower resolution means smaller file size and fewer pixels overall comprising the image. Low resolution is the best choice for onscreen presentations.
Click Insert to scan with the default settings, or click Custom Insert, make changes to the settings, and click Scan.

The Custom Insert option opens the full controls for the scanner. They vary a bit depending on the model; the box for an HP scanner is shown in figure 13.7.
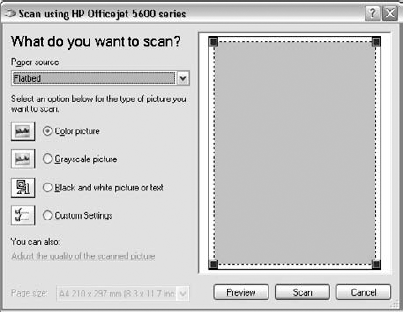
Here are some of the things you can do here:
Choose a scanning mode: Color Picture, Grayscale Picture, or Black and White Picture or Text. This option determines the color depth. Color is full 24-bit color. Grayscale is 256 shades of gray (8-bit, single color). Black and white is single-bit scanning that produces an extremely small file similar to a fax.
Preview the scan: Click the Preview button to do a test scan and then drag the black squares in the preview area to adjust what portion of the image is saved when you do the "real scan" by clicking the Scan button.
Choose a paper source: If your scanner has a document feeder, you have that choice on the Paper Source drop-down list in addition to Flatbed (the default).
Adjust the resolution, brightness, and contrast: Click the Adjust the Quality of the Scanned Picture hyperlink to open an Advanced Properties dialog box. From there you can drag the Brightness and Contrast sliders and choose a resolution setting (dots per inch). The default is 150 dpi.
Tip
The default setting of 150 dpi is appropriate in most cases where you are using the image at approximately the same size as the original, but if you are concerned about file size, you can reduce this to 100 dpi without a noticeable loss of image quality on-screen. If you plan on using the image at a large size, like full screen, and the image was originally a very small hard copy, then scan at a higher resolution.
There are a lot of ways to transfer images from a digital camera in Windows XP or Windows Vista. You can connect most cameras to the PC via a USB port and treat them as a removable drive, from which you can drag and drop pictures into a folder on your hard disk. You can also remove the memory card from the camera and use a card reader, and in some cases you can even insert a memory card into a printer and print the images directly.
With all of these methods available, inserting directly from the camera into the Clip Organizer is probably not your first choice. However, if you want to try it, use the same method as with the scanner. Then just follow the prompts to select and insert the picture.
Note
When you hear digital cameras referred to in megapixel that means a million pixels in total — the height multiplied by the width. For example, a 1,152 by 864-pixel image is approximately 1 megapixel (995,328 pixels, to be exact). High-end cameras are in the 8-megapixel or more range these days, which is overkill for use in a PowerPoint show. Such cameras have settings you can change that control the image size, though, so you can reduce the image size on the camera itself.
After placing a photo on a slide, you will probably need to adjust its size, and/or crop it, to make it fit in the allotted space the way you want it. The following sections explain these techniques.
Sizing a photo is just like sizing any other object. Drag its selection handles. Drag a corner to maintain the aspect ratio, or drag a side to distort it. (Distorting a photo is seldom a good idea, though, unless you're after some weird funhouse effect.)
You can also specify an exact size for a photo the same as with drawn objects. Right-click the photo and choose Size and Position to set a size in the Size and Position dialog box (see figure 13.8). Alternatively, you can display the Format tab, and then use the Height and Width boxes in the Size group.

The most straightforward way to specify the size is in inches in the Height and Width boxes, either in the dialog box or on the tab. These measurements correspond to the markers on the on-screen ruler in Normal view. The size of a slide varies depending on how you have it set up (by using the Page Setup tab), but an average slide size is 10 inches wide by 7.5 inches tall. You can also size the photo using the Scale controls in the Size and Position dialog box, in which you adjust the size based on a percentage of the original size.
Note
The Scale is based on the original size, not the current size. So, for example, if you set the Height and Width to 50%, close the dialog box, and then reopen it and set them each to 75%, the net result will be 75% of the original, not 75% of the 50%. You can override this by deselecting the Relative to Original Picture Size check box, however (see figure 13-8).
If you are setting up a presentation for the primary purpose of showing full-screen graphics, you can use the Best Scale for Slide Show check box (see figure 13.8). This enables you to choose a screen resolution, such as 640x480 or 800x600, and size the pictures so that they will show to the best advantage in that resolution. Choose the resolution that corresponds to the display setting on the PC on which you will show the presentation. To determine what the resolution is on the PC, right-click the Windows desktop, choose Properties, and then look up the resolution under Settings.
Tip
When possible, develop your presentation at the same Windows screen resolution as the PC on which you present the show. Many digital projectors display at 1024 x 768.
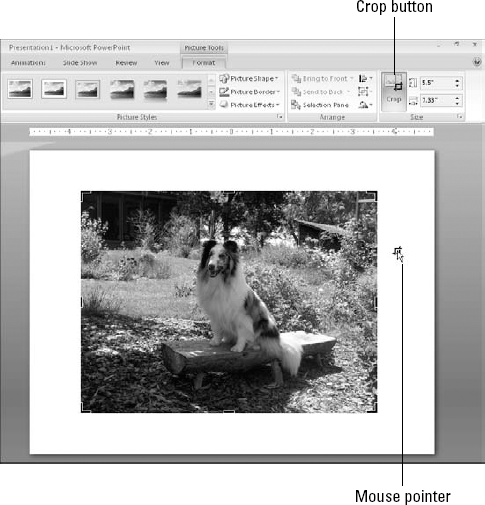
Cropping is for those times when you want only a part of the image. For example, you might have a great photo of a person or animal, but there is extraneous detail around it, as shown in figure 13.9. You can crop away all but the important object in the image with a cropping tool.
Tip
Here's something important to know: Cropping and sizing a picture in PowerPoint does not reduce the overall size of the PowerPoint presentation file. When you insert a picture, PowerPoint stores the whole thing at its original size and continues to store it that way regardless of any manipulations you perform on it within PowerPoint. That's why it's recommended throughout this chapter that you do any editing of the photo in a third-party image program before you import it into PowerPoint. However, there's a work-around. If you use the Compress Pictures option (covered later in this chapter), it discards any cropped portions of the images. That means the file size decreases with the cropping, and that you can't reverse the cropping later.
You can crop two sides at once by cropping at the corner of the image, or crop each side individually by cropping at the sides. To crop an image, do the following:
Select the image, so the Picture Tools Format tab becomes available.
Click the Crop button on the Picture Tools Format tab. Your mouse pointer changes to a cropping tool and crop marks appear on the picture (see figure 13.9).
Position the pointer over a side handle of the image frame, on a side where you want to cut some of the image off.
Drag the handle inward toward the center of the image until only the part of the image you want to keep is inside the thin line.
Repeat steps 3 and 4 for each side. Then click the Crop button again, or press Esc, to turn cropping off.
figure 13.10 shows the result of cropping the image from figure 13.9.
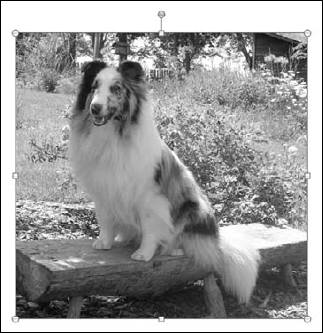
To undo a crop, reenter cropping mode by clicking the Crop button again, and then drag the side(s) back outward again. Or you can simply reset the photo, as described in the following section.
You can also crop "by the numbers" with the Crop settings in the Size and Position dialog box (see figure 13.8).
Warning
You cannot uncrop after compressing the picture (assuming you use the default compression options that include deleting cropped areas of pictures). By default, saving compresses and makes crops permanent, so be sure to undo any unwanted cropping before you save.
Once the picture is in PowerPoint, any manipulations you do to it are strictly on the surface. It changes how the picture appears on the slide, but it doesn't change how the picture is stored in PowerPoint. Consequently you can reset the picture back to its original settings at any time (provided you have not compressed the picture). This resetting also clears any changes you make to the images size, contrast, and brightness (which are discussed in the next section).
Resetting a photo is different depending on what aspects of it you want to reset:
If you want to reset its cropping and sizing, on the Picture Tools Format tab, click the dialog box launcher in the Size group and click the Reset button in the Size and Position dialog box.
If you want to reset its formatting, on the Picture Tools Format tab, click the Reset Picture button in the Adjust group.
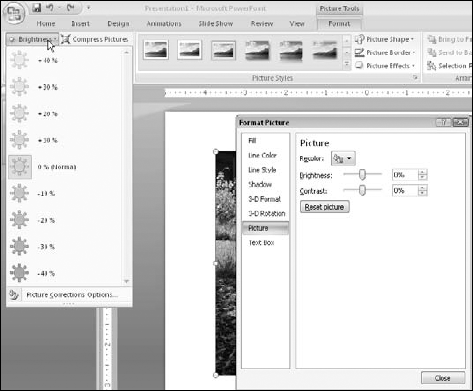
PowerPoint is not a very sophisticated photo editor, but it can do some very elementary things like increase or decrease a pictures brightness and contrast. The easiest way to access those controls is through the Brightness and Contrast drop-down lists on the Format tab. For example, figure 13.11 shows the Brightness settings. To choose a value other than the ones listed, click Picture Corrections Options to open the Format Picture dialog box, also shown in figure 13.11. From there you can enter an exact percentage or drag the Brightness and/or Contrast sliders.
The Transparent Color feature can be really useful, but not all pictures support it. It's available for bitmap images (including scans) and for some but not all clip art. For example, suppose you have a scanned photo of your CEO and you want to make the background transparent so it looks like his head is sitting right on the slide. This feature could help you out with that.
Why some clip art images but not others? An image can have only one color set to be transparent, and some clip art images already have their backgrounds set to be transparent. That's why those clips won't work with the Set Transparent Color feature. To check it out, first insert the picture on a slide. Then select the picture, and open the Recolor menu. If the Set Transparent Color option is available, you can set the transparent color by clicking that command, and then clicking the color that you want to make transparent on the picture. If the results are not what you expected, press Ctrl+Z or click the Undo button on the Quick Access Toolbar to choose a different color to be transparent.
If you set a color to transparent in PowerPoint, every instance of that color in that picture will become transparent. So if you have a picture of a man with a white shirt on a white background and choose to make white the transparent color (because you want to drop out the background), the man's shirt becomes transparent, too. Conversely, what looks like one color in a photo is not usually just one color. Think of a blue sky, for example. It probably consists of at least two dozen different shades of blue. If you try to make one of those shades of blue transparent using PowerPoint's transparency tool, you'll probably just end up with splotches of transparent areas.
So what's the solution? The best way to go is to use Alpha channels in a third-party image-editing program to create true transparency and save the image as TIF or PNG. (JPEG format does not support Alpha channels.)
Recoloring a picture is just like recoloring clip art, which is covered in Chapter 12. Here's a review.
Recoloring options are available from the Recolor button's drop-down list on the Format tab. There are four basic image modes (besides the default No Recolor), shown in the Color Modes section of figure 13.12.
Grayscale: Converts the image to a 256-color grayscale.
Sepia: Same as grayscale except it's browns, not blacks.
Washout: Sets the Brightness to 70% increase and the Contrast to 70% decrease. You can manually adjust those percentages from the Format Picture dialog box.
Black and White: Converts all colors to either black or white, whichever they are closest to.
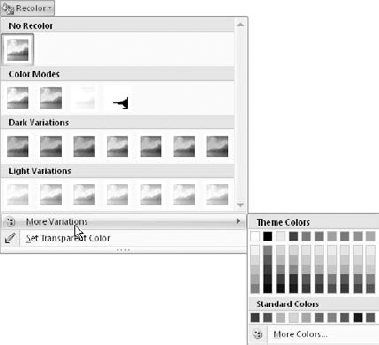
In addition to those basic modes, the following options that are new in PowerPoint 2007 apply a solid-color wash to the picture (such as Grayscale or Sepia but with the chosen color):
Dark Variations: These are deep color washes of the theme colors.
Light Variations: These are light color washes of the theme colors.
More Variations: This opens a Theme Colors palette, from which you can select light and dark tints of the themes or standard (fixed) colors. You can also choose More Colors to open a full Color dialog box for more fixed colors.
Having an image that is too large (that is, too high a dpi) is not a problem quality-wise. You can resize it in PowerPoint to make it as small as you like; just drag its selection handles. There will be no loss of quality as it gets smaller. However, as mentioned earlier in the chapter, having a picture that is much larger than necessary can increase the overall size of the PowerPoint file, which can become problematic if you plan to distribute the presentation on floppy disk or over the Internet.
To avoid problems with overly large graphic files, you can compress the images to reduce their resolution and remove any cropped portions. You can do this from within PowerPoint or with a third-party utility.
PowerPoint offers an image compression utility that compresses all of the pictures in the presentation in a single step and reduces their resolution to the amount needed for the type of output you specify (e-mail, Screen, or Print). To reduce resolution and compress images, do the following:
Click a picture, so that the Format tab appears.
Click the Compress Pictures button. The Compress Pictures dialog box appears, as shown in figure 13.13.
(Optional) If you do not want to compress all of the pictures, mark the Apply to Selected Pictures Only check box.
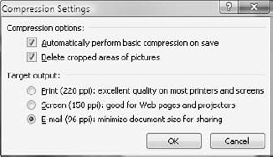
(Optional) Click the Options button to display the Compression Settings dialog box, as shown in figure 13.14, and then change any of these options and click OK.
Automatically Perform Basic Compression on Save: This automatically compresses any images in your file when you save the file.
Delete Cropped Areas of Pictures: This makes any cropping you've done permanent.
Target Output: Choose a resolution to which you want to reduce the picture(s): Print, Screen, or E-mail.
Click OK to perform the compression.

Working with resolution reduction from an image-editing program is somewhat of a trial-and-error process, and you must do each image separately.
You can approximate the correct resolution by simply "doing the math." For example, suppose you have a 10" x 7.5" slide. Your desktop display is set to 800 x 600. So your image needs to be 800 pixels wide to fill the slide. Your image is a 5" x 3" image, so if you set it to 200 dpi, that gives you 1,000 pixels, which is a little larger than you need but in the ballpark.
What goes in must come out, right? Suppose you have a picture that exists only in PowerPoint, for whatever reason. Perhaps it was scanned directly into PowerPoint in an earlier version, for example, and you no longer have access to the original file.
There are two ways to get a graphic out of PowerPoint and make it a separate file again: You can use the Save As Picture feature in PowerPoint, or you can simply use the Windows Clipboard to copy and paste a graphic into an image-editing program.
Exporting a Graphic with Save As Picture:
To save a picture separately from PowerPoint, do the following:
Right-click the picture in PowerPoint and choose Save as Picture.
In the Save as Picture dialog box, display the location where you want to save the file.
Open the Save As Type list and choose the graphic format you want. You can choose TIF, JPEG, or a variety of others. See the discussion of file formats earlier in this chapter for guidance.
Enter a name in the File Name box.
Click Save.
Exporting a Graphic with the Clipboard: Copy-and-paste is a fast and simple way of transferring a graphic from PowerPoint into an image-editing program, and from there you can save it in any supported format. Select a graphic in PowerPoint, copy it (Ctrl+C), open the graphics program, and paste it (Ctrl+V).
Exporting Entire PowerPoint Slides as Graphics: You can save entire slides — or all slides in the whole presentation — as images by simply choosing a graphic file format when doing an Office
Tip
You could also save the presentation in HTML format. This will generate an HTML file and a folder full of support files, and each graphic will be in there as a separate file.
By default, a picture appears in a rectangular frame. You can place a picture in any shape you like, though, to create special effects. (This is especially useful in a photo album, covered later in this chapter.)
To place a picture in a shape, follow these steps:
Select the picture. The Picture Tools Format tab appears.
Open the Picture Shape buttons menu and click the desired shape. See figure 13.15.

Picture styles are new in PowerPoint 2007. They consist of formatting presets you can quickly apply to pictures such as shadows, reflections, borders, and 3-D effects. Most of these are similar to the effects you learned how to apply to shapes in Chapter 10.
To apply a picture style, select one from the Picture Styles group on the Picture Tools Format tab. figure 13.16 shows the Picture Styles gallery open.

Note
The Picture Border button works just like the Object Border controls. To apply an object border or to use the Picture Effects button to apply object effects, see Chapter 10 for details.
Most presentations in PowerPoint are text-based, with accompanying photographs. The default Blank Presentation template is biased in favor of text. Graphics, as you have seen in this chapter, require some extra effort.
The Photo Albums feature in PowerPoint creates a new presentation that is specifically designed as a carrier of pictures. It is useful when you need to create a presentation that is very heavy on graphics, with little or no text except picture captions.
When you create a new photo album, it starts a new presentation for you. Any other presentations that you may have open are not disturbed, and you can switch back to them at any time with the View tab. The new presentation has a title slide, as well as slides for the photos you place in the album.
To start a new photo album, follow these steps:
On the Insert tab, click Photo Album. The Photo Album dialog box opens.
To add a photo from a file, click the File/Disk button. The Insert New Pictures dialog box opens.
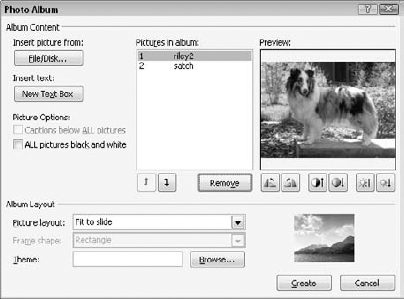
Select one or more pictures, and then click Insert. (To select multiple pictures, hold down Ctrl or Shift as you click on the ones you want.) The photos appear in the Photo Album dialog box as shown in figure 13.17.
Repeat steps 2 and 3 as needed to insert all the photos from disk that you want.
For each image on the Pictures in Album list, select the picture and then apply any correction needed with the buttons beneath the Preview pane. You can rotate right or left, increase or decrease the contrast, and increase or decrease the brightness.
Use the arrows to move an image up or down in the order.
In the Album Layout section, open the Picture Layout box and choose the layout for the presentation slides. For example, in figure 13.17, 1 Picture has been chosen.
If available, choose a frame shape from the Frame Shape list. Some choices from step 7 do not permit a frame shape to be chosen.
Tip
You can create themes specifically for photo albums, and then use them here by clicking the Browse button to browse for a theme. You might also want to experiment with the photo album themes in the dialog box when you create the photo album initially.
(Optional) To add caption boxes for each picture, mark the Captions Below ALL Pictures check box.
(Optional) To show the pictures in black and white, mark the ALL Pictures Black and White check box.
Click Create. PowerPoint creates the new presentation containing the photos and the layout you specified.
Save the photo album (Office
You can reopen the dialog box from figure 13.15 by clicking the down arrow beneath the Photo Album button on the Insert tab and choosing Edit Photo Album.
You can also modify the slides in the presentation individually. These are just regular, editable slides, and you can add anything to them that you like, including text boxes, clip art, and so on. Think of it as an on-screen scrapbook! And new in PowerPoint 2007, you can also crop the photos inserted via the photo album as well.
In this chapter, you learned about the technical specs for graphics that determine their file size, quality, and flexibility, and you learned how to insert them into your presentations. You learned how to format a photo, and how to color, crop, and manipulate photos to create special effects.
In the next chapter, you'll learn how to work with charts. The charting tool in PowerPoint 2007 is much improved from earlier PowerPoint versions, and you'll find out how to take advantage of its new graphics-like capabilities for structuring and formatting numeric data in chart format.