PowerPoint contains many tools that can help you avoid embarrassing mistakes in your presentations text, and this chapter takes a look at some of them. You'll learn how to replace one text string with another, perform a spelling check, set up PowerPoint to correct your most common errors automatically, and use the research tools in PowerPoint, including encyclopedias, translation guides, and thesauruses.
Like all Microsoft applications, PowerPoint has a built-in Find tool, which lets you search for — and, optionally, replace — a string of text anywhere in your presentation. This feature works in all views except for Slide Show, in which it isn't applicable. However, in Slide Sorter view, it finds and replaces all instances only; you cannot interactively confirm each instance.
We will first take a look at the Find function. For example, let's say that Bob Smith was fired this morning. (Poor Bob.) Now you need to go through your presentation and see whether Bob's name is mentioned so that you can take out any lines that refer to him. Follow these steps to find a text string (such as Bob Smith):
Click Find on the Home tab, or press Ctrl+F. The Find dialog box appears.
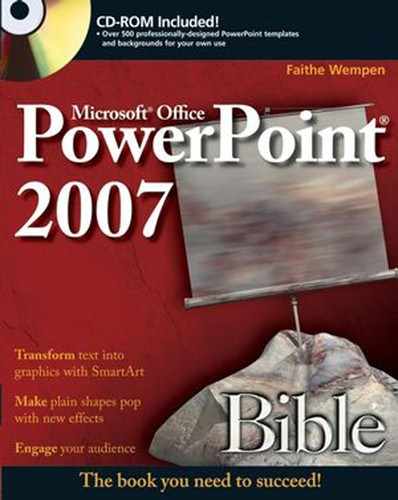
Type what you want to find in the Find What text box, as shown in figure 8.1. If you want to find a text string that you have searched for before, open the Find What drop-down list and select it. This is sometimes faster than retyping.
If you want to find only whole words or to match the case, select the appropriate check box.
Click Find Next. The display jumps to the first instance of the text in your presentation, starting from the insertion point, working downward through the presentation, and then looping back to the top.
If the found instance was not the one that you were looking for, or if you want to see if there are other instances, then click the Find Next button again. You can continue clicking the Find Next button until you have seen all of the instances. When PowerPoint cannot find any more instances, a message appears — The search text was not found — and you must click OK to clear the message.
Click Close when you are finished.
You can also perform a replace, which adds functionality to the Find feature. This action finds the specified text and then replaces it with other text that you specify. For example, suppose that you are preparing a presentation for the Acme Corporations sales staff. Two days before the presentation, you find out that the Primo Corporation has purchased Acme. You now need to go through the entire presentation and change every instance of Acme to Primo.
Tip
While you are using the Find feature, as explained in the preceding steps, you can switch to the Replace dialog box by clicking the Replace button. When you do so, your Find string transfers over to the Replace dialog box, so that you don't have to retype it.
To find and replace a text string, follow these steps:
Click Replace on the Home tab, or press Ctrl+H. The Replace dialog box appears.
Note
The Replace button has a drop-down list. From this list, you can tell Replace Fonts to do a find-and-replace for certain font usage. You'll learn more about this in Chapter 6.
Type the text that you want to find in the Find What text box. If you have previously used Find or Replace, the most recent text that you found appears in the text box.
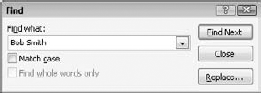
Type the new text in the Replace With text box. For example, if you were replacing layoffs with downsizing, it would look like figure 8.2.
If you want whole words only or a case-sensitive search, select the appropriate check box.
Click Find Next to find the first instance.
If you want to replace that instance, click the Replace button. The next instance appears automatically. After this, click Find Next to go on.
Repeat step 6 to check and selectively replace each instance, or click the Replace All button to change all instances at once.
When you are finished, click Close. You may have to click OK first to clear a dialog box telling you that the specified text was not found.
If you think that a spelling check can't improve the look of your presentation, just think for a moment how ugly a blatant spelling error would look in huge type on a five-foot projection screen. Frightening, isn't it? If that image makes you nervous, it should. Spelling mistakes can creep past even the most literate people, and pop up where you least expect them, often at embarrassing moments.
Fortunately, like other Microsoft Office programs, PowerPoint comes with a powerful spelling program that can check your work for you at any time, minimizing the number of embarrassing spelling mistakes. The Office programs all use the same spelling checker, and so if you are familiar with it in another Office application, you should be able to breeze through a spell check in PowerPoint with no problem.
Warning
When PowerPoint marks a word as misspelled, it really just means that the word is not in its dictionary. Many words, especially proper names, are perfectly okay to use, even though they are not in PowerPoint's dictionary, so don't believe PowerPoint against your own good judgment.
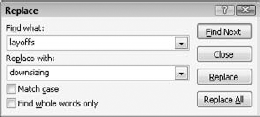
As you work, PowerPoint underlines words that aren't in its dictionary with a red, wavy line. Whenever you see a red-underlined word, you can right-click it to see a list of spelling suggestions, as shown in figure 8.3. Click the correction that you want, or click one of the other commands:
Ignore All: Ignores this and all other instances of the word in this PowerPoint session. If you exit and restart PowerPoint, the list is wiped out.
Add to Dictionary: Adds this word to PowerPoint's custom dictionary. (You learn more about the custom dictionary later in this chapter.)
Spelling: Opens the spelling checker, described in the next section.
Tip
If you don't want to see the red, wavy underlines on-screen, you can turn the feature off by selecting Office
If your presentation is long, it can become tiresome to individually right-click each wavy-underlined word or phrase. In such cases, it's easier to use the spell-check feature in PowerPoint to check all of the words in the presentation.
To begin the spell check, click the Spelling button on the Review tab, or press F7. If there are no misspelled words in your presentation, PowerPoint presents a dialog box telling you that your spell check is complete. Click OK to close this dialog box. If, on the other hand, PowerPoint finds a misspelled word, you can choose from several options, as shown in figure 8.4:
Not in Dictionary text box: Shows the misspelled word.
Change To text box: Shows what the spelling will be changed to if you click the Change or Change All buttons. You can choose a word from the Suggestions list or type your own correction here.
Suggestions text box: Lists words that are close to the spelling of the word that you actually typed. Choose the one you want by clicking it; this moves it to the Change To text box.
Ignore button: Skips over this occurrence of the word.
Ignore All button: Skips over all occurrences of the word in this PowerPoint session only.
Change button: Changes the word to the word shown in the Change To text box.
Change All button: Changes all occurrences of the word in the entire presentation to the word in the Change To text box.
Add button: Adds the word to PowerPoint's custom dictionary so that it is recognized in the future.
Suggest button: Displays the suggestions in the Suggestions text box if you have set the spell checkers options so that suggestions do not automatically appear.
AutoCorrect button: Adds the word to the AutoCorrect list so that if you misspell it the same way in the future, PowerPoint automatically corrects it as you type. See the "Using AutoCorrect to Fix Common Problems" section later in this chapter.
Close button: Closes the Spelling dialog box.
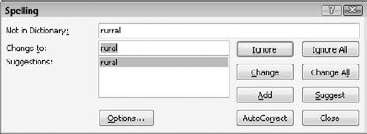
Figure 8.4. When PowerPoint finds a misspelled word with the spell checker, you can respond to it using these controls.
When PowerPoint can't find any more misspelled words, it displays a dialog box to let you know this; click OK to close it.
Tip
If you have more than one language dictionary available (for example, if you use PowerPoint in a multilingual office and have purchased multiple language packs from Microsoft), then you can specify which language's dictionary to use for which text. To do so, select the text that is in a different language than the rest of the presentation, and then click Set Language on the Review tab. Select the appropriate language from the list and click OK.
To control how (and whether) the spell checker operates, do the following:
Choose Office

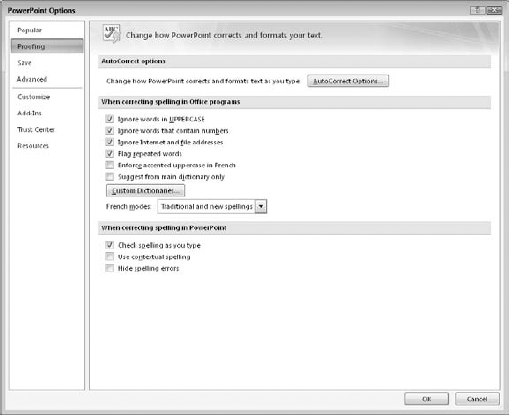
Select or deselect any of the check boxes as desired in the When Correcting Spelling in Office Programs section:
Ignore Words in UPPERCASE: Prevents the spell checker from flagging acronyms.
Ignore Words That Contain Numbers: Prevents the spell checker from noticing words with digits in them, such as license plate numbers or model numbers.
Ignore Internet and File Addresses: Prevents the spell checker from flagging Web or e-mail addresses, network paths, or file paths.
Flag Repeated Words: Flags second and subsequent instances of the same word in a row, preventing you from making mistakes like writing "the the."
Suggest From Main Dictionary Only: Ignores any custom spelling dictionaries if any are present.
Always Suggest Corrections: This option is selected by default. It allows suggestions to appear in the Suggestions text box in the Spelling dialog box (figure 8-4). You can turn this option off for a very small improvement in performance. If you then want a suppestion as you are checking the snellinp. you can click the Suppest button.
Note
The options in the When Correcting Spelling in Office Programs section apply across all Office programs, including Word and Excel.
Select or deselect any of the check boxes as desired in the When Correcting Spelling in PowerPoint section:
Check Spelling As You Type: This option is on by default. Turning it off prevents the spell checker from noticing and underlining words in red that it can't find in its dictionary. This can cause a small improvement in performance on a slow computer; you will not notice the difference on a fast computer.
Use Contextual Spelling: Allows PowerPoint to flag possible errors in context. For example, when this feature is on, PowerPoint identifies "I will go their." as a misspelling for the word "there." This feature also uses some memory, and so it can affect performance on a slow computer.
Hide Spelling Errors: This option is off by default. Selecting this check box prevents the red, wavy underline from appearing beneath misspelled words. It does not prevent the spell checker from checking them; you can right-click a misspelled word to see suggestions for it, as you normally would.
Click OK to accept the new settings.
The main spelling dictionary in PowerPoint is read-only, and so when you add words to the dictionary, these words have to be stored somewhere else. This is where custom dictionaries come in. A custom dictionary contains a list of words that should not be flagged as misspellings. It can include proper names, acronyms, abbreviations, or any other codes or text strings that you frequently type.
Note
PowerPoint shares custom dictionaries with the other Office 2007 applications, and so you can use these dictionaries in PowerPoint or in one of the other applications.
The default custom dictionary is called custom.dic, and it's stored in a separate folder for each local user. If you are running Windows Vista, it's in UsersusernameAppDataRoamingMicrosoftUProof. If you are running Windows XP, it's in Documents and SettingsusernameApplication Data MicrosoftUProof. Because it is unique to the logged-in user, each user can have his or her own custom dictionary.
Tip
If there is a custom.dic file in a folder called Proof (as opposed to UProof), it's left over from an earlier version of Office. If you upgraded to Office 2007, any words that you already set up in it were copied over to the version in the UProof folder. Leave it in place if you still run an older version of Office, as well. Otherwise, you can delete it or leave it as you want.
As you are spell checking, one of the options that you can use is Add to Dictionary — mentioned earlier in the chapter — which adds the word to the default custom dictionary By default, this file is custom.dic. You'll learn how to create additional custom dictionaries later in this chapter.
You can also add words to the custom dictionary without having to type them in the presentation and then spell-check them. Follow these steps to add words:
Choose Office
Click Proofing.
Click Custom Dictionaries.
Select the desired custom dictionary from the list. In figure 8.6, only the default custom.dic dictionary appears.
Click Edit Word List. A dialog box appears, listing all of the words that are currently in that dictionary.
To add a new word, type it in the Word(s) text box and click Add. Words can be no longer than 64 characters.
To delete a word, select it and click Delete. To clear the entire custom dictionary, click Delete All.
Click OK when you are finished editing the custom dictionary.

Warning
The custom dictionary accepts multi-word entries, but you must enter them as separate words in the list; it does not recognize spellings that consist of only part of the word. For example, you could enter Shawna Browslawski, but the spell checker would not recognize Shawna or Browslawski by themselves. However, if you enter them as separate words, they are accepted either individually or together.
If you have a lot of words to add to the dictionary, you might prefer to edit the dictionary file manually Dictionary files are plain-text files, and so you can edit them in Notepad. You can even combine two or more separate dictionary files into a single file by copying and pasting lists of words between them. To edit a dictionary file, open it in a text editor such as Notepad. Remember, the paths for the dictionary files are:
A custom dictionary file can be as large as 64KB in size, or 5,000 words. If you need a larger custom dictionary than this, you must create another dictionary file. You might also want additional custom dictionaries to keep sets of words separate for different clients or projects. For example, when working for a client with many trademarked product names that consist of non-traditional spellings of common words, you might want to set those names as correctly spelled, but when working for another client who does not use those names, you might want those words to be flagged as possible misspellings. You can enable or disable each custom dictionary, and so you can enable only the dictionaries that apply to the present project.
Tip
All spell checks use the main dictionary as well as all of the dictionaries that are selected in the Dictionary List. To disable a certain dictionary from being used, deselect its check box in the Custom Dictionaries dialog box.
To create a custom dictionary, follow these steps:
Choose Office
Click Proofing.
Click Custom Dictionaries.
Navigate to the location in which you want to store the dictionary. The location where you store it depends on who you want to be able to access it:
To make the dictionary accessible to all users of your PC, store it in Program FilesMicrosoft OfficeOFFICE12Dictionaries.
To make the dictionary accessible to only the current Windows user, store it in the default custom dictionary location:
Windows Vista: UsersusernameAppDataRoamingMicrosoftUProof
Windows XP: Documents and SettingsusernameApplication DataMicrosoftUProof
Click Save.
The new dictionary appears in the Dictionary List in the Custom Dictionaries dialog box.
Tip
All enabled custom dictionaries are checked automatically during the spell-check process, but newly added words are placed only in the default custom dictionary. To set the default dictionary, select a custom dictionary in the Custom Dictionaries dialog box and then click the Change Default button.
PowerPoint performs spell check using the native language for your copy of Word. For example, if you bought your copy in the United States, then English (U.S.) is the default language. It is important that you select the correct country as well as the correct language because some countries have different spellings for the same language than others. For example, in the United Kingdom, "s" substitutes for the American "z" in words like realize/realise. The Language setting is also used by some of the research tools, which are covered later in this chapter.
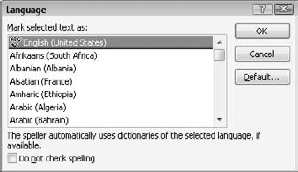
To mark a passage of text as a certain language (and country if applicable), follow these steps:
Select the text that you want to mark. To mark text on more than one slide, select the text from the Outline pane.
On the Review tab, click Language. The Language dialog box opens.
Select the language and country from the list, as shown in figure 8.7.
(Optional) To set a certain language as the default, select it and click Default; then click Yes to confirm.
Click OK.
With AutoCorrect, PowerPoint can automatically correct certain common misspellings and formatting errors as you type. One way to add a word to the AutoCorrect list is to click the AutoCorrect button in the Spelling dialog box. Another way is to directly access the AutoCorrect options. To access AutoCorrect, follow these steps:
Choose Office
Click Proofing.
Click AutoCorrect Options. The AutoCorrect dialog box opens.
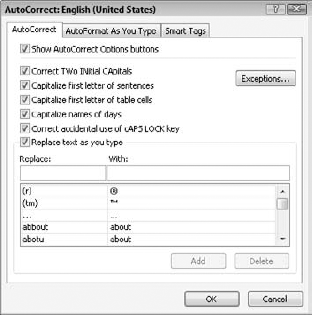
If it is not already displayed, click the AutoCorrect tab, as shown in figure 8.8.
Select the options that you want. At the top of the dialog box is a series of check boxes that help you to fine-tune some other corrections that AutoCorrect makes in addition to spelling corrections:
Show AutoCorrect Options Buttons: This option controls whether a button is available to reverse an AutoCorrect action after the action occurs. (For more on how to use this button, see the end of this section.)
Correct Two Initial Capitals: If you accidentally hold down the Shift key too long and type two capital letters in a row (such as MIcrosoft), PowerPoint corrects this error if you leave this option selected.
Capitalize First Letter of Sentences: Leave this option selected to have PowerPoint capitalize the first letter of the first word after a sentence-ending punctuation mark, such as a period, or to capitalize the first letter of the word that occurs at the beginning of a paragraph.
Tip
Click the Exceptions button to open an AutoCorrect Exceptions dialog box. Here, you can enter a list of capitalization exceptions, such as abbreviations that use periods but aren't at the end of a sentence (for example, approx. and Ave.). You can also set up a list of Two Initial Capitals exceptions.
Capitalize First Letter of Table Cells: Leave this option selected to capitalize the first letter of the first word within a table cell. Otherwise, PowerPoint does not treat text in a table as a sentence for capitalization purposes.
Capitalize Names of Days: Leave this option selected to make sure that the names of days, such as Sunday, Monday, and so on, are capitalized.
Correct Accidental Use of Caps Lock Key: If you accidentally leave the Caps Lock on, PowerPoint can sometimes detect it and fix this problem. For example, if you type the sentence, "hE WAS GLAD TO SEE US," PowerPoint may conclude that the Caps Lock is inappropriately on, and so it turns the Caps Lock off for you and fixes the sentence.
Replace Text As You Type: This option activates the main portion of AutoCorrect, the word list. You must leave this option selected if you want AutoCorrect to correct spelling as you are typing. For example, if you type "yoiu," PowerPoint automatically changes it to "you."
Add items that you commonly misspell to the Replace/With list at the bottom of the dialog box. By default, this list already contains a number of word and symbol pairs. To the left is the common misspelling, and to the right is the word that PowerPoint substitutes in its place. Scroll through this list to see the types of corrections that PowerPoint makes. To add a word pair to the list, type the misspelling in the Replace text box and then type the replacement in the With text box. Then click the Add button. You can also add corrections through the Spelling dialog box.
Tip
You can use AutoCorrect to insert typographical symbols. The (C) entry is already set up to insert a copyright symbol, for example, and the (R) entry will insert a registered trademark symbol. If there is a symbol you use frequently yourself, feel free to set up an AutoCorrect entry to insert it more easily.
If PowerPoint insists on making a correction that you do not want, you can delete that correction from the list. Simply select it from the list and click Delete. For example, one of my clients likes me to code certain headings with (C) in front of them, and so the first thing that I do in any Office program is to remove the AutoCorrect entry that specifies that (C) must be converted to a copyright symbol ((c)).
When you are finished, click OK to close the AutoCorrect dialog box.
Warning
Don't use AutoCorrect for misspellings that you may sometimes want to change to some other word, or you may introduce embarrassing mistakes into your document. For example, if you often type "pian" instead of "pain," and you also sometimes type "pian" instead of "piano," don't tell PowerPoint to always AutoCorrect to "pain," or you may find that PowerPoint has corrected your attempt at typing piano and made it a pain!
When an AutoCorrect action occurs, provided you have not turned off the icon, a small, blue rectangle appears when you point at the AutoCorrected word. Place your cursor over it to display an icon, and then click the icon to see a menu, as shown in figure 8.9. From here, you can reverse the action, disable that particular correction, or open the AutoCorrect Options dialog box.

The AutoFormat As You Type feature enables PowerPoint to convert certain letter combinations to typographical characters that look nicer on a slide than plain text. For example, one of the AutoFormat As You Type actions is to convert two dashes (—) into a single long dash (—).
Other actions include automatic bulleted and numbered lists. For example, in a manual text box, you may type a 1, press Tab, and type a paragraph, then type 2, press Tab, and type another paragraph. In this case, PowerPoint would guess that you want a numbered list and would apply the Numbering format to those paragraphs (just as if you had clicked the Numbering button on the toolbar). figure 8.10 shows all of the AutoFormat As You Type options.
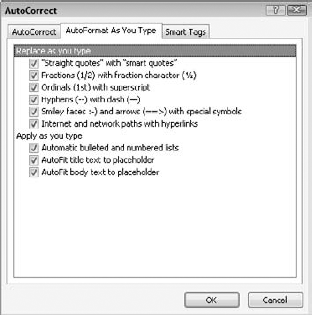
To change the AutoFormat As You Type settings, follow these steps:
Note
For more on the AutoFit title text and body text feature as well as changing a text box's AutoFit behavior in general, see Chapter 4.
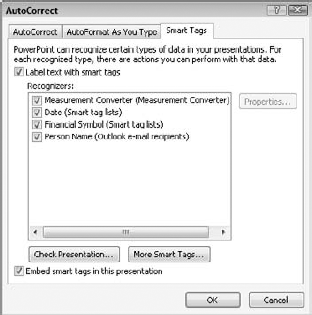
When you move your mouse over certain types of text, a smart tag appears. Depending on the text, a smart tag might offer to perform a variety of actions on that text, such as looking up an address, scheduling a meeting, or getting a stock quote. Smart tags are "smart" in that PowerPoint is able to determine the type of content by its format and then offer appropriate choices. For example, PowerPoint can distinguish dates and telephone numbers from ordinary numbers, based on their patterns.
You can control the specific Smart Tag labels through the AutoCorrect dialog box. Here you can choose what types of recognizers you want to use. A recognizer is a type of data, such as Date,
Financial Symbol, Place, and so on. The types of tags depend on what is installed on your PC. By default, PowerPoint includes the following recognizers:
Measurement converter: Identifies measurements and offers to convert them to other units.
Dates: You can display the Outlook calendar and schedule a meeting.
Financial symbols: You can get stock quotes, company reports, and business news from MSN MoneyCentral.
People's names: You can send e-mail or instant messages, schedule meetings, open the persons contact information in Outlook (or create a new entry), and insert addresses.
A smart tag appears in a document as a dotted purple underline with an "i" icon. Click this icon for a menu of actions that you can perform, as shown in figure 8.11.

Smart tags are not enabled by default, and so you must turn them on if you want to use them. At the same time, you can also configure the tags, and add new tags if desired, by following these steps:
Choose Office
Click Proofing.
Click AutoCorrect Options. The AutoCorrect dialog box opens.
Click the Smart Tags tab.
To turn the Smart Tag labels on or off, select or deselect the Label Text with Smart Tags option.
Select or deselect the options for each individual recognizer type, as shown in figure 8.12.
After enabling or disabling the desired smart tags, click Check Presentation. PowerPoint re-checks the presentation for eligible text.
A confirmation box appears when the check is finished; click OK.
Browse through the presentation and look for the Smart Tag icon; when you see it, you can click it to access the smart tag.
Other smart tags are available, some for free and some for an additional charge. To see what's available, click the More Smart Tags button on the Smart Tags tab of the AutoCorrect dialog box (figure 8.12). Then follow the hyperlinks to the various services to learn about their benefits and costs. After you install new smart tags, these new tags might not be available until you exit and restart PowerPoint.
The Research feature is available in most of the Office applications, including PowerPoint. It enables you to connect with various online and offline data stores to look up information. This may include online encyclopedias, dictionaries, and news services.
The available tools are divided into three broad categories of sites: reference, research., and business/financial. Reference sites include dictionaries, thesauruses, and translation utilities; research sites include encyclopedias and news services; business and financial information includes stock quotes and company profiles.
You can consult all of the reference sites as a group, or you can consult an individual tool. For example, you can look up a word in the dictionary, thesaurus, or translator all at once, or you can just use the thesaurus.
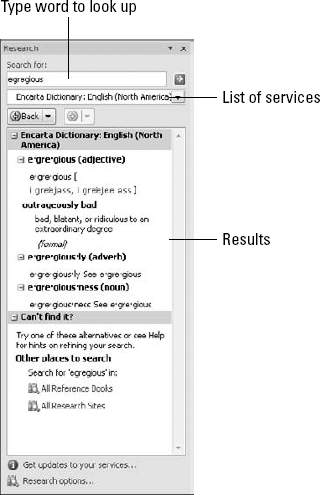
To get a simple, concise definition of a word, a dictionary is your best bet. Here's how to use the dictionary in PowerPoint:
On the Review tab, click Research. The Research task pane opens.
Open the drop-down list of references at the top of the task pane and choose Encarta Dictionary: English (North America), or whatever language and country is appropriate.
In the Search For text box, type the word that you want to look up, and either press Enter or click the green arrow icon. A definition of the word appears, as shown in figure 8.13.
Tip
There are multiple dictionaries available; click the Research Options link at the bottom of the task pane to open a dialog box from which you can select other dictionaries. For example, the English version of Office comes with both North American and United Kingdom dictionaries, although only one is enabled by default (depending on the country in which you purchased Office).
The thesaurus feature works just like a hardbound thesaurus book. It lets you look up synonyms and antonyms for a word so that you can make your vocabulary more varied and colorful.
Note
A synonym is a word that has a similar meaning to another word. An antonym is a word that has the opposite meaning.
To look up a word in the thesaurus, follow these steps:
Select a word that you want to look up.
On the Review tab, click Thesaurus. The Research task pane opens with theword's synonyms and antonyms displayed.
Synonyms are grouped by general meaning. Antonyms are followed by the word (Antonym).
Notice that the Thesaurus button opens the same task pane as the Research button, but with the Thesaurus tool selected.
Note
If the word that you want to look up does not already appear in the presentation, skip step 1, and then, after clicking the Thesaurus button, type the desired word in the Search For text box. Then press Enter or click the green arrow icon.
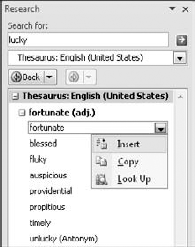
To insert a word into the presentation, do the following:
Position the insertion point where you want to insert the found word, or select the word that you want to replace (if you did not select it already in step 1).
Open the task pane menu for the word that you want to insert. (Move your cursor over the word to display a down arrow, and then click the down arrow.)
Click Insert. As you can see in figure 8.14, you can also click Copy (to copy it to the Clipboard for later insertion) and Look Up (to look up that word in the thesaurus).
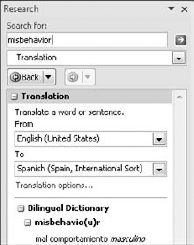
Translation helps you to translate text into a variety of languages. It's not a perfect translation by any means, so don't embarrass yourself and try to translate your entire presentation for a foreign audience. However, for simple words and phrases, as well as rough approximations of meaning, it can serve you well. To translate a passage of text in your presentation, follow these steps:
Select the text to be translated.
On the Review tab, click Translate. The Translation tools appear in the Research task pane.
Select the desired languages in the From and To drop-down lists, as shown in figure 8.15.
Click the green arrow icon. A translation appears for the selected text.
The research sites are sources that provide more in-depth information about a particular word or phrase, such as encyclopedias and news services. To use one of these services, follow these steps:
Select the word or phrase that you want to look up.
On the Review tab, click Research. The Research task pane opens. If it was already open, it closes; click the Research button again to reopen it.
Open the list of services and choose All Research Sites (or a particular site, if desired).
In the results that appear, click a hyperlink to read its information, as shown in figure 8.16. Depending on what you select, a separate Web browser window may open.

Warning
Keep in mind that proper attribution of sources is a must. If you copy information from an online source such as an encyclopedia or news service, you must cite your source. Also, depending on the source, you might need to get written permission to use the data. This is especially true with photographs. Very few news services permit you to reuse their photos without permission.
The business and financial sites work just like research sites, except that they provide information that would be of more use to a businessperson evaluating a company. For example, figure 8.17 shows the business summary that is provided for Microsoft. You can use these sites in the same way as in the preceding steps, except that you must choose All Business and Financial Sites in step 3.

In this chapter, you learned how to use the spelling, proofing, and reference tools in PowerPoint to make a good impression on your audience. You learned how to find and replace text, how to look up reference information online without leaving PowerPoint, and even how to create custom dictionaries to use for different clients. Now you can present with confidence!
In the next chapter, you'll learn how to create and manage tables in PowerPoint. The table feature has undergone some changes since PowerPoint 2003, and I think you'll be surprised and pleased with what you can now do with them.