Whether it's a simple sound effect or a complete musical soundtrack, sounds in a PowerPoint presentation can make a big difference in the audiences perception of your message. In this chapter, you will learn when and how to use sounds, how to place them in the presentation, and how to manage their playback.
Sounds should serve the purpose of the presentation; you should never use them simply because you can. If you add a lot of sounds purely for the fun of it, then your audience may lose respect for the seriousness of your message. That being said, there are many legitimate reasons to use sounds in a presentation. Just make sure that you are clear on what your reasons are before you start working with them. Here are some ideas:
You can assign a recognizable sound, such as a beep or a bell, to each slide, so that when your audience hears the sound, they know to look up and read the new slide.
You can record a short voice-over message from a CEO or some other important person who could not be there in person.
You can punctuate important points with sounds, or use sounds to add occasional humorous touches.
However, if you are trying to pack a lot of information into a short presentation, you should avoid sounds because they take up time when you play them. You should also avoid sounds and other whimsical touches if you are delivering very serious news. You may also want to avoid sounds if you intend to present on a very old and slow computer because any kind of media clip —whether sound or video — will slow the system down even more, both when you load the presentation and when you present it.
There are several ways that you can include a sound in a presentation:
Insert a sound file. The sound plays during the presentation whenever anyone points to or clicks the sound icon, depending on the settings that you specify This is useful in an interactive presentation because it gives the audience a choice of whether to play the sound.
Associate a sound with an object (such as a graphic), so that the sound plays when anyone points to or clicks that object. This is another good technique for interactive presentations.
Associate a sound with an animation effect (such as a series appearing in a graph), so that the sound plays when the animation effect occurs. For example, you might have some text "drive in" onto a slide and associate the sound of an engine revving with that action.
Associate a sound with a slide transition (a move from one slide to the next), so that the sound plays when the next slide appears. For example, you may assign a shutter-click sound, such as the sound that a slide projector makes when it changes slides, to the transitions between slides.
Insert a sound that plays automatically in the background. This is useful for unattended (kiosk-style) presentations.
Note
In this chapter, you learn about the first two of these techniques: inserting files as icons and associating them with objects. Chapter 18 covers transition and animation sounds.
Computer sound files come in several formats, but they can be divided into two broad categories: WAV and MIDI.
WAV: This can refer to a specific file format that has a
.wavextension, but it can also refer generically to any sound file that has an analog origin. For example, when you record sound using a microphone, the resulting file is a WAV file in a generic sense of the word because it was originally a "sound wave" that the microphone captured. The tracks on an audio CD can also be considered WAV files because at some point, presumably, a person went to a recording studio and made music with their voice or with instruments that were recorded. Similarly, the very popular MP3 music format is a WAV format. Other WAV formats include RMI, AU, AIF, and AIFC. WAV files sound very realistic because they are recordings of real-life sounds. The drawback is that the file size is typically large. MP3 is a relatively compact format, but even MP3 files require about 1MB per minute of recording.MIDI: MIDI stands for multi-instrument digital interface, and refers to the interface between a computer and a digital instrument such as an electronic keyboard. When you make a MIDI recording, there is no analog source — it is purely digital. For example, you press a key on an electronic keyboard, and that key press is translated into instructions that are written to a computer file. No microphone, and no sound waves in the air. What is the sound of one key pressing? It is completely up to the software. It could sound like a piano, a saxophone, or a harpsichord — whatever instrument it is set up to "be" at the moment. MIDI files (usually identified by a .mid extension) are smaller in size than WAV files, and several minutes of recording typically take up much less than 1MB of space. The drawback to MIDI music is that it can sound rather artificial and cold. After all, a computer emulating a saxophone is not the same thing as a real saxophone.
You need to understand the difference between these sound formats so that you can choose the correct format when recording sounds for your presentation, or when choosing recorded music. Keep in mind that whenever you use a WAV file in a presentation, you will add considerably to the presentations file size. But also keep in mind that when you choose MIDI over WAV for your music, you get a different type of music, one that sounds more artificial.
Warning
The sounds that come with Microsoft Office are royalty-free, which means that you can use them freely in your presentation without paying an extra fee. However, if you download sounds from the Internet or acquire them from other sources, you must be careful not to violate any copyright laws. Sounds recorded from television, radio, or compact discs are protected by copyright law, and you or your company might face serious legal action if you use them in a presentation without the permission of the copyright holder.
To hear the difference, do the following exercise as an experiment:
In Windows, use the Search feature to locate the sample MIDI files that came with Windows. To do so, search for *.mid.
Note
Windows Vista does not come with any sample sounds. However, if you have Windows XP, or if you upgraded from Windows XP to Windows Vista, then you will have some sample sounds.
Double-click one of the files to play it.
Use Search (or Find) to locate some sample WAV files that came with Windows. To do so, search for *.wav
Double-click one of the files to play it.
Can you hear the difference?
There are sound collections available all over the Internet, just as there are clip art collections. You can also buy sound collections on CD. If you find yourself putting together a lot of presentations, or searching the Internet for hours to find specific sounds for this or that purpose, then you might find it more cost-effective to simply buy a good collection of sounds.
Here are some Web sites where you can find some sounds:
A1 Free Sound Effects (
www.a1freesoundeffects.com/noflash.htm): This Web site offers a lot of free sounds for non-commercial use. You can also buy them quite cheaply for commercial use.Microsoft (
office.microsoft.com/downloads/2002/Sounds.aspx): Microsoft offers a nice collection of free sounds to work with Office versions 2000 and higher. You can also check outhttp://office.microsoft.com.Partners in Rhyme (
www.sound-effect.com): This Web site offers sound and music collections for sale, as well as some free files for download. Their background music clips are cool because they are set up for perfect looping — that is, continuous play without a noticeable break between the end and the beginning.Wav Central (
wavcentral.com): This is a big repository of all kinds of free sounds in WAV format. (Beware of possible copyright violations, though; some of the clips here appear to be from movies, TV shows, and so on.)
PowerPoint offers a selection of sounds, and you can find out how to access them within the program later in this chapter.
The Microsoft Clip Organizer can help you find sounds in Microsoft's collection of clips. Although the collection of sounds is not as extensive as what you would find in clip art, you may be able to find something of use.
Note
This chapter does not specifically address the Clip Organizer because it was covered quite thoroughly in Chapter 12.
Now that you know where to find sounds, and how to make intelligent decisions about their use, let's start using them in your presentations.
The most elementary way to use a sound file in a presentation is to place the sound clip directly on a slide as an object. An icon appears on the slide, and you can click the icon during the presentation to play the sound. This method works well if you want to play the sound at exactly the right moment in the presentation.
Tip
To "hide" the sound icon, drag it off the edge of the slide. The sound still works, but the audience cannot see the icon.
You can place a sound file on a slide in either of two ways: by selecting a sound from the Clip Organizer, or by selecting a sound from a file on your computer or network. The following sections cover each method.
Tip
You can also assign the sound to another object on the slide instead, as explained in the section "Assigning a Sound to an Object," later in this chapter. When you do this, the object to which you attach the sound serves the same function as an icon; you click the object to play the sound.
You learned about the Clip Organizer in Chapter 12. Its primary function is to help you insert clip art (graphics), but it also manages sounds and movie files. The Clip Organizer is a good place to start if you are not sure which sound files are available or what kind of sound you want.
Follow these steps to choose a sound from the Clip Organizer:
Establish your Internet connection, if possible. This will make a much wider variety of clips available.
On the Insert tab, click the down arrow beneath the Sound button, and click Sound from Clip Organizer. The Clip Organizer appears with icons for the available clips.
Tip
If you are getting a lot of music files in the task pane that you don't want to wade through, open the Results Should Be list, click the plus sign next to Sounds, and deselect the check boxes for MP3 Format and Windows Media Audio.
(Optional) To narrow down the list of clips to only those with certain keywords, type the keyword in the Search For text box and press Enter.
(Optional) To preview the clip, do the following:
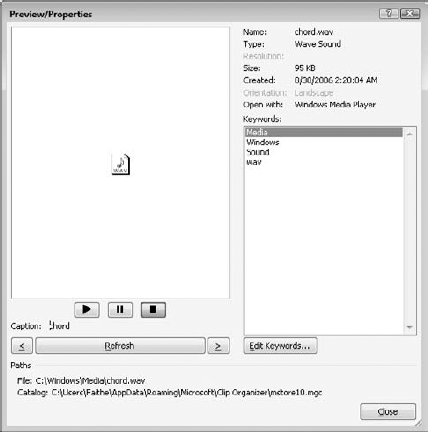
Right-click a clip and choose Preview/Properties from the shortcut menu. A Preview/Properties dialog box opens, and the sound plays.
If you want to play the sound again, click the Play button (right-pointing triangle), as shown in figure 16.1.
(Optional) To preview another clip, click the Next (>) or Previous (<) buttons.
Tip
The Preview/Properties dialog box also enables you to change or add keywords to the clip, as you did with the clip art in Chapter 12. Click the Edit Keywords button to expand the dialog box to include controls for editing the keyword list.
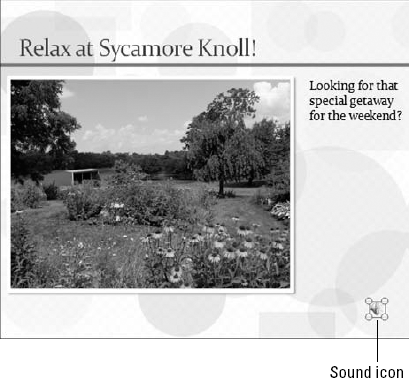
Click the clip that you want to insert. A box appears, asking how you want it to play: Automatically or When Clicked. Choose one of these options. An icon for the sound appears in the center of the slide.
Reposition and resize the icon if necessary. For example, in figure 16.2, the icon has been moved off to the corner where it is less noticeable. You can even drag it completely off the slide and it still works (but it does not appear on-screen).
If you want to insert another sound clip, repeat steps 3 to 6. If you are finished with the Clip Organizer for now, close it by clicking its Close (X) button.
Once the Sound icon is on the slide, you can move and resize it as you would any other object. You can also specify when the sound will play: when the mouse pointer moves over it, when you click it, or automatically. See the section "Fine-Tuning Sound Play Settings," later in this chapter for more details.
If the sound that you want is not accessible from the Clip Organizer, you can either add it to the Clip Organizer, as you learned in Chapter 12, or you can simply import it from a file. The former technique is better if you plan to use the clip a lot; the latter makes more sense if you are using the clip only once or expect to use it only infrequently.
Note
If you installed PowerPoint or Office using the default options, then there are many sound files available in the WindowsMedia folder on your hard disk. You can use one of these files if you want to practice the following steps.
Follow these steps to insert a sound from a file:
On the Insert tab, click the Sound button (or open its list and click Sound from File). The Insert Sound dialog box opens.
Navigate to the drive and folder that contain the sound that you want. If you do not know which location to use, try the WindowsMedia folder on the hard disk where Windows is installed.
Click the sound file that you want to use, as shown in figure 16.3, and then click OK.
A dialog box appears, asking how you want the file to play in the slide show. Choose Automatically or When Clicked. A Speaker icon appears on the slide, as shown in figure 16.2.
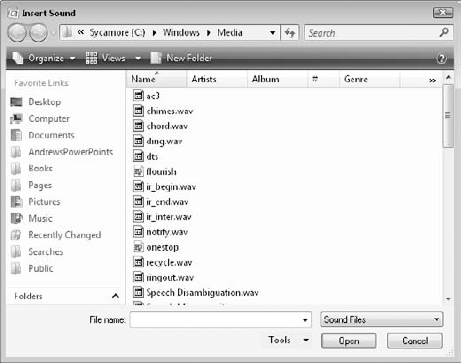
Figure 16.3. Choose a sound file from your hard disk or other location (such as your company's network).
Tip
When sound (WAV) files are smaller than the size specified in PowerPoint's options, they are embedded; sound files that are larger than the specified size are linked. To adjust the size limit, choose Office
When you insert a sound, you can choose the options, Automatically or When Clicked. Automatically makes the sound play when the icon appears. If you don't have any animation set up for the slide, the sound icon appears at the same time as everything else on the slide, and so the sound plays when the slide appears. (See Chapter 18 to learn about animation that can make different items on a slide appear at different times.) The When Clicked option makes the sound play only when a user clicks the icon.
If you want to more precisely define when a sound will play, or change the volume for the sound, try the following method.
As you insert a sound, PowerPoint prompts you to choose whether it is played when clicked or automatically. You can change this behavior later by adding or changing the action setting.
Warning
When you set a sound to play when clicked as you are inserting it, PowerPoint sets up both an Action setting and a custom animation for it, both of which play when clicked. If you turn off the action setting, the custom animation trigger will still be there, and it will still play when clicked. Vice versa applies too; if you delete the custom animation trigger, the action setting will still be there.
Warning
If you set up a sound to play automatically and also allow it to play on a mouse-click or mouseover, then you may end up with two copies playing, and they may not be synchronized.
To play a sound when the mouse either clicks it (mouse-click) or moves over it (mouseover), or to modify the Action settings, do the following:
Click the icon to select it. Selection handles appear around it.
On the Insert tab, click Action. The Action Settings dialog box appears.
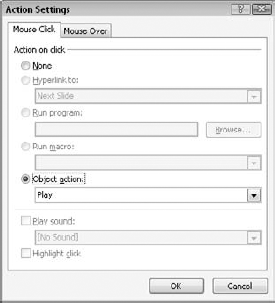
Click the Mouse Click or Mouse Over tab. figure 16.4 shows the Mouse Click tab.
Tip
You can have separate settings for the mouse-click and mouseover actions, and one does not preclude the other. For example, if you have already specified that the sound should play on mouse-click, and you set it up to play on mouseover, this does not change the mouse-click setting.
To make the sound play on mouse-click (or mouseover, depending on the tab that you selected), select the Object Action option. Then make sure that Play is selected from the Object Action drop-down list. To prevent the sound from playing on mouse-click (or mouseover), you can select the Squf option. (This doesn't take away any custom animation trigger, though.)
When you choose Automatically as the setting when you first place a sound, PowerPoint sets it up to play at the exact moment that the sound icon appears on-screen, with no delay You can change this default so that there is a delay, or you can turn it off so that the sound does not play automatically.
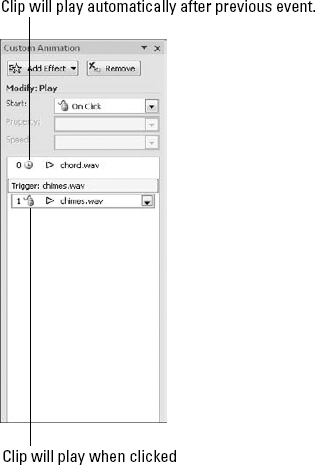
To access a sounds animation settings, click Custom Animation on the Animations tab. The Custom Animation pane appears, with a clip at the top of the list. A clock icon next to the clip indicates that the clip has a Start After Previous designation; this means that the clip is set up to play automatically. A clip that is set up to play on mouse click or mouseover appears with a mouse icon. Both icon types appear in figure 16.5.
Clips that you insert from the Clip Organizer have generic names, such as "Media 3." Clips that you insert manually with the Sound from File command have names that match the filename, such as chord.wav You can rename them in the Selection and Visibility task pane (accessed from the Home tab), and the new name will appear in the Custom Animation pane.
Note
The following sections give a brief overview of the animation settings in PowerPoint; for a fuller discussion, see Chapter 18.
To turn the automatic play on or off for a clip, do the following:
On the Animations tab, click Custom Animation to open the Custom Animation pane if it does not already appear.
Select the icon for the sound. A gray box appears around its name in the pane.
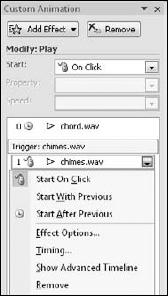
Move your cursor over the sound on the pane, so that a drop-down arrow appears to its right. Click the arrow to open the menu, as shown in figure 16.6.
If you want the sound to play automatically, choose Start With Previous or Start After Previous. Otherwise, choose Start On Click.
Tip
Specifying Start On Click in the Custom Animation pane starts the sound file when a user clicks the mouse anywhere on the slide, even if they do not click the sound icon itself. However, you can mimic the on-mouse-click action settings by clicking the arrow to the right of the sound name in the Custom Animation pane and clicking Timing to open the Timing tab. You can then click the Triggers button, and select the sound in the Start Effect on Click of box.
Depending on the situation, it may be useful to have a sound play after a short delay or to repeat the sound more than once. In Chapter 18, you can learn more about setting animation options. However, here are some quick instructions for customizing a sound:
On the Animations tab, click Custom Animation to open the Custom Animation pane if it does not already appear.
Select the icon for the sound. A gray box appears around its name in the pane.
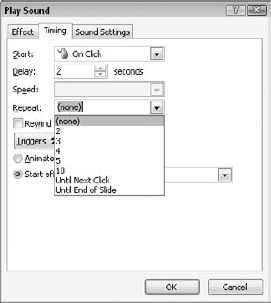
Open the menu for the sound clip, as shown in figure 16.6, and choose Timing. The Play Sound dialog box opens with the Timing tab displayed, as shown in figure 16.7.
Enter a number of seconds in the Delay text box. The delay occurs between when the previous event happens (in this case, the event is the initial appearance of the slide onscreen) and when the sound begins.
Open the Repeat drop-down list and choose the number of times that the sound should repeat. You can choose 2, 3, 4, 5, or 10 times, as well as Until Next Click, and Until Next Slide. You can also type in your own number (up to 9999).
Click OK.
There might be times when you want to start the clip from some point other than the beginning. For example, you may have a really good sound clip, except that the first 5 seconds are garbled or it may contain content that you do not want to use; or you may want to play just the first 15 seconds of the clip. To control the point at which a clip starts, do the following:
On the Animations tab, click Custom Animation to open the Custom Animation pane if it does not already appear.
Select the icon for the sound. A gray box appears around its name in the pane.
Open the menu for the sound clip and choose Effect Options. The Play Sound dialog box opens with the Effect tab displayed, as shown in figure 16.8.
In the Start Playing area, choose one of these options:
From the beginning, which is the default play mode.
From the last position if you want it to pick up where it left off when you stopped it.
From a specific time, and then enter the number of seconds into the clip that it should begin playing.
Click OK.

Normally a clip will stop playing after it has played once (or however many times you have set it up to play), or until a mouse-click. However, there may be times when you want it to stop earlier. For example, you may want a particular song to play while a certain slide is on-screen, but to stop when you move to the next slide. You may also want it to continue for the next two slides, and then stop.
To control when a sound clip stops, you can use the Effect tab of the Play Sound dialog box, as shown in figure 16.8:
Perform steps 1 to 4 of the preceding section.
In the Stop Playing area, choose one of these options:
On Click to use the default play mode.
After Current Slide to stop the audio when you move to the next slide, or when the clip has finished playing, whichever comes first.
After____Slides, and then enter a number of slides; the audio will continue until the specified number of additional slides have passed.
Click OK.
Tip
If you want to play more than one sound back-to-back throughout your presentation (as a background track), type 999 in the After____Slides text box. PowerPoint will stop the first sound when it starts the second one. If you simply put the number of slides that you expect PowerPoint to play the sound, it will not work the way that you expect. For more information, go to this article: www.rdpslides.com/pptfaq/FAQ00047.htm. You can also use the Play Across Slides option in the Play Sound dialog box for this.
When you give your presentation, you can specify an overall volume using the computers volume controls in Windows. However, sometimes you might want the volume of one sound to be different than others. To set the volume for a specific sound, follow these steps:
On the Animations tab, click Custom Animation to open the Custom Animation pane if it does not already appear.
Select the icon for the sound. A gray box appears around its name in the pane.
Open the drop-down menu for the sound clip and choose Effect Options. The Play Sound dialog box opens with the Effect tab displayed.
Click the Sound Settings tab.
Click the Sound Volume button to display a volume slider. Drag the slider up or down to adjust the volume, as shown in figure 16.9.
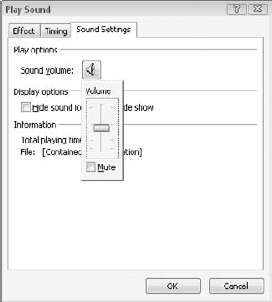
Figure 16.9. You can set the volume for an individual sound in comparison to the overall volume for the entire presentation.
Tip
The sound will play at a consistent volume throughout the duration of the clip. If you need the volume to change partway through, you can use a sound-editing program to change the clip volume before inserting it.
You can control some sound options from the Options tab, which appears when you select a sound clip. This tab allows you to quickly change some settings so that you do not have to open the full dialog boxes, For example, you can adjust the slide show volume, set a sound to play when clicked or automatically, set the sounds icon size, and so on. See figure 16.10.

Many presenters believe that sound icons are distracting and unprofessional, and so they prefer to assign sound files to clip art or to other objects that they place in the presentation. This way they still have precise control over when a sound plays (for example, when they click the clip art), but the control mechanism is hidden.
Although you can assign a sound to any object, many people assign their sounds to graphics. For example, you might attach a sound file of a greeting from your CEO to the CEO's picture.
Follow these steps to assign a sound to an object:
Insert the object that you want to associate with the sound. For example, the object can be a graphic, chart, or text box.
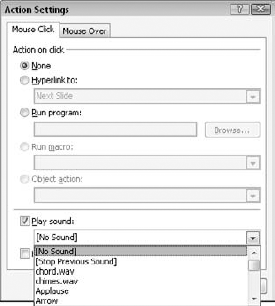
Select the object, and on the Insert tab, click Action. The Action Settings dialog box appears.
Click either the Mouse Click tab or the Mouse Over tab, depending on which action you want. For example, mouse-click plays the sound when you click the object, while mouse over plays the sound when you move your mouse pointer over the object.
Select the Play Sound check box. Then open the drop-down list and choose a sound, as shown in figure 16.11. You can choose from a variety of sounds that are stored in C:WindowsMedia, or you can choose Other Sound to open the Add Sound dialog box and pick a sound from any location. You can only use WAV sounds for this, though.
Click OK. The object now has the sound associated with it so that when you click it or move the mouse over it during the presentation, the sound plays.
Note
Chapter 18 is devoted entirely to transitions and animation effects, and so this chapter does not describe them in detail. In Chapter 18, you can learn how to assign sounds to the transition between slides, or to the movement (animation) of any object on any slide.
A lot of great music is available on CD these days, and most computers contain a CD-ROM drive that reads not only computer CDs but also plays audio CDs. PowerPoint takes advantage of this feature by letting you play tracks from an audio CD during your presentation.
Adding a CD audio clip to a slide is much like adding a regular sound clip. You place the clip on the slide and a little CD icon appears to allow you to activate the clip. You can then set properties for the clip to make it play exactly the way you want. However, the difference is that the audio track is not stored with the presentation file. Therefore, the audio CD must be in the CD drive of the computer that you are using to present the show. You cannot use CD audio tracks in presentations that you plan to distribute as self-running presentations on a data CD or over the Internet, because the computers on which it will run will not have access to the CD.
Tip
If you need to include audio from a CD in a presentation that will be shown on a PC that does not have access to the original audio CD, you can record a part of the CD track as a WAV file. To do this, you can use the Windows Sound Recorder program or another audio-recording utility. However, keep in mind that WAV files can be extremely large and can take up many megabytes for less than a minute of sound. To keep the file size smaller, consider using an MP3 or an ASF file instead of a WAV file. As always, make sure that you are not violating any copyright laws.
To play a CD track for a slide, you must place an icon for it on the slide. You can actually place a range of tracks, such as multiple tracks from a CD, using a single icon. To do so, follow these steps:
Insert the CD in your PC.
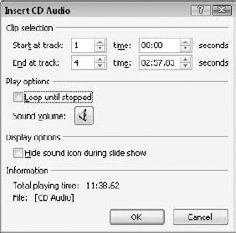
On the Insert tab, click the Sound drop-down arrow and then click Play Audio CD Track. The Insert CD Audio dialog box appears.
Specify the starting track number in the Start at Track text box in the Clip selection section, as shown in figure 16.12.
Specify the ending track number in the End at Track text box. If you want to play only a single track, the Start at Track and End at Track numbers should be the same. The start or end time changes only after you click one of the up- or down-arrows next to the time. For example, if you want to play tracks 1, 2, and 3, you should select track 1 as the start track and track 3 as the end track (as opposed to track 4).
If you want to begin the starting track at a particular spot (other than the beginning), enter this start time in the Time text box for that track. For example, to start the track 50 seconds into the song, you would type 00:50.
By default, PowerPoint plays an entire track. If you want to stop the ending track at a particular spot, enter this end time in the Time text box for that track. For example, in figure 16-12, track 1 is the starting track, and track 4 is the ending track, at 2:57 seconds long. If you want to end track 4 ten seconds early, you can change the Time setting under End to 2:47. You can see the total playing time at the bottom of the dialog box.
(Optional) You can adjust the volume with the Sound Volume button.
Click OK. A message appears, asking whether you want the sound to play Automatically or When Clicked. Make your selection. Depending on your choice, the CD track activates either when the slide appears (Automatically) or when you click its icon during the presentation (When Clicked).
The CD icon now appears in the center of the slide. You can drag it off the edge of the slide if it interferes with your slide content. You can also resize it if you want, just like any other object.
In the Custom Animation pane, open the menu for the CD icon and select Effect Options. Type a number in the Stop Playing After ___ Slides text box. Keep in mind that, in this context, PowerPoint considers each transition (whether backward or forward) a "slide," and so typing 999 in this text box ensures that your soundtrack will play throughout the entire presentation. (You can also do this by setting the Play Track setting on the Options tab to Play Across Slides.)
Tip
You can play any number of tracks from a single CD using a single icon, as long as they are contiguous and you play them in their default order. If you need non-contiguous tracks from the CD, or in a different order, or you just want certain segments of some of the clips, then you must place each clip individually on the slide, and then control their order in Custom Animation. See Chapter 18 for details. If you do not want the icons to appear on the slide, then drag them off the slide's edge.
The CD track is now an animated object on your slide. By animated, I mean that it is an object that has some action associated with it.
Tip
To play CD tracks across multiple slides, you must use custom animation, and you must set the sound to stop playing after 999 slides. Chapter 18 covers custom animation in more detail, but this is briefly how it works: Suppose you have a 30-slide presentation, and you want to play tracks 2, 4, and 6 from your CD, each for 10 slides. On slide 1, you would insert track 2, and set its custom animation to stop playing after 999 slides. Then you would do the same for track 4 on slide 11, and track 6 on slide 21.
To specify which track you want to play and where you want to start it, do the following:
Click the CD icon on the slide.
Display the CD Audio Tools Options tab, and set new values in the Start Playing and Stop Playing text boxes, as shown in figure 16.13. This is an alternative to opening the Play Audio CD dialog box again (from the CD clip's menu in the Custom Animation pane).

You can set many of the same properties for a CD track on a slide that you can for a sound file icon. You can also use the Custom Animation controls to specify precisely when and how a track will play. To do this, follow these steps:
Display the Custom Animation pane from the Animations tab.
Select the CD icon on the slide. A gray box appears around its name in the Custom Animation pane.
Open the drop-down menu for the selected clip and choose Effect Options. This opens the Play CD Audio dialog box.
From this point, the options are exactly the same as those for regular sound files that you have learned about earlier in this chapter. Refer back to the "Fine-tuning Sound Play Settings" section earlier in this chapter for details. All of the same tabs are available, including Effect, Timing, and Sound Settings.
The Advanced Timeline is turned off by default. When you turn it on, a timeline appears at the bottom of the Custom Animation pane, and indicators appear next to each clip to show how long it will take to play and at what point it starts. This is useful when you are trying to coordinate several sound and/or video clips to play sequentially with a certain amount of space between them. It also saves you from having to calculate their starting and ending times in relation to the initial appearance of the slide.
To turn the Advanced Timeline on, do the following:
If the Custom Animation pane does not already appear, click Custom Animation on the Animations tab.
Open the drop-down menu for any of the items in the pane and choose Show Advanced Timeline. The timeline appears.
(Optional) Widen the pane by dragging its left border toward the center of the slide, so that you have more working room.
(Optional) Click the word Seconds at the bottom of the pane. This opens a menu where you can choose Zoom In or Zoom Out to change the zoom on the timeline.
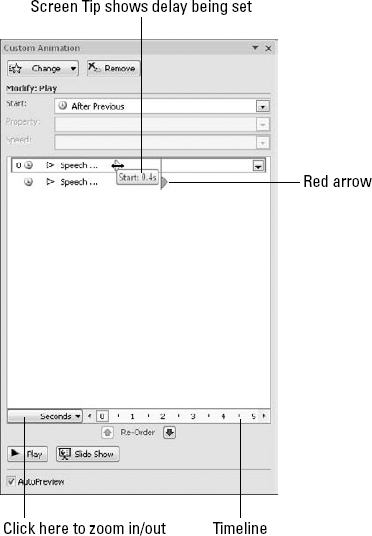
Click a clip to select it on the Custom Animation list. A red, right-pointing arrow appears next to the clip. The arrow position corresponds to the place on the timeline where the clip is currently set to begin. For example, figure 16.14 shows two clips, with each clip beginning at a different point.
Open the clip's drop-down menu and choose either With Previous or After Previous, depending on how you want it to relate to the earlier clip.
Warning
If there is more than one sound clip set to After Previous, a vertical line appears where the first clip will finish. If a clip is set to After Previous, it cannot start before the clip that precedes it. Therefore, any delay that you set up for a subsequent clip will be in relation to the end of the preceding clip. If the clip is set to With Previous, the two can overlap.
(Optional) To reorder the clips on the list, click a clip and then click the up or down Re-Order arrow at the bottom of the pane.
To change the amount of delay that is assigned to a clip, drag the red arrow next to the clip to the right or left. This is the same as changing the number in the Delay text box in the clip's properties.
Tip
You can use custom animation to create complex systems of sounds that play, pause, and stop in relation to other animated objects on the slide. Although Chapter 18 contains full details, here is a quick explanation of how to use custom animation: add a sound to the Custom Animation pane by clicking Add Effect, then choose Sound Actions, and then select Play, Pause, or Stop. In this way, you can create separate actions for the same clip to start, pause, or stop at various points.
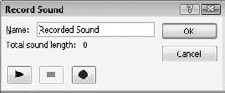
Most PCs have a microphone jack on the sound card where you can plug in a small microphone. You can then record your own sounds to include in the presentation. In this case, I am referring to simple, short sounds. If you want to record a full-blown voice-over narration, see Chapter 16. To record a sound, follow these steps:
Display the slide on which you want to place the sound clip.
On the Insert tab, open the Sound drop-down menu and choose Record Sound. The Sound Recorder dialog box appears, as shown in figure 16.15.
Click the Start Recording button.
Record the sound. When you are finished, click the Stop Recording button (the black square).
(Optional) To play back the sound, click the Play button (the black triangle).
Click OK to place the sound on the slide. A sound icon appears on the slide.
Use the controls that you learned about earlier in this chapter to specify when and how the sound plays.
In this chapter, you learned about the many ways that you can use sound in your presentation. You learned how to place a sound object on a slide, how to associate sounds with other objects, how to use a CD soundtrack, and how to record your own sounds. The next chapter continues to discuss multimedia by looking at how you can place video clips on slides.