
In this chapter we will look at the options you have to manage your software in Fedora. If you are used to a Windows environment where you are reliant on visiting several different vendor websites to download updates, you are in for a shock! Updating a full Fedora installation, including all the application software, is as easy as typing yum update at the command line. You will discover just how easy it is to install and even remove various software packages.
Fedora provides a variety of tools for system resource management. The following sections introduce the RPM Package Manager (RPM), along with command-line and graphical software management tools. You will also learn about monitoring and managing memory and disk storage on your system.
RPM was derived (in part) from early Linux package management software—named RPP, PMS, and PM—that were written in Perl. RPM was first used with Red Hat Linux 2.0 in late 1995, and then rewritten in C for the Red Hat Linux 3.0.3 (Picasso) release in 1996. Since then, the rpm command has been the prime feature of Red Hat’s unique software management system, which is based on the concept of pristine sources, or the capability to use a single, initial archive of a program’s source code to build packages for different systems and to track versions. With the release of Red Hat 8.0 (Psyche) in 2002, Red Hat offered a slightly updated graphical management interface for its venerable RPM application.
In addition to improving the package management of early software management scripts, RPM version 4.1 introduced software features designed to ease the task of building software for different platforms from a single set of source-code files. Changes can be tracked and kept outside a developer’s initial source code and multiple packages can be built from scratch and installed at the same time—simultaneously, RPM also verifies installation dependencies. Additional features, such as a checksum and GNU Privacy Guard (GPG) signatures, enable binary software packages to be safely distributed without the fear of virus infection or the inclusion of Trojan code.
The rpm command uses the RPM system to install, remove (erase), upgrade, verify, and build software archives known as .rpm files. These archives, or packages, contain package identification (a signature), checksums (mathematically derived validation values), and an archive of the software, either in source or binary form. An .rpm package also contains quite a bit of additional information, such as a name, version, and basic description, and can include pre- and post-installation scripts used for software installation, erasure, or upgrading.
The RPM database installed on your computer keeps track of which versions of which packages are installed. RPM uses your system’s /var/lib/rpm directory to store files (actually databases) containing information about the software installed on your system. You can use the ls command to view these files (you might see file sizes different from those shown here, depending on the amount of software you have installed):
total 49288
-rw-r--r--  1 rpm rpm  5488640 Oct 24 21:05 Basenames
-rw-r--r--  1 rpm rpm    12288 Oct 23 21:21 Conflictname
-rw-r--r--  1 rpm rpm  2150400 Oct 24 21:05 Dirnames
-rw-r--r--  1 rpm rpm  5386240 Oct 24 21:05 Filemd5s
-rw-r--r--  1 rpm rpm    28672 Oct 24 21:05 Group
-rw-r--r--  1 rpm rpm    20480 Oct 24 21:05 Installtid
-rw-r--r--  1 rpm rpm    45056 Oct 24 21:05 Name
-rw-r--r--  1 rpm rpm 37601280 Oct 24 21:05 Packages
-rw-r--r--  1 rpm rpm   331776 Oct 24 21:05 Providename
-rw-r--r--  1 rpm rpm    98304 Oct 24 21:05 Provideversion
-rw-r--r--  1 rpm rpm    12288 Oct 23 21:28 Pubkeys
-rw-r--r--  1 rpm rpm   397312 Oct 24 21:05 Requirename
-rw-r--r--  1 rpm rpm   192512 Oct 24 21:05 Requireversion
-rw-r--r--  1 rpm rpm    94208 Oct 24 21:05 Sha1header
-rw-r--r--  1 rpm rpm    49152 Oct 24 21:05 Sigmd5
-rw-r--r--  1 rpm rpm    12288 Oct 23 21:21 Triggername
The primary database of installed software is contained in the file named Packages. As you can see from the preceding example, this database can grow to 37MB (and perhaps larger) if you perform a full installation of Fedora (more than 4GB of software). After you install Fedora, rpm and related commands will use this directory during software management operations.
As a Fedora system administrator, you will use the rpm command or the Fedora Core graphical clients to perform one of five basic tasks. These operations, which must be conducted by the root operator, include the following:
Installing new software
Erasing or removing outdated or unneeded packages
Upgrading an installed software package
Querying to get information about a software package
Verifying the installation or integrity of a package installation
The rpm command has more than 60 command-line options, but its administrative functions can be grouped according to the previous five types of action. Graphical RPM clients provide easy-to-use interfaces to these operations. As a system administrator, you have a choice between using a graphical interface and using rpm’s various command-line options. The general format of an rpm command is
# rpm option packagename
The basic options look like this:
-i—. Installs the selected package or packages-e—. Erases (removes) the selected package or packages-U—. Removes the currently installed package, and then installs software with the contents of the selected package or packages, leaving the existing configuration files-q—. Queries the system or selected package or packages-V—. Verifies installed or selected package or packages
Because the new graphical RPM client can only install and uninstall RPM packages (for now—more functionality is promised), you will still end up administering RPM packages from the command line. You can perform all five basic rpm operations using the rpm command from the command line. This section gives you an introduction to performing those operations. It also provides examples of how to install, verify, query, remove, and upgrade a software package.
The most common rpm operation is software installation. Using rpm is an easy way to keep track of installed software, and it can be used to quickly remove undesired packages. Use the -i option, along with the full or partial name (using regular expressions) of a software package, to install software with rpm. For example, to install the unace archiving package, use the rpm command like this:
# rpm -ivh http://mirrors.zoreil.com/plf.zarb.org/mandrake/10.0/
i586/unace-2.2-2plf.i586.rpm
Retrieving http://mirrors.zoreil.com/plf.zarb.org/mandrake/10.0/
i586/unace-2.2-2plf.i586.rpm
warning: /var/tmp/rpm-xfer.48amVs: V3 DSA signature: NOKEY, key ID 8df56d05
Preparing...                ########################################### [100%]
   1:unace
########################################### [100%]
This example uses the v and h options, which provide a more verbose output and display of hash marks to show the progress of the installation. The example also demonstrates the capability of rpm to use HTTP or FTP servers to fetch files for installation. It also shows that rpm can use GPG keys to validate a file. (The key was not installed in our example.)
You can also use rpm to query its database after installing packages to verify an installation. Use the -V option, along with the name of a software package, to verify installation of your system. For example, to verify the unace archiving package, use the rpm command like this:
# rpm -V unace
Note
If everything is correct with your software installation, your system displays no response to rpm -V after you run the command; only problems are displayed.
As you can see from the following program output, you can get additional information about a package by adding additional verification options (such as two more v’s) to the -V option. To get more information about an installed package, use one or more forms of the rpm query options. For example, to display concise information about an installed package, use the -q option, along with the i option and the installed package name, like this (note that your version will be different from that shown here):
# rpm -qi yum
Name        : yum                          Relocations: (not relocatable)
Version     : 2.4.0                             Vendor: Red Hat, Inc.
Release     : 0.fc4 Build Date: Tue 16 Aug 2005 06:43:52 PM BST
Install Date: Sun 23 Oct 2005 04:39:48 PM BST Build Host: decompose.build.r edhat.com
Group       : System Environment/Base       Source RPM: yum-2.4.0-0.fc4.src.rpm
Size        : 1267012                          License: GPL
Signature   : DSA/SHA1, Tue 13 Sep 2005 07:30:33 PM BST, Key ID b44269d04f2a6fd2
Packager    : Red Hat, Inc. <http://bugzilla.redhat.com/bugzilla>
URL         : http://linux.duke.edu/yum/
Summary     : RPM installer/updater
Description :
Yum is a utility that can check for and automatically download and
install updated RPM packages. Dependencies are obtained and downloaded
automatically prompting the user as necessary.
This form of the rpm query provides quite a bit of information about the software package. (You can also query packages before installation by providing a pathname for them.)
If this package is not up to date, you can easily and quickly upgrade the package by downloading a newer version and then using rpm’s -U or upgrade option like this:
# rpm -Uvh yum-2.4.0-1.rpm
Preparing...                ########################################### [100%]
   1:yum                   ########################################### [100%]
Note that it was not necessary to remove the currently installed software package—the U option removes the old version of the software (saving the old configuration files), and then automatically installs the new software.
You can also upgrade your system software by using the rpm command’s -F or “freshen” option, which fetches a designated package from a remote FTP or HTTP server. For example, to upgrade the fetchmail-conf package, use rpm like this:
# rpm -Fv ftp://ftp.tux.org/linux/redhat/updates/9/en/os/i386/
initscripts-7.14-1.i386.rpm
Retrieving ftp://ftp.tux.org/linux/redhat/updates/9/en/os/i386/
initscripts-7.14-1.i386.rpm
Preparing packages for installation...
initscripts-7.14-1
Use the -e option, along with the name of a software package, to remove or erase software from your system with rpm. For example, to remove the unace archiving package, use the rpm command like this:
# rpm -e unace
Note that if the operation succeeds, no messages will be displayed on your system. You can quickly search for the names of installed packages by piping the output of rpm -qa through the grep and sort commands (refer to Chapter 5, “First Steps with Fedora,” for additional information on grep and sort); here’s how to do that search:
# rpm -qa | grep mail | sort
fetchmail-6.2.5-7.fc4.1
mailcap-2.1.19-1
mailx-8.1.1-44
procmail-3.22-16
sendmail-8.13.4-2
system-switch-mail-0.5.25-4
system-switch-mail-gnome-0.5.25-4
This example returns a sorted list of all packages with names containing the word mail.
Note
Another essential feature of the rpm command is its --rebuilddb option. If your system’s RPM database becomes corrupted, this is your first (and perhaps only) option for restoring software management services. We hope that you never have to use this option; help ensure that by always backing up your data!
Software packages on your Fedora system are organized into various groups, as you see later in this chapter. Using a group organization helps Fedora keep software organized by category and provides for hierarchical listings of software when using graphical RPM clients. You never have to manipulate these groups, but understanding the concept of package organization can help you gain familiarity with the way Fedora works.
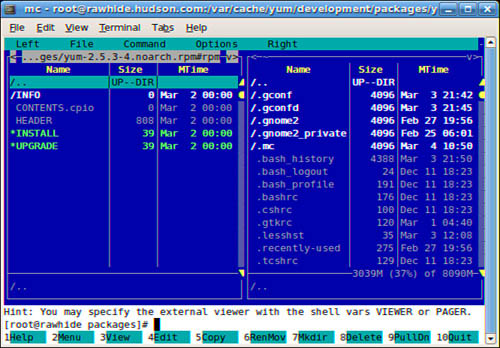
Occasionally, it is useful to extract a single file from an RPM package. You can do so using the command-line version of mc, the Midnight Commander. In Figure 7.1, the Midnight Commander is displaying the contents of the yum .rpm file. The Midnight Commander is a UNIX clone of the famous DOS Norton Commander, a file management utility. Using mc, just highlight the RPM file and press Enter; the contents of the RPM file will be displayed. In the listing, you can browse the file structure of the RPM file and use mc to copy files from it.
You might want to know what a .rpm script will do before you install the application. You can use the F3 key in mc to view the script files. If you want to look at the scripts without using mc, use this command:
# rpm -q --scripts filename > scripts.txt
This command pipes the scripts into a file, where you can examine it with a text editor. You could also pipe it to the less pagination command to view the scripts on your display:
# rpm -q --scripts filename | less
The Fedora graphical package management tool identified in the menu as Add/Remove Software is actually an application named pirut. This application replaces kpackage, gnorpm, and xrpm—all of which are no longer provided. Add/Remove Software allows you to select packages arranged in categories and install or remove them. With the addition of yum to Fedora, you can now add your own packages to the Fedora graphical tools’ database, improving its usefulness over earlier versions.
Launch the Fedora GUI package manager by clicking the Applications menu on your desktop, and then choose Add/Remove Software. You will be asked for the super-user password and then the package management tool launches with the package-browsing screen, shown in Figure 7.2.
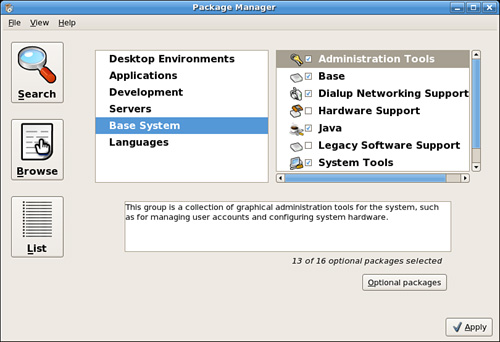
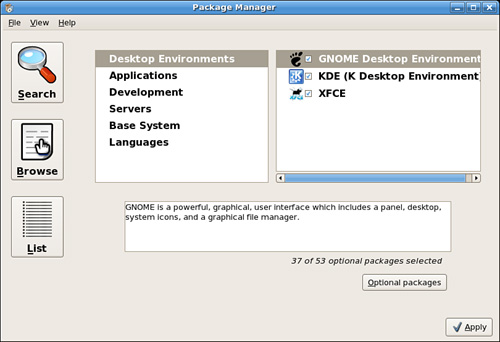
The packages listed in the screen are organized into broad categories, with subcategories listed on the right side. Tick the box next to each subcategory to select the default packages for it. The numbers to the bottom of the package group window indicate the number of packages installed on your system and the total number of packages available in the group. In Figure 7.3, you can see that 37 of 53 possible GNOME packages have been installed.
You can see brief information about the subcategories in the box below the selection. Use the Optional Packages button to get access to all the optional packages related to that subcategory. Simply tick each box to select that package, and click close to return to the main window. Clicking the Apply button starts the download and installation process, which can take some time depending on the amount of packages you specify.
pirut also allows you to search for specific packages, as well as to browse through a long list of packages. Just tick each package you want to install and click the Apply button. With the search function, pirut will remember each package that you tick, so you can use it again and again to build up a list of required packages.
For the Red Hat 8 and 9 releases, the only command-line application for the management of system software provided by Red Hat was RPM; the only GUI tool for management was the Red Hat Packages graphical client (system-config-packages) now identified as Add/Remove Software and rebuilt as pirut. For the average person, RPM is hopelessly complicated; it includes extra complexity to allow it to be used as a general .rpm file-building and development tool, features not normally used by many people. The graphical software management client has been improved for Fedora to enable the use of local and remote yum (that stands for YellowDog Updater, Modified, first used in the YellowDog [PPC] Linux distribution) repositories.
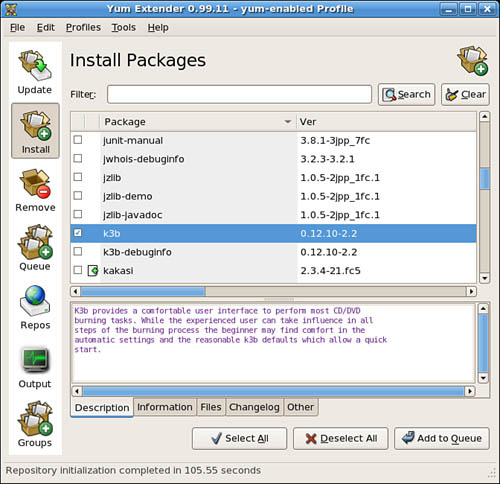
Not previously covered in this book is yumex, which is now included as part of the Fedora Extras project (see Figure 7.4). This handy tool offers similar functionality to pirut, although it has benefited from longer development. Like pirut, you can query the available packages, as well as build up a queue of packages that you want to install, giving you a chance to review your choices before committing. Yumex uses yum under the hood, and can also handle system updates, something that pirut is currently unable to do.
Although there are several alternatives for rpm/system-config-packages, two of the most useful are yum and it’s graphical sidekick pup. These package management applications go a long way toward solving dependency problems and easing the use of RPM to manage software. Both can install software from either local or remote repositories. Interestingly, the yum application is provided in Fedora, and pirut has been modified to be used as a graphical front end for it.
The benefit to installing and using either of these two applications is that they allow you easy access to and installation of programs that neither Red Hat nor Fedora Core can or will provide (such as multimedia and non-GPL licensed applications). Because the yum mirrors for Fedora all have current Fedora updates, you can be assured of access to the latest versions and security updates. The following sections discuss the yum and pup applications in more detail.
Some developers believe that although apt is a good tool, using it for .rpm packages is a hack. apt also is believed to be bloated with unnecessary code used for the Debian .deb packages. A new tool, yum, was developed using the Python language because the Fedora installer, anaconda, was written in Python and much of the code could be shared. This decision is what has made yum the choice for integration into the Fedora distribution. It works much the same as apt, but lacks a GUI tool. The Fedora developers have integrated support for yum into the graphical Fedora package management tool, as well as anaconda. Yum is the default package management tool in Fedora, and underpins pirut, pup, and anaconda, making it one of the important technologies in Fedora. The home page of yum can be found at http://linux.duke.edu/projects/yum/.
yum is automatically provided with Fedora, as it is the package manager of choice. Here are just a few commands to get you going:
yum list—. A list of all packages available from the repository.yum list installed—. A list of all packages installed on your computer.yum list updates—. A list of all updates available for your computer.yum installpackagename—. Installspackagename.yum update—. Run without apackagename,yumwill update all installed packages.yum removepackagename—. Removes a package and dependencies.yum upgrade—. Run without a package name,yumwill upgrade all packages and remove any obsolete packages.yum updatewill not remove obsolete packages.
You will find either apt or yum to be useful additions to Fedora. To learn more about yum, check out Chapter 38, “Advanced yum.”
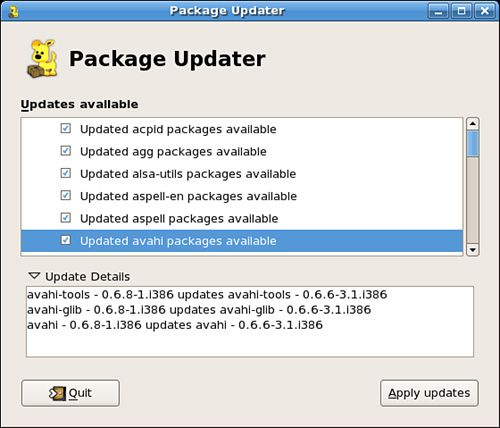
Pup is another new addition to Fedora and allows the user to quickly retrieve and install updates for their system (see Figure 7.5). The link with Yellow Dog Linux is still there, with a rather cheeky yellow puppy being used as the mascot for this application. It is very straightforward to use, simply allowing you to select the packages you want to install and providing details about each update. Just click the Apply Updates button to start the process. Pup can be found under the System Tools menu as the Software Updater option.
Not all the software you might want to use is available in rpm packages or in the exact form that you desire. Many complicated programs have options that can only be selected at compile time and many smaller, special-purpose applications only exist as source code. Fedora provides all the tools necessary for you to compile source code into binary applications. First, we cover building from source rpm files, and then manipulating source rpm files, and finally, building from source tarballs.
Note
For other software package formats, you can use the File Roller application (found in the Accessories menu) to easily display, browse, read, and extract contents of compressed files, including legacy archives such as tarballs or compressed tar archives (recognized by their .gz or .tgz extensions). Other compressed files, such as those created with the compress command (ending in .Z) or bzip2 files (ending in .bz2), are also supported by File Roller. The File Roller client will also convert compressed archives between gzip and bzip2 formats.
A rule of thumb is that you never build rpms as the root user even though the directories are already set up at /usr/src/redhat as follows:
# tree /usr/src/redhat
/usr/src/redhat
|-- BUILD
|-- RPMS
|   |-- athlon
|   |-- i386
|   |-- i486
|   |-- i586
|   |-- i686
|   |-- noarch
|-- SOURCES
|-- SPECS
|-- SRPMS
Using the mkdir command, re-create this directory tree structure in your home directory; you can name the new directory redhat (or anything you like). You might even want to create a new user just to build rpms and source code. (You can compile without being root; you just can’t install the software systemwide as a regular user.)
The configuration information for building rpms is kept in three places:
/usr/lib/rpm/*/macros—. The systemwide defaults/etc/rpm/macros.*—. Where systemwide changes are kept~/.rpmmacros—. Where user-specific changes are kept
Because we need to tell rpm that we will not be using the systemwide default build location for our user, we can
$ echo "%_topdir $HOME/redhat" > $HOME/.rpmmacros
Tip
Here, we use > instead of >> to blank the file in case there is already content in it. The >> construct appends information to a file.
To select a temporary directory
$ echo "%_tmppath $HOME/tmp" >> $HOME/.rpmmacros
To set any compiler optimization flags (here, we are using an Athlon processor as an example), we will use
$ echo "-o3 -march=athlon" >> $HOME/.rpmmacros
To rebuild a src.rpm file as a regular user, you would use
$ rpmbuild --recompile packagename.src.rpm
After a successful build, you will find the binary file(s) in ~/redhat/RPMS/athlon.
You can install them as root with
# rpm -Uvh --replacepkgs --replacefiles packagename.rpm
If the build fails, the error message points you to a solution (usually a dependency has not been satisfied). You will find that a lot of the packages named with -devel are needed before you compile from source code. Install the package for the missing dependency and retry the compile.
You might want to modify a source package for your own uses such as adding documentation, changing default settings, or patching the source code itself. Fedora Core provides the source code to its distribution in the form of source RPM files. You can access the source code on the Fedora FTP site.
Tip
An important part of the RPM file is the .spec file, a specification file. It tells RPM how to behave with the particular source files during compilation, installation, and erasure.
As an example, we will use information that was found at http://elektron.its.tudelft.nl/~rbos36/mdkfreetype2.html (the page has now been removed by the author) to modify the freetype2 library provided with Fedora in order to enable the bytecode interpreter. The code for the interpreter has been disabled by default because of redistribution licensing concerns that do not affect individual use. Enabling the interpreter will result in improved rendering of the TrueType fonts. We use the file from Red Hat 7.3 as our example, but the source file from FC5 should work as well.
Begin work by first installing the source RPM package with rpm -i. (Note that here we are building as root to follow the example from the web page; you should typically build packages as a regular user.) In our example, obtain the freetype-2.1.9-2.src.rpm and install it with rpm -i. The source code files are placed in /usr/src/redhat/SOURCES.
Copy the source file (it is a compressed tar file) to /tmp, and then cd (change directories) there to unpack and modify it:
# cp freetype-2.1.9.tar.bz2 /tmp
# cd /tmp
Because it is a .bz2 (BZip2 compressed) tar file, untar it with
# tar xjvf freetype-2.1.9.tar.bz2
and cd to the new directory:
# cd freetype-2.1.9
Using the text editor of your choice, edit the file include/freetype/config/ftoption.h and find the line
#undef TT_CONFIG_OPTION_BYTECODE_INTERPRETER
Change it to
#define TT_CONFIG_OPTION_BYTECODE_INTERPRETER
Save it and exit the text editor.
Next, re-create the compressed archive:
# cd /tmp
# tar cfj freetype-2.1.9.tar.bz2 ./freetype-2.1.9/
Put it back in your source directory:
# mv freetype-2.1.9.tar.bz2 /usr/src/SOURCES
Now edit the .spec file in /usr/src/redhat/SPECS to change the line beginning with Release to increment the number found there. (We are changing the version number by doing this, so it will not conflict with the version of the application we will be replacing.) Make any changes to the %description line to describe your changes if you desire, and save the file.
# rpmbuild -bb freetype.spec
During the build process, RPM will detect a patch and ask you about the patch; type y for “yes” to continue.
The new RPMs (actually four of them) are found in /usr/src/redhat/RPMS/i386. We need only the one named freetype-2.1.9; you can install it with rpm -Uvh. (This is why we changed the version number; if we had not, RPM would not upgrade to the “same” version. Had we not changed the version number, we could have forced the installation with the --replacepackages --replacefiles option.)
The font server needs to be restarted to use the new library, so we use the service command as shown in Chapter 15, “Automating Tasks.”
# service xfs restart
Enjoy your new look—provided by better rendering of the fonts.
Compiling applications from source is not that difficult. Most source code is available as compressed source tarballs—that is, tar files that have been compressed using gzip or bzip. The compressed files typically uncompress into a directory containing several files. It is always a good idea to compile source code as a regular user to limit any damage that broken or malicious code might inflict, so create a directory named source in your home directory.
From wherever you downloaded the source tarball, uncompress it into the ~/source directory using the -C option to tar:
$ tar zxvf packagename.tgz -C ~/source

$ tar zxvf packagename.tar.gz -C ~/source

$ tar jxvf packagename.bz -C ~/source

$ tar jxvf packagename.tar.bz2 -C ~/source
If you are not certain what file compression method was used, employ the file command to figure it out:
$ file packagename
Now, change directories to ~/source/packagename and look for a file named README, INSTALL, or a similar name. Print out the file if necessary because it contains specific instructions on how to compile and install the software. Typically, the procedure to compile source code is
$ ./configure
which runs a script to check if all dependencies are met and the build environment is correct. Then,
$ make
to compile the software. And finally, as root, run
# make install
If the compile fails, check the error messages for the reason and run
$ make clean
before you start again. You can also run
$ make uninstall
to remove the software if you do not like it.
An alternative to running make install is a program named CheckInstall, which produces an rpm file for your installation. This method allows the RPM database to be aware of and keep track of all the files you are installing. See the following sidebar on CheckInstall for more information.
http://www.rpm.org—Home page for the Fedora Package Manager. This site provides essential links to the latest version of RPM software for Linux and X desktop environments, such as GNOME.
http://www.rpm.org/max-rpm/—Link to the start of an update to Ed Bailey’s classic tome and RPM reference book, Maximum RPM.
http://linux.tnc.edu.tw/techdoc/maximum-rpm/rpmbook/node15.html—History of the Red Hat Package Manager.
http://www.smoogespace.com/documents/behind_the_names.html—A history of Red Hat Linux releases, and a good place to learn about the connection between the names of the releases.
http://www.gnupg.org/—Home page for GNU Privacy Guard, an unencumbered free replacement for Pretty Good Privacy.
http://www.debian.org/doc/manuals/project-history/ch-detailed.en.html—History of the Debian Linux package system.
https://sourceforge.net/projects/yumex/—Home page for the yumex application.