
IN THIS CHAPTER
In this chapter you learn about the five ways to automate tasks on your system: making them services that run as your system starts, making them services you start and stop by hand, scheduling them to run at specific times, connecting multiple commands together on the shell, and writing custom scripts that group everything together under one command.
After you turn on the power switch, the boot process begins with the computer executing code stored in a chip called the BIOS; this process occurs no matter what operating system you have installed. The Linux boot process begins when the code known as the boot loader starts loading the Linux kernel and ends only when the login prompt appears.
As a system administrator, you will use the skills you learn in this chapter to control your system’s services and manage runlevels on your computer. Understanding the management of the system services and states is essential to understanding how Linux works (especially in a multiuser environment) and will help untangle the mysteries of a few of your Fedora system’s configuration files. Furthermore, a good knowledge of the cron daemon that handles task scheduling is essential for administrators at all skill levels.
This chapter is also an introduction to the basics of creating shell scripts, or executable text files written to conform to shell syntax. Shell scripts run like any other command under Linux and can contain complex logic or a simple series of Linux command-line instructions. You can also run other shell scripts from within a shell program. The features and functions for several Linux shells are discussed in this chapter after a short introduction to working from the shell command line. You learn how to write and execute a simple shell program using bash, one of the most popular Linux shells.
Although most people consider a computer to be either on or off, in Fedora there are a number of states in between. Known as runlevels, they control what system services are started at bootup. These services are simply applications running in the background that provide some needed function to your system, such as getting information from your mouse and sending it to the display; or a service could monitor the partitions to see whether they have enough free space left on them. Services are typically loaded and run (also referred to as being started) during the boot process, in the same way as Microsoft Windows services are.
You can manage nearly every aspect of your computer and how it behaves after booting via configuring and ordering boot scripts, as well as by using various system administration utilities included with Fedora. In this chapter, you learn how to work with these boot scripts and system administration utilities. This chapter also offers advice for troubleshooting and fixing problems that might arise with software configuration or the introduction or removal of various types of hardware from your system.
Although the actual boot loading mechanism for Linux varies on different hardware platforms (such as the SPARC, Alpha, or PowerPC systems), Intel-based PCs running Fedora most often use the same mechanism throughout product lines. This process is accomplished through a Basic Input Output System, or BIOS. The BIOS is an application stored in a chip on the motherboard that initializes the hardware on the motherboard (and often the hardware that’s attached to the motherboard). The BIOS gets the system ready to load and run the software that we recognize as the operating system.
As a last step, the BIOS code looks for a special program known as the boot loader or boot code. The instructions in this little bit of code tell the BIOS where the Linux kernel is located, how it should be loaded into memory, and how it should be started.
If all goes well, the BIOS looks for a bootable volume such as a floppy disk, CD-ROM, hard drive, RAM disk, or other media. The bootable volume contains a special hexadecimal value written to the volume by the boot loader application (likely either GRUB or LILO, although LILO is not provided with Fedora) when the boot loader code was first installed in the system’s drives. The BIOS searches volumes in the order established by the BIOS settings (for example, the floppy first, followed by a CD-ROM, and then a hard drive) and then boots from the first bootable volume it finds. Modern BIOSs allow considerable flexibility in choosing the device used for booting the system.
Note
If the BIOS detects a hardware problem, the boot process fails and the BIOS generates a few beeps from the system speaker. These “beep codes” indicate the nature of the problem the BIOS has encountered. The codes vary among manufacturers, and the diagnosis of problems occurring during this phase of the boot process is beyond the scope of this book and does not involve Linux. If you encounter a problem, you should consult the motherboard manual or contact the manufacturer of the motherboard.
Next, the BIOS looks on the bootable volume for boot code in the partition boot sector also known as the Master Boot Record (MBR) of the first hard disk. The MBR contains the boot loader code and the partition table—think of it as an index for a book, plus a few comments on how to start reading the book. (We cover the MBR in more detail in Chapter 39, “Managing the File System.”) If the BIOS finds a boot loader, it loads the boot loader code into memory. At that point, the BIOS’s job is completed, and it passes control of the system to the boot loader.
The boot loader locates the Linux kernel on the disk and loads it into memory. After that task is completed, the boot loader passes control of the system to the Linux kernel. You can see how one process builds on another in an approach that enables many different operating systems to work with the same hardware.
Fedora can use a variety of boot loaders, including GRUB (the default for Fedora), LILO (a long-time standard but not available with Fedora), BootMagic (a commercial program), and others.
Note
Linux is very flexible and can be booted from multiple images on a CD-ROM, over a network using PXE (pronounced “pixie”) or NetBoot, or on a headless server with the console display sent over a serial or network connection. Work is even underway to create a special Linux BIOS at http://www.linuxbios.org/ that expedites the boot process because Linux does not need many of the services offered by the typical BIOS.
This kind of flexibility enables Linux to be used in a variety of ways, such as remote servers or diskless workstations, which are not generally seen in personal home use.
In a general sense, the kernel manages the system resources. As the user, you do not often interact with the kernel, but instead just the applications that you are using. UNIX refers to each application as a process, and the kernel assigns each process a number called a process ID (PID). First, the Linux kernel loads and runs a process named init, which is also known as the “father of all processes” because it starts every subsequent process. The init process looks for a list of instructions in a file named /etc/rc.d/rc.sysinit. That script issues a number of commands that are only run once—each time the system is turned on.
Note
Details about the sequence of events that occur when the Linux kernel is loaded can be found in the file /usr/src/linux-2.6/init/main.c if you installed the Linux kernel documentation.
This next step of the boot process begins with a message that the Linux kernel is loading, and a series of messages is printed to the screen, giving you the status of each command in rc.sysinit script language. A failure should display an error message. The -quiet option may be passed to the kernel at boot time to suppress many of these messages.
Although it is not intended that you modify the rc.sysinit script, knowledge of the contents of the file might aid you in diagnosing a problem if the boot process fails during this step. Look at /etc/rc.d/rc.sysinit, and you will discover that it’s just a text file filled with shell script language.
After the rc.sysinit script has run, the basic system is configured and the kernel is in control of the system. If the boot process were halted at this point, the system would just sit idle and the screen would be blank. To make the system useful for users, we need to start the system services. Those services are some of the applications that allow us to interact with the system.
After finishing with rc.sysinit script during the bootloading process, the init command uses the Linux system initialization table found in /etc/inittab to boot Fedora to a specific system state. The state of the system is commonly referred to as its runlevel.
Several different ways of starting and stopping system services exist, and Fedora uses a method derived from System V UNIX. The System V (pronounced “System Five”) method uses runlevels and different combinations of services to define different states of operation. Runlevels determine which of the many available system services are started, as well as in which order they start. A special runlevel is used to stop the system, and a special runlevel is used for system maintenance. As you will see, there are other runlevels for special purposes.
Note
The System V method makes extensive use of symbolic links, which are ways to reference a file in another location and make it appear as if it were in two or more places at once. The benefit is that you need to edit only one file to change them all. In addition, any reorganization to be done means that only links need to be changed, not the files themselves.
You use runlevels to manage the system services running on your computer. All these special files and scripts are set up during your installation of Fedora Linux, and they receive their initial values based on your choices during the installation—as described in Chapter 3, “Installing Fedora,” and Chapter 4, “Post-Installation Configuration.” You can change and control them manually, as you learn later in this chapter, using tools of varying sophistication.
The Fedora runlevels are defined for the Fedora system in /etc/inittab.
Note
Not all Linux distributions use the same runlevel configurations or runlevel definitions! For example, although Fedora uses runlevel 3 for a full, console-based multiuser mode, pre-7.1 versions of SUSE Linux defined this system state as runlevel 2. Red Hat, Fedora, and SUSE now use the same runlevels to conform to the Linux Standards Base, or LSB. As a system administrator, you should be aware of this issue, especially if you have devised any administrative scripts or tools that deal with system states.
Each runlevel tells the init command what services to start or stop. Although runlevels might all have custom definitions, Fedora has adopted some standards for runlevels:
Runlevel 0—. Known as “halt,” this runlevel is used to shut down the system.
Runlevel 1—. This is a special runlevel, defined as “single,” which boots Fedora to a root access shell prompt where only the root user may log in. Networking, X, and multiuser access are turned off. This is the maintenance or rescue mode. It allows the system administrator to perform work on the system, make backups, or repair configuration or other files.
Runlevel 2—. This runlevel dictates that Fedora be booted to a console, or text-based mode, with multiuser access.
Runlevel 3—. This runlevel is identical to runlevel 2, except that it also starts any networking services.
Runlevel 4—. This runlevel is undefined, and it can readily be configured to boot Fedora to a custom system state.
Runlevel 5—. This runlevel boots Fedora to a networking, multiuser state with an active X session. This is the most common runlevel for home users who want a graphical interface.
Runlevel 6—. This runlevel is used to reboot the system.
Runlevel 1 (also known as single-user mode or maintenance mode) is most commonly used to repair file systems and change the root password on a system when the password has been forgotten. Trespassers with physical access to the machine can also use runlevel 1 to access your system.
Entries in /etc/inittab use a field-based notation that determines the runlevel—when to execute the process, whether or not the process is executed when booting, whether or not to wait for the process to complete, and when to execute the process during booting. The default choices are adequate and need be changed only in unique circumstances that the average user is not likely to encounter.
The value of the default entry, or the initdefault line in /etc/inittab, determines the particular system state that Fedora is in when the login prompt is finally presented. For example,
id:5:initdefault:
In this example, Fedora boots to runlevel 5, a network-enabled, multiuser mode with an active X session and a graphical login. The value 5 is forwarded to the script named rc under the /etc/rc.d directory. This script is used when booting or changing runlevels; it also acts as an interpreter when you boot Fedora in Interactive mode by pressing i during the boot.
After /etc/rc.d/rc.sysinit has finished, init uses the corresponding /etc/inittab entry that matches the designated default runlevel. Using the previous example, the line in /etc/inittab would then be
l5:5:wait:/etc/rc.d/rc 5
Under the /etc/rc.d directory is a series of directories that correspond to each runlevel:
# ls /etc/rc.d
init.d  rc0.d  rc2.d  rc4.d  rc6.d    rc.sysinit
rc      rc1.d  rc3.d  rc5.d  rc.local
Assuming that the value is 5, the rc script executes all the scripts under the /etc/rc.d/rc.5 directory and then launches the graphical login.
If Fedora is booted to runlevel 5, for example, scripts beginning with the letter K followed by scripts beginning with the letter S under the /etc/rc.d/rc5.d directory are then executed:
# ls /etc/rc.d/rc5.d/
K01yum         K20bootparamd      K28amd        K45named      K61ldap
K74ypxfrd         S05kudzu       S24pcmcia      S85gpm  K05innd
K20iscsi           K30sendmail   K46radvd      K65identd   K84bgpd
S08ip6tables   S25netfs       S90crond K05saslauthd   K20netdump-server
K34dhcrelay   K50netdump    K65kadmin   K84ospf6d         S08ipchains
S26apmd        S90FreeWnn   K10psacct      K20nfs             K34yppasswdd
K50snmpd      K65kprop    K84ospfd          S08iptables    S28autofs
S90xfs  K10radiusd     K20rstatd          K35atalk      K50snmptrapd
K65krb524   K84ripd           S10network     S40smartd      S92lisa
K12canna       K20rusersd         K35dhcpd      K50tux        K65krb5kdc
K84ripngd         S12syslog      S44acpid       S95anacron  K12mailman
K20rwalld          K35smb        K50vsftpd     K70aep1000  K85zebra
S13irqbalance  S55cups        S95atd  K12mysqld      K20rwhod
K35vncserver  K54dovecot    K70bcm5820  K90isicom         S13portmap
S55sshd        S97messagebus K15httpd       K20spamassassin    K35winbind
K54pxe        K74ntpd     K91isdn           S14nfslock     S56rawdevices
S97rhnsd K15postgresql  K24irda            K40mars-nwe   K55routed
K74ups      K95firstboot      S17keytable    S56xinetd      S99local
K16rarpd       K25squid           K45arpwatch   K61hpoj       K74ypserv
S00microcode_ctl  S20random      S84privoxy     S99mdmonitor
These scripts are actually symbolic links to system service scripts under the /etc/rc.d/init.d directory (yours might look different, depending on whether you are working with a workstation or server installation and the services or software packages installed on your system):
# ls /etc/rc.d/init.d/
acpid     bgpd        firstboot  ip6tables   keytable    mars-nwe        nfs
postgresql  ripd       smartd        vncserver  zebra  aep1000   bluetooth
FreeWnn    ipchains    killall     mdmonitor       nfslock  privoxy
ripngd     smb           vsftpd  amd       bootparamd  functions  iptables
kprop       messagebus      nscd     psacct      routed     snmpd         winbind
anacron   canna       gkrellmd   irda        krb524      microcode_ctl   ntpd
pxe         rstatd     snmptrapd     xfs  apmd      cpqarrayd   gpm
irqbalance  krb5kdc     mysqld          ospf6d   radiusd     rusersd
spamassassin  xinetd  arpwatch  crond       halt       iscsi       kudzu
named           ospfd    radvd       rwalld     squid         ypbind
atalk     cups        hpoj       isdn        ldap        netdump         pand
random      rwhod      sshd          yppasswdd  atd       dhcpd
httpd      isicom      lisa        netdump-server  pcmcia   rarpd
saslauthd  syslog        ypserv  autofs    dhcrelay    identd     kadmin
lm_sensors  netfs           portmap  rawdevices  sendmail   tux
ypxfrd  bcm5820   dovecot     innd       kdcrotate   mailman
network         postfix  rhnsd       single     ups           yum
The rc5.d links are prefaced with a letter and number, such as K15 or S10. The (K) or (S) in these prefixes indicates whether a particular service should be killed (K) or started (S), and passes a value of stop or start to the appropriate /etc/rc.d/init.d script. The number in the prefix executes the specific /etc/rc.d/init.d script in a particular order. The symlinks have numbers to delineate the order in which they are started. Nothing is sacred about a specific number, but some services need to be running before others are started. You would not want your Fedora system to attempt, for example, to mount a remote Network File System (NFS) volume without first starting networking and NFS services.
After all the system services are started for our runlevel, init starts the graphical login (because we are in runlevel 5). The graphical login’s definition appears toward the end of /etc/inittab and looks like this:
# Run xdm in runlevel 5

x:5:respawn:/etc/X11/prefdm -nodaemon
This example shows that the shell script named prefdm executes the proper X11 display manager when Fedora is booted to runlevel 5.
After you select a default runlevel, that runlevel is selected every time you restart the system from a power-off state. There might come a time when you do not want to boot into that runlevel. You might want to enter the maintenance mode or start the system without an active X server and graphical login in order to modify or repair the X server or desktop manager. You have to follow several specific steps to boot to a nondefault runlevel if you use GRUB, the default boot loader for Fedora.
Note
If you have enabled a GRUB password, you must first press p, type your password, and then press Enter before using this boot method.
The GRUB boot loader passes arguments, or commands, to the kernel at boot time. These arguments are used, among other things, to tell GRUB where the kernel is located and also to pass specific parameters to the kernel, such as how much memory is available or how special hardware should be configured.
To override the default runlevel, you can add an additional kernel argument to GRUB as follows:
At the graphical boot screen, press
e(for edit), scroll down to select the kernel, and presseagain.Press the spacebar, type
singleor1(Fedora allows S andsas well), and press Enter.Finally, press
bto boot, and you’ll boot into runlevel 1 instead of the default runlevel listed in/etc/inittab.
Fedora includes several command-line and graphical system administration utilities you can use to start, stop, reorder, or restart various services in different runlevels. These commands (discussed later in this chapter) work by renaming, removing, or creating symbolic links from /etc/rc.d/init.d to /etc/rc.d/rc.* as appropriate. Many administrators use these commands to change the symbolic links to the scripts under each /etc/rc.d/rc* directory rather than do it by hand.
The locations of symbolic links can also be confusing. Red Hat (and now Fedora) has traditionally kept them in one place, and the Linux Standards Base (LSB) requires that they now be located elsewhere. Because other scripts reference these files and it would be difficult to change them all, Fedora places symbolic links in the places specified by the LSB.
As you might surmise, symbolic links are very powerful tools in the system administrator’s toolbox.
Each /etc/rc.d/init.d script, or init script, contains logic that determines what to do when receiving a start or stop value. The logic might be a simple switch statement for execution, as in this example:
case "$1" in
  start)
        start
        ;;
  stop)
        stop
        ;;
  restart)
        restart
        ;;
  reload)
        reload
        ;;
  status)
        rhstatus
        ;;
  condrestart)
        [ -f /var/lock/subsys/smb ] && restart || :
        ;;
  *)
        echo $"Usage: $0 {start|stop|restart|status|condrestart}"
        exit 1
esac
Although the scripts can be used to customize the way that the system runs from power-on, absent the replacement of the kernel, this script approach also means that the system does not have to be halted in total to start, stop, upgrade, or install new services.
Note that not all scripts use this approach, and that other messages might be passed to the service script, such as restart, reload, or status. Also, not all scripts respond to the same set of messages (with the exception of start and stop, which they all have to accept by convention) because each service might require special commands.
Tip
You can write your own init scripts using the existing scripts as examples. Sample scripts can also be found in /usr/share/doc/initscripts/sysvinitfiles, along with a brief tutorial written by Red Hat and a brief explanation of all the options available to use in init scripts.
After all the system scripts have been run, your system is configured and all the necessary system services have been started. If you are using a runlevel other than 5, the final act of the init process is to launch the user shell—bash, tcsh, zsh, or any of the many command shells available. The shell launches and you see a login prompt on the screen.
As the master control file for system startup, /etc/inittab and its corresponding system of symbolic links control system services. You can manage /etc/inittab and its symbolic links using these graphical and nongraphical administrative tools:
chkconfig—. A small script that helps you configure system services.ntsysv—. A graphical interface for thechkconfigconfiguration script.system-config-services—. A full graphical services configuration client. This application is found in the System Services/Sever settings menu as the Services menu item.
The following sections explain how to use all these administrative tools to configure and manage services in Fedora.
Traditionally, the command-line tool chkconfig has been used to effect administration of the services and their associations in the different runlevels. chkconfig was a major improvement over the process of configuring the symbolic links by hand. It is an effective, text-based command-line tool that you can use to display, diagnose, or change the starting or stopping of system services (as available under /etc/rc.d/init.d) in each runlevel.
For example, to list all services that are turned on in runlevel 5, you can pipe the output of chkconfig through the grep command like this:
# /sbin/chkconfig --list | grep '5:on' | sort
anacron         0:off   1:off   2:on    3:on    4:on    5:on    6:off
apmd            0:off   1:off   2:on    3:on    4:on    5:on    6:off
atd             0:off   1:off   2:off   3:on    4:on    5:on    6:off
autofs          0:off   1:off   2:off   3:on    4:on    5:on    6:off
canna           0:off   1:off   2:on    3:off   4:on    5:on    6:off
crond           0:off   1:off   2:on    3:on    4:on    5:on    6:off
Not all the output is shown here, but as you can see, chkconfig can display the value of off or on for each service and each runlevel. The sample output shows only those services that are started in runlevel 5. The chkconfig command can be used to reassign start or stop values for each runlevel and each service. As an example, to alter the scripts to start power management (controlled by the apmd script under /etc/rc.d/init.d) when using Fedora during runlevel 5, use chkconfig like this:
# chkconfig --level 5 apmd on
You can then verify this action by again using grep on chkconfig’s output like this:
# chkconfig --list | grep apmd
apmd            0:off   1:off   2:on    3:on    4:on    5:on   6:off
The chkconfig command does not start or stop a service; instead, it alters the scripts that start or stop a service, or it can report on the status of a service. Affecting only the current runlevel by default, other runlevels can be modified by using the -levels option. You would use the ntsysv or service commands or run the daemons directly in order to actually start or stop services (as described later in this chapter). All these tools have useful man pages to refresh your memory of all the available options.
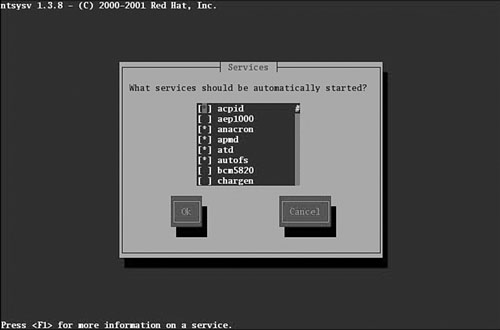
ntsysv is a graphical interface you can use to access chkconfig and use a graphical interface. ntsysv is an ncurses-based interface, meaning that it offers crude, block graphics and elements you can tab through and select by pressing the spacebar (see Figure 15.1).

When you have the ntsysv application open, you can scroll through the list of services and toggle a service on or off by pressing the spacebar on the keyboard. When finished, use the Tab key to highlight the OK or Cancel button. Your changes are saved and used the next time Fedora is booted.
Note
ntsysv is simple to use and it’s an excellent tool for a system without X, but it works for only the runlevel you are currently in. Use the --level option to modify other runlevels.
The Fedora tool setup is an ncurses-based menu for all the available ncurses-based command-line configuration tools (see Figure 15.2). It can be used to access ntsysv and all the other command-line configuration tools.
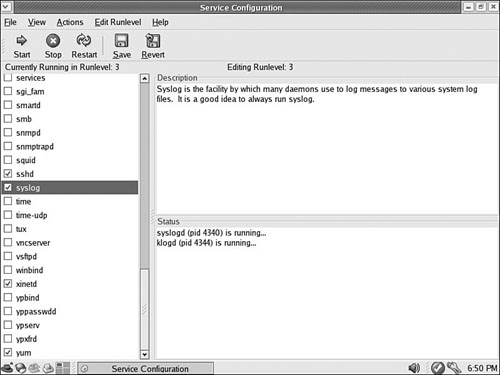
Fedora’s developers have added GUIs to many text-only, command-line–based system administration tools as Linux has matured. These tools provide an easier-to-use interface and don’t require memorization or lookup of command-line options. Fedora provides its own Service Configuration tool for the control and administration of services (see Figure 15.3). You can access the GUI menu selection from the System Settings/Server Settings menu, and then select Services. The command-line name of this tool is system-config-services.
The xinetd daemon is a replacement for inetd; it listens for requests for services on certain ports and starts those services as required. xinetd is called a super server because it controls other servers. Its purpose is to conserve resources by not running services when not needed. The xinetd daemon is more secure than the older inetd, offers better logging facilities than inetd, and can redirect service requests to another machine. It does not require the root user to start any services.
The configuration file for xinetd is found at /etc/xinetd.conf, configuration files for individual services are located in /etc/xinet.d/; the particulars of its format are covered in the man page for xinetd.conf, which also provides a sample file listing. Fedora provides the appropriate server RPM packages already configured to use xinetd if possible. If you are installing servers manually from source code, the included documentation describes the appropriate xinetd configuration. Services run under xinetd cannot be started and stopped in the same manner as the services run from scripts in /etc/rc.d/init.d; you must restart the xinetd service itself and let it control those services.
Here is a sample listing of the rsync file /etc/xinet.d/rsync:
# default: off
# description: The rsync server is a good addition to an ftp server, as it
#       allows crc checksumming etc.
service rsync
{
        disable = yes
        socket_type     = stream
        wait            = no
        user            = root
        server          = /usr/bin/rsync
        server_args     = --daemon
        log_on_failure  += USERID
}
The items are straightforward and vary from service to service. Although you can edit this by hand, it can be configured via the command line or graphical service configuration clients.
After making changes to system services and runlevels, you can use the telinit command to change runlevels on-the-fly on a running Fedora system. Changing runlevels this way allows system administrators to alter selected parts of a running system to make changes to the services or to put changes into effect that have already been made (such as reassignment of network addresses for a networking interface).
For example, a system administrator can quickly change the system to maintenance or single-user mode by using the telinit command with its S option like this:
# telinit S
The telinit command uses the init command to change runlevels and shut down currently running services. The command then starts services for the specified runlevel, where in this example, the single-user runlevel is the same as runlevel 2. The init command can only be run from a console, not from an xterm running in an X session.
After booting to single-user mode, you can then return to multiuser mode without X, like this:
# telinit 3
If you have made changes to the system initialization table itself, /etc/inittab, use the telinit command’s q command-line option to force init to re-examine the table.
Reordering or changing system services during a particular runlevel is rarely necessary when using Fedora unless some disaster occurs. But system administrators should have a basic understanding of how Linux boots and how services are controlled in order to perform troubleshooting or to diagnose problems. By using additional utilities such as the dmesg | less command to read kernel output after booting or by examining system logging with cat /var/log/messages | less, it is possible to gain a bit more detail about what is going on when faced with troublesome drivers or service failure.
To better understand how to troubleshoot service problems in Fedora, look at the diagnosis and resolution of a typical service-related issue. In this example, X won’t start: You don’t see a desktop displayed, nor does the computer seem to respond to keyboard input. The X server might either be hung in a loop, repeatedly failing, or might exit to a shell prompt with or without an error message.
The X server attempts to restart itself only in runlevel 5, so to determine whether the X server is hung in a loop, try switching to runlevel 3.
Tip
If you are working on a multiuser system and might inadvertently interrupt the work of other users, ask them to save their current work; then change to a safer runlevel, such as single-user mode.
Change to runlevel 3 by switching to another virtual console with Ctrl+Alt+F2, logging in as root, and running the command telinit 3. This switch to runlevel 3 stops the X server from attempting to restart. Now you can easily examine the error and attempt to fix it.
First, try to start the X server “naked” (without also launching the window manager). If you are successful, you will get a gray screen with a large X in the middle. If so, kill X with the Ctrl+Alt+Backspace key combination, and look at your window manager configuration. (This configuration varies according to which window manager you have chosen.)
Let’s assume that X won’t run “naked.” If we look at the log file for Xorg (it’s clearly identified in the /var/log directory), we’ll pay attention to any line that begins with (EE), the special error code. We can also examine the error log file, .xsessions-error, in our home directory if such a file exists.
If we find an error line, the cause of the error might or might not be apparent to us. One nice thing about the Linux community is that it is very unlikely that you are the first person to experience that error. Enter the error message (or better, a unique part of it) into http://www.google.com/linux and discover what others have had to say about the problem. You might need to adjust your search to yield usable results, but that level of detail is beyond the scope of this chapter. Make adjustments and retest as before until you achieve success. Fix the X configuration and start X with startx. Repeat as necessary.
Caution
Before making any changes to any configuration file, always make a backup copy of the original, unmodified file. Our practice is to append the extension .original to the copy because that is a unique and unambiguous identifier.
If you need to restore the original configuration file, do not rename it, but copy it back to its original name.
If you change a configuration file for a system service, it is usually necessary to stop and restart the service to make it read the new configuration. If you are reconfiguring the X server, it is often convenient to change from runlevel 5 to runlevel 3 to make testing easier and then switch back to runlevel 5 to re-enable the graphical login. If a service is improperly configured, it is easier to stop and restart it until you have it configured correctly than it is to reboot the entire machine.
There are several ways to manually start or stop services or to change runlevels while using Fedora. The traditional way to manage a service (as root) is to call the service’s /etc/rc.d/init.d name on the command line with an appropriate keyword, such as start, status, or stop. For example, to start the automated nightly update of the yum RPM package database, call the /etc/rc.d/init.d/yum script like this:
# /etc/rc.d/init.d/yum start
Enabling nightly yum update:                   [ OK ]
The script executes the proper programs and reports their status. Stopping services is equally easy, and in fact, you can also check the status of some services by using the status keyword like this:
# /etc/rc.d/init.d/yum status
Nightly yum update is enabled.
In this example, the yum script reports that the daemon is running. This information might be useful for other system management tasks.
A much easier way to manually start or stop a service is to use a script named service. Using service, you do not have to know the full pathname to the system service; you need know only the name of the system service you want to manipulate. Using this approach, the previous yum example looks like this:
# service yum start
Nightly yum update is enabled:                 [ OK ]
Of course, the GUI tools mentioned earlier also have the functionality to start and stop specific services in your current runlevel. The tool you choose is a matter of personal preference; a good system administrator is aware of them all.
There are three ways to schedule commands in Fedora, all of which work in different ways. The first is the at command, which specifies a command to run at a specific time and date relative to today. The second is the batch command, which is actually a script that redirects you to the at command with some extra options set so that your command runs when the system is quiet. The last option is the cron daemon, which is the Linux way of executing tasks at a given time.
If there is a time-intensive task you want to run, but you do not want to do it while you are still logged in, you can tell Fedora to run it later with the at command. To use at, you need to tell it the time at which you want to run and then press Enter. You then see a new prompt that starts with at>, and everything you type there—until you press Ctrl+D—comprises the commands you want at to run.
When the designated time arrives, at performs each action individually and in order, which means later commands can rely on the results of earlier commands. In this next example, run at just after 5 p.m., at is used to download and extract the latest Linux kernel at a time when the network should be quiet:
[paul@caitlin ~]$ at now + 7 hours
at> wget http://www.kernel.org/pub/linux/kernel/v2.6/linux-2.6.10.tar.bz2
at> tar xvfjp linux-2.6.10.tar.bz2
at> <EOT>
job 2 at 2005-01-09 17:01
Specifying now + 7 hours as the time does what you would expect: at was run at 5 p.m., so the command runs just after midnight that night. When your job finishes, at sends you mail with a full log of your job’s output; type mail at the console to bring up your mailbox and then press the relevant number to read at’s mail.
If you have a more complex job, you can use the -f parameter to have at read its commands from a file, like this:
echo wget http://www.kernel.org/pub/linux/kernel/v2.6/linux-2.6.10.tar.bz2;
tar xvfjp linux-2.6.10.tar.bz2 > myjob.job
at -f myjob.job tomorrow
As you can see, at is flexible about the time format it takes; you can specify it in three ways:
Using the
nowparameter, you can specify how many minutes, hours, days, or weeks relative to the current time—for example,now + 4 weekswould run the command one month from today.You can also specify several special times, including
tomorrow,midnight,noon, orteatime(4 p.m.). If you do not specify a time withtomorrow, your job is set for precisely 24 hours from the current time.You can specify an exact date and time using
HH:MM MM/DD/YYformat—for example, 16:40 22/12/05 for 4:40 p.m. on the 22nd of December 2005.
When your job is submitted, at reports the job number, date, and time that the job will be executed; the queue identifier; plus the job owner (you). It also captures all your environment variables and stores them along with the job so that, when your job runs, it can restore the variables, preserving your execution environment.
The job number and job queue identifier are both important. When you schedule a job using at, it is placed into queue a by default, which means it runs at your specified time and takes up a normal amount of resources.
There is an alternative command, batch, which is really just a shell script that calls at with a few extra options. These options (-q b -m now, if you were interested) set at to run on queue b (-q b), mailing the user on completion (-m), and running immediately (now). The queue part is what is important: Jobs scheduled on queue b are executed only when the system load falls below 0.8—that is, when the system is not running at full load. Furthermore, they run with a lower niceness, meaning queue a jobs usually have a niceness of 2, whereas queue b jobs have a niceness of 4.
Because batch always specifies now as its time, you need not specify your own time; it simply runs as soon as the system is quiet. Having a default niceness of 4 means that batched commands get less system resources than queue jobs (at’s default) and less system resources than most other programs. You can optionally specify other queues using at. Queue c runs at niceness 6, queue d runs at niceness 8, and so on. However, it is important to note that the system load is checked only before the command is run. If the load is lower than 0.8, your batch job is run. If the system load subsequently rises beyond 0.8, your batch job continues to run, albeit in the background, thanks to its niceness value.
When you submit a job for execution, you are also returned a job number. If you forget this or just want to see a list of other jobs you have scheduled to be run later, use the atq command with no parameters. If you run this as a normal user, it prints only your jobs; running it as a super-user prints everyone’s jobs. The output is in the same format as when you submit a job, so you get the ID number, execution time, queue ID, and owner of each job.
If you want to delete a job, use the atrm command followed by the ID number of the job you want to delete. The next example shows atq and atrm being used to list jobs and delete one:
[paul@caitlin ~]$ atq
14      2005-01-20 23:33 a paul
16      2005-02-03 22:34 a paul
17      2005-01-25 22:34 a paul
15      2005-01-22 04:34 a paul
18      2005-01-22 01:35 b paul
[paul@caitlin ~]$ atrm 16
[paul@caitlin ~]$ atq
14      2005-01-20 23:33 a paul
17      2005-01-25 22:34 a paul
15      2005-01-22 04:34 a paul
18      2005-01-22 01:35 b paul
In that example, job 16 is deleted using atrm, and so it does not show up in the second call to atq.
The default configuration for at and batch is to allow everyone to use it, which is not always the desired behavior. Access is controlled through two files: /etc/at.allow, and /etc/at.deny. By default, at.deny exists but is empty, which allows everyone to use at and batch. You can enter usernames into at.deny, one per line, to stop those users scheduling jobs.
Alternatively, you can use the at.allow file; this does not exist by default. If you have a blank at.allow file, no one except root is allowed to schedule jobs. As with at.deny, you can add usernames to at.allow one per line, and those users can schedule jobs. You should use either at.deny or at.allow: When someone tries to run at or batch, Fedora checks for her username in at.allow. If it is in there, or if at.allow does not exist, Fedora checks for her username in at.deny. If her username is in at.deny or at.deny does not exist, she is not allowed to schedule jobs.
The at and batch commands work well if you just want to execute a single task at a later date, but they are less useful if you want to run a task frequently. Instead, there is the crond daemon for running tasks repeatedly based on system—and user—requests. cron has a similar permissions system to at: Users listed in the cron.deny file are not allowed to use cron, and users listed in the cron.allow file are. An empty cron.deny file—the default—means everyone can set jobs. An empty cron.allow file means that no one (except root) can set jobs.
There are two types of jobs: system jobs and user jobs. Only root can edit system jobs, whereas any user whose name appears in cron.allow or does not appear in cron.deny can run user jobs. System jobs are controlled through the /etc/crontab file, which by default looks like this:
SHELL=/bin/bash
PATH=/sbin:/bin:/usr/sbin:/usr/bin
MAILTO=root
HOME=/

# run-parts
01 * * * * root run-parts /etc/cron.hourly
02 4 * * * root run-parts /etc/cron.daily
22 4 * * 0 root run-parts /etc/cron.weekly
42 4 1 * * root run-parts /etc/cron.monthly
The first four lines are optional: SHELL specifies which shell should be used to execute the job (defaults to the shell of the user who owns the crontab file, usually /bin/bash), PATH specifies the search path for executables to use, and you should avoid using environment variables there. MAILTO defines to whom mail should be sent. If this is not set, it uses the owner of the crontab, but if you do not want to receive mail when your job runs, just set it to "". Finally, HOME specifies the home directory of the user; again, this defaults to the user’s home directory if left unspecified.
The next line, # run-parts, starts with a pound sign (#) and so is treated as a comment and ignored. The next four lines are the important parts: They are the jobs themselves.
Each job is specified in seven fields that define the time to run, owner, and command. The first five commands specify the execution time in quite a quirky order: minute (0–59), hour (0–23), day of the month (1–31), month of the year (1–12), and day of the week (0–7). For day of the week, both 0 and 7 are Sunday, which means that 1 is Monday, 3 is Wednesday, and so on. If you want to specify “all values” (that is, every minute, every hour, every day, and so on), use an asterisk, *.
The next field specifies the username of the owner of the job. When a job is executed, it uses the username specified here. The last field is the command to execute.
So, the first job runs at minute 1, every hour of every day of every month and executes the command run-parts /etc/cron.hourly. The run-parts command is a simple script that runs all programs inside a given directory—in this case, /etc/cron.hourly. So, in this case, the job executes at 00:01 (1 minute past midnight), 01:01, 02:01, 03:01, and so on, and uses all the programs listed in the cron.hourly directory.
The next job runs at minute 2 and hour 4 of every day of every month, running run-parts /etc/cron.daily. Because of the hour limitation, this script runs only once per day, at 4:02 a.m. Note that it uses minute 2 rather than minute 1 so that daily jobs do not clash with hourly jobs. You should be able to guess what the next two jobs do, simply by looking at the commands they run!
Inside each of those four directories (cron.hourly, cron.daily, cron.weekly, and cron.monthly) is a collection of shell scripts that are run by run-parts. For example, in cron.daily are scripts such as rpm, which saves a list of your packages in /var/log/rpmpkgs every day; logrotate, which handles backing up of log files; and makewhatis, which updates the whatis database. You can add other system tasks to these directories if you want to, but you should be careful to ensure your scripts are correct.
Caution
The cron daemon reads all the system crontab files and all user crontab files once a minute (on the minute; that is, at 6:00:00, 6:01:00, and so on) to check for changes. However, any new jobs it finds are not executed until at least one minute has passed.
For example, if it is 6:01:49 (that is, 49 seconds past one minute past 6 a.m.) and you set a cron job to run at 6:02, it will not execute. At 6:02, the cron daemon rereads its configuration files and sees the new job, but is not able to execute it. If you set the job to run at 6:02 a.m. every day, it will be executed the following morning and every subsequent morning.
This same situation exists when deleting jobs. If it is 6:01:49 and you have a job scheduled to run at 6:02, deleting the job makes no difference: cron runs it before it rereads the crontab files for changes. However, after it has reread the crontab file and noticed the job is no longer there, it is not executed on subsequent days.
There are alternative ways of specifying dates. For example, you can use sets of dates and times by using hyphens or commas, such as hours 9–15 would execute at 9, 10, 11, 12, 13, 14, and 15 (from 9 a.m. to 3 p.m.), whereas 9,11,13,15 would miss out at the even hours. Note that it is important that you do not put spaces into these sets because the cron daemon would interpret them as the next field. You can define a step value with a slash (/) to show time division: */4 for hours means “every four hours all day,” and 0-12/3 means “every three hours from midnight to noon.” You can also specify day and month names rather than numbers, using three-character abbreviations: Sun, Mon, Tue, Fri, Sat for days, or Jan, Feb, Mar, Oct, Nov, Dec for months.
As well as system jobs, there are also user jobs for those users who have the correct permissions. User jobs are stored in the /var/spool/cron directory, with each user having his own file named after his username—for instance, /var/spool/cron/paul or /var/spool/cron/root. The contents of these files contain the jobs the user wants to run and take roughly the same format as the /etc/crontab file, with the exception that the owner of the job should not be specified because it is always the same as the filename.
To edit your own crontab file, type crontab -e. This brings up a text editor (vim by default, but you can set the EDITOR environment variable to change that) in which you can enter your entries. The format of this file is a little different from the format for the main crontab because this time there is no need to specify the owner of the job—it is always you.
So, this time each line is made up of six fields: minute (0–59), hour (0–23), day of the month (1–31), month of the year (1–12), day of the week (0–7), and then the command to run. If you are using vim and are new to it, press i to enter insert mode to edit your text; then press Esc to exit insert mode. To save and quit, type a colon followed by wq and press Enter.
When programming, we tend to use a sandbox subdirectory in our home directory where we keep all sorts of temporary files that we were just playing around with. We can use a personal job to empty that directory ever morning at 6 a.m. so that we get a fresh start each morning. Here is how that would look in our crontab file:
0 6 * * * rm -rf /home/paul/sandbox/*
If you are not allowed to schedule jobs, you will be stopped from editing your crontab file.
When your jobs are placed, you can use the command crontab -l to list your jobs. This just prints the contents of your crontab file, so its output is the same as the line you just entered.
If you want to remove just one job, the easiest thing to do is type crontab -e to edit your crontab file in vim; then, after having moved the cursor to the job you want to delete, type dd (two ds) to delete that line. If you want to delete all your jobs, you can use crontab -r to delete your crontab file.
Fedora includes a rich assortment of capable, flexible, and powerful shells. Each shell is different but has numerous built-in commands and configurable command-line prompts and might include features such as command-line history, the capability to recall and use a previous command line, and command-line editing. As an example, the bash shell is so powerful that it is possible to write a minimal web server entirely in bash’s language using 114 lines of script (see the link at the end of this chapter).
Although there are many shells to choose from, most people stick with the default, bash. This is because bash does everything most people need to do, and more. Change your shell only if you really need to.
Table 15.1 lists each shell, along with its description and location, in your Fedora file system.
Table 15.1. Shells with Fedora
Name | Description | Location |
|---|---|---|
| A small shell ( |
|
| A version of |
|
| The Bourne Again SHell |
|
| A symbolic link to |
|
| The C shell, a symbolic link to |
|
| The Korn shell |
|
| A symbolic link to |
|
| The restricted shell (for network operation) |
|
| A standalone shell |
|
| A symbolic link to |
|
| A |
|
| A compatible |
|
Having a basic understanding of the capabilities of the shell command line can help you write better shell scripts. If, after you have finished reading this short introduction, you want to learn more about the command line, check out Chapter 36, “Command Line Masterclass.” You can use the shell command line to perform a number of different tasks, including
Searching files or directories with programs using pattern matching, or expressions; commands include the GNU
gawk(linked asawk) and thegrepfamily of commands, includingegrepandfgrepGetting data from and sending data to a file or command, known as input and output redirection
Feeding or filtering a program’s output to another command (called using pipes)
A shell can also have built-in job-control commands to launch the command line as a background process, suspend a running program, selectively retrieve or kill running or suspended programs, and perform other types of process control.
Multiple commands can be run on a single command line using a semicolon to separate commands:
$ w ; free ; df
  6:02pm  up 4 days, 24 min,  1 user,  load average: 0.00, 0.00, 0.00
USER     TTY      FROM              LOGIN@   IDLE   JCPU   PCPU  WHAT
bball    pts/0    shuttle.home.org  1:14pm  0.00s  0.57s  0.01s  w
total       used       free     shared    buffers     cached
Mem:        190684     184420       6264         76      17620     142820
-/+ buffers/cache:      23980     166704
Swap:      1277156       2516    1274640
Filesystem           1k-blocks      Used Available Use% Mounted on
/dev/hda1             11788296   4478228   6711248  41% /
none                     95340         0     95340   0% /dev/shm
This example displays the output of the w, free, and df commands. Long shell command lines can be extended inside shell scripts or at the command line by using the backslash character (). For example,
$ echo ""this is a long
> command line and"" ; echo ""shows that multiple commands
> may be strung out.""
this is a long command line and
shows that multiple commands may be strung out.
The first three lines of this example are a single command line. In that single line are two instances of the echo command. Note that when you use the backslash as a line-continuation character, it must be the last character on the command line (or in your shell script, as you will see later in this chapter).
Using the basic features of the shell command line is easy, but mastering use of all features can be difficult. Entire books have been devoted to using shells, writing shell scripts, and using pattern-matching expressions. The following sections provide an overview of some features of the shell command line relating to writing scripts.
The shell command line allows you to use strings of specially constructed character patterns for wildcard matches. This is a simpler capability than that supported by GNU utilities such as grep, which can use more complex patterns, known as expressions, to search through files or directories or to filter data input to or out of commands.
The shell’s pattern strings can be simple or complex, but even using a small subset of the available characters in simple wildcards can yield constructive results at the command line. Some common characters used for shell pattern matching are
*—. Matches any character. For example, to find all files in the current directory ending in.txt, you could use$ ls *.txt
?—. Matches a single character. For example, to find all files in the current directory ending in the extension.d?c(where?could be 0–9, a–z, or A–Z),$ ls *.d?c
[xxx]or[x-x]—. Matches a range of characters. For example, to list all files in a directory with names containing numbers,$ ls *[0-9]*
x—. Matches or escapes a character such as?or a tab character. For example, to create a file with a name containing a question mark,$ touch foo?
Note that the shell might not interpret some characters or regular expressions in the same manner as a Linux command, and mixing wildcards and regular expressions in shell scripts can lead to problems unless you’re careful. For example, finding patterns in text is best left to regular expressions used with commands such as grep; simple wildcards should be used for filtering or matching filenames on the command line. And although both Linux command expressions and shell scripts can recognize the backslash as an escape character in patterns, the dollar sign ($) has two wildly different meanings (single-character pattern matching in expressions and variable assignment in scripts).
Caution
Make sure that you read your command carefully when using wildcards; an all-too-common error is to type something like rm -rf * .txt with a space between the * and the .txt. By the time you wonder why the command is taking so long, bash will already have deleted most of your files. The problem is that it treats the * and the .txt separately. * matches everything, so bash deletes all your files.
You can create, overwrite, and append data to files at the command line, using a process called input and output redirection. The shell recognizes several special characters for this process, such as >, <, or >>.
In this example, the output of the ls command is redirected to create a file named textfiles.listing:
$ ls *.txt >textfiles.listing
Use output redirection with care because it is possible to overwrite existing files. For example, specifying a different directory but using the same output filename overwrites the existing textfiles.listing:
$ ls /usr/share/doc/mutt-1.4/*.txt >textfiles.listing
Fortunately, most shells are smart enough to recognize when you might do something foolish. Here, the bash shell warns that the command is attempting to redirect output to a directory:
$ mkdir foo
$ ls >foo
bash: foo: Is a directory
Output can be appended to a file without overwriting existing content by using the append operator, >>. In> append operator> this example, the directory listing is appended to the end of textfiles.listing instead of overwriting its contents:
$ ls /usr/share/doc/mutt-1.4/*.txt >>textfiles.listing
You can use input redirection to feed data into a command by using the < like this:
$ cat < textfiles.listing
You can use the shell here operator, <<, to specify the end of input on the shell command line:
$ cat >simple_script <<DONE
> echo ""this is a simple script""
> DONE
$ cat simple_script
echo ""this is a simple script""
In this example, the shell feeds the cat command you are typing (input) until the pattern DONE is recognized. The output file simple_script is then saved and its contents verified. This same technique can be used in scripts to create content based on the output of various commands and define an end-of-input or delimiter.
Many Linux commands can be used in concert in a single, connected command line to transform data from one form to another. Stringing Linux commands together in this fashion is known as using or creating pipes. Pipes are created on the command line with the bar operator (|). For example, a pipe can be used to perform a complex task from a single command line like this:
 $ find /d2 -name '*.txt' -print | xargs cat |
tr ' ' '
' | sort | uniq >output.txt
This example takes the output of the find command to feed the cat command (via xargs) the name all text files under the /d2 command. The content of all matching files is then fed through the tr command to change each space in the data stream into a carriage return. The stream of words is then sorted, and identical adjacent lines are removed using the uniq command. The output, a raw list of words, is then saved in the file named output.txt.
The shell allows you to start a command and then launch it into the background as a process by using an ampersand (&) at the end of a command line. This technique is often used at the command line of an X terminal window to start a client and return to the command line. For example, to launch another terminal window using the xterm client,
$ xterm &
[3] 1437
The numbers echoed back show a number (3 in this example), which is a job number, or reference number for a shell process, and a Process ID number, or PID (1437 in this example). The xterm window session can be killed by using the shell’s built-in kill command, along with the job number like this:
$ kill %3
Or the process can be killed by using the kill command, along with the PID, like so:
$ kill 1437
Background processing can be used in shell scripts to start commands that take a long time, such as backups:
# tar -czf /backup/home.tgz /home &
Why should you write and use shell scripts? Shell scripts can save you time and typing, especially if you routinely use the same command lines multiple times every day. Although you could also use the history function (press the Up or Down keys while using bash or use the history command), a shell script can add flexibility with command-line argument substitution and built-in help.
Although a shell script won’t execute faster than a program written in a computer language such as C, a shell program can be smaller in size than a compiled program. The shell program does not require any additional library support other than the shell or, if used, existing commands installed on your system. The process of creating and testing shell scripts is also generally simpler and faster than the development process for equivalent C language commands.
Note
Hundreds of commands included with Fedora are actually shell scripts, and many other good shell script examples are available over the Internet—a quick search yields numerous links to online tutorials and scripting guides from fellow Linux users and developers. For example, the startx command, used to start an X Window session from the text console, is a shell script used every day by most users. To learn more about shell scripting with bash, see the Advanced Bash-Scripting Guide, listed in the “Reference” section at the end of this chapter. You will also find Sams Teach Yourself Shell Programming in 24 Hours a helpful guide to learning more about using the shell to build your own commands.
When you are learning to write and execute your first shell scripts, start with scripts for simple but useful tasks. Begin with short examples, and then expand the scripts as you build on your experience and knowledge. Make liberal use of comments (lines preceded with a pound # sign) to document each section of your script. Include an author statement and overview of the script as additional help, along with a creation date or version number. Write shell scripts using a text editor such as vi because it does not automatically wrap lines of text. Line wrapping can break script syntax and cause problems. If you use the nano editor, include its -w flag to disable line wrap.
In this section, you learn how to write a simple shell script to set up a number of aliases (command synonyms) whenever you log on. Instead of typing all the aliases every time you log on, you can put them in a file by using a text editor, such as vi, and then execute the file. Normally these changes are saved in systemwide shell configuration files under the /etc directory to make the changes active for all users or in your .bashrc, .cshrc (if you use tcsh), or .bash_profile files in your home directory.
Here is what is contained in myenv, a sample shell script created for this purpose (for bash):
#!/bin/sh
alias ll='ls -l'
alias ldir='ls -aF'
alias copy='cp'
This simple script creates command aliases, or convenient shorthand forms of commands, for the ls and cp commands. The ll alias provides a long directory listing: The ldir alias is the ls command, but prints indicators (for directories or executable files) in listings. The copy alias is the same as the cp command. You can experiment and add your own options or create aliases of other commands with options you frequently use.
You can execute myenv in a variety of ways under Linux. As shown in this example, you can make myenv executable by using the chmod command and then execute it as you would any other native Linux command:
$ chmod +x myenv
This line turns on the executable permission of myenv, which can be checked with the ls command and its -l option like this:
$ ls -l myenv
-rwxrwxr-x    1 winky    winky          11 Aug 26 17:38 myenv
You can run your new shell program in several ways. Each method produces the same results, which is a testament to the flexibility of using the shell with Linux. One way to run your shell program is to execute the file myenv from the command line as if it were a Linux command:
$ ./myenv
A second way to execute myenv under a particular shell, such as pdksh, is as follows:
$ pdksh myenv
This invokes a new pdksh shell and passes the filename myenv as a parameter to execute the file. A third way requires you to create a directory named bin in your home directory, and to then copy the new shell program into this directory. You can then run the program without the need to specify a specific location or to use a shell. You do this like so:
$ mkdir bin
$ mv myenv bin
$ myenv
This works because Fedora is set up by default to include the executable path $HOME/bin in your shell’s environment. You can view this environment variable, named PATH, by piping the output of the env command through fgrep like so:
$ env | fgrep PATH
/usr/kerberos/bin:/usr/local/bin:/bin:/usr/bin:
/usr/X11R6/bin:/sbin:/home/paul/bin
As you can see, the user (paul in this example) can use the new bin directory to hold executable files. Another way to bring up an environment variable is to use the echo command along with the variable name (in this case, $PATH):
$ echo $PATH
/usr/kerberos/bin:/usr/local/bin:/usr/bin:/bin:/usr/X11R6/bin:/home/bball/bin
Caution
Never put . in your $PATH in order to execute files or a command in the current directory—this presents a serious security risk, especially for the root operator, and even more so if . is first in your $PATH search order. Trojan scripts placed by crackers in directories such as /tmp can be used for malicious purposes, and are executed immediately if the current working directory is part of your $PATH.
After you execute the command myenv, you should be able to use ldir from the command line to get a list of files under the current directory and ll to get a list of files with attributes displayed. However, the best way to use the new commands in myenv is to put them into your shell’s login or profile file. For Fedora, and nearly all Linux users, the default shell is bash, so you can make these commands available for everyone on your system by putting them in the /etc/bashrc file. Systemwide aliases for tcsh are contained in files with the extension .csh under the /etc/profile.d directory. The pdksh shell can use these command aliases as well.
Note
To use a shell other than bash after logging in, use the chsh command from the command line or the system-config-users client during an X session. You’ll be asked for your password (or the root password if using system-config-users), as well as the location and name of the new shell (refer to Table 15.1). The new shell becomes your default shell, but only if its name is in the list of acceptable system shells in /etc/shells. See Chapter 5, “First Steps with Fedora,” for details on changing your shell.
The majority of shell scripts use a shebang line (#!) at the beginning to control the type of shell used to run the script; this bang line calls for an sh-incantation of bash:
#!/bin/sh
A shebang line (it is short for sharp and bang, two names for # and !) tells the Linux kernel that a specific command (a shell, or in the case of other scripts, perhaps awk or Perl) is to be used to interpret the contents of the file. Using a shebang line is common practice for all shell scripting. For example, if you write a shell script using bash, but want the script to execute as if run by the Bourne shell, sh, the first line of your script will contain #!/bin/sh, which is a link to the bash shell. Running bash as sh causes bash to act as a Bourne shell. This is the reason for the symbolic link sh, which points to bash.
You might also find different or new environment variables available to your scripts by using different shells. For example, if you launch csh from the bash command line, you will find several new variables or variables with slightly different definitions, such as
$ env
...
VENDOR=intel
MACHTYPE=i386
HOSTTYPE=i386-linux
HOST=thinkpad.home.org
On the other hand, bash might provide these variables or variables of the same name with a slightly different definition, such as
$ env
...
HOSTTYPE=i386
HOSTNAME=thinkpad.home.org
Although the behavior of a shebang line is not defined by POSIX, variations of its use can be helpful when you are writing shell scripts. For example, as described in the wish man page, you can use a shell to help execute programs called within a shell script without needing to hard code pathnames of programs. The wish command is a windowing Tool Control Language (tcl) interpreter that can be used to write graphical clients. Avoiding the use of specific pathnames to programs increases shell script portability because not every UNIX or Linux system has programs in the same location.
For example, if you want to use the wish command, your first inclination might be to write
#!/usr/local/bin/wish
Although this works on many other operating systems, the script fails under Linux because wish is located under the /usr/bin directory. However, if you write the command line this way,
#!/bin/sh
exec wish "$@"
the script will always find the correct binary.
When writing shell scripts for Linux, you work with three types of variables:
Environment variables—. Part of the system environment, you can use them in your shell program. New variables can be defined, and some of them, such as
PATH, can also be modified within a shell program.Built-in variables—. These variables, such as options used on the command (interpreted by the shell as a positional argument), are provided by Linux. Unlike environment variables, you cannot modify them.
User variables—. Defined by you when you write a shell script. You can use and modify them at will within the shell program.
A major difference between shell programming and other programming languages is that in shell programming, variables are not typed—that is, you do not have to specify whether a variable is a number or a string, and so on.
Assume that you want to use a variable called lcount to count the number of iterations in a loop within a shell program. You can declare and initialize this variable as follows:
Command | Environment |
|---|---|
|
|
|
|
Note
Under pdksh and bash, you must ensure that the equal sign (=) does not have spaces before and after it.
To store a string in a variable, you can use the following:
Command | Environment |
|---|---|
|
|
|
|
Use the preceding variable form if the string doesn’t have embedded spaces. If a string has embedded spaces, you can do the assignment as follows:
Command | Environment |
|---|---|
|
|
|
|
You can access the value of a variable by prefixing the variable name with a $ (dollar sign). That is, if the variable name is var, you can access the variable by using $var.
If you want to assign the value of var to the variable lcount, you can do so as follows:
Command | Environment |
|---|---|
|
|
|
|
It is possible to pass options from the command line or from another shell script to your shell program.
These options are supplied to the shell program by Linux as positional parameters, which have special names provided by the system. The first parameter is stored in a variable called 1 (number 1) and can be accessed by using $1 within the program. The second parameter is stored in a variable called 2 and can be accessed by using $2 within the program, and so on. One or more of the higher numbered positional parameters can be omitted while you’re invoking a shell program.
Understanding how to use these positional parameters and how to access and use variables retrieved from the command line is necessary when developing more advanced shell programs.
For example, if a shell program mypgm expects two parameters—such as a first name and a last name—you can invoke the shell program with only one parameter, the first name. However, you cannot invoke it with only the second parameter, the last name.
Here is a shell program called mypgm1, which takes only one parameter (a name) and displays it on the screen:
#!/bin/sh
#Name display program
if [ $# -eq 0 ]
then
   echo "Name not provided"
else
   echo "Your name is "$1
fi
If you execute mypgm1, as follows,
$ bash mypgm1
Name not provided
However, if you execute mypgm1, as follows,
$ bash mypgm1 Sanjiv
you get the following output:
Your name is Sanjiv
The shell program mypgm1 also illustrates another aspect of shell programming: the built-in variables provided to the shell by the Linux kernel. In mypgm1, the built-in variable $# provides the number of positional parameters passed to the shell program. You learn more about working with built-in variables in the next major section of this chapter.
Using positional parameters in scripts can be helpful if you need to use command lines with piped commands requiring complex arguments. Shell programs containing positional parameters can be even more convenient if the commands are infrequently used. For example, if you use your Fedora system with an attached voice modem as an answering machine, you can write a script to issue a command that retrieves and plays the voice messages. The following lines convert a saved sound file (in .rmd or voice-phone format) and pipe the result to your system’s audio device:
#!/bin/sh
# play voice message in /var/spool/voice/incoming
rmdtopvf /var/spool/voice/incoming/$1 | pvfspeed -s 8000 |
pvftobasic >/dev/audio
A voice message can then easily be played back using this script (perhaps named pmm):
$ pmm name_of_message
Shell scripts that contain positional parameters are often used for automating routine and mundane jobs, such as system log report generation, file system checks, user resource accounting, printer use accounting, and other system, network, or security administration tasks.
You could use a simple script, for example, to examine your system log for certain keywords. If the script is run via your system’s scheduling table, /etc/crontab, it can help automate security monitoring. By combining the output capabilities of existing Linux commands with the language facilities of the shell, you can quickly build a useful script to perform a task normally requiring a number of command lines. For example, you can create a short script, named greplog, like this:
#!/bin/sh
#    name: greplog
#      use: mail grep of designated log using keyword
# version: v.01 08aug02
#
#  author: bb
#
# usage: greplog [keyword] [logpathname]
#
#  bugs: does not check for correct number of arguments

# build report name using keyword search and date
log_report=/tmp/$1.logreport.`date '+%m%d%y'`

# build report header with system type, hostname, date and time
echo "=============================================================="
      >$log_report
echo "           S Y S T E M   M O N I T O R   L O G" >>$log_report
echo uname -a >>$log_report
echo "Log report for" `hostname -f` "on" `date '+%c'`     >>$log_report
echo "=============================================================="
      >>$log_report ; echo "" >>$log_report

# record log search start
echo "Search for->" $1 "starting" `date '+%r'` >>$log_report
echo "" >>$log_report

# get and save grep results of keyword ($1) from logfile ($2)
grep -i $1 $2 >>$log_report

# build report footer with time
echo "" >>$log_report
echo "End of" $log_report at `date '+%r'` >>$log_report

# mail report to root
mail -s "Log Analysis for $1" root <$log_report

# clean up and remove report
rm $log_report
exit 0
In this example, the script creates the variable $log_report, which will be the filename of the temporary report. The keyword ($1) and first argument on the command line is used as part of the filename, along with the current date (with perhaps a better approach to use $$ instead of the date, which appends the script’s PID as a file extension). Next, the report header containing some formatted text, the output of the uname command, and the hostname and date is added to the report. The start of the search is then recorded, and any matches of the keyword in the log are added to the report. A footer containing the name of the report and the time is then added. The report is mailed to root with the search term as the subject of the message, and the temporary file is deleted.
Note
By default, Fedora uses the logwatch log monitoring command (actually a Perl script) in your system’s /etc/cron.daily directory to generate various reports each day at 0402 (4:02 a.m.). Configure logwatch by editing the file /etc/log.d/logwatch.conf. Other system monitoring tools are included, such as tripwire. System logging can be controlled by editing /etc/syslog.conf.
You can test the script by running it manually and feeding it a keyword and a pathname to the system log, /var/log/messages, like this:
# greplog FAILED /var/log/messages
Note that your system should be running the syslogd daemon. If any login failures have occurred on your system, the root operator might get an email message that looks like this:
Date: Thu, 23 Oct 2003 16:23:24 -0400
From: root <[email protected]>
To: [email protected]
Subject: FAILED

==============================================================
           S Y S T E M   M O N I T O R   L O G
Linux stinky 2.4.22-1.2088.nptl #1 Thu Oct 9 20:21:24 EDT 2003 i686 i686 i386
+GNU/Linux
Log report for stinkpad.home.org on Thu 23 Oct 2003 04:23:24 PM EDT
==============================================================

Search for-> FAILED starting 04:23:24 PM

Oct 23 16:23:04 stinkpad login[1769]: FAILED LOGIN 3 FROM (null) FOR bball,
+Authentication failure

End of /tmp/FAILED.logreport.102303 at 04:23:24 PM
To further automate the process, you can include command lines using the script in another script to generate a series of searches and reports.
Built-in variables are special variables provided to shell by Linux that can be used to make decisions within a shell program. You cannot modify the values of these variables within the shell program.
Some of these variables are
$#—. Number of positional parameters passed to the shell program$?—. Completion code of the last command or shell program executed within the shell program (returned value)$0—. The name of the shell program$*—. A single string of all arguments passed at the time of invocation of the shell program
To show these built-in variables in use, here is a sample program called mypgm2:
#!/bin/sh
#my test program
echo "Number of parameters is $#"
echo "Program name is $0"
echo "Parameters as a single string is $*"
If you execute mypgm2 from the command line in pdksh and bash as follows,
$ bash mypgm2 Sanjiv Guha
you get the following result:
Number of parameters is 2
Program name is mypgm2
Parameters as a single string is Sanjiv Guha
Some characters have special meaning to Linux shells; these characters represent commands, denote specific use for surrounding text, or provide search parameters. Special characters provide a sort of shorthand by incorporating these rather complex meanings into a simple character. Some special characters are shown in Table 15.2.
Table 15.2. Special Shell Characters
Character | Explanation |
|---|---|
| Indicates the beginning of a shell variable name |
| Pipes standard output to next command |
| Starts a comment |
| Executes a process in the background |
| Matches one character |
| Matches one or more characters |
| Output redirection operator |
| Input redirection operator |
| Command substitution (the backquote or backtick—the key above the Tab key on most keyboards) |
| Output redirection operator (to append to a file) |
| Wait until following end-of-input string ( |
| Range of characters |
| All characters a through z |
| Characters a or z |
Space | Delimiter between two words |
Special characters are very useful to you when you are creating shell scripts, but if you inadvertently use a special character as part of variable names or strings, your program will behave incorrectly. As you learn in later parts of this section, you can use one of the special characters in a string if you precede it with an escape character (/, or backslash) to indicate that it isn’t being used as a special character and shouldn’t be treated as such by the program.
A few special characters deserve special note. They are the double quotes ("), the single quotes ('), the backslash (), and the backtick (`)—all discussed in the following sections.
If a string contains embedded spaces, you can enclose the string in double quotes (") so that the shell interprets the whole string as one entity instead of more than one.
For example, if you assigned the value of abc def (abc followed by one space, followed by def) to a variable called x in a shell program as follows, you would get an error because the shell would try to execute def as a separate command:
Command | Environment |
|---|---|
|
|
|
|
The shell executes the string as a single command if you surround the string in double quotes as follows:
Command | Environment |
|---|---|
|
|
|
|
The double quotes resolve all variables within the string. Here is an example for pdksh and bash:
var="test string"
newvar="Value of var is $var"
echo $newvar
Here is the same example for tcsh:
set var="test string"
set newvar="Value of var is $var"
echo $newvar
If you execute a shell program containing the preceding three lines, you get the following result:
Value of var is test string
You can surround a string with single quotes (') to stop the shell from expanding variables and interpreting special characters. When used for the latter purpose, the single quote is an escape character, similar to the backslash, which you learn about in the next section. Here, you learn how to use the single quote to avoid expanding a variable in a shell script. An unexpanded variable maintains its original form in the output.
In the following examples, the double quotes in the preceding examples have been changed to single quotes.
pdksh and bash:
var='test string'
newvar='Value of var is $var'
echo $newvar

tcsh:

set var = 'test string'
set newvar = 'Value of var is $var'
echo $newvar
If you execute a shell program containing these three lines, you get the following result:
Value of var is $var
As you can see, the variable var maintains its original format in the results, rather than having been expanded.
As you learned earlier, the backslash () serves as an escape character that stops the shell from interpreting the succeeding character as a special character. Imagine that you want to assign a value of $test to a variable called var. If you use the following command, the shell reads the special character $ and interprets $test as the value of the variable test. No value has been assigned to test; a null value is stored in var as follows:
Command | Environment |
|---|---|
|
|
|
|
Unfortunately, this assignment might work for bash and pdksh, but it returns an error of undefined variable if you use it with tcsh. Use the following commands to correctly store $test in var:
Command | Environment |
|---|---|
|
|
|
|
The backslash before the dollar sign ($) signals the shell to interpret the $ as any other ordinary character and not to associate any special meaning to it. You could also use single quotes (') around the $test variable to get the same result.
You can use the backtick (`) character to signal the shell to replace a string with its output when executed. This special character can be used in shell programs when you want the result of the execution of a command to be stored in a variable. For example, if you want to count the number of lines in a file called test.txt in the current directory and store the result in a variable called var, you can use the following command:
Command | Environment |
|---|---|
|
|
|
|
Comparing values or evaluating the differences between similar bits of data—such as file information, character strings, or numbers—is a task known as comparison of expressions. Comparison of expressions is an integral part of using logic in shell programs to accomplish tasks. The way the logical comparison of two operators (numeric or string) is done varies slightly in different shells. In pdksh and bash, a command called test can be used to achieve comparisons of expressions. In tcsh, you can write an expression to accomplish the same thing.
The following section covers comparison operations using the pdksh or bash shells. Later in the chapter, you learn how to compare expressions in the tcsh shell.
The pdksh and bash shell syntax provide a command named test to compare strings, numbers, and files. The syntax of the test command is as follows:
test expression
or
[ expression ]
Both forms of the test commands are processed the same way by pdksh and bash. The test commands support the following types of comparisons:
The following operators can be used to compare two string expressions:
=—. To compare whether two strings are equal!=—. To compare whether two strings are not equal-n—. To evaluate whether the string length is greater than zero-z—. To evaluate whether the string length is equal to zero
Next are some examples using these operators when comparing two strings, string1 and string2, in a shell program called compare1:
#!/bin/sh
string1="abc"
string2="abd"
if [ $string1 = $string2 ]; then
   echo "string1 equal to string2"
else
   echo "string1 not equal to string2"
fi

if [ $string2 != string1 ]; then
   echo "string2 not equal to string1"
else
   echo "string2 equal to string2"
fi

if [ $string1 ]; then
   echo "string1 is not empty"
else
   echo "string1 is empty"
fi

if [ -n $string2 ]; then
   echo "string2 has a length greater than zero"
else
   echo "string2 has length equal to zero"
fi

if [ -z $string1 ]; then
   echo "string1 has a length equal to zero"
else
   echo "string1 has a length greater than zero"
fi
If you execute compare1, you get the following result:
string1 not equal to string2
string2 not equal to string1
string1 is not empty
string2 has a length greater than zero
string1 has a length greater than zero
If two strings are not equal in size, the system pads out the shorter string with trailing spaces for comparison. That is, if the value of string1 is abc and that of string2 is ab, string2 will be padded with a trailing space for comparison purposes—it will have a value of ab.
The following operators can be used to compare two numbers:
-eq—. To compare whether two numbers are equal-ge—. To compare whether one number is greater than or equal to the other number-le—. To compare whether one number is less than or equal to the other number-ne—. To compare whether two numbers are not equal-gt—. To compare whether one number is greater than the other number-lt—. To compare whether one number is less than the other number
The following shell program compares three numbers, number1, number2, and number3:
#!/bin/sh
number1=5
number2=10
number3=5

if [ $number1 -eq $number3 ]; then
   echo "number1 is equal to number3"
else
   echo "number1 is not equal to number3"
fi

if [ $number1 -ne $number2 ]; then
   echo "number1 is not equal to number2"
else
   echo "number1 is equal to number2"
fi

if [ $number1 -gt $number2 ]; then
   echo "number1 is greater than number2"
else
   echo "number1 is not greater than number2"
fi

if [ $number1 -ge $number3 ]; then
   echo "number1 is greater than or equal to number3"
else
   echo "number1 is not greater than or equal to number3"
fi

if [ $number1 -lt $number2 ]; then
   echo "number1 is less than number2"
else
   echo "number1 is not less than number2"
fi

if [ $number1 -le $number3 ]; then
   echo "number1 is less than or equal to number3"
else
   echo "number1 is not less than or equal to number3"
fi
When you execute the shell program, you get the following results:
number1 is equal to number3
number1 is not equal to number2
number1 is not greater than number2
number1 is greater than or equal to number3
number1 is less than number2
number1 is less than or equal to number3
The following operators can be used as file comparison operators:
-d—. To ascertain whether a file is a directory-f—. To ascertain whether a file is a regular file-r—. To ascertain whether read permission is set for a file-s—. To ascertain whether a file exists and has a length greater than zero-w—. To ascertain whether write permission is set for a file-x—. To ascertain whether execute permission is set for a file
Assume that a shell program called compare3 is in a directory with a file called file1 and a subdirectory dir1 under the current directory. Assume that file1 has a permission of r-x (read and execute permission) and dir1 has a permission of rwx (read, write, and execute permission). The code for the shell program would look like this:
#!/bin/sh
if [ -d $dir1 ]; then
   echo "dir1 is a directory"
else
   echo "dir1 is not a directory"
fi

if [ -f $dir1 ]; then
   echo "dir1 is a regular file"
else
   echo "dir1 is not a regular file"
fi

if [ -r $file1 ]; then
   echo "file1 has read permission"
else
   echo "file1 does not have read permission"
fi
if [ -w $file1 ]; then
   echo "file1 has write permission"
else
   echo "file1 does not have write permission"
fi

if [ -x $dir1 ]; then
   echo "dir1 has execute permission"
else
   echo "dir1 does not have execute permission"
fi
If you execute the shell program, you get the following results:
dir1 is a directory
file1 is a regular file
file1 has read permission
file1 does not have write permission
dir1 has execute permission
Logical operators are used to compare expressions using Boolean logic, which compares values using characters representing NOT, AND, and OR.
!—. To negate a logical expression-a—. To logically AND two logical expressions-o—. To logically OR two logical expressions
This example named logic uses the file and directory mentioned in the previous compare3 example.
#!/bin/sh
if [ -x file1 -a -x dir1 ]; then
   echo file1 and dir1 are executable
else
   echo at least one of file1 or dir1 are not executable
fi

if [ -w file1 -o -w dir1 ]; then
   echo file1 or dir1 are writable
else
   echo neither file1 or dir1 are executable
fi
if [ ! -w file1 ]; then
   echo file1 is not writable
else
   echo file1 is writable
fi
If you execute logic, it yields the following result:
file1 and dir1 are executable
file1 or dir1 are writable
file1 is not writable
As stated earlier, the method for comparing expressions in tcsh is different from the method used under pdksh and bash. The comparison of expressions demonstrated in this section uses the syntax necessary for the tcsh shell environment.
The following operators can be used to compare two string expressions:
==—. To compare whether two strings are equal!=—. To compare whether two strings are not equal
The following examples compare two strings, string1 and string2, in the shell program compare1:
#!/bin/tcsh
set string1 = "abc"
set string2 = "abd"

if  (string1 == string2) then
   echo "string1 equal to string2"
else
   echo "string1 not equal to string2"
endif

if  (string2 != string1) then
   echo "string2 not equal to string1"
else
   echo "string2 equal to string1"
endif
If you execute compare1, you get the following results:
string1 not equal to string2
string2 not equal to string1
These operators can be used to compare two numbers:
>=—. To compare whether one number is greater than or equal to the other number<=—. To compare whether one number is less than or equal to the other number>—. To compare whether one number is greater than the other number<—. To compare whether one number is less than the other number
The next examples compare two numbers, number1 and number2, in a shell program called compare2:
#!/bin/tcsh
set number1=5
set number2=10
set number3=5

if  ($number1 > $number2) then
   echo "number1 is greater than number2"
else
   echo "number1 is not greater than number2"
endif

if  ($number1 >= $number3) then
   echo "number1 is greater than or equal to number3"
else
   echo "number1 is not greater than or equal to number3"
endif

if  ($number1 < $number2) then
   echo "number1 is less than number2"
else
   echo "number1 is not less than number2"
endif

if  ($number1 <= $number3) then
   echo "number1 is less than or equal to number3"
else
   echo "number1 is not less than or equal to number3"
endif
When executing the shell program compare2, you get the following results:
number1 is not greater than number2
number1 is greater than or equal to number3
number1 is less than number2
number1 is less than or equal to number3
These operators can be used as file comparison operators:
-d—. To ascertain whether a file is a directory-e—. To ascertain whether a file exists-f—. To ascertain whether a file is a regular file-o—. To ascertain whether a user is the owner of a file-r—. To ascertain whether read permission is set for a file-w—. To ascertain whether write permission is set for a file-x—. To ascertain whether execute permission is set for a file-z—. To ascertain whether the file size is zero
The following examples are based on a shell program called compare3, which is in a directory with a file called file1 and a subdirectory dir1 under the current directory. Assume that file1 has a permission of r-x (read and execute permission) and dir1 has a permission of rwx (read, write, and execute permission).
The following is the code for the compare3 shell program:
#!/bin/tcsh
if  (-d dir1) then
   echo "dir1 is a directory"
else
   echo "dir1 is not a directory"
endif

if (-f dir1) then
   echo "file1 is a regular file"
else
   echo "file1 is not a regular file"
endif

if (-r file1) then
   echo "file1 has read permission"
else
   echo "file1 does not have read permission"
endif

if (-w file1) then
   echo "file1 has write permission"
else
   echo "file1 does not have write permission"
endif
if (-x dir1) then
   echo "dir1 has execute permission"
else
   echo "dir1 does not have execute permission"
endif

if (-z file1) then
   echo "file1 has zero length"
else
   echo "file1 has greater than zero length"
endif
If you execute the file compare3, you get the following results:
dir1 is a directory
file1 is a regular file
file1 has read permission
file1 does not have write permission
dir1 has execute permission
file1 has greater than zero length
Logical operators are used with conditional statements. These operators are used to negate a logical expression or to perform logical ANDs and ORs:
!—. To negate a logical expression&&—. To logically AND two logical expressions||—. To logically OR two logical expressions
This example, named logic, uses the file and directory mentioned in the previous compare3 example:
#!/bin/tcsh
if ( -x file1 && -x dir1 ) then
   echo file1 and dir1 are executable
else
   echo at least one of file1 or dir1 are not executable
endif

if ( -w file1 || -w dir1 ) then
   echo file1 or dir1 are writable
else
   echo neither file1 or dir1 are executable
endif
if ( ! -w file1 ) then
   echo file1 is not writable
else
   echo file1 is writable
endif
If you execute logic, it yields the following result:
file1 and dir1 are executable
file1 or dir1 are writable
file1 is not writable
The for statement is used to execute a set of commands once each time a specified condition is true. The for statement has a number of formats. The first format used by pdksh and bash is as follows:
for curvar in list
do
    statements
done
This form should be used if you want to execute statements once for each value in list. For each iteration, the current value of the list is assigned to vcurvar. list can be a variable containing a number of items or a list of values separated by spaces. The second format is as follows:
for curvar
do
    statements
done
In this form, the statements are executed once for each of the positional parameters passed to the shell program. For each iteration, the current value of the positional parameter is assigned to the variable curvar.
This form can also be written as follows:
for curvar in $@
do
    statements
done
Remember that $@ gives you a list of positional parameters passed to the shell program, quoted in a manner consistent with the way the user originally invoked the command.
Under tcsh, the for statement is called foreach. The format is as follows:
foreach curvar (list)
    statements
end
In this form, the statements are executed once for each value in list, and, for each iteration, the current value of list is assigned to curvar.
Suppose that you want to create a backup version of each file in a directory to a subdirectory called backup. You can do the following in pdksh and bash:
#!/bin/sh
for filename in *
do
   cp $filename backup/$filename
   if [ $? -ne 0 ]; then
      echo "copy for $filename failed"
   fi
done
In the preceding example, a backup copy of each file is created. If the copy fails, a message is generated.
The same example in tcsh is as follows:
#!/bin/tcsh
foreach filename (`/bin/ls`)
   cp $filename backup/$filename
   if ($? != 0) then
      echo "copy for $filename failed"
   endif
end
The while statement can be used to execute a series of commands while a specified condition is true. The loop terminates as soon as the specified condition evaluates to False. It is possible that the loop will not execute at all if the specified condition initially evaluates to False. You should be careful with the while command because the loop will never terminate if the specified condition never evaluates to False.
In pdksh and bash, the following format is used for the while flow control construct:
while expression
do
    statements
done
In tcsh, the following format is used:
while (expression)
    Statements
end
If you want to add the first five even numbers, you can use the following shell program in pdksh and bash:
#!/bin/bash
loopcount=0
result=0
while [ $loopcount -lt 5 ]
do
   loopcount=`expr $loopcount + 1`
   increment=`expr $loopcount * 2`
   result=`expr $result + $increment`
done

echo "result is $result"
In tcsh, this program can be written as follows:
#!/bin/tcsh
set loopcount = 0
set result = 0
while ($loopcount < 5)
   set loopcount = `expr $loopcount + 1`
   set increment = `expr $loopcount * 2`
   set result = `expr $result + $increment`

end

echo "result is $result"
The until statement can be used to execute a series of commands until a specified condition is true. The loop terminates as soon as the specified condition evaluates to True.
In pdksh and bash, the following format is used:
until expression
do
    statements
done
As you can see, the format of the until statement is similar to that of the while statement, but the logic is different: In a while loop, you execute until an expression is False, but in an until loop, you loop until the expression is True.
If you want to add the first five even numbers, you can use the following shell program in pdksh and bash:
#!/bin/bash
loopcount=0
result=0
until [ $loopcount -ge 5 ]
do
   loopcount=`expr $loopcount + 1`
   increment=`expr $loopcount * 2`
   result=`expr $result + $increment`
done

echo "result is $result"
The example here is identical to the example for the while statement, except that the condition being tested is just the opposite of the condition specified in the while statement.
The tcsh shell does not support the until statement.
The repeat statement is used to execute only one command a fixed number of times.
If you want to print a hyphen (-) 80 times with one hyphen per line on the screen, you can use the following command:
repeat 80 echo '-'
The select statement is used to generate a menu list if you are writing a shell program that expects input from the user online. The format of the select statement is as follows:
select item in itemlist
do
    Statements
done
itemlist is optional. If it isn’t provided, the system iterates through the item entries one at a time. If itemlist is provided, however, the system iterates for each entry in itemlist and the current value of itemlist is assigned to item for each iteration, which then can be used as part of the statements being executed.
If you want to write a menu that gives the user a choice of picking a Continue or a Finish, you can write the following shell program:
#!/bin/ksh
select  item in Continue Finish
do
   if [ $item = "Finish" ]; then
      break
   fi
done
When the select command is executed, the system displays a menu with numeric choices to the user—in this case, 1 for Continue and 2 for Finish. If the user chooses 1, the variable item contains a value of Continue; if the user chooses 2, the variable item contains a value of Finish. When the user chooses 2, the if statement is executed and the loop terminates.
The shift statement is used to process the positional parameters, one at a time, from left to right. As you’ll remember, the positional parameters are identified as $1, $2, $3, and so on. The effect of the shift command is that each positional parameter is moved one position to the left and the current $1 parameter is lost.
The shift statement is useful when you are writing shell programs in which a user can pass various options. Depending on the specified option, the parameters that follow can mean different things or might not be there at all.
The format of the shift command is as follows:
shift number
The parameter number is the number of places to be shifted and is optional. If not specified, the default is 1; that is, the parameters are shifted one position to the left. If specified, the parameters are shifted number positions to the left.
The if statement evaluates a logical expression to make a decision. An if condition has the following format in pdksh and bash:
if [ expression ]; then
    Statements
elif [ expression ]; then
    Statements
else
    Statements
fi
The if conditions can be nested. That is, an if condition can contain another if condition within it. It isn’t necessary for an if condition to have an elif or else part. The else part is executed if none of the expressions that are specified in the if statement and are optional in subsequent elif statements are true. The word fi is used to indicate the end of the if statements, which is very useful if you have nested if conditions. In such a case, you should be able to match fi to if to ensure that all if statements are properly coded.
In the following example for bash or pdksh, a variable var can have either of two values: Yes or No. Any other value is invalid. This can be coded as follows:
if [ $var = "Yes" ]; then
   echo "Value is Yes"
elif [ $var = "No" ]; then
   echo "Value is No"
else
   echo "Invalid value"
fi
In tcsh, the if statement has two forms. The first form, similar to the one for pdksh and bash, is as follows:
if (expression) then
    Statements
else if (expression) then
    Statements
else
    Statements
endif
The if conditions can be nested—that is, an if condition can contain another if condition within it. It isn’t necessary for an if condition to have an else part. The else part is executed if none of the expressions specified in any of the if statements are true. The optional if part of the statement (else if (expression) then) is executed if the condition following it is true and the previous if statement is not true. The word endif is used to indicate the end of the if statements, which is very useful if you have nested if conditions. In such a case, you should be able to match endif to if to ensure that all if statements are properly coded.
Using the example of the variable var having only two values, Yes and No, here is how it would be coded with tcsh:
if ($var == "Yes") then
   echo "Value is Yes"
else if ($var == "No" ) then
   echo "Value is No"
else
   echo "Invalid value"
endif
The second form of the if condition for tcsh is as follows:
if (expression) command
In this format, only a single command can be executed if the expression evaluates to True.
The case statement is used to execute statements depending on a discrete value or a range of values matching the specified variable. In most cases, you can use a case statement instead of an if statement if you have a large number of conditions.
The format of a case statement for pdksh and bash is as follows:
case str in
   str1 | str2)
      Statements;;
   str3|str4)
      Statements;;
   *)
      Statements;;
esac
You can specify a number of discrete values—such as str1, str2, and so on—for each condition, or you can specify a value with a wildcard. The last condition should be * (asterisk) and is executed if none of the other conditions are met. For each of the specified conditions, all the associated statements until the double semicolon (;;) are executed.
You can write a script that will echo the name of the month if you provide the month number as a parameter. If you provide a number that isn’t between 1 and 12, you will get an error message. The script is as follows:
#!/bin/sh

case $1 in
   01 | 1) echo "Month is January";;
   02 | 2) echo "Month is February";;
   03 | 3) echo "Month is March";;
   04 | 4) echo "Month is April";;
   05 | 5) echo "Month is May";;
   06 | 6) echo "Month is June";;
   07 | 7) echo "Month is July";;
   08 | 8) echo "Month is August";;
   09 | 9) echo "Month is September";;
   10) echo "Month is October";;
   11) echo "Month is November";;
   12) echo "Month is December";;
   *) echo "Invalid parameter";;
esac
You need to end the statements under each condition with a double semicolon (;;). If you do not, the statements under the next condition will also be executed.
The format for a case statement for tcsh is as follows:
switch (str)
   case str1|str2:
      Statements
      breaksw
   case str3|str4:
      Statements
      breaksw
   default:
      Statements
      breaksw
endsw
You can specify a number of discrete values—such as str1, str2, and so on—for each condition, or you can specify a value with a wildcard. The last condition should be default and is executed if none of the other conditions is met. For each of the specified conditions, all the associated statements until breaksw are executed.
The example that echoes the month when a number is given, shown earlier for pdksh and bash, can be written in tcsh as follows:
#!/bin/tcsh

set month = 5
switch  ( $month )
   case 1: echo "Month is January" ; breaksw
   case 2: echo "Month is February" ; breaksw
   case 3: echo "Month is March" ; breaksw
   case 4: echo "Month is April" ; breaksw
   case 5: echo "Month is May" ; breaksw
   case 6: echo "Month is June" ; breaksw
   case 7: echo "Month is July" ; breaksw
   case 8: echo "Month is August" ; breaksw
   case 9: echo "Month is September" ; breaksw
   case 10: echo "Month is October" ; breaksw
   case 11: echo "Month is November" ; breaksw
   case 12: echo "Month is December" ; breaksw
   default: echo "Oops! Month is Octember!" ; breaksw
endsw
You need to end the statements under each condition with breaksw. If you do not, the statements under the next condition will also be executed.
You should be aware of two other statements: the break statement and the exit statement.
The break statement can be used to terminate an iteration loop, such as a for, until, or repeat command.
exit statements can be used to exit a shell program. You can optionally use a number after exit. If the current shell program has been called by another shell program, the calling program can check for the code (the $? or $status variable, depending on the shell) and make a decision accordingly.
As with other programming languages, shell programs also support functions. A function is a piece of a shell program that performs a particular process; you can reuse the same function multiple times within the shell program. Functions help eliminate the need for duplicating code as you write shell programs.
The following is the format of a function in pdksh and bash:
func(){
   Statements
}
You can call a function as follows:
func param1 param2 param3
The parameters param1, param2, and so on are optional. You can also pass the parameters as a single string—for example, $@. A function can parse the parameters as if they were positional parameters passed to a shell program from the command line as command-line arguments, but instead use values passed inside the script. For example, the following script uses a function named Displaymonth() that displays the name of the month or an error message if you pass a month number out of the range 1 to 12. This example works with pdksh and bash:
#!/bin/sh
Displaymonth() {
   case $1 in
      01 | 1) echo "Month is January";;
      02 | 2) echo "Month is February";;
      03 | 3) echo "Month is March";;
      04 | 4) echo "Month is April";;
      05 | 5) echo "Month is May";;
      06 | 6) echo "Month is June";;
      07 | 7) echo "Month is July";;
      08 | 8) echo "Month is August";;
      09 | 9) echo "Month is September";;
      10) echo "Month is October";;
      11) echo "Month is November";;
      12) echo "Month is December";;
      *) echo "Invalid parameter";;
   esac
}
Displaymonth 8
The preceding program displays the following output:
Month is August
http://www.linuxgazette.com/issue70/ghosh.html—A Linux Gazette article on “Bootstrapping Linux,” which includes much detail on the BIOS and MBR aspects of the boot process.
http://www.lostcircuits.com/advice/bios2/1.shtml—the LostCircuits BIOS guide; much detail on the meaning of all those BIOS settings.
http://www.rojakpot.com/default.aspx?location=1—The BIOS Optimization Guide; details on tweaking those BIOS settings to your heart’s content.
http://www-106.ibm.com/developerworks/linux/library/l-slack.html—A link through IBM’s website to an article on booting Slackware Linux, along with a sidebar about the history of System V versus BSD init scripts.
/usr/src/linux/init/main.c—The best place to learn about how Linux boots. Fascinating reading, really. Get it from the source!
http://sunsite.dk/linux-newbie/—Home page for the Linux Newbie Administrator Guide—A gentle introduction to Linux System Administration.
The GRUB Manual—The still yet-to-be-completed manual can be found at http://www.gnu.org/software/grub/manual/. On your Fedora system, info grub provides a plethora of information and a sample grub.conf file (/boot/grub/menu.lst is a symbolic link to /boot/grub/grub.conf; use either name) can be found in /usr/doc/grub.
“LILO User’s Guide”—Werner Almesberger’s definitive technical tome on the LInux LOader, or LILO, and how it works on Intel-based PCs. Look under the /usr/share/doc/lilo*/doc directory for the file User_Guide.ps, which can be viewed using the gv client. LILO has been dropped from Fedora; GRUB is now the default boot loader supported in the distribution.
“Managing Initscripts with Red Hat’s chkconfig”—by Jimmy Ball, Linux Journal, April 2001; pp. 128–132.
“Grub, Glorious Grub”—Hoyt Duff, Linux Format, August 2001; pp. 58–61. A tutorial on the GRUB boot loader.
http://www.redhat.com/docs/manuals/linux/RHL-9-Manual/custom-guide/s1-services-serviceconf.html—Red Hat’s guide to use the system-config-service client (then called redhat-config-service).
http://www.linuxbase.org/spec/refspecs/LSB_1.0.0/gLSB/sysinit.html—The Linux Standard Base description of system initialization; this is the standard.
http://www.gnu.org/software/bash/bash.html—The bash home page at the GNU Software Project.
http://www.tldp.org/LDP/abs/html/—Mendel Cooper’s “Advanced Bash-Scripting Guide.” http://www.linuxnewbie.org/nhf/intel/shells/basic.html—Learn basic shell commands at this site.
http://www.cs.princeton.edu/~jlk/lj/—”The New Korn Shell—ksh93,” an article by David G. Korn, Charles J. Northrup, and Jeffery Korn regarding the korn shell.
http://web.cs.mun.ca/~michael/pdksh/—The pdksh home page.
http://lug.umbc.edu/~mabzug1/bash-httpd.html—The Bash-httpd FAQ, with links to the latest version of the bash web server, bash-httpd-0.02.
http://www.tcsh.org/—Find out more about tcsh here.
http://www.zsh.org/—Examine zsh in more detail here.