Understanding Managed Metadata
This section explores an important concept in content classification and categorization. If you are into blogging and social networking, the concept of tags should not be new to you. Tagging content as a favorite and further categorizing it using relevant category tags is a task that a typical blogger or a social networking site user performs on a daily basis. In fact, the popularity of social networking and various blogging engines has popularized the concept of tags even more than the traditional approach of organizing content in hierarchical folders.
A typical blogging engine allows publishers and readers to apply various tags to blog posts to ease in classification and categorization of content. For example, a technical article on a technology blog can be applicable to both SharePoint and ASP.NET and can be marked with both tags by the author. Later, readers looking for either SharePoint related or ASP.NET related articles would both be able to find the article when searching via related tags. Thus tagging is different from a folder based hierarchical structure in the sense that one piece of content can now come under multiple hierarchies. If you were to use the old school folder based hierarchical navigation, you would end up creating two copies of the same article. Further, blogging engines maintain a dictionary of all these tags so that they can be reused in different blogs.
By drawing parallels to the concept of tagging, as it applies to the blogging engines, let’s explore the related concepts in the SharePoint world.
In SharePoint, a tag loosely maps to a term. A term is a word or a phrase that can be associated with an item in SharePoint. A collection of related terms is called a term set. Managed metadata refers to the management of the terms and term sets.
Further, two types of terms are available in SharePoint:
• Managed terms (or taxonomy) are predefined words or phrases that can only be created by privileged users referred as Metadata Content Managers.
• Enterprise keywords (or folksonomy) are words or phrases that have been added by the end user.
To use terms and managed metadata to tag items in SharePoint, you need to provision an instance of the Managed Metadata Service, which allows you to perform two key tasks:
• Use managed metadata.
• Share content types across site collections and web applications. (You explore this later in the hour when in the discussion of content type publishing hubs.)
Provisioning the Managed Metadata Service
You can set up and configure an instance of the managed metadata service from the SharePoint central administration. You can find the related options on the Manage Service Applications screen, as illustrated in the following section.
Creating and Managing Term Sets
When the service is created, click the service hyperlink to access the Term Store Management tool. Using this tool, you can create and manage term sets and also assign managed metadata roles. A user’s role determines how the user can work with managed metadata.
If you receive the “The Managed Metadata Service or Connection is currently not available.” error message while attempting to use the Term Store Management Tool, make sure that your Managed Metadata Web Service is running by navigating to the Central Admin, Manage Services on Server link (present under System Settings). Click the Start button to start the service in case it is not already started.
Using the Term Store Management tool is intuitive; you can right-click an item in the hierarchy to create a new item under it or perform various other functions such as copy a term, merge terms, deprecate a term, and so on, as shown in Figure 12.9.
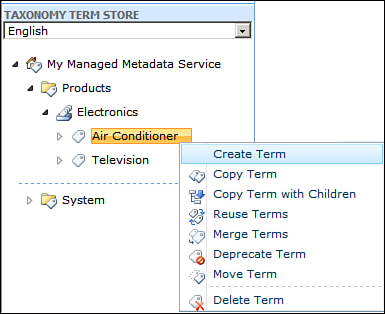
Figure 12.9. Term Store Management tool
You can configure a number of properties at each level, when creating a new item:
• At the group level you can specify a group name, description, group manager (group managers have the same privileges as group contributors and an additional privilege to add or remove members from the group contributors list), and contributors (contributors can edit the terms and term set hierarchies within the group).
• At the term set level you can specify the term set name, description, term set owner, contact email for receiving term set related suggestions, stakeholders (users who are notified before any major changes are made to the term set), submission policy (a closed submission policy allows only owners of the term set to add terms while an open policy allows term set users as well to add additional terms), and finally whether the term set is available for tagging.
• At the term level you can specify whether the term is available for tagging, language for the label, a default label for the term, and a synonym for the term.
Go ahead and use the Term Store Management tool to create a new group named Products. Create a new term set under this group and call it Electronics. Further create the following set of terms, as shown in Figure 12.10, under the Electronics term set.

Figure 12.10. Creating a group, term set, and terms using the Term Store Management tool
Recall that while configuring the Managed Metadata Service, you specified the database name as MyManagedMetadataService_DB. At this point if you happen to connect to the database, using either SQL Server Management Studio or Visual Studio Server explorer and examine the contents of the ECMTermLabel, you find all the terms you just created in this table.
Further, you can also create the Products group and the Electronics term set using the following code:
using (SPSite site = new SPSite("http://YourSiteCollection/"))
{
// Instantiate a new TaxonomySession for the root site collection
TaxonomySession session = new TaxonomySession(site);
// Instantiate a connection to the My Managed Metadata Service
TermStore termStore = session.TermStores["My Managed Metadata Service"];
if (termStore != null)
{
// Create Products group
Group productsGroup = termStore.CreateGroup("Products");
// Create Electronics term set
TermSet electronicsTermSet = productsGroup.CreateTermSet("Electronics");
// Create Air Conditioner term and further Split and Window terms under it
// 1033 is Locale Identifier for English
Term airConditionerTerm =
electronicsTermSet.CreateTerm("Air Conditioner", 1033);
Term splitTerm = airConditionerTerm.CreateTerm("Split", 1033);
Term windowTerm = airConditionerTerm.CreateTerm("Window", 1033);
// Create Television term and further LCD and Plasma terms under it
Term televisionTerm = electronicsTermSet.CreateTerm("Television", 1033);
Term lcdTerm = televisionTerm.CreateTerm("LCD", 1033);
Term plasmaTerm = televisionTerm.CreateTerm("Plasma", 1033);
// Commit
termStore.CommitAll();
}
}
All you need to do is add a reference to Microsoft.SharePoint.Taxonomy.dll present under the 14ISAPI directory, and you can start working with the various classes in the Microsoft.SharePoint.Taxonomy namespace. The preceding code is pretty much self-explanatory. You start by creating a new TaxonomySession object and using it to get a reference to a term store provided by the My Managed Metadata Service. Next create a Products group with the Electronics term set under it and start adding terms to the same. Finally, commit all the changes to the term store. For the complete code listing, see the ManagedMetadataAPIDemo project in the source code for this hour.
Classifying and Tagging Items
Now that the term set is ready, you can utilize this term set to classify and tag items in SharePoint. Create a new custom list called My Products. In this example you add consumer electronics related products data to this list and tag them with the appropriate terms from the Electronics term set. To accomplish this, add a new column of type Managed Metadata to the list. In the Term Set Settings section configure the column to use the Electronics term set, as shown in Figure 12.11.

Figure 12.11. Adding a Managed Metadata column to a list
With your list set up, add a few items to it. Notice that as you type in a value for the Product Category, SharePoint prompts you with the matching terms from the Electronics term set, as shown in Figure 12.12.
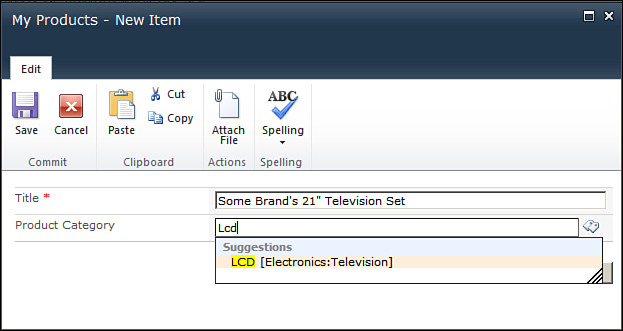
Figure 12.12. Tagging products with related terms from the term set
So far so good, but what if a term is better known by another name (or synonyms) as well. For example, what if a user tries to type in “Liquid Crystal Display” instead of “LCD”? Fortunately, the Term Store Management tool allows you to configure synonyms as well for a term. You can do so by typing in the synonyms in the Other Labels section, as shown in Figure 12.13.
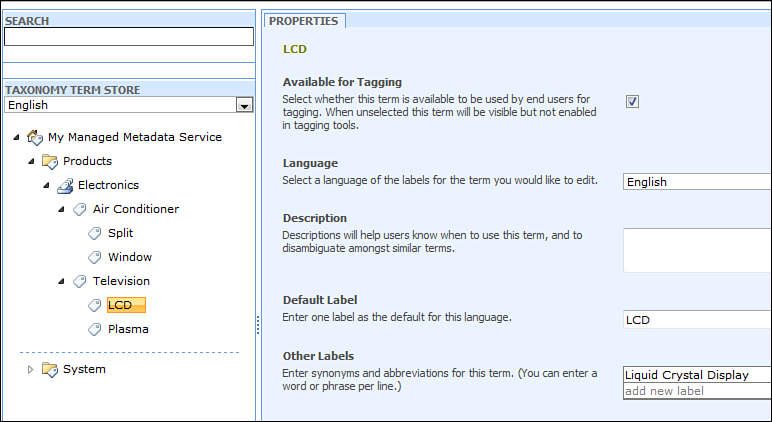
Figure 12.13. Configuring synonyms
Now because “Liquid Crystal Display” has been configured as a synonym for the term “LCD,” as you try to type in the word “Liquid” in the Product Category field, SharePoint identifies it as a synonym for LCD and prompts you. Further, when you select the suggested value, SharePoint intelligently replaces Liquid Crystal Display with LCD.
Content Organization with Managed Metadata
Go ahead and populate the My Products list with a few more products as shown in Figure 12.14.

Figure 12.14. Items in the My Products list
Now that your list is populated with a sufficient number of items and appropriate product categories are assigned to each item, you need to understand how managed metadata makes your content better organized and convenient to browse. Go to Metadata Navigation Settings on the List Settings page. Select the Product Category field in the Configure Navigation Hierarchies and Configure Key Filters sections as shown in Figure 12.15.

Figure 12.15. Configuring the navigation hierarchies and key filters to use in the Product Category field
After you do the configuration specified in Figure 12.15, note that on navigating back to the My Products list you now have the option to select terms from the term set and specify key filters, as shown in Figure 12.16.

Figure 12.16. Using the navigation hierarchy and key filters based on the Product Category field
You can expand the Product Category and select one of the terms in the navigation hierarchy to filter the list to display only the matching items. If you want to filter by multiple terms at a time, you can use key filters. As you can see, list navigation and filtering based on managed metadata is easy to configure and intuitive to use as well.
Understanding the Idea of Enterprise Keywords
So far you have seen how administrators or privileged users can configure the managed terms or taxonomy. Now you see how end users can create and add their own words and phrases, by understanding the idea of enterprise keywords or folksonomy.
To understand the concept of enterprise keywords, create a new document library called My Document Library. In the Library Settings for My Document Library, select the Enterprise Metadata and Keywords Settings option. Check the Add an Enterprise Keywords Column to This List and Enable Keyword Synchronization check box.
Now upload a new document to the library and edit its properties. Notice that a new option to specify enterprise keywords appears where you can type in a term, as illustrated in Figure 12.17. If something matches, SharePoint prompts you with the match; otherwise, when you click Save, a new term is created by SharePoint and added to the Keywords term set.

Figure 12.17. Using the enterprise keywords
At this stage if you revisit the Term Store Management tool, you would notice that any new keyword that you type in gets added under the Keywords term set in the System group, as shown in Figure 12.18.
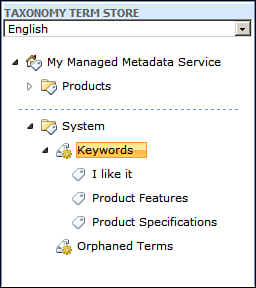
Figure 12.18. The Keywords term set in the System group
Further, if you were to open any document in this library in a Microsoft Office application, for example, Microsoft Word, you should be able to view Enterprise Keywords in the Document Properties panel, as shown in Figure 12.19. As you would expect, updating the Enterprise Keywords property with a term not already configured as a keyword causes the same to be added as a new enterprise keyword.
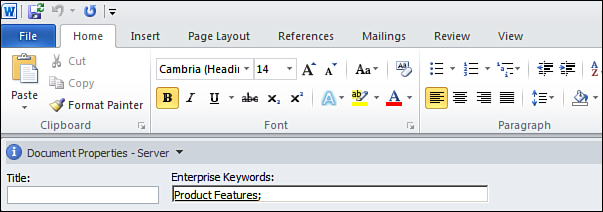
Figure 12.19. Configuring a new enterprise keyword from the Document Properties panel in Microsoft Word
At times, you might want to tag content only for your specific needs and don’t want the same to appear for all users. To do this, select the desired document in your library and click the Tags and Notes button. A pop-up window similar to one shown in Figure 12.20 appears, allowing you to specify the tags.
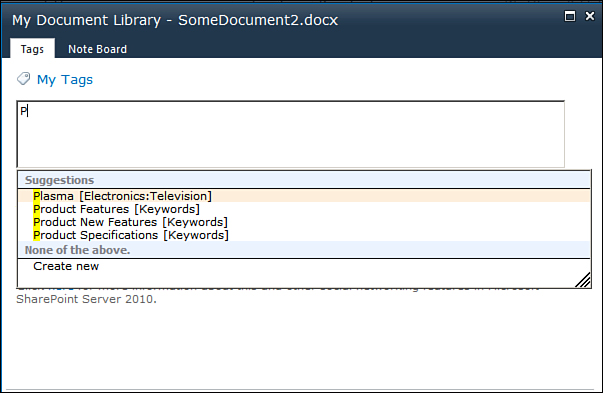
Figure 12.20. Tagging content for personal use
As you begin typing notice that suggested values are retrieved from both the Keywords and the Products term sets. An interesting implication of this is that as you keep tagging content, this also starts appearing in your activity feed on your My Site.