Understanding Records Management in SharePoint
Prior to SharePoint 2010 all records management features were restricted to the Records Center site template. The Records Center site served as an archive for records, and documents moved to the archive became records. Although the Records Center site template is still present in SharePoint 2010, a major difference is that in SharePoint 2010 you can activate many of the records management related features on any site, even if it is not based on the Records Center site template. This provides flexibility since users can take advantage of record management related features for documents from within the same document library without the need of moving them to a Records Center site. This is called in place records management, or in other words, when you declare a document a record, the document remains in place and SharePoint 2010 manages it as a record.
Now that you’ve had an introduction to records management, let’s begin exploring the Records Center site template and various ideas related to centralized records management.
Exploring the Records Center Site Template
You can create the Records Center as a site or as a site collection. However when creating the Records Center as a separate site collection you get the ability to segregate its content in a separate content database, which gives you the option of moving all the archived content to an alternate storage location when required.
Try It Yourself: Provision a Records Library
1. Provision a new Records Center site collection from Central Administration, by selecting the Records Center site template, present under the Enterprise tab.
2. Once the site collection is provisioned navigate to the top-level site’s landing page, shown in Figure 13.1. You can customize this landing page to educate the users about your records management policies and organizational compliance. The Submit a Record button lets users upload documents to the Drop Off Library, which are then moved to the correct library/folder according to the configured records management rules.

Figure 13.1. Welcome page of the Records Center site
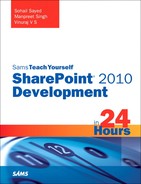
3. To configure various record management settings, navigate to the Records Center Management page, shown in Figure 13.2, by clicking on the Manage Records Center link under Site Actions.
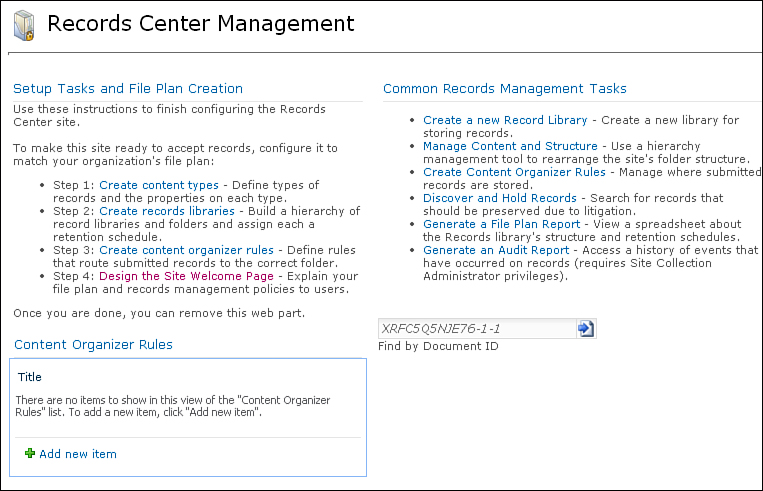
Figure 13.2. Records Center Management console
4. The Records Center Management page lists the following steps required to configure the Records Center site:
a. Create content types.
b. Create records libraries.
c. Create content organizer rules.
d. Customize the Records Center’s welcome page.
Let’s go through each of these steps one by one to set up a Records Center site.
5. Create a DocumentWithDeptInfo content type, inheriting from the Document content type. Add a new site column called Dept and select the type of information as Choice. Enter the following three departments as values the user can choose for this column:
• Finance
• HR
• Operations
Keep the other fields as default.
6. Modify the Dept column settings to required; that is, the column must contain information.
7. Next create a new Library with the Records Library template. Name the new library My Records.
8. Modify the library settings and set the document type DocumentWithDeptInfo as the default content type for the library.
Now that you have a content type and a records library ready for use, let’s explore various records management related features one by one.
The first topic is the steps involved in configuring and managing document retention policies in a Records Center site. SharePoint allows you to configure a multistage retention policy that you can use to specify the entire life cycle of a document as a single policy. Based on content metadata, you can add multiple retention stages to a policy to perform actions such as kick starting a workflow, moving the content to the recycle bin, or even permanently deleting the content. A retention policy can be configured on a content type, a library, or a folder.
Try It Yourself: Configure a Retention Policy
1. To configure a retention policy, navigate to the library settings page for My Records library.
2. Click the Information Management Policy Settings link. You should now be able to view content types associated with the library and whether any content type has a retention policy defined as shown in Figure 13.3.

Figure 13.3. Configuring the information management policy settings
3. To define a retention policy on DocumentWithDeptInfo content type, select the DocumentWithDeptInfo content type.
4. On the Edit Policy screen, check the Enable Retention check box. Notice that as you do so you get an option to add a retention stage.
5. As discussed earlier, you can add multiple retention stages to a policy, for example, using a custom workflow to send reminders to a user for a particular timeframe, in the case of no action moving to the next retention stage, which may move the content to a different records library or delete the content permanently. Click the Add a Retention Stage link to add a new retention stage.
6. To configure a retention stage, you need to specify an event and an action. Figure 13.4 defines a retention stage to delete all documents not modified for one year.
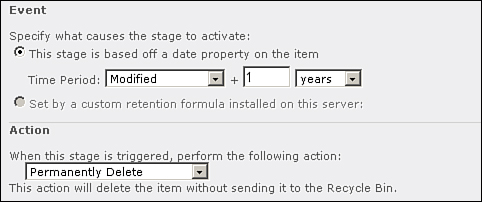
Figure 13.4. Configuring a retention stage
7. Click OK to save the changes.
8. The Edit Policy screen provides a number of other options as well, including
• Policy Statement—For the benefit of the end users to explain to them the rules that apply to their content
• Auditing—To log events such as users who opened, downloaded, or viewed the content, modified content properties, and so on
• Barcodes and Labels—For managing nondigital content
As shown in Figure 13.5 enable auditing to track users who opened, downloaded, or viewed the content and also specify a matching policy description.

Figure 13.5. Configuring auditing
9. You can optionally add an administrative description and a policy statement, which can help other administrators and end users understand the purpose of your policy. Click OK to save the changes and create the policy. The newly created policy should now be visible against the DocumentWithDeptInfo content type.
From now on, any content (associated with the DocumentWithDeptInfo content type) lying unused for more than a year is deleted automatically.
Understanding Hold and eDiscovery
Hold and eDiscovery is a new feature in SharePoint 2010. Using this feature you can discover content and place it on hold—that is, lock it down to prevent editing. Either you can search for content and automatically place it on hold or holds can be set manually as well via the Compliance Details window. Holds and eDiscovery is used especially in scenarios where you need to freeze the content that may be required for a review or inspection in case of litigation, investigation, or audit.
You can configure various options related to Holds and eDiscovery by navigating to Site Settings and using the following three links under the Hold and eDiscovery section:
• Hold Reports—Provides information on the items that are on a hold in the site
• Holds—Allows you to create a hold and specify a manager for that hold
• Discover and Hold Content—Allows you to search content related to a particular litigation, investigation, or audit and add a search result to a hold or send the results to another site.
Try It Yourself: Configure Hold and eDiscovery
1. Upload some documents to My Records library and randomly select the department from Finance/HR/Operations. Assume that you want to place all records related to the Finance department on hold.
2. Select the Discover and Hold Content link (from Site Settings, Hold and eDiscovery section) and configure various attributes as shown in Figure 13.6.
3. Click the Add a New Hold Link as shown in Figure 13.6 to create a Hold Finance Records hold, as illustrated in Figure 13.7, so that it is available for selection in Figure 13.6.
Figure 13.6. Creating a hold based on search criteria
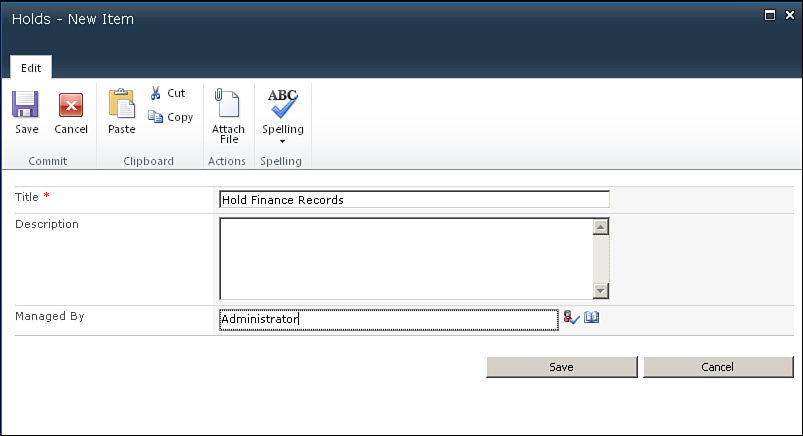
Figure 13.7. Creating a new hold
4. You can also preview the search result by clicking the Preview Results button. Click the Add Results to Hold button to place the search results on hold.
For eDiscovery to work, search should be set up and working. You learn more about search in Hour 18, “Introducing SharePoint Search”; for now, follow these steps to start a crawl so that your eDiscovery search results display the relevant content: Navigate to Manage Service Applications in Central Administration and click Search Service Application. Select the Manage button from the ribbon. Select the Content Sources option under the Crawling section in the left-hand menu. Select the Start Full Crawl option as shown in the Figure 13.8.

Figure 13.8. Starting a full crawl
Once the crawl is over, your recently uploaded documents start appearing in the search results.
5. Once the items are added to the hold, an email confirmation is sent as indicated in the confirmation message, which you receive by clicking on the Add Results to Hold button.
6. In case you want to select and place individual records on hold, you can do so by selecting the Compliance Details link (as shown in Figure 13.9) and clicking on the Add/Remove from Hold link in the Compliance Details window.

Figure 13.9. Viewing compliance details
Once a document or a record is on hold, content disposition rules are not applied to it, and the item is retained until the hold is released. In case the document was editable before, its contents are frozen and it is no longer is available for any further modifications.
Also note that the Compliance Details window provides the option to Generate Audit Log Report. If you remember we discussed auditing and configured the same while setting up an information management policy. Clicking on the link takes you to the View Auditing Reports page with options to view various audit reports from where you can view the configured audit reports.
Content Organizer
Content Organizer is a new routing feature in SharePoint 2010 that allows you to route documents to different libraries and folders within those libraries based on a certain set of routing rules. At the heart of the Content Organizer are the Content Organizer Rules. Rules govern the Content Organizer engine and establish where the content should go.
You can configure the Content Organizer using the following links under the Site Administration section on the Site Settings page:
• Content Organizer Settings
• Content Organizer Rules
As the name suggests you can configure Content Organizer settings from the Content Organizer Settings option and create new routing rules using the Content Organizer Rules option. Any rules that you configure are stored in the Content Organizer Rules list.
The Drop Off Library is central to the Content Organizer engine, and any content that users drop off in this library, is routed to various locations according to the configured Content Organizer rules.
To better appreciate the functionality of the Content Organizer, create a routing rule to move documents to subfolders in a document library, depending on their department, whenever a user uploads a new document.
You already have the DocumentWithDeptInfo content type set up that users can use to specify while uploading the content which department the document belongs to.
Now create a new routing rule to move the documents uploaded by the user to the appropriate department folder in the My Records library depending on the value of the Dept field, as selected by the user.
Try It Yourself: Create a Content Routing Rule
1. Navigate to the Content Organizer Rules page (from Site Settings, Site Administration section, Content Organizer Rules link) and click the Add New Item button to create the new rules as per the following attributes (as illustrated in Figure 13.10 as well):

Figure 13.10. Configuring the Content Organizer rule
• Rule Name—Document Organizer (by Department).
• Rule Status And Priority—5 (Medium).
• Submission’s Content Type—Select DocumentWithDeptInfo content type and leave the other fields as default.
• Conditions—Leave as default.
• Target Location—Select the My Records library by clicking the browse button. Also check the Automatically Create a Folder for Each Unique Value of a Property check box. Select the Dept property for the Select a Property (Must Be a Required, Single Value Property) field and specify the format for folder name as %1.
2. Once the rule is configured, navigate to the Drop Off Library and add a new document to the library or click the Submit a Record button on the site’s landing page. Note the message from Content Organizer clearly indicates that documents uploaded to the Drop Off Library are automatically moved to the correct library, as you would expect.
3. Select a department from the drop-down list and click Submit, as shown in Figure 13.11.
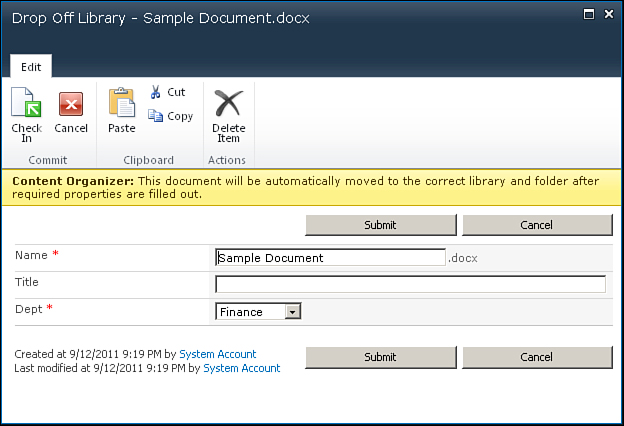
Figure 13.11. Selecting a department while uploading a new document
Notice that since the Document ID Service feature is active in the Record Center site collection, the uploaded document is assigned a unique document ID as well, as indicated in the URL shown in Figure 13.12.

Figure 13.12. Document URL indicates the document has been routed to the correct location.
Configuring In-Place Records Management
As discussed earlier, SharePoint 2010 allows you to declare a document as a record “in place,” without the need of it being moved to the Records Center site. In a site not created with the Records Center template, you can activate the relevant features and take advantage of the records management related features discussed previously.
For example, first and foremost, to take advantage of in-place records management, enable the In Place Records Management site collection feature from Site Settings, Site Collection Administration, Site Collection Features link.
Activating this feature provides the following new links under Site Administration:
• Record Declaration Settings
• Site Collection Policies
This feature is required if you want to mark incoming documents as records. Further, you are also suggested to activate the Document ID Service to assign document IDs to incoming documents.
Site Collection Policies allows you to define information management policies at the site collection level.
Using the Record Declaration Settings, you can specify at the site collection level users who can declare records and what restrictions to put in place when a document is marked as a record. For example, you can choose to block edit and delete (default) functionality, or you can choose to enforce no additional restrictions, as shown in Figure 13.13.
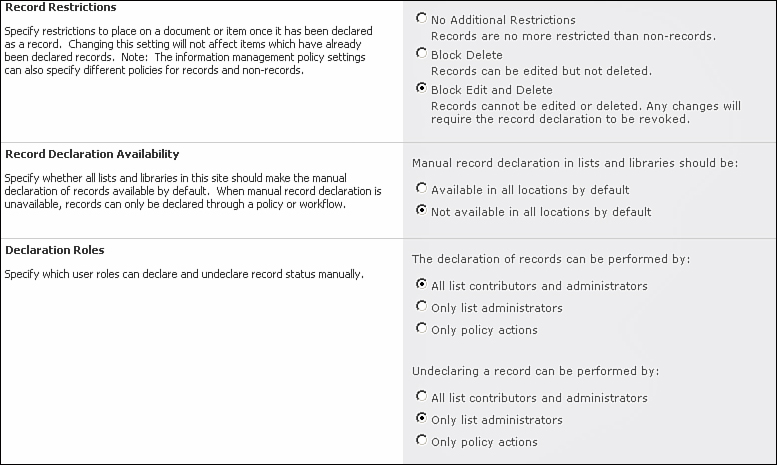
Figure 13.13. Configuring record declaration settings
Further, for a document library, you can configure how you want the documents to be converted to records by navigating to the library setting and selecting the Record Declaration Settings option. You can choose to inherit the site collection settings or override them. You can also select the option to automatically declare items as records when added to the library, as shown in Figure 13.14.
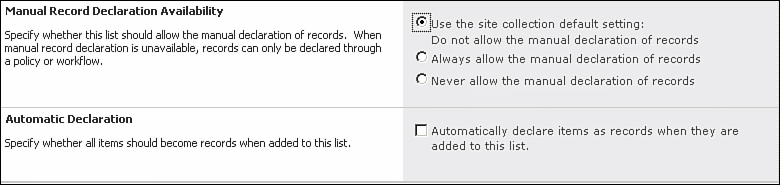
Figure 13.14. Configuring record declaration settings for a document library
Further, you can also take advantage of the Hold and eDiscovery feature, by activating the corresponding feature at the site level.
To take advantage of the Content Organizer in place, you need to activate the Content Organizer site feature.
The Content Organizer feature has a dependency on the hidden feature DocumentRoutingResources (id: 0c8a9a47-22a9-4798-82f1-00e62a96006e), which must be activated before the Content Organizer feature can be activated. The following stsadm statement activates this hidden feature:
stsadm -o activatefeature
-id 0c8a9a47-22a9-4798-82f1-00e62a96006e -url http://splearn
Once the preceding feature is activated, a new content type called Rule is created for you, visible under the site’s content type gallery, and a Drop Off Library is created as well, as shown in Figure 13.15. At this stage you can begin configuring Content Organizer rules.

Figure 13.15. A content type called Rule is created automatically when the Content Organizer is configured in a site.