
Creating the Hello World Silverlight Application
In this section you write a simple Silverlight application that consists of a label, textbox, and a button. On clicking the button a message box displays to the user with a custom message concatenated with the text entered by the user in the textbox.
Open Visual Studio and create a new project of type Silverlight Application. Name it HelloWorldSLApp as shown in Figure 9.2.
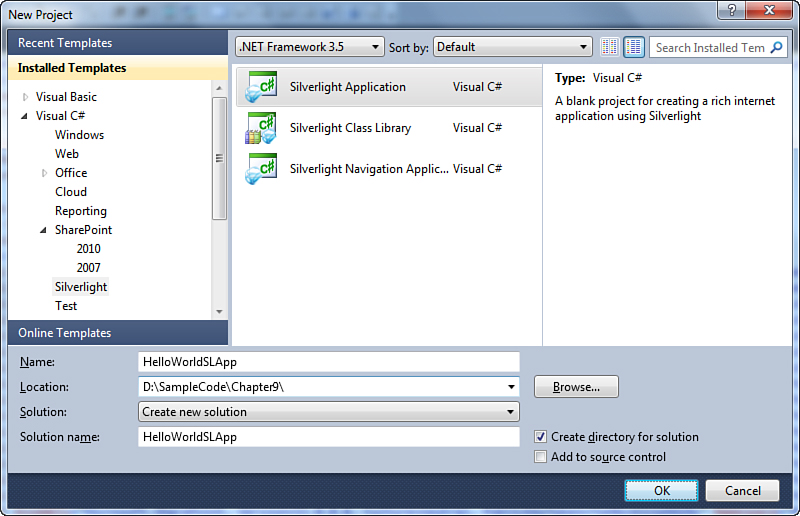
Figure 9.2. Creating a new Silverlight project
Click OK, and you see the New Silverlight Application screen as shown in Figure 9.3. This screen allows you specify the hosting application for the Silverlight application and select the version of Silverlight to use for the current project. Every Silverlight application needs to be hosted on a web page. Create a new ASP.NET application to host your new Silverlight application. Later on you see how to host this Silverlight application in SharePoint.

Figure 9.3. Options to host the new Silverlight application
Keep the default settings and click OK.
Even if you are creating a Silverlight application for hosting on SharePoint it is a good idea to create an ASP.NET web application to host the Silverlight application as it makes it easier to debug and test the Silverlight application before finally deploying to the SharePoint site.
You see the Silverlight and the ASP.NET web application projects created in the Visual Studio solution, as shown in Figure 9.4.

Figure 9.4. The HelloWorldSLApp solution structure
You see two files with the .xaml extension in the Silverlight project. The App.xaml file contains the entry point for the Silverlight application in the form of the function Application_Startup. Also the MainPage.xaml represents your Silverlight form.
App.xaml and the MainPage.xaml consist of a codebehind file having the extension .xaml.cs. The .xaml file contains the XAML markup for controls, styles, and resources. The codebehind files contain the class declarations and events. This model is similar to the ASP.NET projects where we have the .aspx and the code-behind .aspx.cs files.
Open the MainPage.xaml file and update the markup as shown in the following code:
<UserControl x:Class="HelloWorldSLApp.MainPage"
xmlns="http://schemas.microsoft.com/winfx/2006/xaml/presentation"
xmlns:x="http://schemas.microsoft.com/winfx/2006/xaml"
xmlns:d="http://schemas.microsoft.com/expression/blend/2008"
xmlns:mc="http://schemas.openxmlformats.org/markup-compatibility/2006"
mc:Ignorable="d"
d:DesignHeight="300" d:DesignWidth="400" xmlns:dataInput="clr-namespace: System.Windows.Controls;assembly=System.Windows.Controls.Data.Input">
<Grid x:Name="LayoutRoot" Background="White">
<Grid.ColumnDefinitions>
<ColumnDefinition Width="130" />
<ColumnDefinition Width="*" />
</Grid.ColumnDefinitions>
<Grid.RowDefinitions>
<RowDefinition Height="100" />
<RowDefinition Height="*" />
</Grid.RowDefinitions>
<dataInput:Label Height="50" HorizontalAlignment="Left" Margin="20,48,0,0" Name="LabelName" VerticalAlignment="Top" Width="100" Content="Enter Name" />
<TextBox Grid.Column="1" Height="23" HorizontalAlignment="Left" Margin="6,48,0,0" Name="TextboxName" VerticalAlignment="Top" Width="206" />
<Button Content="Submit" Grid.Column="1" Grid.Row="1" Height="23" HorizontalAlignment="Left" Margin="22,30,0,0" Name="ButtonSubmit" VerticalAlignment="Top" Width="75" Click="ButtonSubmit_Click" />
</Grid>
</UserControl>
Open the Main.xaml.cs file and update the code as follows:
using System;
using System.Collections.Generic;
using System.Linq;
using System.Net;
using System.Windows;
using System.Windows.Controls;
using System.Windows.Documents;
using System.Windows.Input;
using System.Windows.Media;
using System.Windows.Media.Animation;
using System.Windows.Shapes;
namespace HelloWorldSLApp
{
public partial class MainPage : UserControl
{
public MainPage()
{
InitializeComponent();
}
private void ButtonSubmit_Click(object sender, RoutedEventArgs e)
{
MessageBox.Show(string.Format("'{0}' - Welcome to the world of Silverlight", TextboxName.Text));
}
}
}
Rebuild the entire solution. The HelloWorldSLApp.xap file is added to the ASP.NET web application project under the ClientBin folder.
Silverlight applications are packaged as .xap files, which are nothing but zip files. You can view the contents of this file by renaming it to .zip and opening it in Windows Explorer. Right-click HelloWorldSLAppTestPage.aspx and click View in Browser. You can see the Silverlight form in the browser. Enter some text and click Submit. You see the message box shown in Figure 9.5.
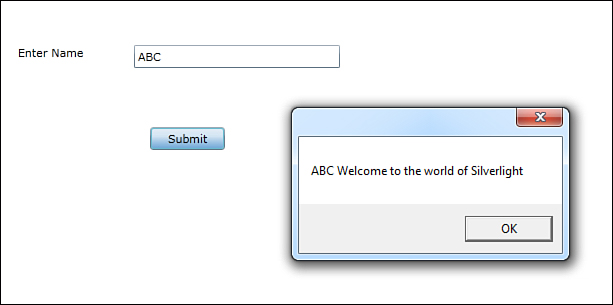
Figure 9.5. HelloWorldSLApp Silverlight application
Let’s review what exactly you wrote in this first Silverlight application. The XAML defines the user interface. The Grid control in the XAML is used to achieve the desired layout. Two rows and two columns are defined using the Grid.ColumnDefinitions and Grid.RowDefinitions tags. The width of the first column is 130 px, and the other column takes the remaining width by defining Width="*". The desired height for rows is specified in a similar manner:
<Grid.ColumnDefinitions>
<ColumnDefinition Width="130" />
<ColumnDefinition Width="*" />
</Grid.ColumnDefinitions>
<Grid.RowDefinitions>
<RowDefinition Height="100" />
<RowDefinition Height="*" />
</Grid.RowDefinitions>
The various controls for the Silverlight application are then defined. The positioning of the controls in the Grid is defined through the Grid.Columns and Grid.Rows attributes. The absence of the attributes indicates the first row or first column.
The Grid control is one of the few controls in Silverlight used to achieve the desired layout. The other controls are StackPanel and Canvas. While the Grid control defines the layout through rows and columns the StackPanel allows you to lay the control next to each other horizontally or vertically, similar to a stack. The Canvas allows you lay controls through absolute positioning in pixels. You can use a combination of these controls nested within each other to achieve complex layouts.
Finally the code behind the MessageBox.Show function is called to display the name entered by the user along with some custom text message.
Right-click the HelloWoldSLApp.Web project and click Properties. Go to the Silverlight tab, and you can see your Silverlight project listed there as shown in Figure 9.6. This setting is responsible for copying the HelloWorldSLApp.xap file to the ClientBin folder of the web application.

Figure 9.6. Silverlight Applications tab in ASP.NET project properties
Open the HelloWorldSLAppTestPage.aspx file. You can see the object tag that renders your Silverlight application on the ASP.NET page.
<div id="silverlightControlHost">
<object data="data:application/x-silverlight-2," type="application/ x-silverlight-2" width="100%" height="100%">
<param name="source" value="ClientBin/HelloWorldSLApp.xap"/>
<param name="onError" value="onSilverlightError" />
<param name="background" value="white" />
<param name="minRuntimeVersion" value="3.0.40818.0" />
<param name="autoUpgrade" value="true" />
<a href="http://go.microsoft.com/fwlink/?LinkID=149156&v=3.0.40818.0" style="text-decoration:none">
<img src="http://go.microsoft.com/fwlink/?LinkId=161376" alt="Get Microsoft Silverlight" style="border-style:none"/>
</a>
</object><iframe id="_sl_historyFrame" style="visibility:hidden;height:0px;width:0px;border:0px"></iframe></div>
The source parameter specifies the path of the .xap file to be loaded. The onError parameter specifies the JavaScript function to handle errors that might occur while loading the Silverlight application.
You can also pass custom data to your Silverlight application from the object tag through the initParams parameter, which is not mentioned in this code sample. This data is accessible in the Silverlight application in the Application_Startup event of App.xaml through the InitParams property of the StartupEventArgs object, which is passed as a parameter to the Application_Startup event.