
Chapter 1
Server Issues: Why Your Server Matters
In This Chapter
- Getting to know the servers
- Making sure your server is healthy and fast
- Excluding pages or sites from the search engines
- Passing instructions to search engines with a robots text file
- Using Meta robots tags
- Building a customized 404 Error page
- Avoiding dirty IPs and bad neighborhoods
- Serving your site to different devices
Your web server is the software application or service that runs your website. (The term web server can be used to refer to both the hardware and the software that runs a website, but in this chapter, we talk about the software.) Anytime a user does something on your site, such as loads a page or views an image, your web server receives the request and serves up what the user wants. Like a good waiter in a restaurant, you want your site’s server to be as fast and efficient as possible so that your site visitors feel happy and well satisfied. This is especially important when it comes to Google as page speed is a factor in its algorithm.
Server issues impact search engine ranking, from the type of server you use to how well it performs. Search engines don’t want to present sites that frustrate users by being slow or unavailable in their results. A slow server, or a server that fails often, can cause a site to drop out of the search engine’s index (the databases of website content that Google, Yahoo, or Bing pull from when delivering search results) or prevent a site from ever being indexed in the first place. A key and yet often overlooked point of failure for a website is the server environment where it resides.
If your site is up and running, you’re either operating your own server equipment or using a hosting facility. Either way, you need to know what type of server you use. You also need to know something about the IP address that your site occupies. An IP (Internet Protocol) address is the numeric code that identifies the logical address where your site resides on the web — as well as other server-level factors that can have a big impact on your success with your search engine optimization (SEO) efforts.
In this chapter, we discuss the importance of choosing the right server and keeping your server in optimal health. You also discover ways to identify server problems that can have a negative impact upon your search engine ranking so that you can address them.
Meeting the Servers
In the world of web servers, two competitors hold more than 65 percent of the market share: Apache and Microsoft IIS. In this section, we give you some basic information on each server to introduce you to these two reigning heavyweights.
Using the Apache server
The most popular web server on the market, the Apache HTTP Server is an open-source software application (a computer program whose source code is available for free to the public) maintained by the Apache Software Foundation. Currently in version 2.4.12, the Apache web server supports approximately 40 percent of all sites on the World Wide Web. The fact that it’s free may contribute to its popularity, but the Foundation people in charge say it also contributes to its strength because the entire Internet community can participate in identifying and fixing bugs, and in improving the software.
 For search engine optimization purposes, Apache is the best server available. Its configuration options make it the most flexible server, which is important because SEO requires constant monitoring and tweaking. Apache also gives you direct access to the server even if a third-party hosting provider runs your site. This access offers a crucial advantage over the Microsoft IIS server environment.
Using the Microsoft IIS server
The main competitor to the Apache server is Microsoft Internet Information Services (IIS). This proprietary software (meaning that you must purchase it from Microsoft) provides a platform for running a website. IIS is currently in version 8.5 and comes included with the Windows Server 2012 R2 operating system for data centers. IIS is primarily used for sites that are written on a Microsoft stack (.NET, ASP, and others — technical stuff that you don’t really need to know other than whether your site is set up on IIS). If your website is programmed in .NET, your only option is to use an IIS server.
Microsoft IIS has the second-most market share after Apache. The main disadvantage with IIS occurs if your site resides on a shared server operated by a third-party hosting provider. With an IIS server, only the administrator can access the server directly — so anytime you need to look at or make changes to your server files, you have to go through the hosting provider, which can cause delays and end up being a little frustrating. However, if you have a dedicated server (a server not shared with any other sites) that you can access directly, the IIS server can accommodate your SEO needs if you have administrator-level access rights.
 You can overcome some of the administrator-rights requirements and get Apache-like, flexible functionality out of your IIS web server. To do this, you need to install an ISAPI_Rewrite plug-in into IIS. ISAPI stands for Internet Server Application Program Interface; you can get ISAPI_Rewrite software from several vendors. If you’re using IIS 7.0 or higher, we suggest that you download the software directly from Microsoft. Another version that’s excellent and that works well on IIS 5.0, 6.0, or 7.0 comes from Helicon Tech (
www.isapirewrite.com). (For more information on ISAPI_Rewrite, see Chapter 4 of this minibook.)
Using other server options
NGINX is currently the third most popular web server, with just over 14 percent of the market, and developers call it a strong choice because it’s speedy and secure. As with Microsoft IIS, you need administrative access to the server, or at least to the place where NGINX configuration files are allowed, to make changes. A bunch of other little guys out there also offer web servers with intriguing names like Appweb, Barracuda, Cherokee, Yaws, and IceWarp. Red Hat makes an enterprise (large-scale) edition of the Apache server that targets large clients with high-traffic demands. All of these have different limitations that you won’t find with the Big Two (Apache and Microsoft IIS).
For your SEO efforts, we generally recommend using an Apache, NGINX, or Microsoft IIS server to ensure you have the flexibility and performance you need.
Making Sure That Your Server Is Healthy, Happy, and Fast
A slow server can spell disaster for your site. If the search engines keep trying to visit your site to no avail, eventually they may stop trying. They don’t want to index a site that isn’t going to load when users try to access it — search engines don't want to give their users unreliable, slow information. That kind of thing makes the search engine look bad.
If your website takes forever to load a new page, or links end in error messages, you also won’t have happy site visitors. And you may lose their business for good.
To succeed with search engines and users, you need a fast, clean server. You should check your server’s health regularly to ensure it’s performing well. Here are three things you should look for:
- Malfunctions: You need to make sure that your site remains free of server problems such as improper redirects (server directives that detour a request to a different page), script errors, or malfunctions that could cause a page not to display.
Fast processing speed: Speed counts a lot with the search engines. Kind of like the postal service through rain, sleet, or snow, the search engine spiders have a lot of ground to cover as they roam the Internet. If your site bogs down their progress due to a slow server, they’re less likely to crawl it completely and won’t re-index it as often.
Servers, in the overall scheme of things, are pretty cheap. If you take the cost divided by the number of visitors per year, you are talking about pennies. You should therefore address speed issues head-on, buying servers any time performance is slow.- Clean and uncrowded IP: Your IP address also matters and should be monitored because your site can be adversely affected if another site on your IP is caught spamming (intentionally trying to deceive or manipulate the search engines) or doing other dirty deeds.
Running a Check Server tool
One way to check the status of your server is to run a quick diagnostic utility called a Check Server tool. This utility attempts to crawl your site the same way that a search engine spider does. If the Check Server tool runs into any obstacles that could prevent the spider from indexing your site, it tells you about them on a report that the utility creates. Even if your content is perfect, a poorly functioning server can keep your site from reaching its full potential in the search engine rankings. It’s a good idea to run this diagnostic tool on a regular basis.
You can use any Check Server tool you have access to. We offer a free Check Server tool located on our website. To run our Check Server, follow these steps:
- Go to
www.seotoolset.com/tools/free-tools/. - Go to the Check Server Page tool and enter your website’s domain (such as www.yourdomain.com) in the Your URL text box.
- Click the Check Response Headers button and wait until the report appears.
A Check Server tool performs several different page requests and checks the returned status codes and the content. If they don’t match up, by showing error codes or inconsistent page content, it may be that your server is showing the search engines an error, even though there’s no real problem. Having this information lets you fix issues quickly, which is important because search engines often reduce website rankings because of web server errors that they encounter. At the very least, even if you encounter a common error that would not cause a search engine to drop you from its index, a cleaner site likely ranks higher in the search engine results.
In the first row of the table on the report, you’ll notice a number — in Figure 1-1, it’s 200. This represents the web page’s status as a search engine would see it. The server code that you see in the figure, 200, means the page is normal.

Figure 1-1: Our Check Server report identifies the server status code for a web page.
Table 1-1 explains the most common server status codes. These server statuses are standardized by the World Wide Web Consortium (W3C), an independent governance organization that oversees Internet standards, so they mean the same thing to everyone. We’ve boiled down the technical language into understandable English to show you what each server status code means about your web page. You can find the official definitions on the W3C site at www.w3.org/protocols/rfc2616/rfc2616-sec10.html, in case you want to research further.
Table 1-1 Server Status Codes and What They Indicate
Code |
Description |
Definition |
What it Means |
200 |
OK |
The web page appears as expected. |
This is what you want to see. Your server and web page have the welcome mat out for the search engine spiders (and users, too). |
301 |
Moved Permanently |
The web page has been redirected permanently to another web page URL. |
When a search engine spider sees this status code, it moves easily to the appropriate new page. A 301 Redirect status isn’t a problem for your search engine optimization. |
302 |
Found (Moved Temporarily) |
The web page has been moved temporarily to a different URL. |
This status should raise a red flag if you find it on your web server. Even though there are supposed to be legitimate uses for a 302 Redirect code, they can cause serious problems for your optimization efforts. Spammers frequently use 302 Redirects maliciously, so if you don’t want a search engine mistaking your site for a spam site, avoid these redirects. |
400 |
Bad Request |
The server couldn’t understand the request because of bad syntax. |
This code could appear because of a typo in the URL. Whatever the cause, you don’t want a search engine spider blocked from reaching your content pages, so investigate this if you see this status code on your site. |
401 |
Unauthorized |
The request requires user authentication. |
Usually, this code means that you need to log in before you can view the page content. Not a good error for spiders to hit. |
403 |
Forbidden |
The server understands the request but refuses to fulfill it. |
If you find this status code on your website, find out why. If you want to block the spiders from entering, there ought to be a good reason. |
404 |
Not Found |
The web page isn’t available. |
You’ve seen this error code; it’s the Page Can Not Be Displayed page that appears when a website is down or nonexistent. You definitely don’t want a spider following a link to your website only to be greeted by a 404 Error! That’s like visiting a house and finding the lights off and the doors locked. If your server check shows you have a 404 Error for one of your landing pages, you definitely want to fix it ASAP. |
500 and up |
Miscellaneous Server Errors |
The 500–505 status codes indicate that something’s wrong with your server. |
Check out what’s causing the problem. |
From the Check Server report, you can also glean whether the page is cloaked. Cloaking (showing one version of a page’s content to users but a different version to the spiders) is a big no-no with the search engines, so if your page appears to be cloaked, you need to know about it. If the page uses cloaking, the Check Server report says so.
Indulging the need for speed
 You also want to monitor your site’s performance, which is computer-speak for speed. The faster your server can deliver a page after it has been requested, the better. You want your human visitors to have a smooth, pleasant experience using your site because that leads to more conversions for you (which could be sales, sign-ups, subscriptions, votes, or whatever action that you want people to take on your site). More importantly for your search engine rankings, you want the search engine spiders to be able to move fast and freely through your site. The quicker they can get to your pages, the more pages they’ll index and the more often they’ll come back.
You can tell how long it takes a search engine spider to retrieve your web pages. This information shows up as a call in your server log (a server log is a complete record of requests sent to the web server and the server’s actions in response). You should be able to check your server logs and establish a benchmark, and then regularly check it again for comparison. If checking your server logs sounds too complicated, try this easier way: Use the Web Page Analyzer free tool offered at www.websiteoptimization.com/services/analyze, instead. Either way, one factor that influences your search results ranking is your page response time, so this is a good thing to keep tabs on.
Many factors influence your website’s performance. The user’s Internet connection speed, location, and computer have a big impact on how fast your site is, and these factors are frustratingly out of your control. When a search engine spider comes to crawl your site, you can rest assured that on its end, things are humming. On your end, though, many things can affect site speed. These include server computing power (also known as chip speed) and setup, the amount of Internet bandwidth available compared to the amount of traffic, the efficiency of your HTML code and programming, contention with other sites sharing your IP, and whether you’re the only site on your IP address, to name a few.
Testing your page speed with Google
As mentioned earlier in this chapter, Google considers page speed in its algorithm. Google representatives have said that Google’s search engine has more than 200 variables in its algorithm. Remember, an algorithm is the search engine’s formula for calculating what sites it presents to a user for any given query (a word or phrase searched for). Google isn’t always forthcoming about what those variables are because if everyone knew, some people might use that information to try to cheat the system.
But every now and again, we are given clues and verification about what those variables are, such as when Google announced in spring 2010 that site speed is a factor in its algorithm for ranking sites.
Site speed is so important to Google because Google wants everyone to help make its search engine and the web faster for its users. So, how do you improve your site speed? Let’s look at some of the ways.
Many factors impact the speed of your site, including anything on the user’s end such as connection speeds and location. What are some of the things that can improve the speed of your site? One way is to compress the information between your web server and the search engine browser. This can be done using what’s called gzip compression. Gzip compression can be enabled through the server configuration. The Google Developers site has more tips on how to start using gzip on your site (https://developers.google.com/speed/docs/insights/EnableCompression).
Other ways to improve your site speed include things like minifying JavaScript, cleaning up your Cascading Style Sheets (CSS) code, and compressing and choosing the best file extension for your images (for example, GIF) throughout the page, just to name a few.
As we said before, many factors impact the speed of your site. This includes anything on the user’s end, such as connection speeds and location, and on your end, including server computing power, sharing IP addresses with other sites, and much more.
Google offers a variety of tools to test and improve site speed in its official resource site for developers, aptly named Google Developers and found at https://developers.google.com. To get a good idea of how fast your page is, you can check out Google’s PageSpeed Insights tools at https://developers.google.com/speed/pagespeed/.
PageSpeed Insights is actually a collection of tools aimed at speeding up your site. You can simply enter a page URL into the online version of the tool, or install an extension to the Chrome browser to get suggestions for making components of a page load faster. Google has stated that it uses the PageSpeed extension to introduce new performance best practices. This helps keep you updated about what Google deems important. Google also offers add-ons for Apache and NGINX web servers that automatically optimize web pages at serving time. You can also get to PageSpeed Insights while signed in to Google Search Console (it’s under Other Resources), and here you’ll see your site as it’s experienced by users on both desktop and mobile devices. Google designed this tool to emulate how a browser displays your page to visitors using a desktop or a mobile device, and as it loads, it takes note of the resources that are slowing down load time and offers suggestions for speeding it up.
Excluding Pages and Sites from the Search Engines
Sometimes, you need to block a spider from crawling a web page or site. For instance, you may have a development version of your website where you work on changes and additions to test them before they become part of your live website. You don't want search engines to index this in-progress copy of your website because that would cause a duplicate-content conflict with your actual website. You also don’t want users to find your in-progress pages. So, you need to block the search engines from seeing those pages.
Using a robots text file
The best way to exclude pages from the search engines’ view is with a robots text (.txt) file. The robots text file’s job is to give the search engines instructions on what not to spider within your website. This is a simple text file that you can create using a program like Notepad, and then save with the filename robots.txt. Place the file at the root of your website (www.yourdomain.com/robots.txt), which is where the spiders expect to find it. In fact, whenever the search engine spiders come to your site, the first thing they look for is your robots text file. This is why you should always have a robots text file on your site, even if it’s blank. You don’t want the spiders’ first impression of your site to be a 404 Error (the error that comes up when a file cannot be located).
With a robots text file, you can selectively exclude particular pages, directories, or the entire site. You have to write the HTML code just so, or the spiders ignore it. The command syntax you need to use comes from the Robots Exclusion Protocol (REP), which is a standard protocol for all websites. And it’s very exact; only specific commands are allowed, and they must be written correctly with specific placement, uppercase/lowercase letters, punctuation, and spacing. This file is one place where you don’t want your webmaster getting creative.
A very simple robots text file could look like this:
User-agent: *
Disallow: /personal/
This robots text file tells all search engine robots that they’re welcome to crawl anywhere on your website except for the directory named /personal/.
Before writing a command line (such as Disallow: /personal/), you first have to identify which robot(s) you’re addressing. In this case, the line User-agent: * addresses all robots because it uses an asterisk, which is known as the wild card character because it represents any character. If you want to give different instructions to different search engines, as many sites do, write separate User-agent lines followed by their specific command lines. In each User-agent: line, you replace the asterisk (*) character with the name of a specific robot:
- User-agent: Googlebot gets Google’s attention.
- User-agent: Bingbot targets Bing.
The search engines have a number of crawlers tasked with specific jobs, including bots that look for news, video, images, and mobile content. You can further control how the search engines crawl your site by blocking any of many specific user agents. Google’s common user agents are listed at https://developers.google.com/webmasters/control-crawl-index/docs/crawlers. Meet the Bing crawlers here: http://www.bing.com/webmaster/help/which-crawlers-does-bing-use-8c184ec0. Remember that at this time, Yahoo contracts to use Bing’s crawlers and index for its search results, so anything you block from Bing, you also block from Yahoo.
Note that if your robots text file has User-agent: * instructions, as well as another User-agent: line specifying a specific robot, the specific robot follows the commands you gave it individually, rather than the more general instructions.
You can type just a few different commands into a robots.txt file:
- Excluding the whole site: To exclude the robot from the entire server, you use the command:
Disallow: /  This command actually removes all your site’s web pages from the search index, so be careful not to do this unless that is what you really want.
- Excluding a directory: A word of caution — usually, you want to be much more selective than excluding a whole directory. But if you really want to, you can exclude a directory (including all its contents and subdirectories), by putting it inside slashes:
Disallow: /personal/ - Excluding a page: You can write a command to exclude just a particular page. You use only a slash at the beginning and must include the file extension at the end. Here’s an example:
Disallow: /private-file.htm - Directing the spiders to your sitemap: In addition to Disallow:, another useful command for your SEO efforts specifies where the robot can find your sitemap — the page that contains links throughout your site organization, like a table of contents:
We should point out that in addition to the commands discussed in the preceding list, Google recognizes Allow, as well. Only Google uses this command, and it may confuse other engines, so we don't recommend using it.
We recommend that you always include at the end of your robots text file a Sitemap: command line. This line ensures that the robots find your sitemap, which helps them navigate more fully through your site so that more of your site gets indexed.
Here are a few notes about the robots text file syntax:
- The commands are case sensitive, so you need a capital D in Disallow.
- Always include a space following the colon after the command.
- To exclude an entire directory, put a forward slash after, as well as before, the directory name.
- If you’re running your website on a UNIX machine, everything is case sensitive.
- All files not specifically excluded are available for spidering and indexing.
To see a complete list of the commands, robot names, and instructions about writing robots text files, go to www.robotstxt.org.
Always be aware of your robots text tag. Mistakes here can absolutely destroy your site's rankings in the search engine. Here’s a story that's unfortunately all too common about a business that learned about this the hard way. The company had a huge website and multiple development environments in which staff made changes and tested new pages before those pages went live. Of course, they set up a robots text file set to Disallow: / all pages on the test site because they didn’t want the search engines to index an in-progress copy of their website.
After a major revision, the company moved the finished test site into place, replacing the old site files entirely — including the robots text file. Unfortunately, the company neglected to take out the Disallow: / command. Soon, the search engines stopped crawling its pages. The site started to drop like a boulder in the rankings, and no one knew why. It took the company three days to figure out that the cause was its robots text file! By simply changing one line of code in that file, the company fixed the problem, but it was a costly lesson. Its estimated revenue loss topped $150,000 per day. The moral of the story: Don’t forget to update your robots.txt when you upload a new site!
As a further safeguard, make it part of your regular site maintenance to check your robots text file. It’s such a powerful on/off switch for your site’s SEO efforts that it merits a regular peek to make sure it’s still functioning properly.
Using Meta robots tags
Besides the robots text file, there is also another way you can prevent search engines from seeing something on your site. On an individual web page, you can include a special tag in the HTML code to tell robots not to index that page or not to follow the links on that page. You would place this tag after the other Meta tags, which are part of the HTML code located in the Head section of a web page.
Using Meta robots tags is less efficient than using a site-wide robots text file for two reasons. First, robots sometimes ignore Meta robots tags, and second, these tags slow down the robots reading your pages, which may decrease the number of pages they’re willing to crawl. Also, this method can give your webmaster headaches because the tags have to be maintained on the individual pages, rather than in a central file.
This Meta robots tag tells the search engine robot not to index the page and not to follow any of the links on the page:
<meta name="robots" content="noindex, nofollow">
You can use this tag to tell the robot to read and index the page’s content, but not to follow any of the links:
<meta name="robots" content="index, nofollow">
This tag instructs the robot to ignore the page’s content, but follow the links:
<meta name="robots" content="noindex, follow">
Being wise to different search engine robots
Not all search engines are created equal. We focus on the crawlers for Google and Bing because they account for nearly all search-generated traffic on the web. Note that Yahoo has contracted with Bing to use its crawler. Even among these, however, you find a few slightly different options for your robots.txt file and Meta robots tags.
For example, you can use a different Meta robots tag per search engine to partially control where the two-line description appears that accompanies your page’s link on a search engine results page (SERP). To see what we’re talking about, look at Figure 1-2, which shows a typical SERP result with its two-line description.
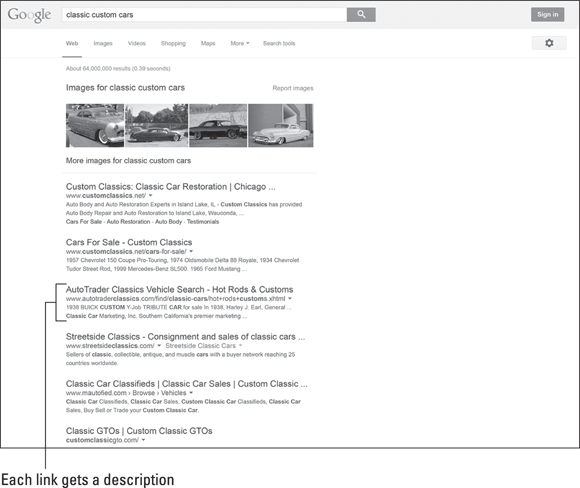
Figure 1-2: Search engines display a brief description with each link.
The search engines pull SERP descriptions from varying places, depending on which seems most relevant to the user’s search query. They sometimes pull information from a directory that they either manage or contract with, which is a hand-assembled set of website data arranged like a list. Different search engines work with different directories:
- Google: Uses one of three sources for its search engine results descriptions: the Open Directory Project (historically known as ODP and today known as DMOZ), which is a hand-assembled, human-edited directory of website data (go to
www.dmoz.orgif you want more information about this ambitious project); the Meta description tag on the web page itself; or a snippet Google chooses from the on-page content that contains the searched-for keywords and some surrounding text (also referred to as an auto-snippet). - Yahoo: Displays a description pulled from the Meta description tag, or the on-page content.
- Bing: Pulls descriptions from either the Meta description tag or the on-page content.
You can prevent the search engines from using the directories, if you feel the manually edited description there is either out of date or inaccurate for some reason. For SEO purposes, you’re always better off to avoid showing someone else’s description for your pages. If you like that description’s wording, use it on your web page, but we recommend that you exclude the directories. By using the proper Meta robots tag, you can force search engines to pull descriptions from your Meta description tag or your web page.
This tag instructs Google not to pull the description from the Open Directory Project:
<meta name="robots" content="noodp">
Within a Meta robots tag, you can include multiple commands by separating them with a comma. To tell all robots not to pull descriptions from the DMOZ directory and not to follow the links on the page, you write the tag like this:
<meta name="robots" content="noodp, nofollow">
Creating Custom 404 Error Pages
You’ve seen it probably a hundred times — File 404: Page Can Not Be Displayed. It’s the error page that means, “Sorry, you’re out of luck. The web page you wanted is broken or missing, and you can’t see it right now. So go away!” A user will probably do only one thing when presented with this 404 Error page, and that’s hit the Back button.
You can give your website visitors and search engines a much better experience than getting the generic 404 Error page if your website has a problem displaying a page. You can present them with a customized 404 Error page that’s actually helpful and friendly, rather than the standard browser-issued version.
This issue matters to your SEO efforts, too. If the spiders find a default 404 Error page on your site, you’ve thrown a roadblock in front of them that they have no way to get over. Search engines can’t hit the Back button or use the other advanced features of your website. All they can do is follow links. If they come across a bad link and you don’t give them anywhere else to go, they leave your site. This may result in entire sections of your site not being indexed. Creating a custom 404 Error page that includes links to other pages on your site helps prevent this from happening. You have to give the engines something to follow.
Designing a 404 Error page
Here are tips for creating a user- and SEO-friendly 404 Error page for your website:
- Design the page to look like your website. Let your users know that they’re still on your site and everything’s under control.
- Apologize and tell them what happened (include a message such as “Sorry, the page you requested is unavailable”). Your message should match the tone of your site, but consider making it humorous to keep your readers engaged, such as, “The well-armed monkeys normally operating this web page are engaged in full-scale warfare at the moment. To avoid the flying fur, try one of the escape routes suggested below.”
- Offer suggestions that include links to other pages that the user might want to go to. Include helpful descriptions in the links. (“Read about our car customization services.” “See pictures of ‘new’ classic cars.” “Hear what our customers say about us.”)
- Include a link back to your home page, including meaningful keywords in the anchor text (the visible link text that a user can click). Don’t call this link just Home.
- Include a link to your sitemap. This is especially important for search engine robots because they can follow that map to get around your entire site. Providing access to your sitemap becomes even more beneficial because the engines continually return to your site to see if those nonexistent pages have returned. If they have, the search engines re-index them. If they haven’t, the robots still find your 404 Error page and all your relevant links.
- If you have a good programmer, customize the page contents based on where the user had a problem. For instance, if the page was supposed to show Ford Mustang steering wheel options, the message and links could dynamically change to offer the user a way to get to another Ford Mustang page in your site, instead of just showing him a generic error message.
- If you’re running a sale, put images linked to your current ads on the page.
- Put a search text box on your error page, front and center. Let users type in what they’re looking for and go to that exact page on your site.
- Put a Meta robots tag on your custom 404 Error page. Tell the search engines to follow the links on the page but not to index it:
<meta name="robots" content="noindex, follow"> - Don’t redirect your 404 Error page. For more on handling redirects properly, see Chapters 3 and 4 of this minibook.
- Be sure that your 404 Error page passes a 404 Error code, which prevents search engines from indexing it. Many sites forget this step, and their error pages can show up in search results (see Figure 1-3).
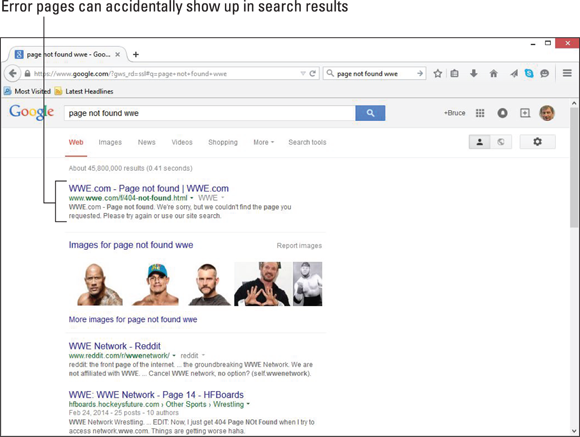
Figure 1-3: It’s embarrassing to have your error pages rank with the search engines.
Customizing your 404 Error page for your server
After you’ve created your 404 Error page, you need to customize it for your server. The instructions vary depending on which server you use, so we provide a list of options in the next few sections.
Apache
For an Apache server, you need to add some code into your .htaccess file that instructs the server to present a custom page (in this case, 404.php), instead of the standard error, in the event of a particular error occurring (in this case, ErrorDocument 404):
ErrorDocument 404 /error-pages/404.php
If you like, you can enhance the user-friendliness of your site even more by creating custom pages for other types of errors, as well. In the following code snippet, the server is told to display five different custom pages that have been built for different kinds of errors that could occur on the site:
ErrorDocument 404 /error-pages/404.php
ErrorDocument 403 /error-pages/403.php
ErrorDocument 401 /error-pages/401.php
ErrorDocument 500 /error-pages/500.php
ErrorDocument 501 /error-pages/501.php
Microsoft IIS
Configuring a custom 404 Error page in the Microsoft IIS server environment is easy if you have the administrator rights to access the server. (If you have to beg your ISP staff to do it, the task may take longer but can still be done.) You simply make changes within the Properties dialog box to point the 404 error type to the customized error page you created. You can also assign custom pages to other error statuses (401, 500, and so forth, as shown in Table 1-1) if desired, but 404 is the most important one to set up for your site visitors. To get ready, you need to have your site up on your IIS server (at least one page, anyway) and have already created a custom 404 Error page. (We call the page 404error.aspx in the following steps.) To create a 404 Error page in IIS, please follow these steps:
Open the Internet Services Manager.
Typically, you can find the Internet Services Manager in your Programs list below Administrative Tools.
- Click the plus sign (+) next to your server name to expand the list.
- Right-click the Default Web Server (or, if you’ve renamed it, whatever the new name is) and choose Properties from the pop-up menu that appears.
- Click the Custom Errors tab.
- Select the error 404 from the list, and then click the Edit button.
Browse and select your custom error page.
Figure 1-4 shows 400.htm, but you should name yours 404error.aspx or something similar.
- Click OK to exit the dialog box.
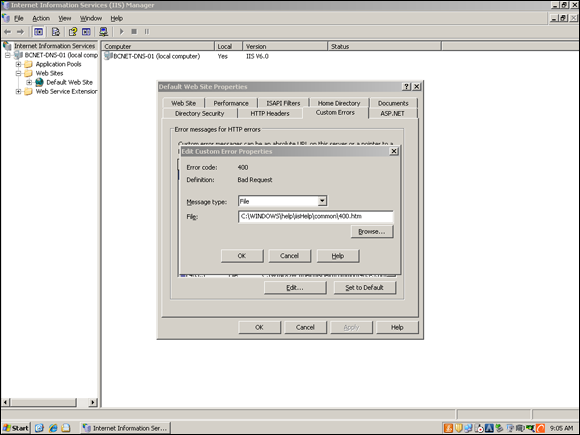
Figure 1-4: You can edit your IIS server properties to set up a custom 404 Error page.
NGINX
NGINX also provides an easy way to present a custom 404 Error page (in this case, 404.html). Inside your NGINX configuration file and inside the settings for your site, simply put in the following lines:
error_page 404 = /404.html;
location /404.html {
    internal;
}
Monitoring your 404 Error logs to spot problems
You can find out a lot by monitoring your 404 Error logs (the server record of every time a page could not be displayed on your site). The error log can alert you of problems with your web pages so that you can fix them. You may also notice people linking to your site with an incorrect URL, in which case you could redirect those bad links (by using a 301 Redirect) to another page that’s valid. Because 404 errors are a major reason why people abandon a site, tracking where your site gets 404 Errors can help you capture and hold visitors, improving your traffic and your bottom line.
Fixing Dirty IPs and Other “Bad Neighborhood” Issues
Knowing the IP address of your site and monitoring it to make sure that it remains clean are good ideas. It’s like renting an apartment: Just because the neighborhood was quiet and peaceful when you first moved in doesn’t mean that it won’t change over time and become an undesirable place to live.
IP addresses come in two flavors: virtual and dedicated. If you’re using a virtual IP address, it means that multiple websites (as many as your server allows) use the same IP address as you. If you’re using a dedicated IP address, you’re the only site on that IP.
We recommend that you use a dedicated IP for your site, if possible, to provide maximum site performance. Even so, you still need to monitor it to make sure it stays clean because you can also be affected by bad behavior of other IPs within the same C block. (The second-to-last set of digits in an IP address, such as the 179 in the IP address 208.215.179.146, identifies the C block, which is similar to an area code for a telephone number, except that unlike your area code, you can change C blocks. You can move your site to a new IP address and C block if you have trouble with the one you’re in. Call your hosting company and tell it you want to be moved.)
If you do share a virtual IP with other sites, which is often the case with small or brand-new websites, it's like being in an apartment building. Similar to living in an apartment building, it’s important that the IP isn’t full of bad neighbors, even though that’s pretty much out of your control. If the search engines find out you’re next door to a spam site, for example, your site could be tainted by association. Google has indicated that it is difficult to be tainted by surrounding sites, but why take a chance? We recommend being in clean IP blocks whenever possible.
The other drawback of using a virtual IP is that, occasionally, a search engine or a user navigates to your website by your IP address, rather than your URL (usually, only if your server is configured incorrectly). If you’re on a virtual IP, they may not be able to find your site. Any of the various sites located on that IP could come up; it’d be the luck of the draw. And do not forget that shared IPs may mean that your server performance will slow down based on the traffic load of your neighbors.
To find out your website’s IP address, look no further than our free Check Server Page tool, which we cover in the section “Running a Check Server tool,” earlier in this chapter. The report identifies your DNS IP address (refer to Figure 1-1).
After you have an IP address, you can find many tools on the web that can evaluate whether it’s clean. By “clean,” we mean that the IP is not on any IP blacklists, which are lists of sites suspected of illegal acts such as child pornography, email spam (sending unsolicited email indiscriminately to tons of people), or hacking (attempting to break into computer networks and bypass their security). You may have never done anything unethical on your website, but your IP’s history with previous sites (or other current sites, if you’re on a shared IP) could still haunt you.
Being blacklisted is bad news. Most major email services (Hotmail, Yahoo, AOL, Gmail, and so on) block any email coming from a blacklisted IP address, so being blacklisted seriously affects your ability to communicate with the outside world. For instance, it harms your ability to reply to sales inquiries and thus can cost you money.
Being blacklisted also puts you in hot water with the search engines. Search engines refer to these IP blacklists for purposes of website crawling, indexing, and ranking. We don't know how much the IP blacklists influence the individual search engines, and Google indicates that it should not, except in severe cases, impact your rankings. However, the search engines do flag your site and watch it closely because they assume that a site involved in email spam has a high likelihood of being involved in other types of spam. Simply put, you become guilty by association.
To find an IP checker tool, do a search on Google for [“ip blacklist” check]. We found several free options this way — one you might try is MX Lookup (www.mxtoolbox.com). Alternatively, we recommend the monitoring reports at DNSstuff (www.dnsstuff.com), which are available for a paid subscription only.
When you run an IP check, it shows you the status of your IP with many different blacklists. If you see any red flags, you need to take steps to get off of that blacklist ASAP by following these steps:
Contact your ISP (Internet service provider) and request a change to a clean IP.
Better yet, try to move to an entirely new C block. You want to get as far away as possible.
Alternatively, ask your hosting provider to clean up the neighborhood, and then to petition the search engines to have the IP marked as clean. They can do that.
If your hosting provider won’t cooperate, then cut your losses and change hosting providers.
However, this problem should never occur. There is no excuse for an ISP operating blacklisted IP ranges.
Run an IP check on your new IP address when you get it.
Confirm for yourself that you’re moving into a good neighborhood. If you can, try to check the target IP before you’re moved to it.
The diagnostics available through Google Search Console (www.google.com/webmasters/tools/) are extremely helpful. After you sign up your website (which is free), Google verifies your site and then sends a spider to check it out. You receive a report that quickly tells you if it found anything wrong. Hearing in Google’s own words that your site is A-OK is reason enough to celebrate, but you get the added bonus of lots of cool tools to try. (See Book VIII if you want more coverage of analytics and webmaster tools.)
Serving Your Site to Different Devices
In Book IV, Chapter 3, we outline your options for a website that satisfies your customers using mobile devices. You can create your mobile website to be one or a combination of the following types:
- A responsive website: Your single website looks different depending on the visitor’s device.
- A dynamic-serving site: You can give a mobile visitor different content from what a desktop visitor sees.
- A separate mobile site: This type of site is designed specifically for mobile users.
We list the preceding options for handling your mobile website in order of preference. The search engines prefer that webmasters use responsive design because of its advantages over the other options: You have to maintain and optimize only one code base and one server architecture to serve your site to any device and have it look and behave correctly. But different websites have different needs, and you can find in-depth coverage of when you use each mobile development technique, as well as how to decide the right one to use for your business, in Book IV, Chapter 3.
The following sections describe the basic server setup for each type of mobile website implementation, giving you background so that you know where to start when speaking with your developer.
Server setup for a responsive website
Actually, with the exception of how JavaScript is handled (you have some options here), no special server setup is required for a responsive website. Remember that a responsive site responds to a visitor’s mobile or desktop device by adjusting appearance and function, and everything a browser and a search engine need to know about serving a page to a device, small or large, is contained on the page. There are, of course, technical elements that need to be in place on the page to signal to a browser and search engine that your website is responsive.
In its mobile guide for developers, Google explains that a search engine spider will automatically detect a responsive site if you do the following:
- Allow search engine user agents to crawl the page and its assets (CSS, JavaScript, and images)
- Use the viewport Meta tag in the Head section of the page, a signal to browsers that your page will adapt to all devices
In order to allow the search engine to crawl all the assets of the page, you need to make sure that those files are not blocked in your robots.txt directive, explained earlier in this chapter in “Using a robots text file.”
The viewport Meta tag that you want to include on the page looks like this:
<meta name="viewport" content="width=device-width, initial-scale=1.0">
Read the Google Developers guide to responsive websites for more, including methods for serving JavaScript on the page: https://developers.google.com/webmasters/mobile-sites/mobile-seo/configurations/responsive-design.
Server setup for a dynamic website
In this design, depending on the user agent requesting the page, the server gives different HTML, CSS, and so on for the same URL. If Google’s standard desktop user agent comes across the page, it won’t be apparent that different content is available for a mobile agent unless you give Google a hint to send its mobile agent by to pick up the mobile content. If you’ve got a dynamic-serving site, make sure that your server is set up to do both of the following:
- Detect user-agents correctly (sometimes called user-agent sniffing)
- Use the Vary HTTP header in your server response
The Vary HTTP header looks like this within your server’s response to a request:
HTTP/1.1 200 OK
Content-Type: text/html
Vary: User-Agent
User-agent detection can be tricky and requires constant updating of user-agent strings to match new user agents. We recommend you read more about the technical requirements of dynamically serving your website in the Google Developers guide to dynamic serving: https://developers.google.com/webmasters/mobile-sites/mobile-seo/configurations/dynamic-serving.
Server setup for a separate mobile site
If you have a separate website designed for mobile browsers, you need to set up your server to detect the device and redirect to a mobile site, or vice versa. You have a few ways to detect whether the visitor is on a mobile device, including the use of plug-ins for content management systems like WordPress and Joomla and the use of JavaScript to see whether the browser window is smaller than a certain width. You and your developer can decide the best way to handle device detection and serving for your site.
Along with the server-side setup, you also need to put in place some code that tells the search engine that the two URLs (the mobile version and the desktop version) for each page should essentially be treated as the same page and should have all their link and ranking signals combined. For the benefit of search engines and your search rankings, you need to
- Detect user agents correctly (requiring a constant updating of user-agent strings, as explained in “Server setup for a dynamic website”)
- Use rel="canonical" and rel="alternate" attributes to indicate the relationship between corresponding desktop and mobile URLs
You place the rel="canonical" attribute on the mobile page pointing to the corresponding desktop URL. You place rel="alternate" on the desktop page pointing to the corresponding mobile URL. You should place this annotation in the HTML of the pages themselves, and you may also include it in each website’s XML sitemap.
You can find more details, including the exact implementation of the rel="canonical" and rel="alternate" link attributes, in the Google Developers mobile guide to using separate URLs: https://developers.google.com/webmasters/mobile-sites/mobile-seo/configurations/separate-urls.