
First of all, let me thank you for starting at chapter 1. I'm one of those people who tend to read magazines backwards and skim technology books, so I appreciate it when someone reads a book's chapters in order. Then again, maybe you read this book backwards as well. In that case, you'll find the "Hello World!" walkthrough in this chapter to be a refreshingly simple take on building Silverlight applications unencumbered with patterns such as Model View ViewModel (MVVM), words such as DependencyProperty, and technologies such as Windows Communication Foundation (WCF) Rich Internet Application (RIA) Services. For the rest of you, don't worry—we'll cover each of those throughout the rest of the book, steadily building our Silverlight skills as we go.
Since you've picked up a Silverlight book, you would probably like to know what Silverlight is. Luckily, I'm horrible at marketing, so I'll put it simply: Silverlight is a cross-platform .NET runtime, cross-browser plug-in, and a set of Windows-based developer tools for building RIAs. At its heart, Silverlight is an implementation of the concepts and standards from Windows Presentation Foundation (WPF) such as binding, the property system, and Extensible Application Markup Language (XAML) in a cross-platform version of the .NET Common Language Runtime (CLR) and libraries.
There. I think that paragraph managed to get all of the acronyms defined for the rest of the book. Then again, this is a Microsoft technology, so expect more acronyms before we're through.
Silverlight runs on Windows and Mac as well as on Linux through the Moonlight project. It runs on Windows Phone 7 and Nokia Symbian S60 phones. We've seen demos of it running on set-top boxes connected to televisions and serving up ads and content on the Xbox. Put simply, short of ASP.NET, Silverlight is the broadest reaching technology ever produced by Microsoft.
Silverlight applications work on the web as well as on the client. You can create virtually any type of application in Silverlight, from web content, to widgets, to media players to full-blown client applications.
In this section, we'll introduce Silverlight, looking at how it fits into the developer stack both on the web and on the desktop. We'll then look at some of the different types of applications Silverlight is well suited for. Then, we'll check out the features and capabilities that have been added since the first edition of this book, before we wrap up with a walkthrough of creating your own first Silverlight application.
Silverlight got its start as a web page plug-in, so that's where we'll start as well.
Silverlight sits in that interesting place between desktop applications and browser applications. In many ways, it's like a little traditional desktop application embedded in HTML. Of course, the same can be said of many JavaScript Ajax applications, themselves modeled on the code-on-the-client desktop application paradigm.
Great frameworks such as jQuery and the impending, somewhat nebulously defined HTML 5 further muddy the waters. Where's Silverlight's place on the web? Why should you use Silverlight instead of these other technologies?
I'll give you a few reasons:
Silverlight is here, now.
Silverlight works across platforms and browsers, now.
Silverlight has top-tier media support, including digital rights management (DRM), far more advanced than the proposed HTML 5 standards.
Silverlight is a no-brainer if you're already a .NET developer looking to expand to other platforms.
Don't get me wrong; I think HTML 5, when fully spec'd and adopted, will be a great thing for the web—both exciting and capable. Having said that, Silverlight has more advanced authoring tools, faster execution, and more capabilities than HTML 5 is expected to have. Rather than carrying out a zero-sum game, I believe HTML 5 will raise the floor, driving the quality and experience up across the spectra of platforms and developer tools.
I don't personally think that the code-on-the-client application development approach is going to disappear. Though doom has been forecast for many major development approaches over the years, few have actually declined when another rose in popularity. Silverlight and HTML 5 will just provide more options for how to implement the solution you need in the most optimal way, using the tools you're comfortable with and the skills you already have.
Also remember that HTML/JavaScript and Silverlight aren't mutually exclusive. Silverlight applications can happily coexist on a page with Ajax applications, each complementing the other with features that play to their strengths.
Silverlight is far more than a web technology. Though it can live on a web page, it's also common to have out-of-browser Silverlight applications, either connected to services or simply using resources on the client. In those instances, you may wonder when to use WPF and when to use Silverlight.
Silverlight and WPF were born of the same ideas. WPF came first and broke the ground required to make XAML a UI-friendly markup language. WPF also introduced us to dependency properties and binding, storyboard-based animation, and subpixel-rendered vector UI.
But WPF is large and complex. It's also deeply rooted in Windows, with no good way to substitute alternate stacks for those it relies on. WPF also relies on the rather outdated and web-unfriendly code access security model for application security. So, when Microsoft decided to enter the RIA space with a CLR based vector UI technology, they took the concepts and some of the code from WPF and reimplemented it in a smaller, tighter, and more platform-independent way.
Silverlight primarily is a subset of WPF with some additions. Some of the additions, such as the Visual State Manager, have been migrated back from Silverlight into WPF. Others, such as Deep Zoom, Media Stream Source, and the webcam and microphone APIs, are currently Silverlight-only features. Ignoring alternative solutions to the same problems, figure 1.1 shows this relationship using our friend, the Venn diagram.
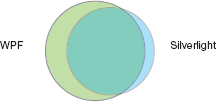
Figure 1.1. Silverlight primarily is a subset of WPF with a few extras added. Ignoring alternative solutions to the same problems, the places where WPF differs most are in the integration with the Windows OS and the access to the full .NET framework.
I recommend that developers new to both technologies learn Silverlight before learning WPF. In general, you'll find it easier to learn Silverlight first and then scale up to WPF, should your needs dictate. Silverlight is smaller, typically having a single approach to solving a given problem, whereas WPF may have several solutions for the same task. Though Silverlight doesn't have everything WPF has, Silverlight is an excellent, capable development platform and can cover many types of applications we would've previously written in Windows Forms, WPF, or even HTML.
You can build just about anything you'd like using Silverlight. Of course, Silverlight is better suited for some types of applications over others. For example, though possible, you wouldn't necessarily want to build an entire website using Silverlight; there are better tools for the job.
Silverlight excels at media. When Silverlight 1.0 was first introduced, one of the few capabilities it had was an excellent media stack. Silverlight through version 4 has built upon that to include new media capabilities such as smooth streaming, pluggable codecs using the Media Stream Source API, and even the DRM technologies required for the large content producers to adopt Silverlight.
Silverlight's early focus on media was both helpful and hurtful. Video on the web is a great way to gain product adoption, especially when you have a capable high-def video technology. Early on, many potential Silverlight developers failed to see past the media roots and missed the rich business capabilities Silverlight provides.
Starting with versions 3 and 4, Silverlight gained serious business capabilities. From simple things such as sync and async validation, to patterns such as MVVM and Prism, and entire middle-tier frameworks such as WCF RIA Services, Silverlight showed itself to be a mature platform, able to absorb the best practices from other areas and build upon them.
Though business and media applications certainly are great staples, another fun application type is games. Silverlight has good support for casual games, including the ability to generate bitmaps on the fly, create sound from bits, loop audio in the background, and more. The community has successfully ported over physics and gaming engines to Silverlight, making it even easier to create complex casual games. Future versions of Silverlight are expected to be even more gaming friendly; we've just seen the tip of the iceberg so far.
There are many other types of Silverlight applications ranging from ads, to photo viewers, to social media clients, to analogs for virtually every type of major desktop and web application. Some of those, such as desktop applications, weren't possible with Silverlight 2, the version used in the first edition of this book. Let's take a high-level view of what has changed in that time.
The first edition of this book was written for Silverlight 2. Silverlight 3 and 4 have added an amazing number of new capabilities to the platform in all areas, from core capabilities, to device access, to the introduction of both trusted and sandboxed out-of-browser client applications. The advancements in Silverlight can be loosely grouped into four main areas: business and client applications, media and graphics, user interaction, and text.
When the first edition of this book was released, Silverlight 2 was just starting to gain adoption. It was a brand new technology from Microsoft (the managed code version was, anyway), one with strong competition. Though Silverlight 2 could have been used to build rich business applications, it didn't have the chops to be a strong contender in that space yet. Many of the features in this section are useful in applications of all sorts; I hate to classify them under the heading of "business," but that's the largest consumer of these features.
Validation, covered in chapter 13, was one of the biggest new features for business applications. Silverlight didn't add just validation but included support for validation through attributes, validation through exceptions, and even asynchronous validation, all of which work with the Silverlight controls. Silverlight even made it possible to completely customize the style of the validation information provided to the end-user.
One technology that builds heavily on the validation stack is WCF RIA Services (chapter 17). A good bit of the validation functionality rolled into the Silverlight runtime actually came from that project. WCF RIA Services provides a way to share validation and logic between the client and server as well as a framework for validation, data access, and security, shareable between Silverlight and other clients.
WCF RIA Services builds upon the WCF stack, but it's not the only enhancement there. The Silverlight networking stack, described in chapter 14, was greatly enhanced to support in-browser and out-of-browser operation, as well as SOAP 1.2 and a number of new protocol enhancements. These changes make it easier to use Silverlight behind a firewall where the services often have different requirements than those on the Internet.
Despite the promises of a paperless office, printing (covered in chapter 19) is still a staple of business applications everywhere. Printing in Silverlight is optimized for relatively short reports or documents, as well as for the equivalent of print-screen operations. It's super simple to use—as easy as working with XAML on the pages.
Finally, we come to a biggie: out-of-browser sandboxed and trusted applications. Covered in section 5.1, out-of-browser mode was one of the most significant enhancements made to how Silverlight operates. Silverlight 3 introduced the basic out-of-browser mode with a sandbox roughly equivalent to the one in browser. Silverlight 4 opened up whole new classes of applications by adding the trusted application mode with its reduction in prompts, increased file access, and (on Windows) access to IDispatch COM Automation servers. All of these features add up to a platform that's more than capable of being the client for our complex business applications.
One of the next major areas of enhancement for Silverlight is media.
Silverlight was first and best known for its media capabilities. The Silverlight media team didn't rest on that, instead pumping out enormous advances in media in both Silverlight 3 and 4.
Silverlight 2 included a Media Stream Source API for pushing media through the pipeline. But that API required that the bits be preencoded into one of the formats natively understood at the time. Though useful, this could lead to double-encoding and made transcoding even more difficult.
Silverlight 3 added support for pushing raw video and audio out of custom Media Stream Source implementations, as covered in section 20.6. As a result, you can write a managed codec for any type of media or even do something crazy like I did and use it to generate audio and video in real time for an emulator. Another option for generating video or at least images in real-time is the new bitmap API covered in section 21.2.
Speaking of codecs, one of the new codecs added was H.264 for video. H.264 has emerged as one of the most popular codecs for TV and video for devices. It was a logical choice for an additional native Silverlight format because now content producers can use even more of their content without reencoding. To appeal to the same audience, Silverlight 3 and 4 also continued to improve DRM capabilities, including the addition of offline DRM.
A new and exciting feature for Silverlight 4 is built-in support for video and audio capture devices or, specifically, webcams and microphones. Though not yet quite at the level that would allow you to create a real-time video chat application, the support does open up a number of new possibilities for application development. Webcam and microphone support are both covered in section 20.7.
Under the covers, Silverlight now has support for all formats of portable network graphics (PNG), something that was only partially supported in previous versions. Silverlight 4 also has support for pixel shaders and a set of built-in performance-tuned effects such as drop-shadow and blur, covered in section 18.4.
With all of these advancements plus a number of performance optimizations and even additions such as the Silverlight Media Framework, Silverlight continues its leadership in the media space, offering everything you need to build rich media-centric applications.
Sometimes, what you want is more than just a media experience; you want an application that can be truly interactive. Silverlight has your back there, too.
Since Silverlight 2, user interaction has received a number of important enhancements. Two of the most requested features, mouse scroll wheel and right-click mouse support (both covered in section 8.2), are now baked into the Silverlight core runtime.
One of the newer and hotter user interaction mechanisms is multi-touch, covered in section 8.3. The ability to support multipoint interaction with the user interface, especially in kiosk and handheld/tablet scenarios, is quickly becoming a requirement for many applications. Silverlight now includes core runtime support for multipoint touch interaction with Silverlight application.
Another user interaction piece missing from Silverlight 2 was the easy ability to show dialogs and pop-up windows (simulated) within your applications. Silverlight now not only has those (covered in chapter 15) but also notification toast, covered in chapter 5.
Finally, all the interaction in the world has no value if your user can't read the text on the screen. Happily, Silverlight includes plenty of improvements in text as well.
By far, the biggest improvement to text since Silverlight 2 is proper ClearType font rendering. Silverlight 2 performed only grayscale rendering, giving text a fuzzy appearance unless you carefully picked your color schemes.
While ClearType may be important for font rendering in general, right-to-left or bidirectional (BiDi) text is something that's absolutely essential for the correct rendering of many non-European languages. Silverlight supports not only BiDi text but also input method editors (IMEs) for complex composite characters for many languages, especially eastern languages.
Finally, one great improvement to text rendering and entry is the inclusion of the new rich text box control. This control allows you to display or edit text that includes multiple fonts and styles. The control can even embed other elements that can be interactive when the control is in read-only mode.
ClearType, BiDi and IME text, and the rich text box are all covered in chapter 9, along with insight into the text rendering stack in general and how to apply these new features to text throughout Silverlight.
Those are the major items. Of course, there are many more improvements sprinkled throughout. In addition to capturing the major items in this book, I've also added information based on the experience gained from working with Silverlight since its inception as well as recent knowledge gained from working closely with the Silverlight product team. In important areas, such as layout and rendering, I've gone deeper than needed by the average developer to provide some insight into the inner workings of Silverlight.
That was a lot to cover. I hope you enjoy reading it as much as I enjoyed writing it. Before we start covering individual feature areas, we'll need to get our development environment set up and build a small "Hello World!" application.
If you're a .NET developer, you're already well on your way to becoming a Silverlight developer. Silverlight builds on the .NET framework and uses the same tools as other .NET framework applications. You'll use Visual Studio and, optionally, Expression Blend to build your applications. You'll be able to turn to CodePlex and other open-source sites for sample code to use. And, of course, you'll have a huge community of peers to lean on when trying to figure out those hard problems.
Before you can do any of that, though, you need to make sure your development environment is set up.
Silverlight 4 requires Visual Studio 2010 to work with projects and build the solutions. The multitargeting support of Visual Studio 2010 means that your applications can target either Silverlight 3 or Silverlight 4, once you have the Silverlight 4 tools installed.
If you don't already have a version of Visual Studio 2010, you can get the free Visual Web Developer 2010 Express from Microsoft at www.microsoft.com/express/Web/. The free web developer tools will enable you to create Silverlight 4 applications as well as ASP.NET applications. If you want additional features and tools as well as the ability to create more than just web applications, upgrade to Visual Studio 2010 Pro or higher.
Once you have installed Visual Studio 2010, visit http://silverlight.net/getstarted/ and use the Web Platform Installer to install the Silverlight 4 tools and SDK as well as any optional components.
The Silverlight tools for Visual Studio 2010 and the SDK contain everything you need to develop Silverlight 4 applications, including WCF RIA Services 1.0.
Optionally, you may want to install Microsoft Expression Blend 4. The link for that is also available on the Get Started page on Silverlight.net. Expression Blend 4 provides a designer-friendly set of tooling that makes creating complex animations, behaviors, and layouts a snap.
Microsoft and the community have created a number of helpful sites that will make your learning process go smoothly.
The official Microsoft Silverlight developer site is http://silverlight.net. There you'll find videos, sample applications, tutorials, add-ons and the community forums, all designed to help you be the best and most efficient Silverlight developer you can be.
In addition to Silverlight.net, http://channel9.msdn.com includes interviews with community and product team members, as well as tutorials. Silverlight.TV, located on Channel 9 at http://channel9.msdn.com/shows/SilverlightTV/, is a great resource for timely insight into the Silverlight products and releases.
The MSDN documentation for Silverlight 4 may be found at http://bit.ly/SL4MSDN.
Also, as a completely shameless plug, you may want to subscribe to my own blog at http://10rem.net. You can also follow me on twitter; my id is @pete_brown.
Finally, one other place you'll want to visit is Dave Campbell's Silverlight Cream: http://bit.ly/SilverlightCream. Dave has done a spectacular job, daily compiling the best Silverlight posts on the web. From Dave's link blog, you'll get an idea of what other community member blogs to subscribe to.
At this point, your developer machine is set up, you've subscribed to a few blogs, created an account at Silverlight.net, and maybe even poked around a little on the sites. Before we get into the features in detail in the rest of the book, I thought it would be good to see just how easy it is to build your first Silverlight "Hello World!" application.
Expectations have come a long way since the days of C, where just getting "Hello World!" to compile and output to the screen was considered a great accomplishment. Rather than rehash that tired example, I think it would be neat if our "Hello World!" example actually did something interesting-like hit a public service on the web. Twitter is the ubiquitous example, and far be it for me to buck a trend.
Using Twitter—Twitter search in this example—also allows us to explore a number of the features of Silverlight, including layout, network access, LINQ to XML, and more.
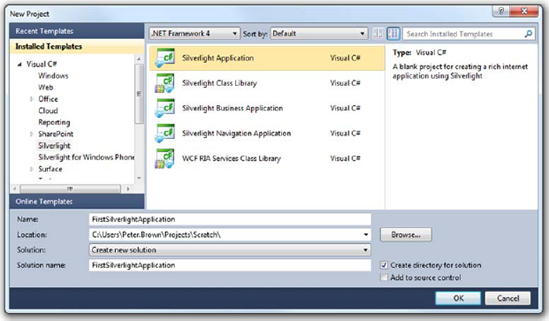
Open Visual Studio 2010. Choose File > New Project and create a new Silverlight Application project. The name isn't important but I chose FirstSilverlightApplication for mine. Figure 1.2 shows the dialog with the correct project type selected and named.
Once you click OK, you'll be presented with another dialog. This dialog provides options specific to the Silverlight project. Figure 1.3 shows the dialog.

Typically, you'll leave the options at their default values and just click through this dialog. But it's important to understand what's available to you. Table 1.1 describes each of the options presented in this dialog.
Table 1.1. The New Silverlight Application dialog options
Option | Description |
|---|---|
Host in a new website | Silverlight applications, even out-of-browser apps, are served from a website. You can also serve them from a static HTML page on the file system but this is a limiting option. You'll typically want to leave this checked, unless you have an existing website you want to use when building your application. |
New Web Project Name | Provide a project name for the website. The default is usually sufficient. |
New Web Project Type | If you're an ASP.NET programmer and have a preference as to the ASP.NET project type, set it here. Otherwise, leave at the default. |
Silverlight Version | This allows you to select either Silverlight 3 or Silverlight 4. For this book, every example will assume Silverlight 4. |
Enable WCF RIA Services | Check this if you want to link the web project to the Silverlight project as a WCF RIA Services endpoint. This enables additional compile-time tooling. |
Once the new solution is created, you'll see two projects. The first one is the Silverlight application; the second is the website. The website project contains a folder ClientBin, which will contain the compiled output (.xap file) from your Silverlight application. It also contains two test pages that may be used to test your Silverlight application. By default, the .aspx page is set as the startup page but you may use the HTML page if you later plan to host on a non-.NET server. (Yes, Silverlight applications may be hosted by any HTTP server and not just Internet Information Services [IIS] running ASP.NET.)
With the project open and ready, it's time to turn to the user interface.
Open the MainPage.xaml file; it's usually open by default when you create a new Silverlight project. MainPage.xaml is the start page for your application, set as such by a single line of code inside App.xaml.cs.
Inside the opening and closing Grid tags, add the following XAML markup:
<Button Content="Get Tweets"
        Height="23"
        HorizontalAlignment="Left"
        Margin="12,12,0,0"
        x:Name="GetTweets"
        VerticalAlignment="Top"
        Width="75"/>
<ListBox x:Name="TweetList"
        Margin="12,41,12,12"/>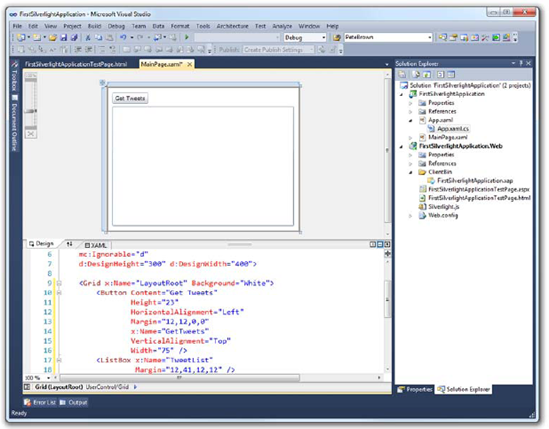
That markup creates two elements on the page: a Button and a ListBox. You could've dragged those controls from the toolbox onto the design view but that would be hard to describe in detail in this book. In the design view, you should end up with a form that looks like figure 1.4.
Next, double-click the Get Tweets button to create an event handler in the code-behind. Incidentally, this code, like all code in Silverlight, will run on the client inside the Silverlight plug-in. The event handler will be used in the next section, where we make a call to the Twitter search API.
The next step is to call out to the Twitter search API. Fill out the event handler we just created in the code-behind to include this code:
private void GetTweets_Click(object sender, RoutedEventArgs e)
{
  WebClient client = new WebClient();

  client.DownloadStringCompleted += (s,ea) =>
    {
System.Diagnostics.Debug.WriteLine(ea.Result);
};
client.DownloadStringAsync(
new Uri("http://search.twitter.com/search.atom?q=silverlight"));
}The code here does a few interesting things. First, it creates an instance of WebClient, one of the easiest to use network clients in Silverlight. It then sets up an event handler using a lambda expression to respond to the results. Finally, it asynchronously calls the method to download the result string from search.twitter.com. The search is for tweets mentioning "silverlight".
Tip
The lambda expression approach here simply uses an anonymous delegate (an unnamed function) as the event handler. The beauty of this approach is that it doesn't clutter up your code with tons of event handlers that are really part of discrete processes. You can learn more about lambda expressions in the C# language on MSDN at http://bit.ly/CSharpLambda.
The network call is asynchronous because all network calls in Silverlight are asynchronous. This can take a little getting used to at first but is easy to deal with once you've done it a few times. Chapter 14 goes into detail on how to use the asynchronous methods as well as the reasons behind them.
If you run the application, click the Get Tweets button, and view the output window, you'll see that you've already built enough to call Twitter and pull back the results in XML format. Not bad for a few lines of code! Our next step is to parse the results and display them in the ListBox control.
If you look in the output window from your last run, you'll see that the result format is an AtomPub document with an entry node for each of the results. In Silverlight, you can parse Atom a couple ways: you can use the built-in parsing of the SyndicationFeed class or you can use LINQ to XML to parse the results.
LINQ to XML is a great technology and has many uses above and beyond AtomPub document parsing, so I'm going to go that route. We'll end up with a little more code than the alternative approach, but I think it's worth it.
Before we do the actual parsing, we'll need to create a simple class to hold the content we're interested in. In Visual Studio, right-click the Silverlight project and choose Add > Class. Name the class Tweet.cs and fill it out so it looks like this:
public class Tweet
{
    public string Message { get; set; }
    public Uri Image { get; set; }
}
Save that class and move back to MainPage.xaml.cs. Somewhere inside the MainPage class, add the following collection variable. Above the GetTweets_Click method would be a perfect location:
private ObservableCollection<Tweet> _tweets =
    new ObservableCollection<Tweet>();
Be sure to right-click the ObservableCollection type name and choose Resolve to add the appropriate using statement to your code. This collection will be the location where we place all of the parsed tweets. It's also what we'll bind the ListBox to. We'll use the ObservableCollection class in chapter 11 when we cover binding.
LINQ is something you may have used on other .NET projects. If so, you'll feel right at home because it's supported in Silverlight as well. If not, it's pretty easy to pick up. Think of it almost like SQL but in code and working on objects and written backwards, with no database in sight. Okay, it's not exactly like SQL, but it's a great query language that lets you perform iterations and filters in a single line of code. In any case, you won't need to be a LINQ expert for this example.
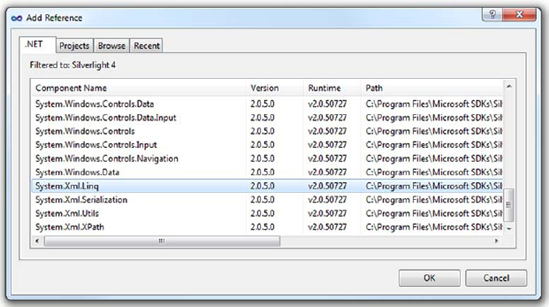
Right-click the project and choose Add Reference; add a reference to System.Xml.Linq. Figure 1.5 shows the dialog with the correct reference selected.
Once the reference is added, replace the Debug.WriteLine statement and the event handler declaration in the code-behind with the code from listing 1.1. This code performs the actual parsing of the XML document returned by Twitter search and loads the tweets collection with the processed results.
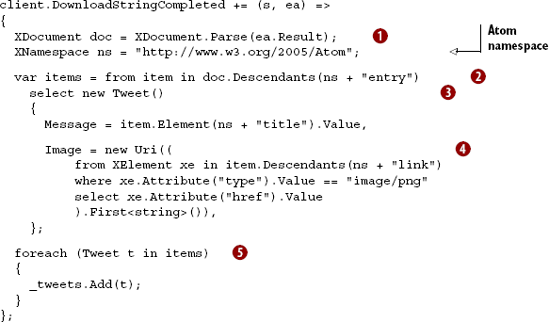
Be sure to right-click and resolve the XDocument class in order to add the correct using statement to the top of your code.
The code does some interesting processing. It first loads the results into an XDocument ![]() so that it may be processed using LINQ statements. It then goes through the document selecting each
so that it may be processed using LINQ statements. It then goes through the document selecting each entry element ![]() and creating a new Tweet object from each
and creating a new Tweet object from each ![]() . The Tweet object itself is filled out by first grabbing the title element's value and assigning that to the
. The Tweet object itself is filled out by first grabbing the title element's value and assigning that to the Message and then doing another LINQ query to find the link element that has a type of image/png and assigning that to the Image property ![]() . Finally, the code loops through each of the results and adds them to the
. Finally, the code loops through each of the results and adds them to the tweets collection ![]() .
.
The namespace declaration at the top is necessary because the Atom namespace is the default xmlns in the document. When parsing XML, you need to have the default namespace declared or the results will be empty.
With the parsing out of the way, the next step is to bind the ListBox to the _tweets collection so that it has a place to pull the data from.
Silverlight is all about binding data. Chapter 11 goes into detail on how binding works and how to use it. For now, it's important to understand that rarely in Silverlight will you find yourself assigning data directly to controls. Instead, you'll set up binding relationships and let the elements pull the data as it becomes available.
In this case, we want to set the ListBox's ItemsSource property to our collection, so that it knows to load its individual items from the collection when the collection is updated. Since we're using an ObservableCollection, the ListBox will be alerted whenever an item is added to or removed from that collection.
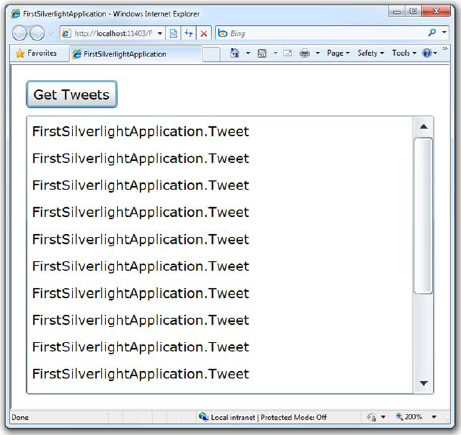
Figure 1.6. The default presentation for the ListBox items leaves something to be desired. It looks like WinForms or something! I demand more from our first Silverlight example.
Add the following line of code to the MainPage constructor, under the InitializeComponent call:
TweetList.ItemsSource = _tweets;
That's all you need to do to set up the binding relationship for the ListBox. Run the application and retrieve the tweets. You should end up with something that looks like figure 1.6.
That's not really what we want, though. All we see are a bunch of type names. We want to display images and text. The reason you see the type name is because this is the default item template behavior. By default, the individual items are presented as their ToString call. This works fine for a string or numbers or similar, but with complex types? Not so much.
Our final step in this walkthrough is to pretty up the ListBox results so we can see something more meaningful.
To make the ListBox present items using a format of our own choosing, we need to use a DataTemplate. DataTemplates are covered in detail in section 11.4. For now, understand that they're a chunk of XAML that'll be used to format each item in the list.
The DataTemplate for this ListBox will contain two columns for each row. The first column will contain the picture of the tweeter; the second will contain the body of the tweet.
Open MainPage.xaml and replace the entire ListBox declaration with the XAML from listing 1.2.
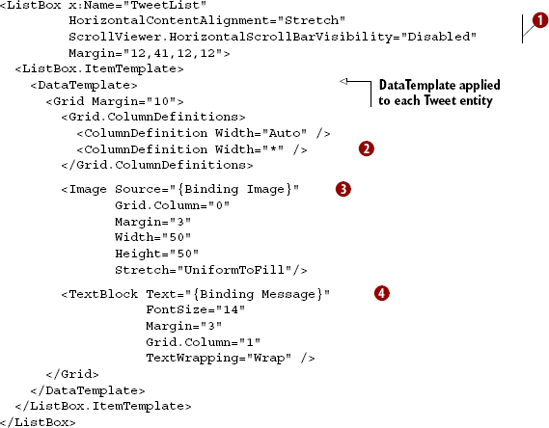
In this markup, we first tell the ListBox that we want its content to take up the full width of the ListBox, without any horizontal scrolling ![]() . The next bit of markup defines the grid, with an autosized first column and a full-width second column
. The next bit of markup defines the grid, with an autosized first column and a full-width second column ![]() . Then, we bind an
. Then, we bind an Image to the Image property ![]() of the Tweet class and a
of the Tweet class and a TextBlock to the Message property ![]() .
.
The end result of the work we've done, including this fine ListBox DataTemplate, is shown in figure 1.7.
I've been working with Silverlight and WPF for a number of years now, but it never fails to impress me just how easy it is to have complete control over what your application displays. I remember the days when you had to purchase specialty controls to do something as simple as display an image inside a ListBox. Now, all you need to do is a little XAML. And, if you don't feel like typing in XAML, you can crack open Expression Blend and use it to design the DataTemplate interactively on the design surface. As a famous dark lord of the Sith once said, "Impressive...most impressive."

Silverlight is one of the most promising development platforms to come from Microsoft since the original release of .NET a decade ago. Silverlight fills a niche that sits solidly between traditional desktop applications and web applications, while offering capabilities that both lack. It does all this via a small plug-in that takes only minutes to install and runs on different browsers and different operating systems.
The code your write and the skills you gain are portable between the desktop and the web, devices in your pocket, game consoles in your living room, and the set-top box on your TV. That's a pretty good return on your investment.
Silverlight has come a long way since the Silverlight 2 version covered in the original edition of this book. It's amazing just how much the product teams have been able to pack into the product in those two years. Before I joined Microsoft, I heard rumors about people with sleeping bags in their offices and coffee delivered by the gallon. I suspect I now know which team they work for, and I have to say that I'm "super" impressed with the results.
Your environment is all set up, and you've whetted your appetite by building a simple "Hello World!" application in Silverlight 4. In the next chapter, we'll dive right into the meat of what makes Silverlight UI work: XAML. From there, we'll take a tour of all the features this platform has to offer.