Saving Your Spreadsheets
As with any application software that you use, you need to periodically save your work. And Calc is no different; you need to save your spreadsheets, otherwise you take the chance of losing the information that you've entered into the various cells.
To Save Your Calc Spreadsheet
1. |
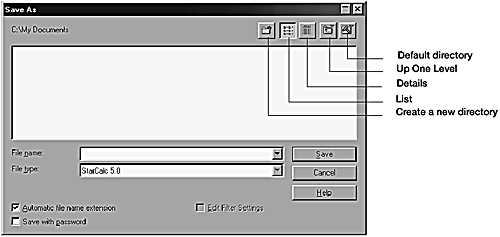
Click the Save button on the Function toolbar. The Save As dialog box opens (see Figure 2.6). Figure 2.6. The Save As dialog box allows you to name your spreadsheet file and choose a location to save it.
Now, you may wonder why the Save As dialog box appears when you've clicked the Save document button (or selected the File menu and then selected Save). Well, the first time you save a new spreadsheet, the Save As dialog box opens so that you can give the spreadsheet a filename. |
2. |
Type a name in the File name box to name the spreadsheet file. If you wish to save the file in a format other than the default (StarCalc 5.0), click the File type box and select the appropriate file type. Note You can save your Calc spreadsheets in a number of different file formats, including StarCalc 5.0 (the default), MS Excel, and HTML. |
3. |
Click the Save button to save your spreadsheet to the default folder. By default, Calc will open the My Documents folder on your computer to use as the location for saving your spreadsheet files (this is on a Windows-based computer; other operating systems will default to the folder StarOffice/user/work). However, if you wish to save to another folder or create a new folder for your file, you will need to take advantage of some of the buttons that are located in the upper right corner of the Save As dialog box (continue to next step). |
4. |
Click the Up One Level button as needed to locate the drive or folder that you wish to save your spreadsheet in (along the way, you may have to double-click drive or folder icons to locate the actual folder you wish to use). Once you've located the folder in the Save As window, double-click the folder to open it. If you want to create a new folder for your spreadsheets, use the Up One Level button to locate the drive or folder where you will place the new folder and open that location (use a combination of clicks on the Up One Level button and double-clicks on the specific drive or folder icons that appear in the Save As window). Once you reach the appropriate location for the new folder, click the Create new directory button. The Create New Folder dialog box will open (see Figure 2.7). Type a name for the folder and then click OK. Figure 2.7. You can create a new folder from the Save As dialog box.
|
5. |
Once you either locate or create the folder that you wish to save the spreadsheet in, click the Save button and the spreadsheet file will be saved to the folder. |

To Save the Spreadsheet with a Password
If you store your files on a public file server (a network file server that has no real security of its own), you can actually assign passwords to your spreadsheets. Once you assign a password to a spreadsheet, you won't be able to open the spreadsheet without the password (so only use passwords on your spreadsheet files when it's absolutely necessary).
You password-protect a spreadsheet from the Save As dialog box. So, you can assign the password the very first time you save the spreadsheet, or you can open the Save As dialog box (select File, then Save As) to assign the password at any time.
1. |
In the Save As dialog box, click the Save with password checkbox. |
2. |
Click the Save button (if you have already saved the file before and are adding password protection, click the Yes button to overwrite the existing file). |
3. |
The Enter Password dialog box will appear (see Figure 2.8). Type your password in the Password box and then repeat the password in the Confirm box. Figure 2.8. Calc spreadsheet files can be password-protected.
|
4. |
Click OK to assign the password to the spreadsheet file. |

The next time you open the password-protected spreadsheet, the Enter Password dialog box will appear. Provide the password for the file and then click OK. The spreadsheet will open on the StarOffice Desktop.
Note
Password protection only keeps another user from opening your spreadsheet in Calc. Someone can always delete your file from the Windows or StarOffice Explorer without knowing the password.
To Save Changes to the Spreadsheet
Once you've given your spreadsheet a name and saved it to a particular location, you can save any changes that you make to the spreadsheet by clicking the Save Document button on the Function toolbar. If for some reason you decide to rename the file or change the location of the file, you can select the File menu, then select Save As.
The Save As dialog box will appear. You can assign the spreadsheet a new name or save it under the current name to a new location.