
Aligning Cell Entries
You've probably already got a feel for the fact that Calc treats text and numerical entries differently. In fact, when you enter text, Calc aligns it on the left of the cell, whereas values are aligned on the right of the cell. You can quickly change the horizontal alignment of text and values using the alignment tools on the Object toolbar (see Figure 3.12).
Figure 3.12. The Object toolbar provides alignment tools that make it easy to change the horizontal alignment of cell data.

Note
Remember that by default there are alignments provided to differentiate text entries from values. If you change the alignment of data in cells, you can no longer use alignment as an indicator of what type of information a cell holds.
The horizontal alignment tools provided are:
If you select Align Left as your alignment setting, you also have the ability to determine the indent of the data from the left side of the cell. Use the Increase Indent tool on the Object bar to increase the indent, and the Decrease Indent tool to decrease the indent. Each time you click the Increase Indent tool, you increase the indent by 10 points (which is about.14 inches; there are 72 points in an inch).
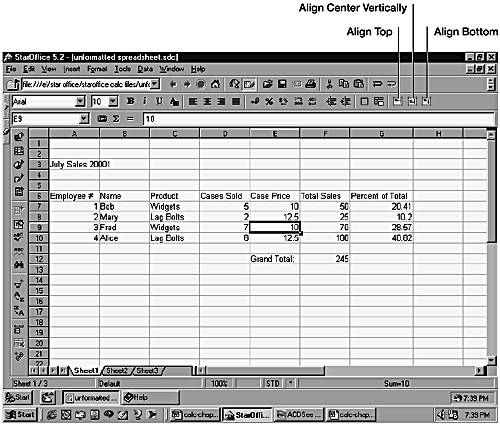
You can also control the vertical alignment of data in your spreadsheet cells. Three vertical alignment tools are available on the Object bar (see Figure 3.13).
Figure 3.13. The Object bar provides vertical alignment tools for aligning data from top to bottom in a cell.
The vertical alignment tools are:
Align Center Vertically— Aligns the data in the center of the cell vertically.
Align Bottom— Places the data in the bottom of the cell (the default setting).
You will find that the vertical alignments have more impact (and are more obvious) when you increase the height of a cell. Changing the vertical alignment of the data in a cell that is using the default row height will show only minimal change at best.
You can also control the vertical and horizontal alignment of a cell's content (or the contents of an entire range of cells) using the Alignment tab of the Cell Attributes dialog box. Open the Cell Attributes dialog box (Format, Cells) and then click the Alignment tab (see Figure 3.14).
Figure 3.14. The horizontal and vertical alignment options can also be accessed on the Alignment tab.

The Alignment tab includes the alignment options available using the tools on the Object bar, and also adds some additional enhancements. For example, there is a Default alignment option in the Horizontal box that returns the data to the default alignment (on the left for text and on the right for values).
Additionally, if you choose Left as the horizontal alignment in the Horizontal box, you are provided with the ability to indent the data in the cell from the left side of the cell. Use the Indent click box to determine the number of points in the left indent.
The Alignment tab of the Cell Attributes dialog box also provides an additional option for vertical alignment. The Standard vertical alignment (in the Vertical box) sets the vertical alignment to the default setting (which is actually on the bottom of the cell).
A quick mention should be made regarding the other features available on the Alignment tab such as the distance from gridlines, text direction, and text flow. These features provide you with additional ways to orient text in your spreadsheet cells. These features will be covered in the section “Using Special Alignment Settings” in Chapter 4.