
Apple has always taken pride in its language-friendliness. You can shift from language to language on the fly, as you type, even in midsentence—without reinstalling the operating system or even restarting the computer.
Mountain Lion’s facility with language, though, goes the extra overseas mile. It lets you type vertical Japanese and Chinese text; includes fonts for 20 more non-Roman alphabets (including the ones you need for five Indian languages); offers “filtering by tones, ordering and filtering by radical or stroke count, and improved pinyin-han conversion accuracy” (you have to be a Chinese speaker to appreciate those tweaks); and much more.
First, tell your Mac which languages you’d like to have available. Open System Preferences→Language & Text. On the Language tab, you see a listing of the languages the Mac can switch into, in the corresponding languages—Français, Español, and so on. Just drag one of the languages to the top of the list to select it as the target language, as shown in Figure 5-4.
Note
You can mix English with right-to-left languages like Hebrew and Arabic. There’s even a split-cursor option that makes the pointer flip directions at the boundary between right-to-left and left-to-right text.
Now launch Safari, TextEdit, Mail, or Stickies. Every menu, button, and dialog box is now in the new language you selected! If you log out and back in (or restart) at this point, the entire Finder will be in the new language, too.
Note
Programs differ widely in their “language awareness.” If you use a language beyond the 22 in the list, adding it (with the Edit List button) ensures that its relevant features will be available in all programs. (You may still have to add additional language software to make your menus and dialog boxes change.)
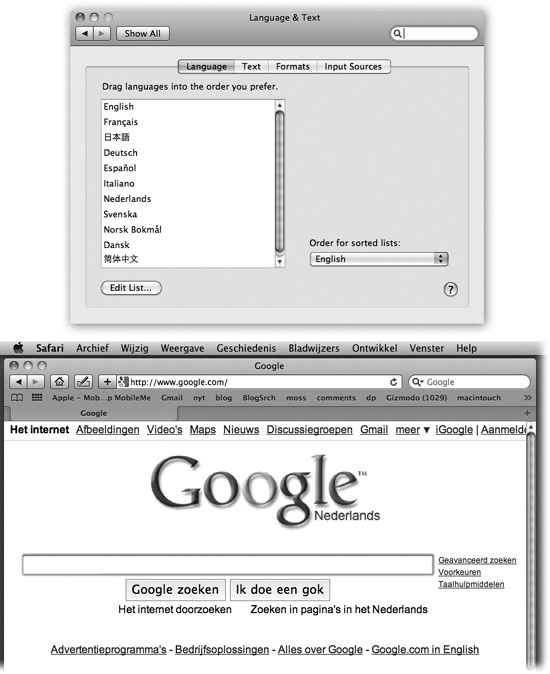
Figure 5-4. Top: This is the list of the 22 “system localizations” that you get with a standard OS X installation. Bottom: Here’s Safari running in Dutch. Actually understanding Dutch would be useful at a time like this—but even if you don’t, it can’t help but brighten up your workday to choose commands like Spraakfunctie or Knip. (Alas, your success with this trick varies by program.)
Of course, if you’re really French (for example), you’ll also want to make these changes:
On the Formats tab, choose your French-speaking country from the Region pop-up menu, so that time and date formats, number punctuation, and currency symbols also conform to your local customs. (Turn on “Show all regions” if necessary.)
For example, the decimal and thousands separator characters for displaying large numbers differ from country to country. (The number 25,600.99, for example, would be written as “25 600,99” in France, and as “25.600,99” in Spain.) And what appears to an American to be July 4 (the notation “7/4”), to a European indicates April 7.
If, for some reason, Apple’s preprogrammed settings aren’t right for your region, you’ll see Customize buttons that let you override them.
Choose the French keyboard layout from the Input Sources tab, as explained next.
GEM IN THE ROUGH: Draw Those Chinese Characters
Apple has made a huge push to appeal to Chinese Mac fans. There’s a new Chinese dictionary and improved text input; eight new Chinese fonts; compatibility with popular Chinese mail services like QQ, 163, and 126; built-in Safari searching using Baidu (like a Chinese Google); and Share-button posting directly to Youku and Tudou (like YouTube) and Sina Weibo (a microblogging service).
If you want to write in Chinese, you can draw the characters you want, right on your laptop’s trackpad. (This trick requires a recent Mac laptop, one of the multitouch models.)
To set this up, turn on Chinese–Simplified or Chinese–Traditional, choose the Chinese writing system you prefer, and then turn on Trackpad Handwriting in the System Preferences→Language & Text→Input Sources pane.
Then, when you’re actually writing, use the flag (Input) menulet to choose Pinyin—Simplified (or whichever system you like). Now press Shift-Control-space bar to make the writing panel appear, as shown here.
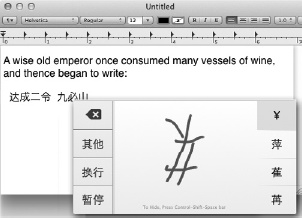
The trick is to understand that the panel is a full map of your trackpad. Draw your character by dragging across the trackpad; white lines appear as you go.
On both sides of the onscreen panel, you see the Mac’s interpretations of your character; to choose one, tap the corresponding spot on the outside edges of your actual trackpad. (Or, to backspace—delete your most recent line—tap the upper-left corner of your trackpad.) The Mac drops the character into your document.
Press Shift-Control-space bar again to hide the panel, and shake your head in wonder.
While the Mac can display many different languages, typing in those languages is another matter. The symbols you use when you’re typing in Swedish aren’t the same as when you’re typing in English. Apple solved this problem by creating different keyboard layouts, one for each language. Each rearranges the letters that appear when you press the keys. For example, when you use the Swedish layout and press the semicolon key, you don’t get a semicolon (;)—you get an ö.
Apple even includes the famous Dvorak layout and the not-very-famous Colemak layout. Both are scientific rearrangements of the standard layout that put the most common letters directly under your fingertips on the home row. Fans of the Dvorak layout, and the more modern Colemak layout, claim greater accuracy, better speed, and less fatigue.
Use the list in the Input Sources pane to indicate which keyboard layout you want. If you select anything in the list, then “Show input menu in menu bar” turns on automatically. That option puts a tiny flag icon in your menu bar—a keyboard menulet that lets you switch from one layout to another just by choosing its name. (To preview a certain keyboard arrangement, launch the Keyboard Viewer program described next.)
There you are, two-thirds of the way through your local matchmaker newsletter, when it hits you that you need a heart symbol. Right now.
You can’t help wishing there were an easy way to find those special symbols that hide among your fonts—fancy brackets, math symbols, special stars and asterisks, and so on.
The Keyboard Viewer, described next, can generate a few of them. But to see the full range of symbols available, you need the Character Viewer. To make it appear, choose Edit→Special Characters.
Most programs have this command. If yours doesn’t, here’s the long way: Open System Preferences, click Language & Text, click the Input Sources tab, and then turn on the Keyboard & Character Viewer checkbox. You’ve just installed the Keyboard menulet.
Then, next time you’re word processing or doing page layout, choose Show Character Viewer from this menu. The resulting window (Figure 5-5, top) rounds up all symbols from all your fonts at once. To find a particular symbol, click the “by Category” tab, and then click the various category headings: Arrows, Bullets/Stars, Math Symbols, and so on.
When you find the symbol you want, double-click it. The correct symbol pops into your document. (If not, you may get the correct character in the wrong font. In that case, change the font of the inserted character manually. To find out what font it came from, click the symbol in the Font Variation panel to see the font name.)
Keyboard Viewer, which is descended from the Key Caps program of old, consists of a single window containing a tiny onscreen keyboard (Figure 5-5, bottom). When you hold down any of the modifier keys on your keyboard (like ⌘, Option, Shift, or Control), you can see exactly which keys produce which characters. The point, of course, is to help you learn which keys to press when you need special symbols or non-English characters, such as © or ñ, in each keyboard layout.
Note
Keyboard Viewer shows only the symbols you can produce by typing keystrokes. A font may contain thousands of other characters that can’t actually be typed; the Character Viewer is the only way to access these other symbols.
It’s a great tool—if you can find it.
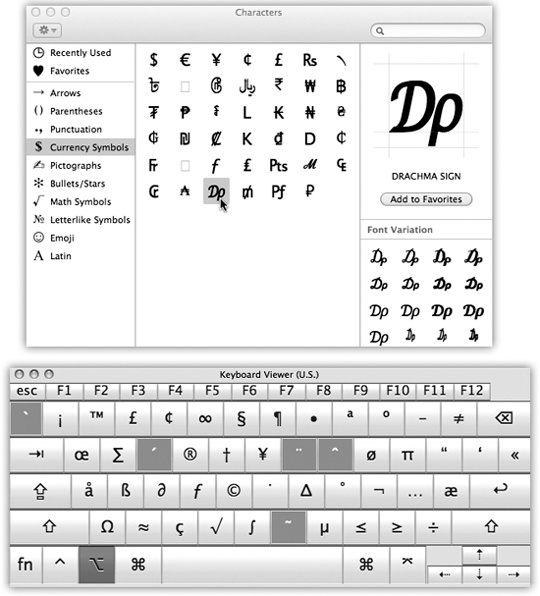
Figure 5-5. Top: You can preview variations of the same symbol in the
Font Variation panel. You can also use the search box to find a
symbol by name: “heart” or “yen” or “asterisk,” for example. And
if you click the ![]() menu in the top left, you can choose
Customize List—and you’ll have access to a staggering array of
even more symbol categories, including wacky symbols from other
alphabets. Bottom: How do you make a π symbol? Keyboard
Viewer reveals the answer. When you press the Option key, the
Keyboard Viewer keyboard shows that the pi character (π) is mapped
to the P key. To insert the symbol into an open document, just
click it in the Keyboard Viewer window.
menu in the top left, you can choose
Customize List—and you’ll have access to a staggering array of
even more symbol categories, including wacky symbols from other
alphabets. Bottom: How do you make a π symbol? Keyboard
Viewer reveals the answer. When you press the Option key, the
Keyboard Viewer keyboard shows that the pi character (π) is mapped
to the P key. To insert the symbol into an open document, just
click it in the Keyboard Viewer window.
Here’s how. Open System Preferences→Language & Text, click Input Sources, and then turn on Keyboard & Character Viewer at the top of the list. The Input menulet—usually a tiny flag—appears at the top of the screen. You can open the Keyboard Viewer by choosing its name from this menulet.
To see the effect of pressing the modifier keys, either click the onscreen keys or press them on your actual keyboard. The corresponding keys on the onscreen keyboard light up as they’re pressed.
Tip
You’re not stuck viewing the characters in a 12-point font size—a good thing, because some of them are hard to read when displayed that small. You can make the Keyboard Viewer window nearly fill the screen by clicking its Zoom button. That will magnify the Keyboard Viewer window and its font size.