Printing has always been one of the Mac’s strong suits—and you’re about to find out why.
Setting up a printer is incredibly easy. The first time you want to print something, follow this guide:
Connect the printer to the Mac, and then turn the printer on.
Inkjet printers connect to your USB jack. Laser printers hook up either to your USB jack or to your network (Ethernet or wireless).
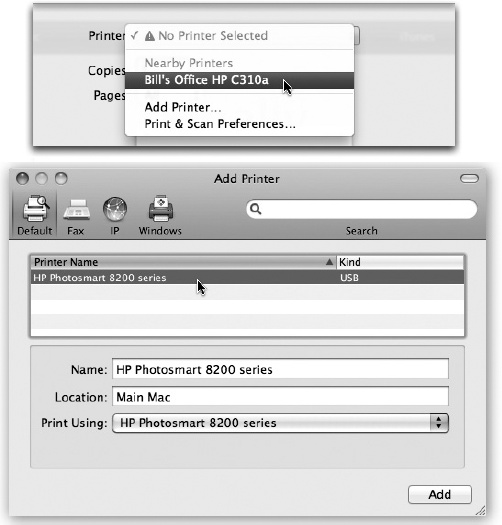
Open the document you want to print. Choose File→Print. In the Print dialog box, choose your printer’s name from the Printer pop-up menu (or one of its submenus, if any, like Nearby Printers). See Figure 9-1.
Cool! Wasn’t that easy? Very nice how the Mac autodiscovers, autoconfigures, and autolists almost any USB, FireWire, Bluetooth, or Bonjour printer.
Have a nice afternoon. The End.
Oh—unless your printer isn’t listed in the Printer pop-up menu. In that case, read on.
Note
“Nearby Printers” refers to printers that aren’t connected directly to your Mac but are accessible anyway: a printer connected to an Apple Time Capsule or an AirPort base station, certain network printers that speak Bonjour, or printers connected to other Macs that you’ve shared, as described later in this chapter.
From the Printer pop-up menu (Figure 9-1, top), choose Add Printer.
A special setup window opens (Figure 9-1, bottom), which is even better at auto-detecting printers available to your Mac. If you see the printer’s name here, click it and then click Add.
Figure 9-1. Top: To introduce your Mac to a new printer, try to print something. If you have a USB printer or a “nearby” one, it’s probably listed here already. Off you go. If your printer isn’t listed, choose Add Printer from this pop-up menu. Bottom: Your Mac should automatically “see” any printers that are hooked up and turned on. Click the one you want, and then click Add.
You’re all set. Have a good time.
Unless, of course, your printer still isn’t showing up. Proceed to step 4.
Click the icon for the kind of printer you have: Default, IP, or Windows.
Default usually does the trick, especially if you have an inkjet printer. Choose IP if you have a network printer that’s not showing up in Default—especially if you have an old AppleTalk printer. And choose Windows if there’s a Windows-only printer out there on your office network.
After a moment, the names of any printers that are turned on and connected appear in the printer list. For most people, that means only one printer—but one is enough.
Click the name of the printer you want to use.
As an optional step, you can open the Print Using pop-up menu at the bottom of the dialog box. Choose “Select a driver to use,” and then, in the list that appears, choose your particular printer’s model name, if you can find it. That’s how your Mac knows what printing features to offer you when the time comes: double-sided, legal size, second paper tray, and so on.
Click Add.
After a moment, you return to the main Printer Browser window (Figure 9-1, top), where your printer now appears. You’re ready to print.
Note
If you still don’t see your printer’s name show up, ask yourself: Is my Mac on a corporate network? Does the network have an LPR (Line Printer Remote) printer? If you and your company’s network nerd determine that the printer you want to use is, in fact, an LPR printer, then click IP Printing at the top of the Printer Browser dialog box. Fill in the appropriate IP address and other settings, as directed by your cheerful network administrator.
If you’re lucky enough to own several printers, repeat the steps above for each one. Eventually, you’ll have introduced the Mac to all the printers available to it, so all their names show up in the printer list.
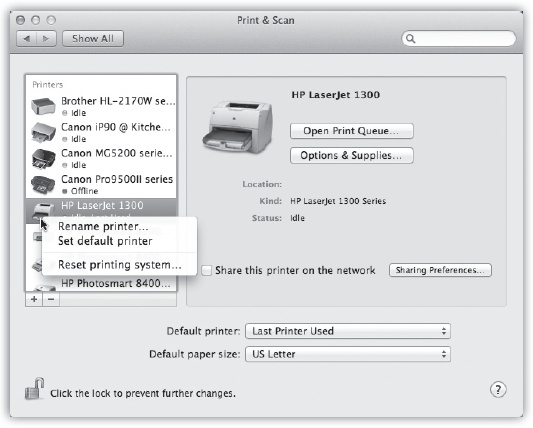
To see the printer list so far, open System Preferences→Print & Scan. You can have all kinds of fun here (Figure 9-2):
Choose a default printer. As indicated by the Default Printer pop-up menu, OS X intends, conveniently enough, to use whichever printer you used for the last printout for the next one. Most people, after all, don’t switch printers much.
Still, you can choose one particular printer from this pop-up menu to set it as the default printer—the one the Mac uses unless you intervene by choosing from the Printer pop-up menu in the Print dialog box (Figure 9-1).
Create desktop printer icons. This handy, little-known feature gives you drag-and-drop access to your printers.
From the Print & Scan pane of System Preferences, just drag a printer’s icon out of the window and onto the desktop (or wherever you like). Repeat for your other printers. From now on, you can print a document on a certain printer just by dragging the document’s icon onto the appropriate printer icon.
Check the ink level. Click a printer, and then click Options & Supplies, to see how your inkjet ink or laser-printer toner level is. That way, you won’t be caught short when you’re on a deadline and your printer is out of ink. You now get a bright yellow “low ink” warning in the dialog box that actually appears when you print.