Mountain Lion’s download-only schtick is revolutionary and, in most cases, incredibly convenient. But sometimes, you’ll miss having a physical disk with the Mountain Lion installer on it. You might wish you had one if, for example, you want to install Mountain Lion on a huge array of Macs, like the ones at a school or in a business; downloading that 4-gig installer over and over again would drive you crazy.
You might also wish you had an installation disk when your Mac starts acting up and the tricks described in Appendix B don’t seem to work.
As it turns out, you can make a Mountain Lion installation disk fairly easily. All you need is a hard drive, a flash drive, or even a blank DVD. (Hard drives and flash drives are much faster at performing the actual installation.)
If you’re planning to use a flash drive or a hard drive, the first step is to format it so that the Mac will be able to start up from it. To do that, connect or insert the drive. (It needs at least 5 gigabytes of free space. These steps assume that there’s nothing else on it.)
Now open Disk Utility (it’s in your Applications→Utilities folder). In Disk Utility, click the drive’s name in the left-side list (not the partition name beneath it). Then click the Partition tab in the main window.
Under Partition Layout, choose 1 Partition. Then click the actual partition—the big rectangle “map” in the middle of the window—and then click Options beneath it. In the resulting dialog box, click GUID Partition Table; click OK.
Tip
Actually, it’s fine to create multiple partitions, so you don’t wind up wasting a lot of disk space. Just give the installation partition at least 5 gigabytes so it will have room for the Mountain Lion installer.
Now, back at the Partition window, you can type a name for your drive. From the Format menu, choose “Mac OS Extended (Journaled).” Click Apply. Click Partition in the confirmation window. The process may take a minute or two.
Now you’ll turn your formatted drive into a Mountain Lion installer.
Start by grabbing the Install OS X Mountain Lion.app program that winds up in your Applications folder when you first buy Mountain Lion. (You have to think of this before you actually run it, as described in the box on Reinstalling: Tricks of the Trade. That box also tells you how you can re-download the Mountain Lion installer app if it’s too late for that.)
Right-click the installer’s icon. From the shortcut menu, choose Show Package Contents.
In the resulting folder, open Contents, and then open Shared Support. Inside is a disk-image file called InstallESD.dmg. Your job is to convert this disk image into an actual disk.
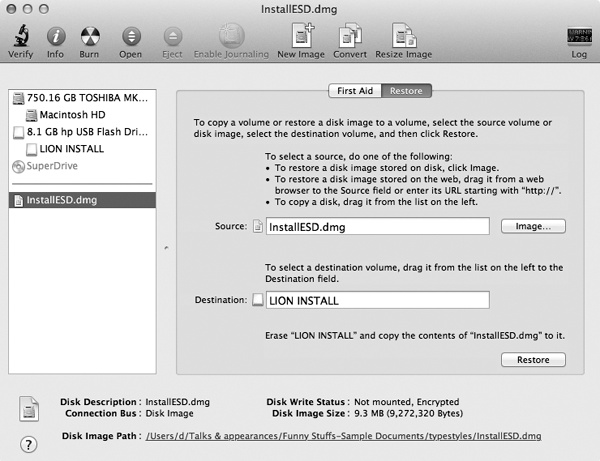
To do that, open Disk Utility again. Drag the InstallESD.dmg disk image into the list at the left side of Disk Utility’s window. Click InstallESD.dmg in the list; then click the Restore tab. Insert the flash drive, or connect the hard drive, that you formatted in Phase 1.
Last steps: Drag your drive’s icon out of the left-side list into the Destination box (Figure A-4). Click Restore; enter your administrator name and password when you’re asked.
Note
If you want to create a Mountain Lion DVD (instead of a flash drive or a hard drive), here’s the only different step. Instead, just click InstallESD.dmg in the left-side list, and then click Burn in the toolbar. Insert a blank DVD and then click Burn.
When the “restoring” process is complete, you wind up with an actual Mountain Lion flash drive or disk that you baked all by yourself.
To use it, turn off the Mac. Connect your homemade installer drive. When you turn on the Mac, hold down the Option key so that a choice of startup disks appears. Click your homemade installer to start up from it.
Now you can install Mountain Lion as usual, or use any of the recovery features described in Appendix B.