
There are two kinds of people in the world: those who have a regular backup system—and those who will.
You’ll get that grisly joke immediately if you’ve ever known the pain that comes with deleting the wrong folder by accident, or making changes that you regret, or worst of all, having your hard drive die. All those photos, all that music you’ve bought online, all your email—gone.
Yet the odds are overwhelming that at this moment, you do not have a complete, current, automated backup of your Mac. Despite about a thousand warnings, articles, and cautionary tales a year, guess how many do? About four percent. Everybody else is flying without a net.
If you don’t have much to back up—you don’t have much in the way of photos, music, or movies—you can get by with burning copies of stuff onto blank CDs or DVDs or using a free online backup system like Dropbox, CrashPlan, or IDrive. But those methods leave most of your Mac unprotected: all your programs and settings.
What you really want, of course, is a backup that’s rock-solid, complete, and automatic. You don’t want to have to remember to do a backup, to insert a disc, and so on. You just want to know you’re safe.
That’s the idea behind Time Machine, a marquee feature of OS X. It’s a silent, set-it-and-forget-it piece of peace of mind. You sleep easy, knowing there’s a safety copy of your entire system: your system files, programs, settings, music, pictures, videos, document files—everything. If your luck runs out, you’ll be so happy you set up Time Machine.
Here’s the bad news: Time Machine requires a second hard drive. That’s the only way to create a completely safe, automatic backup of your entire main hard drive.
That second hard drive can take any of these forms:
An external USB, FireWire, or Thunderbolt hard drive.
An Apple Time Capsule. That’s an AirPort wireless base station/network backup hard drive in one; it’s available in gigantic capacities.
Another internal hard drive.
A partition of any one of those drives.
An iPod, if you’ve turned on “Enable disk use” (in iTunes) or if it’s a flash-memory one like the Nano.
The hard drive of another Mac on the network (Mac OS X 10.5 or later) that you’ve mounted on your screen.
Tip
It’s perfectly OK to back up several Macs onto the same external hard drive, as long as it’s got enough room. You can also back up onto a hard drive that has other stuff on it, although of course that means you’ll have less room for Time Machine backups.
In all cases, the backup disk must be bigger than the drive you’re backing up (preferably much bigger).
Here’s what you can’t use as the backup disk: a CD or your startup drive.
Note
The backup drive must be a standard Mac-formatted hard drive—yet many new drives bought by Mac fans come preformatted as Windows disks. Fortunately, Time Machine automatically reformats them to the Mac OS Extended (Journaled) scheme, which it requires. Thoughtful, really.
Sure, it sounds like an Apple plot to sell more hard drives. But you’d be surprised at how cheap hard drives are. At this writing, you can buy a 1-terabyte hard drive (1,000 gigabytes) for $60, for goodness’ sake—and hard drive prices-per-gigabyte go only down.

Figure 5-11. The Mac has just encountered a second hard drive. Time Machine still works if there’s other stuff on the drive, but life is simpler if you don’t use that drive for anything but Time Machine.
The first time the Mac sees your second hard drive, it invites you to use it as Time Machine’s backup drive (Figure 5-11). That could be the moment you connect an external drive, or the first time you turn on the Mac after installing an internal drive.
If you click Use as Backup Disk, you’re taken immediately to
the Time Machine pane of System Preferences (Figure 5-12). It shows
that Time Machine is now on, your backup disk has been selected, and
the copying process has begun. The Mac starts copying
everything on your hard drive, including OS X
itself, all your programs, and everyone’s Home folders. You know
that because you see both a progress message and the
![]() symbol that appears next to the backup
drive’s name in your Sidebar.
symbol that appears next to the backup
drive’s name in your Sidebar.
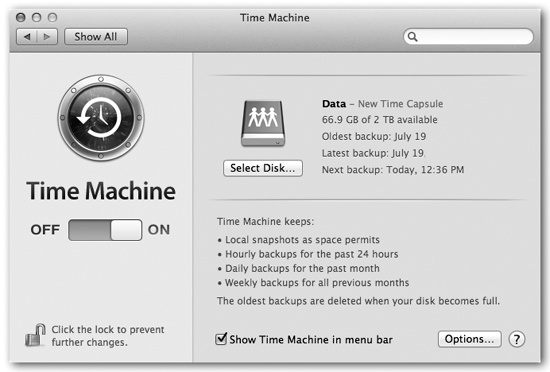
Figure 5-12. Use the big On/Off switch to shut off all Time Machine activity, although it would be hard to imagine why you’d want to risk it. You can click Select Disk to choose a different hard drive to represent the mirror of your main drive (after the first one is full, for example).
And that, ladies and gentlemen, is the easiest setup for a backup program in history.
Note
Unless you turn on encryption (see the box on Encrypted Time Machine Backups), Time Machine doesn’t use any compression or encoding; it’s copying your files exactly as they sit on your hard drive, for maximum safety and recoverability. On the other hand, it does save some space on the backup drive, because it doesn’t bother copying cache files, temporary files, and other files you’ll never need to restore.
Now go away and let the Mac do its thing. The first backup can take hours as the Mac duplicates your entire internal hard drive onto the second drive. The Mac may feel drugged during this time.
Tip
You can create multiple backups on different disks—a great feature if you have a laptop that you carry between work and home. You can have a backup drive at both places; Time Machine will seamlessly switch between them. To set this up, just choose another backup disk in System Preferences→Time Machine. Time Machine will automatically back up to that drive, too.
From now on, Time Machine quietly and automatically checks your Mac once an hour. If any file, folder, or setting has changed, it gets backed up at the end of the hour. These follow-up backups are quick; Time Machine backs up only what’s changed.
So, should disaster strike, the only files you can lose are those you’ve changed within the past 59 minutes.
Tip
And even then, you can force more frequent backups if you want to. Just choose Back Up Now from the Time Machine menulet. Or choose Back Up Now from the shortcut menu of the Dock’s Time Machine icon.
You can pause the backup the same way—if you need to use the backup drive for another quick task, for example. Open System Preferences→Time Machine and turn the big switch Off. Don’t forget to turn the backing-up on again when you’re finished.
By the end of the day, you’ll have 24 hourly backups on that second disk, all taking up space. So at day’s end, Time Machine replaces that huge stash with a single daily backup. You can no longer rewind your system to 3:00 p.m. last Monday, but you can rewind to the way it was at the end of that day.
Similarly, after a month, Time Machine replaces those 30 dailies (for example) with four weekly backups. Now you may not be able to rewind to October 14, but you can rewind to November 1. (Apple assumes it won’t take you a whole week to notice that your hard drive has crashed.)
Tip
You can see these backups, if you want. Open your backup drive, open the Backups.backupdb folder, and then open the folder named for your computer. Inside, you’ll find a huge list of backup folders, bearing names like 2013-03-22-155831. That’s the backup from March 22, 2013, at 15:58 (that is, 3:58 p.m.) and 31 seconds.
The point is that Time Machine doesn’t just keep one copy of your stuff. It keeps multiple backups. It remembers how things were in every folder—not just yesterday, but last week, last month, and so on. It keeps on making new snapshots of your hard drive until the backup drive is full.
At that point, the oldest ones get deleted to make room for new ones.
Tip
Ordinarily, Time Machine alerts you when it has to start deleting old backups. If you’d rather have it just do it without bothering you, then open System Preferences, click Time Machine, click Options, and then turn off “Notify after old backups are deleted.”
By the way, if a backup is interrupted—if you shut down the Mac, put it to sleep, or take your laptop on the road—no big deal. Time Machine resumes automatically the next time you’re home and connected.
Time Machine keeps on working even on a laptop that’s far from home. Thanks to a feature called local snapshots, Time Machine works as usual by making its backups right on the laptop’s own hard drive.
Of course, this system won’t help you if your hard drive dies; your backup is on the same drive, so you’ll lose the originals and the backups simultaneously. But what local snapshots do provide is a safety net—a way to recover a file that you deleted or changed during this time away. Better yet, once you’re home again, when your laptop rejoins the network, the local snapshots are intelligently merged with the master Time Machine backups, as though you’d never been away.
If Time Machine is turned on on your laptop, it makes local snapshots automatically—once an hour, as usual. As time goes on, Time Machine condenses those backups to daily or weekly snapshots to save disk space.
Note
If your laptop gets really low on disk space, Time Machine stops making new snapshots and may even delete old ones so that you can keep using your Mac. When you make more space, snapshots resume automatically.
POWER USERS’ CLINIC: Declaring Stuff Off-Limits to Time Machine
The whole point of Time Machine is to have a backup of your entire hard drive. That’s how most people use it.
It’s conceivable, though, that you might want to exclude some files or folders from the Time Machine treatment. There are two reasons.
First, you might not want certain, ahem, private materials to be part of your incriminating data trail.
Second, you might want to save space on the backup drive, either because it’s not as big as your main drive or because you’d rather dedicate its space to more backups of the essential stuff. For example, you might decide not to back up your collection of downloaded TV shows, since video files are enormous. Or maybe you use an online photo-sharing Web site as a backup for all your photos, so you don’t think it’s necessary to include those in the Time Machine backup.
To eliminate certain icons from the backup, open the Time Machine pane of System Preferences. Click Options.

In the resulting list, click the ![]() button; navigate to your hard drive, and
then select the files or folders you don’t want backed up. Or just
find their actual icons in the Finder and drag them into the list
here. (Use the
button; navigate to your hard drive, and
then select the files or folders you don’t want backed up. Or just
find their actual icons in the Finder and drag them into the list
here. (Use the ![]() button to remove items from the list,
thereby excluding them from the excluded list.)
button to remove items from the list,
thereby excluding them from the excluded list.)
If you’re strapped for disk space, one logical candidate to exclude is the System folder on your main hard drive—that is, OS X itself. After all, if you lose your hard drive, you already have a copy of OS X: the original App Store installer.
When you add the System folder to the exclusion list, Time Machine makes another space-saving offer: “Would you like to also exclude other files installed with Mac OS X, such as system applications and UNIX tools?”
Agreeing (by clicking Exclude All System Files) saves you another several gigabytes of backup space.
If you need to recover a file, enter Time Machine as usual. Your local snapshots show up on the same timeline as backups made on your regular, external backup disk, but they’re color-coded: pink tick marks for external backups, gray for local ones. If the pink bars are dimmed, it’s because you’re not hooked up to your external Time Machine backup drive.
Time Machine has four faces. There’s the application itself, which sits in your Applications folder; open it only when you want to enter Restore mode. There’s its Dock icon, which also enters Restore mode, but which has a shortcut menu containing useful commands like Back Up Now (and Stop Backing Up).
There’s the Time Machine menulet, which may be the handiest of all. It identifies the time and date of the most recent backup; offers Back Up Now/Stop Backing Up commands; and has direct access to Time Machine’s restore mode and preferences pane.
Tip
If you Option-click the Time Machine menulet, you get two secret new commands: Verify Backups (just in case you’re a little nervous about your backups’ integrity) and Browse Other Backup Disks. Yes, it’s perfectly possible to back up onto multiple hard drives—to keep one offsite so you won’t be hosed in case of fire, flood, or burglary, for example—and this is how. (Right-clicking the Time Machine icon on the Dock is another way to get this command.)
Finally, then there’s its System Preferences pane, where you
adjust its settings (Figure 5-12). To see it,
choose ![]() →System Preferences→Time Machine. Or choose
Time Machine Preferences from Time Machine’s Dock icon or
menulet.
→System Preferences→Time Machine. Or choose
Time Machine Preferences from Time Machine’s Dock icon or
menulet.
All right, you’ve got Time Machine on the job. You sleep easy at night, confident that your life is in order—and your stuff is backed up.
Then, one day, it happens: Your hard drive crashes. Or you can’t find a file or folder you know you had. Or you save a document in some non–Auto Save program and then wish you could go back to an earlier draft. Some kind of disaster—sunspots, clueless spouse, overtired self—has befallen your files. This is Time Machine’s big moment.
Start by pinpointing what you’re looking for, in one of these two ways:
Open the disk or folder window where the missing or changed item was.
Type what you’re looking for into the search box at the top of any Finder window. Click the location button that makes the most sense: “This Mac” or the name of the window you’re in.
In the case of deleted files or folders, the search will probably come up empty; that’s totally OK.
Now click the Time Machine icon on the Dock, or choose Enter Time Machine from the menulet (Figure 5-13, top). Don’t look away; you’ll miss the show.
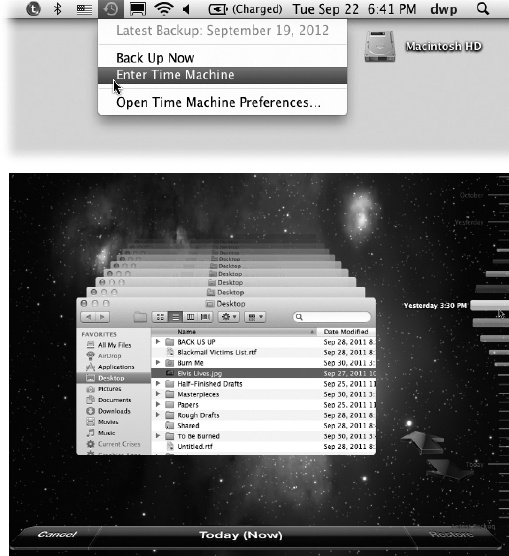
Figure 5-13. Top: Choose Enter Time Machine from the menulet. (If you don’t see this menulet, turn on “Show Time Machine status in the menu bar,” shown in Figure 5-12.) Bottom: This is the big payoff for all your efforts. The familiar desktop slides down, dropping away like a curtain. For the first time, you get to see what’s been behind the desktop all this time. Turns out it’s outer space. Time Machine shows you dozens of copies of the Finder window, representing its condition at each backup, stretching back to the past. If the “ruler tick marks” are both pink and gray, you’re seeing backups on both your laptop’s own hard drive and the usual external drive, as described earlier in this chapter.
Your desktop slides down the screen like a curtain that’s been dropped from above. And it reveals…outer space. This is it, the ultimate Apple eye candy: an animated starry universe, with bits of stardust and meteors occasionally flying outward from the massive nebula at the center.
Front and center is your Finder window—or, rather, dozens of them, stretching back in time (Figure 5-13, bottom). Each is a snapshot of that window at the time of a Time Machine backup.
You have four ways to peruse your backup universe:
Click individual windows to see what’s in them.
Drag your cursor through the timeline at the right side. It’s like a master dial that flies through the windows into the past.
Click one of the two big, flat perspective arrows. The one pointing into the past means, “Jump directly to the most recent window version that’s different from the way it is right now.”
In other words, it’s often a waste of time to go flipping through the windows one at a time, because your missing or changed file might have been missing or changed for the last 25 backups (or whatever). What you want to know is the last time the contents of this window changed. And that’s what the big flat arrows do. They jump from one changed version of this window to another. (Or, if you began with a search, the arrow takes you to the most recent backup with a matching result.)
Use the search box in the corner of the window. You can search for whatever you’re missing in the current backup.
As you go, the very bottom of the screen identifies where you are in time—that is, which backup you’re examining.
Tip
OK, it’s all very dazzling and all. But if you’re technically inclined, you don’t have to sit still for the big show. Just open the backup disk itself, whose icon appears on your desktop. Inside, you’ll find nested folders, neatly representing every computer, every backup, every day, and every hour—which you can rummage through by hand.
In many ways, the recovery mode is just like the Finder. You can’t actually open, edit, rename, or reorganize anything here. But you can use Quick Look to inspect the documents to make sure you’ve got the right version. And you can use icon, list, column, or Cover Flow views to sort through the files you’re seeing.
If you’re trying to recover an older version of a file or folder, highlight it and then click the flat arrow button that’s pointing away from you; Time Machine skips back to the most recent version that’s different from the current one.
If you’re trying to restore a deleted file or folder that you’ve now located, highlight it and then click Restore (lower right). The OS X desktop rises again from the bottom of the screen, there’s a moment of copying, and then presto: The lost file or folder is back in the window where it belonged.
Note
Time Machine prides itself not just on recovering files and folders, but also on putting them back where they belong. If you recover a different version of something that’s still there, OS X asks if you want to replace it with the recovered version—or to keep both versions.
And if you’re recovering a document whose original folder no longer exists, Time Machine automatically recreates the folder so that the recovered item feels at home.
The Finder isn’t the only program that’s hooked into Time Machine’s magic. Contacts and Mail work with Time Machine, too. Other software companies can also revise their own applications to work with it.
In other words, if you want to recover certain addresses or email messages that have been deleted, you don’t start in the Finder; you start in Contacts or Mail.
Then click the Time Machine icon on the Dock. Once again, you enter the starry recovery mode—but this time, you’re facing a strange, disembodied, stripped-down copy of Contacts or Mail (Figure 5-14).

Figure 5-14. The Time Machine version of Contacts is a weird, simplified, viewing-only version. You can’t do much here besides browse your backups—but when you’re in dire straits, that’s enough.
You’re ready to find your missing data. Click the Jump Back arrow to open the most recent version of your address book file or email stash that’s different from what you’ve got now. (You can also use the timeline on the right if you remember the date when things went wrong.)
Tip
If you’re looking for something particular, specify that before you start clicking. For example, type a name into the Contacts search box first.
At this point, you can select individual Contacts entries or email messages to restore; just click the Restore button.
Often, though, you’d rather reinstate the entire Contacts file or email collection from the backup. That’s what the Restore All button is for.
If you click it, the experience is slightly different. Contacts may discover a lot of duplicate name-and-address entries and invite you to step through them, deciding which ones “win” (the old or the new).
Every hard drive will die at some point. You just hope it won’t happen while you own the computer.
But if it does, you, as a Time Machine aficionado, won’t care. You’ll just repair or replace the hard drive, and then proceed as follows.
Connect the Time Machine backup disk to the Mac. Start the recovery mode.
There are actually three ways to recover a dead Mac or a dead hard drive, none of which require an actual DVD, as in the days of yore. If the hard drive is fine but it just can’t start up your Mac, hold down ⌘-R during startup. If the hard drive is empty, you can restart from the Internet itself (if it’s a Mac released since Lion came out). And if all else fails, you can always use the Recovery Disk Assistant that you wisely made long in advance of your horror-story dead-disk day.
Appendix B covers all three of these recovery modes in more detail.
The point is, however, that all three of them present “Restore from a Time Machine backup” as one of the options.
Choose “Restore from a Time Machine backup.” Click Continue.
Now you’re shown a list of Time Machine backup disks. You probably have only one.
Click your Time Machine backup disk. In the list of backups, click the most recent one.
The installer goes about copying everything from the backup disk onto your new, empty hard drive. When it’s all over, you’ll have a perfect working system, just the way it was before your series of unfortunate events.
Beware, however: Restoring your earlier version also erases any files you’ve created or changed since you installed the update. Back them up manually before you proceed!
Then follow the steps; when you’re asked to choose a backup to restore, choose the most recent one. When it’s all over, copy the latest files (the ones that you manually backed up) back onto the hard drive.
Weirdly enough, you can also use Time Machine as a glorified data bucket that carries your world from one computer to another. You can bring over some or part of any Time Machine backup to a totally different Mac.
On the new machine, connect your backup disk. In the Applications→Utilities folder, open the program called Migration Assistant. On the first screen, click “From another Mac, PC, Time Machine backup, or other disk.” The subsequent screens invite you to choose which backup, which Home folder, and which elements (applications, settings, files) you want to bring over.
Time Machine is a very different kind of backup program. A few questions, therefore, are bound to come up—like these:
Can I back up more than one Mac onto the same disk? Yes. Each Mac’s backup is stored in a separate folder on that disk.
Does the backup disk have to be dedicated to Time Machine? No. It can have other files and folders on it. Keep in mind, though, that the more space that’s available, the further back your backup trail can go.
Can I use more than one backup disk—like one at the office and one at home? Yes. Just use the Time Machine panel of System Preferences (or the Time Machine Dock icon’s shortcut menu) to select the new backup drive each time you switch.
Can I delete something from all the backups at once? Yes. Click the Time Machine icon on the Dock to enter the Restore (outer-space) mode. Find and select the file or folder you want to obliterate. From the
 menu, choose Delete All Backups of [the
Thing’s Name]. (Sneaky, huh? That command is never in the
menu except when
you’re in Time Machine restoring mode.)
menu, choose Delete All Backups of [the
Thing’s Name]. (Sneaky, huh? That command is never in the
menu except when
you’re in Time Machine restoring mode.)Can Time Machine back up other hard drives besides the main internal one? Yes. Open System Preferences→Time Machine. Click Options. Your secondary drives are listed here on the excluded-items list. If you want them backed up, too, remove them from the list (click the drive name and then click the
 button.)