
In this chapter, you’ll be spending a lot of time in the Network
pane of System Preferences (Figure 10-1). (Choose
![]() →System Preferences; click Network.) This list
summarizes the ways your Mac can connect to the Internet or an office
network—Ethernet, WiFi, Bluetooth, cellular modem card, VPN, and so
on.
→System Preferences; click Network.) This list
summarizes the ways your Mac can connect to the Internet or an office
network—Ethernet, WiFi, Bluetooth, cellular modem card, VPN, and so
on.
The order of the network connections listed in the Network pane is important. That’s the sequence the Mac uses as it tries to get online. If one of your programs needs Internet access and the first method isn’t hooked up, then the Mac switches to the next available connection automatically.
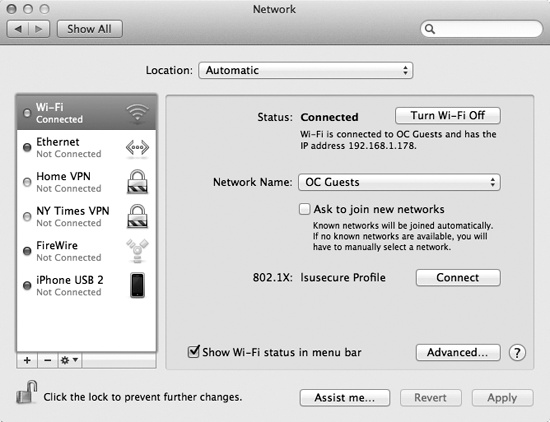
Figure 10-1. You set up all your network connections here, and you can connect to and disconnect from all your networks here. The listed network connections are tagged with color-coded dots. A green dot means turned on and connected to a network; yellow means the connection is working but some other setting is wrong (for example, your Mac can’t get an IP address); red means there’s no connection, or you haven’t yet set up a connection.
In fact, OS X can maintain multiple simultaneous network connections—Ethernet, WiFi, dial-up, even FireWire—with a feature known as multihoming.
This feature is especially relevant for laptops. When you open your Web browser, your laptop might first check to see if it’s plugged into an Ethernet cable, which is the fastest, most secure type of connection. If there’s no Ethernet, then it looks for a WiFi network.
Here’s how to go about setting up the connection-attempt sequence you want:
Open System Preferences. Click the Network icon.
The Network Status screen (Figure 10-1) brings home the point of multihoming: You can have more than one network connection operating at once.
From the
 pop-up menu, choose
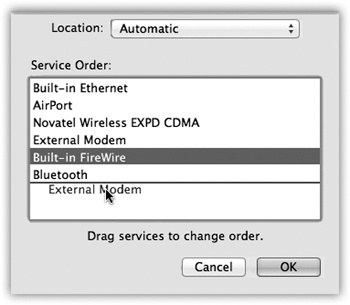
Set Service Order.
pop-up menu, choose
Set Service Order.Now you see the display shown in Figure 10-2. It lists all the ways your Mac knows how to get online, or onto an office network.
Drag the items up and down the list into priority order.
If you have a wired broadband connection, for example, you might want to drag Built-in Ethernet to the top of the list, since that’s almost always the fastest way to get online.
Click OK.
You return to the Network pane of System Preferences, where the master list of connections magically re-sorts itself to match your efforts.
Your Mac will now be able to switch connections even in real time, during a single Internet session. If lightning takes out your Ethernet hub in the middle of your Web surfing, your Mac will seamlessly switch to your WiFi network, for example, to keep your session alive.
All right, then: Your paperwork is complete. The following pages guide you through the process of setting up these various connections.