
This panel offers two ways to show off OS X’s glamorous graphics features: desktop pictures and screen savers.
Mountain Lion comes with an expanded collection of desktop pictures, ranging from National Geographic–style nature photos to plain solid colors. To install a new background picture, first choose one of the image categories in the list at the left side of the window, as shown in Figure 15-9.
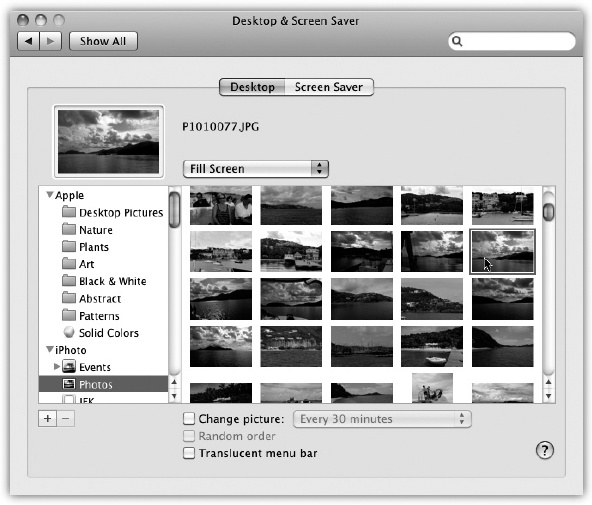
Figure 15-9. Using the list of picture sources at left, you can preview
an entire folder of your own images before installing one as your
new desktop picture. Use the ![]() button to select a folder of assorted
graphics—or, if you’re an iPhoto veteran, click an iPhoto album
name, as shown here. Clicking one of the thumbnails installs the
corresponding picture on the desktop.
button to select a folder of assorted
graphics—or, if you’re an iPhoto veteran, click an iPhoto album
name, as shown here. Clicking one of the thumbnails installs the
corresponding picture on the desktop.
Your choices include Desktop Pictures (muted, soft-focus swishes and swirls and a few nature shots); Nature (bugs, water, outer space); Plants (flowers, soft-focus leaves); Art (a collection of famous paintings by Monet, Dégas, Seurat, and other canvas superheroes); Black & White (breathtaking monochrome shots); Abstract (swishes and swirls with wild colors); Patterns (a pair of fabric closeups); and Solid Colors (simple grays, blues, and greens). Some of them are really nice.
Tip
You can choose any solid color—not just one of the preselected shades Apple gives you. Click Custom Color and go nuts.
Of course, you may feel that decorating your Mac desktop is much more fun if you use one of your own pictures. You can use almost any graphics file: JPEG, GIF, TIFF, Photoshop, and even PDF. (Guess you could use the PDF option to help teach yourself your camera’s user guide by staring at your desktop every morning.)
That’s why icons for your own Pictures folder and iPhoto and
Aperture albums also appear here, along with a ![]() button that lets you choose
any folder of pictures. When you click one of
these icons, you see thumbnail versions of its contents in the
main screen to its right. Just click the thumbnail of any
picture to apply it immediately to the desktop.
(There’s no need to remove the previously installed picture first.)
button that lets you choose
any folder of pictures. When you click one of
these icons, you see thumbnail versions of its contents in the
main screen to its right. Just click the thumbnail of any
picture to apply it immediately to the desktop.
(There’s no need to remove the previously installed picture first.)
No matter which source you use to choose a photo of your own, you have one more issue to deal with. Unless you’ve gone to the trouble of editing your chosen photo so that it matches the precise dimensions of your screen (1920 x 1080 pixels, for example), it probably isn’t exactly the right size.
Fortunately, OS X offers a number of solutions to this problem. Using the pop-up menu just to the right of the desktop preview well, you can choose options like Fill Screen (enlarges or reduces the image so that it fills every inch of the desktop without distortion, although parts may get chopped off) or Fit to Screen (as large as possible without distortion or cropping; “letterbox bars” may appear on the sides or at top and bottom).
The novelty of any desktop picture, no matter how interesting, is likely to fade after several months of all-day viewing. That’s why the randomizing function is so delightful.
Turn on “Change picture” at the bottom of the dialog box. From the pop-up menu, specify when you want your background picture to change: “every day,” “every 15 minutes,” or, if you’re really having trouble staying awake at your Mac, “every 5 seconds.” (The option called “when waking from sleep” refers to the Mac waking from sleep, not you.)
Finally, turn on “Random order,” if you like. If you leave it off, your desktop pictures change in alphabetical order by file name.
Now, at the interval you specified, your desktop picture changes automatically, smoothly cross-fading between the pictures like a slideshow. You may never want to open another window, because you’ll hate to block your view of the show.
On the Screen Saver panel, you can create your own screen-saver slideshows—an absolute must if you have an Apple Thunderbolt Display and a cool Manhattan loft apartment.
Tip
Of course, a screen saver doesn’t really save your screen. Flat-panel screens, the only kind Apple sells, are incapable of “burning in” a stationary image of the sort that originally inspired the creation of screen savers years ago.
No, these screen savers serve two unrelated functions. First, they mask what’s on your screen from passersby whenever you leave your desk. Second, they’re kind of fun.
When you click a module’s name in the Screen Saver list, you see a mini version of it playing back in the preview screen. Click the preview to give the module a dry run on your full screen. When you’ve had enough of the preview, just move the mouse or press any key. You return to the Screen Saver panel.
In Mountain Lion, the Screen Saver module has been given a deep cleaning and an architectural overhaul. It now offers two categories of screen savers.
At the top of the scrolling list of icons at left, Apple has installed 14 “slideshows”—attractive animations that gracefully fling photos around in different show-offy ways—that began life in programs like iPhoto.
At right, use the Source pop-up menu to specify which photos you want included in the slideshow. You can use any of the photo sets that Apple provides (National Geographic, Aerial, Cosmos, Nature Patterns); you can choose Choose Folder to specify some photos of your own from a folder on your Mac; or you can choose Photo Library to see a list of your iPhoto or Aperture albums. Each creates an amazingly dramatic, almost cinematic experience, worthy of setting up to “play” during dinner parties like the lava lamps of the ’70s.
“Shuffle slide order,” of course, scrambles the photo sequence so that it’s different every time. Wouldn’t want you to get bored staring at your screen, now.
Beneath the list of slideshows, you’ll find the icons for seven more traditional, non-photographic slideshow displays. Each has options worth exploring. For example:
Flurry. Flaming, colorful, undulating arms of fire, which resemble a cross between an octopus and somebody arc welding in the dark. If you click Screen Saver Options, you can control how many streams of fire appear at once, the thickness of the arms, the speed of movement, and the colors.
Arabesque. Patterns of small circles that come and go, shrink and grow; drugged-out randomness.
Shell. Five swirling fireworksy spinners, centered around a bigger one.
Message. The Apple logo and the computer’s name, faintly displayed on the monitor. (These elements shift position every few minutes.) Lets corporate supervisors glance over at the screens of unattended Macs to find out which employees aren’t at their desks.
iTunes Artwork. This module builds a gigantic mosaic of album art from your music collection. The tiles periodically flip around, just to keep the image changing. (The Options button lets you specify how many rows of album-art squares appear, and how often the tiles flip.)
Word of the Day. A parade of interesting words drawn from the Dictionary program. You’re invited to tap the D key to open the dictionary to that entry to read more. Build your word power!
Random. The Mac chooses a different screen saver each time. Surrender to the power of chance!
No matter which screen-saver mode you choose, you can also turn on “Show with clock.” This option superimposes the current time on whatever screen saver you’ve selected. You’d be surprised at how handy it can be to use your Mac as a giant digital clock when you’re getting coffee across the room.
You can control when your screen saver takes over your monitor in a couple of ways:
After a period of inactivity. Using the “Start after” pop-up menu, you can set the amount of time that has to pass without keyboard or mouse activity before the screen saver starts. The duration can be as short as 1 minute or as long as 1 hour, or you can choose Never to prevent the screen saver from ever turning on by itself.
When you park your cursor in the corner of the screen. If you click the Hot Corners button, you can turn each corner of your monitor into a hot corner (Figure 15-10).
If you work in a business, or in a nosy family, it might be worth noting here that you can set things up so that your password is required to exit the screen saver. Visit System Preferences→Security & Privacy, and turn on “Require password immediately after sleep or screen saver begins.”
