
If you travel with a laptop, you know the drill. You’re constantly opening up System Preferences→Network so you can switch between Internet settings: Ethernet at the office, WiFi at home. Or maybe you simply visit the branch office from time to time, and you’re getting tired of having to change the local access number for your ISP each time you leave home (and return home again).
The simple solution is the ![]() →Location submenu, which appears once you’ve set
up more than one Location. As Figure 10-7 illustrates, all
you have to do is tell it where you are. OS X handles the details of
switching Internet connections.
→Location submenu, which appears once you’ve set
up more than one Location. As Figure 10-7 illustrates, all
you have to do is tell it where you are. OS X handles the details of
switching Internet connections.
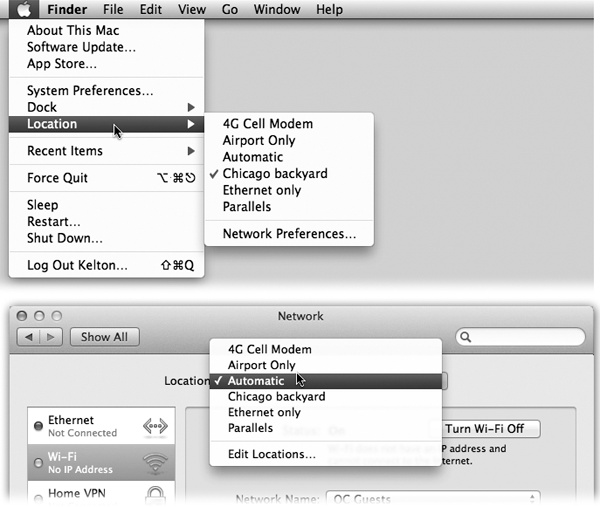
Figure 10-7. The Location feature lets you switch from one “location” to
another just by choosing its name—either from the ![]() menu (top) or from this pop-up menu in System
Preferences (bottom). The Automatic location just means “the
standard, default one you originally set up.” (Don’t be fooled:
Despite its name, Automatic isn’t the only location that offers
multihoming, described earlier in this chapter.)
menu (top) or from this pop-up menu in System
Preferences (bottom). The Automatic location just means “the
standard, default one you originally set up.” (Don’t be fooled:
Despite its name, Automatic isn’t the only location that offers
multihoming, described earlier in this chapter.)
To create a Location, which is nothing more than a set of memorized settings, open System Preferences, click Network, and then choose Edit Locations from the Location pop-up menu. Continue as shown in Figure 10-8.
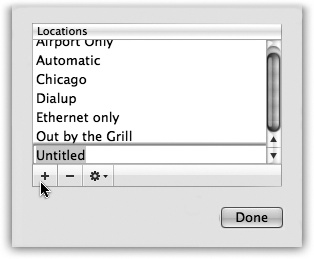
Figure 10-8. When you choose Edit Locations, this list of existing
Locations appears; click the ![]() button. A new entry appears at the bottom
of the list. Type a name for your new location, such as Chicago
Office or Dining Room Floor.
button. A new entry appears at the bottom
of the list. Type a name for your new location, such as Chicago
Office or Dining Room Floor.
When you click Done, you return to the Network panel. Take this opportunity to set up the kind of Internet connection you use at the corresponding location, just as described on the first pages of this chapter.
If you travel regularly, you can build a list of Locations, each of which “knows” the way you like to get online in each city you visit.
A key part of making a new Location is putting the various Internet connection types (Ethernet, Wi-Fi, Modem, Bluetooth) into the correct order. Your connections will be slightly quicker if you give the modem connection priority in your Hotel setup, the WiFi connection priority in your Starbucks setup, and so on.
You can even turn off some connections entirely. For example,
if you use nothing but a cable modem when you’re at home, you might
want to create a location in which only the
Ethernet connection is active. Use the Make Service Inactive command
in the ![]() menu.
menu.
Conversely, if your laptop uses nothing but WiFi when you’re on the road, your Location could include nothing but the Wi-Fi connection. You’ll save a few seconds each time you try to go online, because your Mac won’t bother hunting for an Internet connection that doesn’t exist.
Once you’ve set up your various Locations, you can switch
among them using the ![]() →Location submenu, as shown in Figure 10-8. As soon as
you do so, your Mac is automatically set to get online the way you
like.
→Location submenu, as shown in Figure 10-8. As soon as
you do so, your Mac is automatically set to get online the way you
like.
Tip
If you have a laptop, create a connection called Offline. From the Show pop-up menu, choose Network Port Configurations; make all the connection methods in the list inactive. When you’re finished, you’ve got yourself a laptop that will never attempt to go online. It’s the laptop equivalent of Airplane Mode on a cellphone.