
Here’s another gift to you from the iPhone: Reminders. It’s a program that not only records your life’s little tasks, but also reminds you about them when the time comes. If you have a laptop, Reminders can even remind you about something based on where you are, just as it does on the iPhone and iPad. For example, it can remind you to feed your cats when you arrive home each day—or it can ask you if you’ve turned off the gas burners when you leave your vacation house.
If you have an iCloud account, your reminders sync across all your gadgets. Create or check off a task on your iPhone, and you’ll also find it created or checked off on your Mac, iPhone, iPad, iPod Touch, or PC. (Yes, you can get iCloud syncing on your PC. See www.apple.com/icloud/setup/pc.html).
The iCloud account also explains why the location feature is useful even if you have a desktop Mac that doesn’t move around a lot. You can program a reminder on your Mac—and your phone or tablet will alert you when you move into or away from a specified place.
Tip
If you have an iPhone—oh, wow. Siri and Reminders are a match made in heaven. “Remind me to file the Jenkins report when I get to work.” “Remind me to set the TiVo for tonight at 8.” “Remind me about Timmy’s soccer game a week from Saturday.” “Add waffles to my Groceries list.” Speech recognition rocks when it comes to leaving notes for yourself. And iCloud will take care of copying each reminder from one to the other.
Once you’ve opened Reminders (Figure 16-26), you record a
new task by clicking the ![]() button in the upper right, or choose File→New Reminder (⌘-N). A
new blank line appears in your list. Type your reminder.
button in the upper right, or choose File→New Reminder (⌘-N). A
new blank line appears in your list. Type your reminder.
Later, as you go through life completing tasks, click the checkbox next to each one. Doing that makes the item seem to disappear—but in fact, it whips into a separate list called Completed (the top of the list, shown in Figure 16-26).
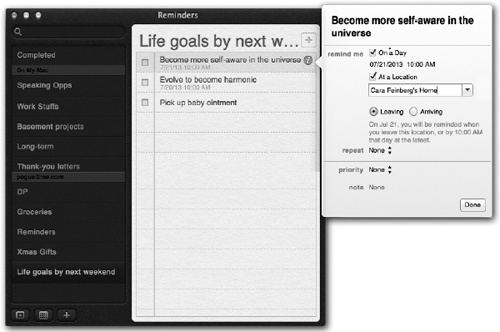
Figure 16-26. To open the Details panel, double-click the reminder item in
the list, or click the ![]() button to its right. Here, you can make
your reminder pop up at a certain time or place, create an
auto-repeating schedule for it, assign a priority level to it, or
just type in some notes about it. To close the panel, click
Done or click anywhere else in Reminders.
button to its right. Here, you can make
your reminder pop up at a certain time or place, create an
auto-repeating schedule for it, assign a priority level to it, or
just type in some notes about it. To close the panel, click
Done or click anywhere else in Reminders.
If you double-click an item’s name (or click its
![]() button), you open the Details bubble. See
Figure 16-26.
button), you open the Details bubble. See
Figure 16-26.
Here are the options you’ll find:
On a Day. Reminders can remind you at a certain time on a certain date. In the Details bubble, next to “remind me,” turn on On a Day. The proposed time is the next “o’clock”—if it’s 12:15 now, the app suggests 1:00. But you can tap the date to open a clickable mini-calendar (to change the date), or click the digits of the time to edit them.
At a location. If you turn on this checkbox, your Mac or phone will use its location circuits to remind you when you arrive at or depart from a certain place. (Your laptop will remind you, if it’s within a WiFi hotspot. But more often, this option will be useful if you have an iPhone or iPad that’s on the same iCloud account. Record the reminder on your Mac—receive the reminder on your phone.)
The little pop-up menu here proposes Current Location—wherever you are at the moment. That’s handy if, for example, you’re dropping off your dry cleaning and want to remember to pick it up the next time you’re driving by.
But you can tap that line to specify Home (your home address, as you’ve set it up in Contacts). You can also start typing any city name, or the name of any person in your Contacts whose address you’ve specified.
The final step is to tap either Leaving or Arriving. Later, your gadgets will remind you at the appointed time, or as you approach (or leave) the appointed address. It’s fairly mind-blowing the first few times it happens.
Repeat. Reminders can remind you about things that recur in your life, like quarterly tax payments, haircuts, and anniversaries. Tap Repeat if you want this reminder to appear every day, week, two weeks, month, or year. (This option appears only if you’ve turned on the On a Day option.)
Priority. Tap here to specify High, Medium, or Low priority—or None. You’ll see one, two, or three exclamation marks (!!!) next to each item in your Reminders list, indicating its urgency.
Notes. Here’s a handy place where you can record freehand notes about this item: an address, a phone number, details of any kind.
Click Done to close the Details bubble and record your changes.
As you now know, Reminders can give you warnings of upcoming deadlines and to-do items. You don’t have to wait until it gives you a reminder, though.
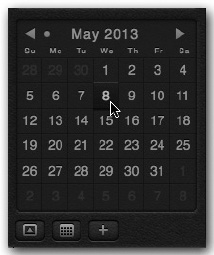
Below the list of lists, you’ll see a tiny ![]() icon. Click it to view the mini-calendar; see Figure 16-27.
icon. Click it to view the mini-calendar; see Figure 16-27.
Handily enough, you can create more than one to-do list, each with its own name: a Groceries list, Kids’ Chores, a running tally of expenses, and so on. Here’s a great way to log what you eat if you’re on a diet, or to keep a list of movies people recommend.
If you share an iCloud account with another family member, you might create a different Reminder list for each person. (Of course, now you run the risk that your spouse might sneakily add items to your to-do list!)
If you have an Exchange account, one of your lists can be synced to your corporate Tasks list. It doesn’t offer all the features of the other lists in Reminders, but at least it’s kept tidy and separate. (Just set up your Exchange account in System Preferences→Mail, Contacts & Calendars.)
The list of lists is the dark-gray panel at the left side of
Reminders; it’s visible in Figure 16-26. If you don’t
see it—if you’re feeling a little listless—click the
![]() button at the lower-left corner of the
window.
button at the lower-left corner of the
window.
At the outset, the list of lists lists only two lists:
Completed and Reminders. But you can create others. Click the
![]() button at the bottom-left corner, or choose
File→New List. If you have any kind of online account set up, like
an iCloud account, you’ll then have to specify either On My Mac or
“[the account’s name]” from the submenu.
button at the bottom-left corner, or choose
File→New List. If you have any kind of online account set up, like
an iCloud account, you’ll then have to specify either On My Mac or
“[the account’s name]” from the submenu.
In any case, you’ve just made a new list called New List. Type to rename it to “Groceries list,” “Movies list,” whatever you like. (You can also get rid of a list by clicking it and then pressing the Delete key.)
Tip
You can view the contents of more than one list simultaneously. Just Shift-click the names of the lists you want in the left column; the right-side pane displays a unified, combined list of all their contents.
You can also open a list into a window of its own, just by double-clicking its name in the left column.
Once you’ve created some lists, you have two ways to switch among them:
You can assign a task to a different list by dragging it. Click any blank part of its line (not the text itself), and drag carefully onto the name of a different list in the List list at left.
Once you’ve set up a few reminders in Reminders, you’ll marvel as it gracefully integrates with the Notification Center when it wants your attention.
But the real power of Reminders becomes apparent when you see it auto-synchronize your to-do lists across other gadgets, like iPhones, iPads, iPod Touches, other Mountain Lion Macs, and even Windows PCs.
To give it permission for that kind of sharing, open System Preferences→iCloud and turn on the Calendars & Reminders checkbox.
Note, however, that Reminders can also coordinate with the to-do list features of Exchange and so-called CalDAV services (Yahoo is one). To set them up, open System Preferences→Mail, Contacts & Calendars. Tap the account you want (like Exchange or Yahoo); finally, turn the Calendars & Reminders switch On.
That should do it. Now your to-do lists are synced, both ways.
Tip
You can also export your lists as .ics files, which you can then import into Google Calendar or another program. Just click the list and then choose File→Export. You can also import an existing .ics file (from another computer, for example) into a Reminders list you’ve selected: it’s File→Import, of course.
By the way, you can also create lists that live only on your Mac and don’t get synced anywhere else.
To create such a list, click the ![]() button below the list of lists; from the
pop-up menu, choose On My Mac. Type a name for your new list, content that
anything you put there won’t get synced anywhere else.
button below the list of lists; from the
pop-up menu, choose On My Mac. Type a name for your new list, content that
anything you put there won’t get synced anywhere else.