
TextEdit is a basic word processor—but it’s not nearly as basic as people think it is. You can create real documents with real formatting, using style sheets, colors, automatic numbering and bullets, tables, and customized line spacing. You can even open, edit, and create Microsoft Word documents. If you had to, you could write a children’s book in TextEdit, and it would look pretty decent.
Better yet, TextEdit (Figure 16-29) is now a showcase for Mountain Lion’s iPaddish features, like full-screen mode, Auto Save, and Versions (see Chapter 4). It can also save your files into your iCloud locker, as described on Email.
And TextEdit works with OS X’s long list of built-in text-editing features: smart links, smart quotes, smart dashes, smart copy/paste, abbreviation expansion, auto–typo correction, data detectors, and so on. They’re all described in Chapter 5.
Tip
You can magnify the type size of a TextEdit document just the way you do on an iPhone or an iPad: by pinching or spreading. That is, spread two fingers on your trackpad to enlarge the type, or pinch on the trackpad to shrink it. Best. Tip. Ever.
The one confusing aspect of TextEdit is that it’s both a plain text editor (no formatting; globally compatible) and a true word processor (fonts, sizes, styles; compatible with other word processors). Here’s the scheme:
You can change a plain text document to a formatted one by choosing Format→Make Rich Text. The ruler appears automatically to remind you that a new world of formatting has just become available.
Conversely, you can change a formatted document (a Word file you’ve opened, for example) to a plain text document by choosing Format→Make Plain Text. An alert message appears to point out that you’re about to lose all formatting.
If you know what kind of document you always want to open, go to the TextEdit→Preferences dialog box; on the New Document tab, select Rich Text or Plain Text. That’s what you’ll get each time you choose File→New.

Tip
Here’s also where you can turn on smart links, smart quotes, smart dashes, and the other smart text-processing features described in Chapter 5.
As you begin typing, all the usual word processing rules apply, with a few twists:
Choose bold, italic, and font sizes using the new formatting toolbar. (You can still use the commands in the Format menu.) You can even create subscripts or superscripts, change the color of the text (Format→Font→Show Colors), and so on.
Common paragraph-alignment options—Align Left, Align Right, Center, Justify—are all available as toolbar buttons and also reside in the Format→Text submenu. Adjust the line spacing (single, double, or any fraction or multiple) using the Spacing pop-up menu in the toolbar.
The toolbar also offers automatic bulleting and numbering of paragraphs. Choose the style you prefer from the pop-up menu at the right end of the toolbar.
You can select several nonadjacent bits of text simultaneously. To pull this off, highlight your first piece of text by dragging, and then press ⌘ as you use the mouse to select more text. Bingo: You’ve highlighted two separate chunks of text.
When you’re done selecting bits of text here and there, you can operate on them en masse. For example, you can make them all bold or italic in one fell swoop. You can even use the Cut, Copy, and Paste commands, as described in the next section. When you cut or copy, the command acts upon all your selections at once.
You can also drag any one of the highlighted portions to a new area, confident that the other chunks will come along for the ride. All the selected areas wind up consolidated in their new location.
Similarly, you can use the Find command. To do that, choose Edit→Find→Find (or just press ⌘-F). Fill in the search box; the sought-for term appears highlighted everywhere in your document at once. (You can also search and replace, using the other commands in the Edit→Find submenu.)
If you Option-drag vertically, you can freely select an arbitrary column of text (not necessarily the entire page width). This technique is very useful when you want to select only one column in a multicolumn layout, or when you want to select the numbers in a list and format them all at once.
A style is a prepackaged collection of formatting attributes that you can apply and reapply with a click of the mouse (bold, 24-point Optima, double-spaced, centered, for instance). You can create as many styles as you need: chapter headings, sidebar styles, and so on. You end up with a collection of custom-tailored styles for each of the repeating elements of your document.
Once you’ve created your styles, you can apply them as you need them, safe in the knowledge that they’ll be consistent throughout the document. During the editing process, if you notice that you accidentally styled a headline using the Subhead style, you can fix the problem by simply reapplying the correct style.
Note
Unlike a real word processor, TextEdit doesn’t let you change a style’s formatting and thereby update every occurrence of it. Fortunately, you can search for all occurrences of a style and change them all simultaneously (see the facing page).
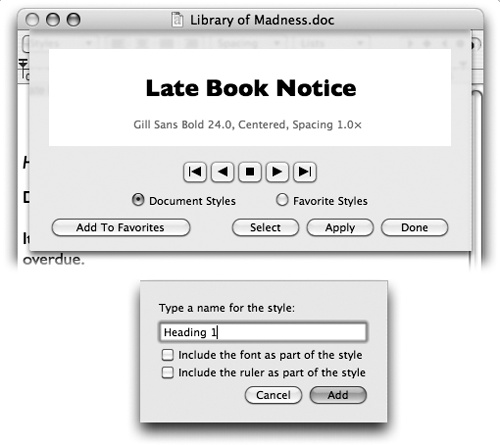
Creating a named style. To create a style, format some text so it looks the way you like it, complete with font, color, line spacing, tab settings, and so on.
Then, from the ¶ pop-up menu at the left end of the toolbar, choose Show Styles (Figure 16-30, top). Click Add to Favorites, type a name for the style, turn on both checkboxes (Figure 16-30, bottom), and then click Add.
Figure 16-30. Top: Highlight the text you want to format. Then, from the ¶ pop-up menu in the toolbar, choose Show Styles. With each click of the
 button, you summon a snippet of the
next chunk of formatting. When you find one you like, you can
either click Apply (to zap the highlighted text into
submission) or Add To Favorites (to reuse this canned style
later). In the latter case, you can give the new style a name
(bottom).
button, you summon a snippet of the
next chunk of formatting. When you find one you like, you can
either click Apply (to zap the highlighted text into
submission) or Add To Favorites (to reuse this canned style
later). In the latter case, you can give the new style a name
(bottom).Applying a style. Later, when you want to reuse the formatting you set up, highlight some text and then choose the appropriate name from the ¶ pop-up menu. TextEdit applies the formatting immediately.
Tip
If you simply click inside a paragraph, applying a style affects only paragraph attributes, like line spacing, tab stops, and alignment. If you highlight a random chunk of text instead, applying a style affects only character attributes, like the font and type size. If you highlight an entire paragraph, however, both text and paragraph formatting appear.
Deleting a style. To delete a superfluous style, choose Show Styles from the ¶ pop-up menu on the toolbar. Click the Favorite Styles button, choose the unwanted style’s name from the pop-up menu, and then click Remove From Favorites. (Deleting a style doesn’t affect any formatting that’s already in your document; it just removes the name from the Styles menu.)
Replacing all occurrences. You can highlight every occurrence of a certain style at once—and then change, copy, or delete them all at once.
To make this work, choose Show Styles from the ¶ pop-up menu. Choose the style you want to work on. (If “Document styles” is selected, click the
button to page through the styles; if
“Favorite styles” is selected, choose from the pop-up menu.)
Then click Select.In the little details sheet that appears, click the options you want, and then click Select. TextEdit highlights every occurrence of that style in the entire document (or selection). At this point, you can use any of the usual text-formatting controls to modify them all simultaneously.
Formatting by example. In TextEdit, you can also use Option-⌘-C and Option-⌘-V (Format→Font→Copy Style and Format→Font→Paste Style) to grab formatting from one place in your document and reuse it elsewhere. (Of course, you can’t apply styles in text-only documents.)
Tables can make life a heck of a lot easier when you want to create a resumé, agenda, program booklet, list, multiple-choice test, Web page, or another document where numbers, words, and phrases must be aligned across the page. In the bad old days, people did it by pressing the Tab key to line up columns—a technique that turned into a nightmare as soon as you tried to add or delete text. But using a word processor’s table feature is light-years easier and more flexible, because each row of a table expands to contain whatever you put into it. Everything else in its row remains aligned.
Tip
Tables are sometimes used for designing Web pages. Even though you can’t see the table outlines, many a Web page is filled with columns of text that are aligned invisibly by tables. And now that TextEdit can save your work as an HTML document, it’s suddenly a viable candidate for designing basic Web pages.
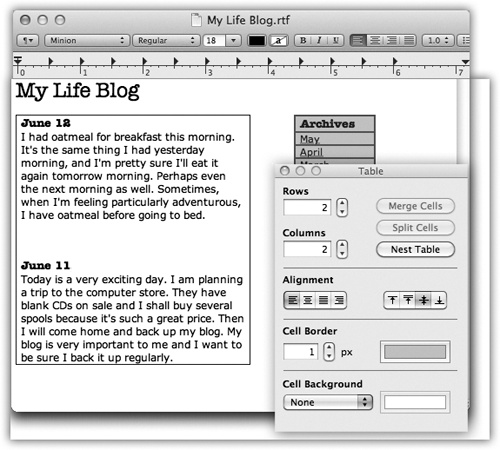
Create a table by choosing Format→Table. The floating Table palette appears (Figure 16-31). Use it to specify how many rows and columns you want. The placeholder table in your document adjusts itself in real time.
Format the table using the other controls in the Table palette. The Alignment controls let you specify how the text in the table cells hugs its border. Cell Border controls the thickness of the line around the selected cells’ borders (or, if you enter 0, makes the table walls invisible). The color swatch next to Cell Border specifies the color of the solid lines. The Cell Background controls let you color in the table cells with colors of your choice. (Choose Color Fill from the pop-up menu, and then click the color swatch.) This is an especially valuable option for Web designers.
Adjust the rows and columns by dragging the cell borders.
Merge two selected cells by clicking Merge Cells in the Table palette. Once you’ve done that, you can use the Split Cells button to split them apart again. (Split Cells doesn’t work except in cells you’ve previously merged.)
Nest one table inside a cell of another by clicking in the cell and then clicking Nest Table. Change the numbers in the Rows and Columns boxes to set up its dimensions (Figure 16-31).
The Table palette isn’t the only clue that Apple intends TextEdit to be a quick-and-dirty Web page design program. Consider these other tools:
You can easily add graphics to the page by dragging or pasting them into a document. The program understands TIFF, PICT, JPEG, and GIF formats.
You can add Web-style hyperlinks by highlighting “Click here” (or whatever the link says), choosing Edit→Add Link, and then entering the Web address in the resulting dialog box. Or just drag a link in from Safari, Mail, or another program. (To edit the link later, right-click it, and then choose Edit Link.)
To save a brand-new document as an HTML (Web page) file, choose File→Save; from the File Format pop-up menu, choose Web Page. (To save an existing TextEdit document as an HTML file, choose File→Duplicate and then File→Save; choose Web Page from the pop-up menu.)
Don’t miss the HTML options in TextEdit→Preferences. On the Open and Save tab, you can specify what kind of HTML document you want to produce, what cascading style sheets (CSS) setting you want, and whether or not you want TextEdit to include code to preserve blank areas (white space) in your layout.
Tip
When you open a Web page document—that is, an HTML document—TextEdit is faced with a quandary. Should it open up the page as though it’s a Web page, interpreting the HTML code as though it’s a browser? Or should it reveal the underlying HTML code itself?
Actually, that’s up to you. When you choose File→Open, turn on “Ignore rich text commands” to make the document open up as HTML code. (To make this change permanent, turn on the same checkbox on the Open and Save pane of the TextEdit→Preferences dialog box.)