
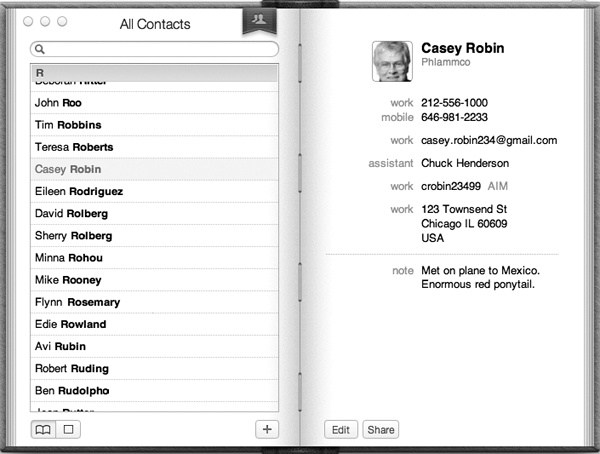
Contacts is OS X’s little-black-book program—an electronic Rolodex where you can stash the names, job titles, addresses, phone numbers, email addresses, and Internet chat screen names of all the people in your life. It can also hold related information, like birthdays, anniversaries, and any other tidbits of personal data you’d like to keep at your fingertips (Figure 11-14).
The best part: It’s centralized. This one address list appears everywhere: in Mail, Messages, and so on. And it synchronizes with your iPhone, iPad, and (via iCloud) your other computers.
Once you make Contacts the central repository of all your personal contact information, you can call up this information in a number of convenient ways:
You can open Contacts and then search for a contact by typing just a few letters in the search box.
Regardless of what program you’re in, you can use a single keystroke (the
 key on aluminum keyboards) to summon the
Contacts Dashboard widget. There you can search for any contact
you want. When you’re done, hide the widget with the same quick
keystroke.
key on aluminum keyboards) to summon the
Contacts Dashboard widget. There you can search for any contact
you want. When you’re done, hide the widget with the same quick
keystroke.When you’re composing messages in Mail, Contacts automatically fills in email addresses for you when you type the first few letters.
Tip
If you choose Window→Address Panel (Option-⌘-A) from within Mail, you can browse all your addresses without even launching the Contacts program. Once you’ve selected the people you want to contact, just click the To button to address an email to them—or, if you already have a new email message open, to add them to the recipients.
When you use Messages to chat with people in Contacts, the pictures you’ve stored of them automatically appear in chat windows.
The free iCloud service can synchronize your contacts to the Web so you can see them while you’re away from your Mac.
Contacts can sync with an iPod, iPhone, or iPad, giving you a “little black book” that fits in your shirt pocket, can be operated one-handed, and comes with built-in musical accompaniment. You can have that happen wirelessly, using iCloud, or wirefully, when you connect your iPod/iPhone/iPad to your Mac. (To set this up, open iTunes while your i-gadget is connected. Click the i-gadget’s icon; on the Contacts or Info tab, turn on Synchronize Contacts.)
You can find Contacts in your Applications folder or in the Dock.
The easiest way to add people to Contacts is to import them from another service, like Yahoo or Exchange, or another program, like Microsoft Outlook (for Mac) or Entourage.
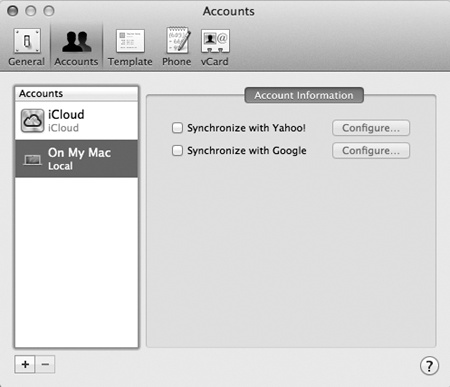
Contacts can synchronize its contacts with online Rolodexes that may be very important to you: your Gmail (Google) contacts, Yahoo contacts, iCloud address book, or your company’s Microsoft Exchange master address book (Figure 11-15).
In Contacts, choose Contacts→Preferences→Accounts. There, staring you in the face, are checkboxes that let you sync your contacts with iCloud, Yahoo, Google. Turn on the checkbox you want, click Configure, agree to the legalese, enter your account information, and boom—you’re done. Contacts is now synced with your online accounts. Change information in one place, and it’s also changed in the other. Even your contacts’ photos, if your online address book has them, show up in Contacts!
Tip
You can also enter this information in the Mail, Contacts & Calendars pane of System Preferences.
If some other online service maintains your address book,
Contacts can sync with it, too, as long as it uses one of the
standard sharing formats (Exchange, CardDAV, or Lightweight
Directory Access Protocol, known by the pros as LDAP). To teach
Contacts about those, choose Contacts→Preferences→Accounts. Click
the ![]() button in the lower left, enter your
account information on the resulting screen, click Create, and
away you go.
button in the lower left, enter your
account information on the resulting screen, click Create, and
away you go.
Note
Contacts may display an advanced Account Settings screen, where you have to enter more detailed information. If you’re a hands-on sort of nerd, you can also force this screen to open on your command. To do that, press Option and point to the Create button, which now says Continue. Click it.
Once you’ve set up a Contacts account, you can also change its settings, right there in the same Preferences dialog box. Specify how often you want your Mac to sync changes with the online account, for example.
Contacts can also slurp in contact info from other address-book or list programs, like Microsoft Outlook (Entourage), Palm Desktop, Excel, and others. Not directly, of course; that would be too easy. But most of those programs can export their information as an intermediary file in one of four popular formats: vCard, LDAP Interchange Format (LDIF), tab-delimited, or comma-separated value (CSV).
For example, Microsoft’s programs can export addresses as vCards; Thunderbird can export in LDIF format; Excel can export tab-delimited or CSV files.
It’s a fine art, this importing business; all kinds of things can go wrong. The fields (like Name, Street, Phone) may not be in the right order. Tab-separated export files may not have the right number of empty fields. And so on.
For best results, choose Contacts→Help, and search for “Importing contacts from other applications.” The resulting page gives special tips for each kind of export/import file format. (Fortunately, if the fields are out of order, Contacts will offer you the chance to straighten them out.)
Contacts exchanges contact information with other programs primarily through vCards. vCard is short for virtual business card. More and more email programs send and receive these electronic business cards, which you can identify by their .vcf file name extensions (if, that is, you’ve set your Mac to display these extensions).
If you ever receive an email with a vCard file attached, drag the .vcf file into your Contacts window to create an instant entry with a complete set of information. You can create vCards of your own, too. Just drag a name out of your Contacts and onto the desktop (or into a piece of outgoing mail).
Tip
In addition to letting you create vCards of individual entries, Contacts makes it easy to create vCards that contain several entries. To do so, ⌘-click the entries in the Name column that you want included, and drag them to the desktop. There they’ll appear all together as a single vCard. You can even drag an item from the Group page to the desktop to make a vCard that contains all the group’s entries.
Keep this trick in mind if you ever want to copy all your contacts from an old PC to a new Mac. By creating a single vCard containing all your contacts, you’ve made it trivial to import them into the copy of Contacts running on your new Mac.
Each entry in Contacts is called a card—like a paper Rolodex card, with predefined spaces to hold all the standard contact information.
To add a new person, choose File→New Card, press ⌘-N, or click
the ![]() button beneath the Name column. Then type in
the contact information, pressing the Tab key to move from field to
field, as shown in Figure 11-16.
button beneath the Name column. Then type in
the contact information, pressing the Tab key to move from field to
field, as shown in Figure 11-16.
Tip
If you find yourself constantly adding the same fields to new cards, check out the Template pane of Contacts’s Preferences (Contacts→Preferences). There you can customize exactly which fields appear for new cards.
Figure 11-16 shows some unusual fields that you can plug into your address cards. The phonetic first/last name fields (shown at top) let you store phonetic spellings of hard-to-pronounce names. There’s a Birthday field and a place to store the Twitter name, too. To add fields like these, choose from the Card→Add Field menu.
Each card also contains a free-form Note field at the bottom, where you can type any other random crumbs of information you’d like to store about the person (pet’s name, embarrassing nicknames, favorite Chinese restaurant, and so on).
When you create a new address card, you’re automatically in Edit mode, which means you can add and remove fields and change the information on the card. To switch into Browse mode (where you can view and copy contact information but not change it), click the Edit button or choose Edit→Edit Card (⌘-L). You can also switch out of Browse Mode in the same ways.
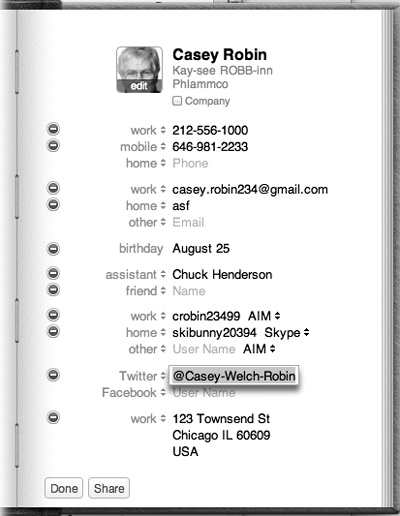
Figure 11-16. If one of your contacts happens to have three office phone extensions, a pager number, two home phone lines, a cellphone, and a couple of fax machines, no problem—you can add as many fields as you need. Each time you fill up a phone, email, chat name, or address box, a new, empty one magically sprouts up to accommodate another one. Click a field’s name to change its label; you can select one of the standard labels from the pop-up menu (Home, Work, and so on) or make up your own labels by choosing Custom.
You can also make new contacts right in Mail, saving you the trouble of having to type names and email addresses manually. Select a message in Mail, and then choose Message→Add Sender to Contacts (Shift-⌘-Y). Presto: OS X adds a new card to the Contacts, with the name and email address fields already filled in. Later, you can edit the card in Contacts to add phone numbers, street addresses, and so on.
A group is a collection of related address cards, saved under a single descriptive name (see Figure 11-17).
Organizing your contacts into groups can make them much easier to find and use—especially when your database of addresses climbs into the hundreds.
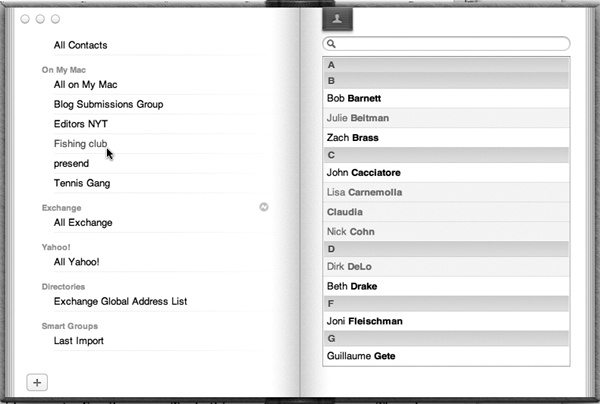
Figure 11-17. If you regularly send out a family newsletter to 35 relatives, you might gather the address cards of all your assorted siblings, cousins, nieces, nephews, uncles, and aunts into a single group called Family. When addressing an outgoing message using Mail, you can type this group name to reach all your kin at once.
Tip
When you send an email message to a group en masse, how does Mail know which email address to use for each person?
Because you’ve told it. In Contacts, choose Edit→Edit Distribution List. A special dialog box appears, listing everyone in each group, along with each person’s complete list of email addresses. (Use the tiny pop-up menu above the list to choose Phone or Address; that way, you can also indicate the preferred phone number and mailing address.) Just click the preferred email address to make it bold.
To see your groups, choose View→Groups, press ⌘-3, or click the red bookmark at the top of the page that shows individuals’ names.
To create a group, click the ![]() button at the bottom of the Group column in
the Contacts window, or choose File→New Group (Shift-⌘-N.) Type a
name for the newly spawned group icon in the Group column.
button at the bottom of the Group column in
the Contacts window, or choose File→New Group (Shift-⌘-N.) Type a
name for the newly spawned group icon in the Group column.
Now you have to fill up the group with the appropriate subset of names. There are three ways to do that:
To turn a set of address cards into a group very quickly when you’re in regular address-book mode (not Groups), select multiple entries from the Names column.
You can do that either by Shift-clicking the names (to make contiguous selections) or by ⌘-clicking (for noncontiguous selections)—and then choose File→New Group From Selection. You end up with a new group containing all the selected names.
While you’re on the Groups page, click All Contacts at the top of the screen. Now your full names list appears on the right page; drag them directly onto the group names to put them there.
If you’re not on the Groups page, drag contacts up onto the Groups bookmark at the top of the page—leave the mouse button down as Contacts shows you the Groups page—and continue dragging onto the group’s name.
Note
You’re not moving those names; in essence, you’re just creating aliases of them, just as you might put songs in different playlists in iTunes. The only exception is Exchange accounts; those names can exist in only one group or folder at a time.
Once you’ve created some groups, you can even add groups to other groups, as though you were nesting folders. You might find it useful to keep a Nieces group and a Nephews group, for example, but to keep both groups inside a master Family group. To do this, create the two groups. Then drag each onto the Family group. Now, whenever you select Family, you’ll see both Nieces and Nephews listed among the rest of the cards; double-click either group to see its members.
Tip
If, while viewing the list of groups, you Option-click someone’s name in the main list, Contacts shows you all the groups and folders that person belongs to.
The Finder has smart folders, Mail has smart mailboxes, and iTunes has smart playlists; inevitably, Contacts has smart groups.
Smart address groups, like smart folders in the Finder, automatically populate themselves with items that match criteria you specify. For example, you might create a smart group called “Apple Employees” that lists all your contacts with “apple.com” in their email addresses. Or when you visit Detroit, you could whip up a group that lists everyone you know who lives there.
To create a smart group, choose File→New Smart Group (Option-⌘-N). Then use the resulting dialog box (which looks a lot like Mail’s smart mailbox dialog box) to specify how you’d like the smart group to fill itself.
Once you’re done, you can use your new smart group much like you’d use a regular group. You can’t add contacts to a smart group yourself, but you can still send an email to all the members of a smart group, for example, or drag one to the Finder to create a composite vCard.
To take someone out of a group, first click the group name, and then click the person’s name in the Name column and press the Delete key. If you want to remove the person from Contacts itself, click Delete in the resulting dialog box. Otherwise, just click Remove from Group or press Return. Contacts keeps the card but removes it from the currently selected group.
You can dress up each Contacts entry with a photo. Whenever you’re editing somebody’s address book card, drag a digital photo—preferably 64 pixels square, or a multiple of that—onto the empty headshot square; the image shows up. Or double-click the picture well. Now you can choose from categories like Defaults (canned photos like animals and bugs); Recents (photos you’ve used recently); Camera (handy if this person is with you—take a new photo); and Linked (photos from online services like Facebook). Don’t miss the swirly button next to it, which lets you apply nutty Photo Boothish effects. At that point, you can enlarge, reposition, and crop the new photo. Click Done when you’re done.
You don’t necessarily have to use a photo, of course. You could add any graphic that you want to represent someone, even if it’s a Bart Simpson face or a skull and crossbones. You can use any standard image file format in an address card—JPEG, GIF, PNG, TIFF, or even PDF. You can drag any of these directly into one of the squares here.
From now on, if you receive an email from that person, the photo shows up right in the email message—even on your phone or iPad.
Tip
If you’ve got snapshots in iPhoto, it’s particularly easy to add a picture to any address card. Just drag a picture directly from the main iPhoto window to the picture frame on the address card to insert it.
To replace a photo on an address card, just drag a new image on top of the old one. If you want to get rid of an existing picture without replacing it, select the card, and then choose Card→Clear Custom Image (or, in Edit mode, select the picture and then press Delete).
Yes, there’s a little photo well on each card of your Contacts app. But here’s a wild guess: Most of yours are empty. After all: Who’s going to go to the trouble of hunting down headshots of 500 acquaintances, just so they fully illustrate their Contacts?
Fortunately, Mountain Lion stands ready to help. With one click, it can harvest headshots from the world’s largest database of names and faces: Facebook. (This assumes you’ve installed the fall 2012 software update that brings Facebook to Mountain Lion.)
Visit System Preferences→Mail, Contacts & Calendars (or “MCC,” as they call it at Apple). Click your Facebook account to see the magical button: Get Profile Photos. When you click it, Mountain Lion goes online for a massive research mission. Using your contacts’ names and phone numbers as matching criteria, it ventures off to Facebook, finds the profile photos of every one on your Contacts, and installs them into Contacts automatically.
Crazier still, it even grabs the headshots of people in your Contacts who aren’t your Facebook friends!
If you have already a photo for somebody, don’t worry; it doesn’t get replaced. Of course, you can switch to the new Facebook profile picture if you prefer. Use the Linked heading in the photo picker as described above.
You can search for a Contacts entry inside the currently selected group by typing a few letters of a name (or address, or any other snippet of contact information) in the search box. To search all your contacts instead of just the current group, click All Contacts in the Group list.
Tip
You can press ⌘-F to jump directly to the search field and start typing. Your savings: one mouse click.
With each letter you type, Contacts filters your social circle and displays the number of matches at the bottom. The matching records themselves appear in the Name column, the first of the matching card entries appears in the far-right pane, and the matching text itself appears highlighted in the matching card.
If Contacts finds more than one matching card, use the ↓ and ↑ keys, or Return and Shift-Return, to navigate through them.
Once you’ve found the card you’re looking for, you can perform some interesting stunts. If you click the label of a phone number (“home” or “office,” for example), you see the Show in Large Type option: Contacts displays the number in an absurdly gigantic font that fills the entire width of your screen, making it possible to read the number as you dial from across the room. You can also click the label of an email address to create a preaddressed email message, or click a home page to launch your Web browser and go to somebody’s site.
Tip
That same pop-up menu lists FaceTime. That is, you can begin a FaceTime video call right from the Contacts.
You can also copy and paste (or drag) address card info into another program or convert it into a Sticky Note.
Tip
Once you find a street address in your Contacts, you can find those coordinates on a map by right-clicking the address’s label and choosing Map This Address from the shortcut menu, as shown in Figure 11-18. Your Web browser obediently leaps up to display the address on a Google map.
You can’t do much to customize Contacts’s appearance, but the Preferences pane (Contacts→Preferences) gives you at least a couple of options in the General pane that are worth checking out:

Figure 11-18. The options that become available when you click the field labels on an address card vary according to field type. Pop-up menus let you send email, open a Web page, or view a map, depending on the type of field you’ve clicked. The Send Message command sends an iMessage to the phone number or email address whose label you’ve clicked—if, in fact, it’s an iMessage-registered number or address.
When you choose File→Print and click Show Details, the Style pop-up menu offers four ways to print whatever addresses are selected at the moment: mailing labels, envelopes, lists, or pocket booklets.
As you fiddle with the options presented, you get to see a miniature preview, right in the dialog box, that shows what you’re going to get.
No matter which mode you choose, the only cards that print are the ones that were selected when you chose File→Print. If you want to print all your cards, therefore, click All in the Group column before you print.
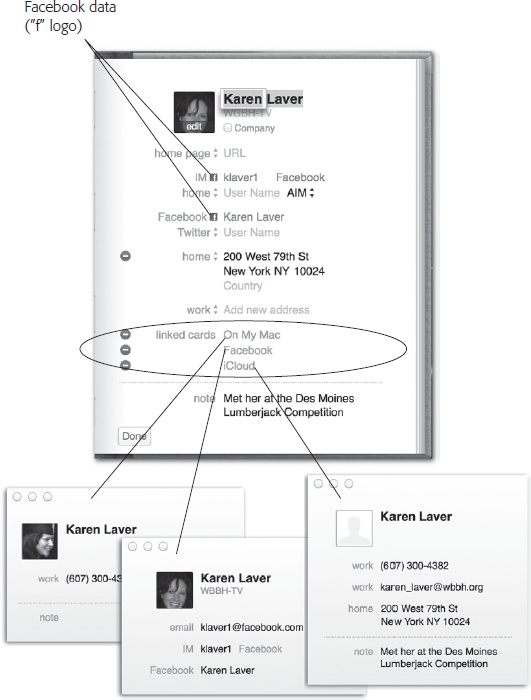
Figure 11-19. To see which accounts Contacts is combining for you for this person, scroll to the bottom of the card. There, the Linked Cards section shows you which cards have been unified. It might list, for example, On My Mac, Yahoo, and Facebook. In other words, this card’s underlying information comes from three different places: your Mac’s own Contacts list, your Yahoo address book, and this person’s Facebook page. You can click one of these gray links to open the corresponding, underlying card from just that service, as shown below.
Tip
You can combine the smart-groups feature with the printing features in one clever way: to print yourself a portable phone book when you’re heading off for a visit to a different city. That is, set up a smart group that rounds up everyone you know who lives in Chicago, and then print that as a pocket address book.
Contacts can sync up with different accounts. Yours might wind up containing several sets of names and numbers: one stored on your phone, one from an iCloud account, and a third from Facebook, for example.
As a favor to you, Contacts can display each person’s name only once in the master All Contacts list. If you click that name, you open up a unified card for that person. It includes all the details from all the underlying cards from that person, cleanly merged into a virtual combined card. See Figure 11-19 for details.
You can also unlink one of the cards: tap the
![]() button next to its account’s name (you’re
just unlinking, not deleting any card). For that matter, you can
manually link cards together, too. Select both (or several) by
⌘-clicking them. Then choose Card→Merge and Link Selected
Cards.
button next to its account’s name (you’re
just unlinking, not deleting any card). For that matter, you can
manually link cards together, too. Select both (or several) by
⌘-clicking them. Then choose Card→Merge and Link Selected
Cards.
Tip
It’s OK to manually link Joe Carnelia’s card with Joseph Carnelia’s card this way—they’re probably the same person. But don’t link up different people’s cards. The point is to make Contacts combine all the numbers, addresses, and so on onto a single card—which, for two different people, could get confusing fast.
Clearly, this stuff gets complex. But in general, Contacts tries to do the right thing. For example, if you edit the information on the unified card, you’re actually changing that information only on the card in the corresponding account. (Unless you add information to the unified card. In that case, the new data tidbit is added to all the underlying source-account cards.)