
Watching movies on your Mac screen couldn’t be simpler: Just insert a movie DVD. Unless you’ve fiddled with your preference settings, the DVD Player program opens and begins playing the movie in full-screen mode. (Even the menu bar disappears. To make it reappear, move your cursor to near the top of the screen.)
Note
If DVD Player doesn’t open automatically when you insert a DVD movie, you can open it yourself. It’s sitting there in your Applications folder. (Then fix the problem, using System Preferences CDs & DVDs.)
Once DVD Player starts playing your movie, you can move your mouse to the bottom of the screen, at any time, to bring up the control bar (Figure 9-18).
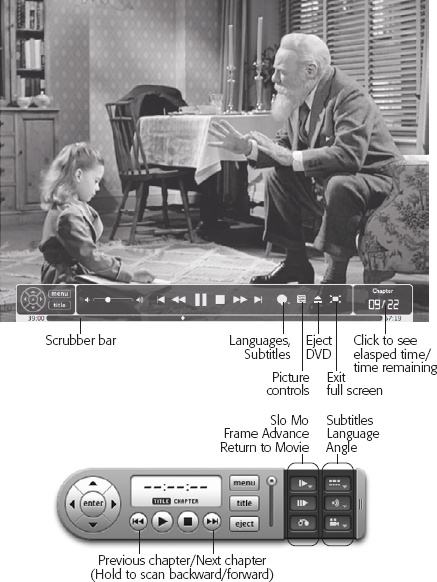
Figure 9-18. Top: Even in full-screen mode, you can control the playback and navigate the disc using the translucent, pop-up control bar. One especially cool feature is the Player Settings button. It opens the Zoom controls window shown here, which gives you manual control over the width and height of the picture on your screen. Don’t miss the scrubber bar at the very bottom, either. It lets you scroll directly to any spot in the DVD. Bottom: When you’re not in full-screen mode, you get a separate, floating “remote control.” It has most of the same controls, but they’re arranged with a more 1999 sort of design aesthetic.
Or just use the keyboard controls, which appear here in this clip ’n’ save cheat sheet:
Function | Keystroke |
|---|---|
Play, Pause | space bar |
Fast-forward, rewind | Shift-⌘-→, Shift-⌘-← (press repeatedly to cycle to 3, 8, 16, and 32 times normal speed) |
Skip forward/back 5 seconds | Option-⌘-→, Option-⌘-← |
Louder, quieter | ⌘-↑, ⌘-↓ |
Mute/Unmute | Option-⌘-↓ |
Next/previous “chapter” | →, ← |
Full-screen mode on/off | ⌘-F |
Half, normal, maximum size | ⌘-1, ⌘-2, ⌘-3 |
Eject | ⌘-E |
Add a bookmark | ⌘-= (equal sign) |
Most Hollywood DVDs have been programmed with onscreen subtitles to help those with hearing impairments and people sitting in noisy bars. The Subtitle button offers a pop-up menu of alternative languages and subtitle options.
A standard Hollywood DVD comes programmed with chapters—invisible markers that let you jump from the beginning of one important scene to the next. To see them in DVD Player, just move your mouse to the top of the screen. A row of chapter thumbnail images appears, which you can click to jump around in.
GEM IN THE ROUGH: Parental Controls
The DVD parental controls in Mountain Lion aren’t much. You can’t say, for example, “Don’t play anything rated PG-13 or above”; you have to rate each DVD yourself, one at a time.
But that’s better than nothing.
Insert the DVD you’re worried about. Choose File→Get Disk Info. Click the Parental Controls tab.
Click the ![]() button and enter your administrator’s
password. (Unless, of course, your 8-year-old is the administrator
of this Mac instead of you, in which case this DVD is the least of
your problems.)
button and enter your administrator’s
password. (Unless, of course, your 8-year-old is the administrator
of this Mac instead of you, in which case this DVD is the least of
your problems.)
Now you can select either “Always ask for authorization” or “Always allow to be played,” depending on your feelings about the movie. Click OK.
All you’ve done so far, however, is to specify what happens when you turn on parental controls—and you haven’t done that yet. Choosing Features→Enable Parental Control does the trick.
When parental control is turned on, nobody can watch the “Always ask for authorization” DVDs without correctly inputting your administrator’s password.
You can create your own scene thumbnails, too. That might not be an especially tempting feature when you’re playing Hollywood DVDs. But on homemade DVDs, made either by you or by somebody else, these custom scene markers can be handy signposts.
First choose Window→Chapters (⌘-B) to open the chapter thumbnail palette. Here you’ll find the existing scene breaks, which may or may not already have “poster frame” images.
All the action takes place in the Action menu
(![]() ) at the bottom of the panel. For example, it
contains the Generate Missing Thumbnails command, for use on DVDs
that have chapter breaks but no little poster frames to represent
them.
) at the bottom of the panel. For example, it
contains the Generate Missing Thumbnails command, for use on DVDs
that have chapter breaks but no little poster frames to represent
them.
Whether there’s a poster frame for a particular chapter or
not, you can substitute an image of your own. Find the exact frame
of the movie that you think looks better than what’s already in the
Chapters palette; click the chapter in the palette, and, from the
![]() pop-up menu, choose Use Current Frame for
Thumbnail. Presto: You’ve replaced the unhelpful (or nonexistent)
chapter image with one that works better.
pop-up menu, choose Use Current Frame for
Thumbnail. Presto: You’ve replaced the unhelpful (or nonexistent)
chapter image with one that works better.
Now, watching a movie while sitting in front of your Mac is not exactly the great American movie-watching dream. Fortunately, every recent Mac has a video-output jack; with the proper cables, you can connect the Mac to your TV for a much more comfortable movie-watching experience.
Of course, if you have an Apple TV, then you can pull off the same stunt without any wires at all, using AirPlay. Read on.