
The Utilities folder (inside your Applications folder) is home to another batch of freebies: a couple of dozen tools for monitoring, tuning, tweaking, and troubleshooting your Mac.
The truth is, you’re likely to use only about six of these utilities. The rest are very specialized gizmos primarily of interest to network administrators or Unix geeks who are obsessed with knowing what kind of computer-code gibberish is going on behind the scenes.
Tip
Even so, Apple obviously noticed that as the sophistication of OS X fans grows, more people open the Utilities folder more often. That’s why there’s a menu command and a keystroke that can take you there. In the Finder, choose Go→Utilities (Shift-⌘-U).
Activity Monitor is designed to let the technologically savvy Mac fan see how much of the Mac’s available power is being tapped at any given moment.
Even when you’re only running a program or two on your Mac, dozens of computational tasks (processes) are going on in the background. The top half of the dialog box, which looks like a table, shows you all the different processes—visible and invisible—that your Mac is handling at the moment.
Check out how many items appear in the Process list, even when you’re just staring at the desktop. It’s awesome to see just how busy your Mac is! Some are easily recognizable programs (such as Finder), while others are background system-level operations you don’t normally see. For each item, you can see the percentage of the CPU being used, who’s using it (either your account name, someone else’s, or root, meaning the Mac itself), whether or not it’s been written as a 64-bit app, and how much memory it’s using.
Or use the pop-up menu above the list to see views like these:
All Processes. This is the complete list of running processes; you’ll notice that the vast majority are little Unix applications you never even knew you had.
All Processes, Hierarchically. In Unix, one process launches another, creating a tree-like hierarchy. The big daddy of them all is the process called launchd. Here and there, you’ll see some other interesting relationships: For example, the Dock launches DashboardClient.
My Processes. This list shows only the programs that pertain to your world, your login. There are still plenty of unfamiliar items, but they’re all running to serve your account.
System Processes. These are the processes run by root—that is, opened by OS X itself.
Other User Processes. Here’s a list of all other processes—“owned” by neither root nor you. Here you might see the processes being run by another account holder, for example (using Fast User Switching), or people who have connected to this Mac from across a network or the Internet.
Active Processes, Inactive Processes. Active processes are the ones that are actually doing something right now; inactive are the ones that are sitting there, waiting for a signal (like a keypress or a mouse click).
Windowed Processes. Now this is probably what you were expecting: a list of actual programs with actual English names, like Activity Monitor, Finder, Safari, and Mail. These are the only ones running in actual windows, the only ones that are visible.
At the bottom of Activity Monitor, you’re offered five tabs that reveal intimate details about your Mac and its behind-the-scenes efforts (Figure 16-32):

Figure 16-32. The many faces of Activity Monitor. Top: It can be a graph of your processor (CPU) activity, your RAM usage at the moment, your disk capacity, and so on. For most people, only the processes listed here with tiny icons beside their names are actual windowed programs—those with icons in the Finder, the ones you actually interact with. Don’t miss the top-left Quit Process button. It’s a convenient way to jettison a locked-up program when all else fails. Bottom: If you double-click a process’s name, you get a two- or three-tab dialog box that offers stunningly complete reams of data (mostly of interest only to programmers) about what that program is up to. (The Open Files and Ports tab, for example, shows you how many files that program has opened, often invisibly.)
CPU. As you go about your usual Mac business, opening a few programs, playing QuickTime movies, playing a game, and so on, you can see the CPU graphs rise and fall, depending on how busy you’re keeping the CPU. You see a different bar for each of your Mac’s cores (independent subchips on your processor), so you can see how efficiently OS X is distributing the work among them.
Tip
You may also want to watch this graph right in your Dock (choose View→Dock Icon→Show CPU Usage) or in a bar at the edge of your screen (choose Window→Floating CPU Window→Horizontally).
Finally, there’s the View→Show CPU History command. It makes a resizable, real-time monitor window float on top of all your other programs, so you can’t miss it.
System Memory. Here’s a colorful graph that reveals the state of your Mac’s RAM at the moment.
The number below the graph shows how much memory is installed in your Mac. If, when your Mac is running a typical complement of programs, the Wired number plus the Active number nearly equals your total RAM amount, it’s time to consider buying more memory. You’re suffocating your Mac.
Disk Activity. Even when you’re not opening or saving a file, your Mac’s hard drive is frequently hard at work, shuffling chunks of program code into and out of memory, for example. Here’s where the savvy technician can see exactly how frantic the disk is at the moment.
Disk Usage. This little graph offers one of the quickest ways to check out how full your hard drive is. (If you have more than one drive—say, a flash drive, tape-backup drive, or whatever—choose another drive’s name from the pop-up menu.)
Network. Keep an eye on how much data is shooting across your office network with this handy EKG-ish graph.
You use the AirPort Utility to set up and manage AirPort base stations (Apple’s wireless WiFi networking routers).
If you click Continue, it presents a series of screens, posing one question at a time: what you want to name the network, what password you want for it, and so on. Once you’ve followed the steps and answered the questions, your AirPort hardware will be properly configured and ready to use.
This little program, formerly called Script Editor, is where you can type up your own AppleScripts, if you’re programmerly inclined.
This program has a split personality; its name is a description of its two halves:
Audio. When you first open Audio MIDI Setup, you see a complete summary of the audio inputs and outputs available on your Mac right now. It’s a lot like the Sound pane of System Preferences, but with a lot more geeky detail. Here, for example, you can specify the recording level for your Mac’s microphone, or even change the audio quality it records.
For most people, this is all meaningless, because most Macs have only one input (the microphone) and one output (the speakers). But if you’re sitting in your darkened music studio, which is humming with high-tech audio gear whose software has been designed to work with this little program, you’ll smile when you see this tab.
There’s even a Configure Speakers button, for those audiophilic Mac fans who’ve attached stereo or even surround-sound speaker systems to their Macs.
Tip
Using the
 menu at the bottom of the window, you
can turn your various audio inputs (that is, microphones, line
inputs, and so on) on or off. You can even direct your Mac’s
system beeps to pour forth from one set of speakers (like the one built
into your Mac), and all other sound, like music, through a
different set.
menu at the bottom of the window, you
can turn your various audio inputs (that is, microphones, line
inputs, and so on) on or off. You can even direct your Mac’s
system beeps to pour forth from one set of speakers (like the one built
into your Mac), and all other sound, like music, through a
different set.MIDI. MIDI stands for Musical Instrument Digital Interface, a standard “language” for inter-synthesizer communication. It’s available to music software companies who have written their wares to capitalize on these tools.
When you choose Window→Show MIDI Window, you get a window that represents your recording-studio configuration. By clicking Add Device, you create a new icon that represents one of your pieces of gear. Double-click the icon to specify its make and model. Finally, by dragging lines from the “in” and “out” arrows, you teach your Mac and its MIDI software how the various components are wired together.
One of the luxuries of using a Mac that has Bluetooth is the ability to shoot files (to colleagues who own similarly clever gadgets) through the air, up to 30 feet away. Bluetooth File Exchange makes it possible, as described on Via Bluetooth.
This program helps you create (or destroy) a partition of your hard drive to hold a copy of Microsoft Windows. Details in Chapter 8.
If you use ColorSync, then you probably know already that this utility is for people in the high-end color printing business. Its tabs include these two:
Profile First Aid. This tab performs a fairly esoteric task: repairing ColorSync profiles that may be “broken” because they don’t strictly conform to the ICC profile specifications. (ICC [International Color Consortium] profiles are part of Apple’s ColorSync color management system.) If a profile for your specific monitor or printer doesn’t appear in the Profiles tab of this program when it should, Profile First Aid is the tool you need to fix it.
Profiles. This tab lets you review all the ColorSync profiles installed on your system. The area on the right side of the window displays information about each ColorSync profile you select from the list on the left.
Console is a viewer for all of OS X’s logs—the behind-the-scenes, internal Unix record of your Mac’s activities.
Opening the Console log is a bit like stepping into an operating room during a complex surgery: You’re exposed to stuff the average person just isn’t supposed to see. (Typical Console entries: “kCGErrorCannotComplete” or “doGetDisplayTransferByTable.”) You can adjust the font and word wrapping using Console’s Font menu, but the truth is that the phrase “CGXGetWindowType: Invalid window -1” looks ugly in just about any font!
Console isn’t useless, however. These messages can be of significant value to programmers who are debugging software or troubleshooting a messy problem, or, occasionally, to someone you’ve called for tech support.
For example, your crash logs are detailed technical descriptions of what went wrong when various programs crashed, and what was stored in memory at the time.
Unfortunately, there’s not much plain English here to help you understand the crash, or how to avoid it in the future. Most of it runs along the lines of “Exception: EXC_BAD_ACCESS (0x0001); Codes: KERN_INVALID_ADDRESS (0x0001) at 0x2f6b657d.” In other words, it’s primarily for the benefit of programmers. Still, tech-support staff may occasionally ask to see the information in one of these logs.
DigitalColor Meter can grab the exact color value of any pixel on your screen, which can be helpful when matching colors in Web page construction or other design work. After launching the DigitalColor Meter, just point anywhere on your screen. A magnified view appears in the meter window, and the RGB (red-green-blue) color value of the pixels appears in the meter window.
Here are some tips for using the DigitalColor Meter to capture color information from your screen:
To home in on the exact pixel (and color) you want to measure, drag the Aperture Size slider to the smallest size—one pixel.
Press ⌘-X (View→Lock X) to freeze your cursor at its current horizontal position; you can now move it only horizontally. Or press ⌘-Y (View→Lock Y) to freeze your cursor at its current vertical position. You can also lock the cursor in both directions. (Press the keystroke again to unlock.) The idea is to make it easier for you to snap exactly the pixel you want.
When the Aperture Size slider is set to view more than one pixel, DigitalColor Meter measures the average value of the pixels being examined.
This important program serves two key functions:
It serves as OS X’s own little Norton Utilities: a powerful hard drive administration tool that lets you repair, erase, format, and partition disks. You’ll probably use Disk Utility most often for its Repair Permissions feature, which solves an uncanny number of weird little Mac glitches. But it’s also worth keeping in mind in case you ever find yourself facing a serious disk problem.
Disk Utility also creates and manages disk images, electronic versions of disks or folders that you can exchange electronically with other people.
The following discussion tackles the program’s two personalities one at a time.
Here are some of the tasks you can perform with this half of Disk Utility:
Repair folders, files, and programs that don’t work because you supposedly don’t have sufficient “access privileges.” This is by far the most common use of Disk Utility, not to mention the most reliable and satisfying. Using the Repair Disk Permissions button fixes an astonishing range of bizarre OS X problems, from programs that won’t open to menulets that freeze up the works.
Get size and type information about any disks attached to your Mac.
Fix disks that won’t appear on your desktop or behave properly.
Completely erase disks—including rewritable CDs and DVDs (such as CD-RW and DVD-RW discs).
Partition a disk into multiple volumes (that is, subdivide a drive so that its segments appear on the desktop with separate disk icons).
Set up a RAID array (a cluster of separate disks that acts as a single volume).
Note
Disk Utility can perform some of its magic on the startup disk—the disk that’s running OS X at the moment. For example, it can check the disk for damage, fix the permissions of the disk, or even adjust its partitions.
But any other operation, like reformatting, erasing, or actually repairing the disk, still requires the Mac to start up from a different disk (an external hard drive, for example, or Mountain Lion’s secret recovery partition). Otherwise, it’d be like a surgeon performing an appendectomy on himself—not a great idea.
The left Disk Utility panel lists your hard drive and any other disks in or attached to your Mac at the moment. When you click the name of your hard drive’s mechanism, like “500 GB Hitachi iC25N0…” (not the “Macintosh HD” volume label below it), you see a panel with five tabs, one for each of the main Disk Utility functions:
First Aid. This is the disk-repair part of Disk Utility, and it does a terrific job at fixing many disk problems. When you’re troubleshooting, Disk Utility should always be your first resort.
To use it, click the icon of a disk and then click either Verify Disk (to get a report on the disk’s health) or Repair Disk (which fixes whatever problems the program finds). In other words, First Aid attempts to perform the same healing effects on a sick hard drive as, say, a program like Norton Utilities.
If Disk First Aid reports that it’s unable to fix the problem, then it’s time to invest in a program like DiskWarrior (www.alsoft.com).
You may wind up using the Verify and Repair Disk Permissions buttons even more often. Their function is to straighten out problems with the invisible Unix file permissions that keep you from moving, changing, or deleting files or folders. (The occasional software installer can create problems like this.) You’d be surprised how often running one of these permission checks solves little OS X glitches.
Chapter 13 has a much more detailed discussion of permissions.
Erase. Select a disk, choose a format—always Mac OS Extended (Journaled), unless you’re formatting a disk for use on a Windows PC—give it a name, and then click Erase to wipe a disk clean.
POWER USERS’ CLINIC: Partition Adjustments on the Fly
You can expand, shrink, or create partitions without having to erase the whole hard drive. If you’re into partitioning at all, this is a huge convenience.
Expanding a partition. Suppose, for example, that your main hard drive has two partitions: a main one (200 gigs) and a secondary one (50 gigs) that used to hold all your photos and movies. But you’ve outgrown the second partition and have moved all those photos and movies to their own external hard drive. Wouldn’t it be nice to add the newly unoccupied 50 gigs to your main partition?
You can do that without having to erase the whole hard drive. (This process, however, nukes everything on the second partition, so make sure you’re prepared to lose it all.)
Open Disk Utility. Click the name of the hard drive (for example, “Hitachi HTS541616J9SA00”—not “Macintosh HD”). Click Partition. You see a display like the one in Figure 16-29.
Click the second partition (or third, or whatever partition is just after the one you want to expand) and then click the
 button below the list. Poof! It’s gone.
Now you can drag the main partition’s bottom edge downward (or type a new size into the Size box), expanding it into the free area. Take a deep breath, and then click Apply.
Shrinking a partition. In Figure 16-29, you can see that a portion of the first partition is lightly shaded. (It’s blue in real life.) The blue represents data; you can’t shrink a partition so much that it crowds out your files. You can, however, shrink the partition to eliminate empty space. Just drag the lower edge of its map chunk upward.
Creating new partitions. Anytime there’s leftover space on the drive, you can create new partitions from it. To do that, click the
 button, and proceed as described in
Figure 16-33.
button, and proceed as described in
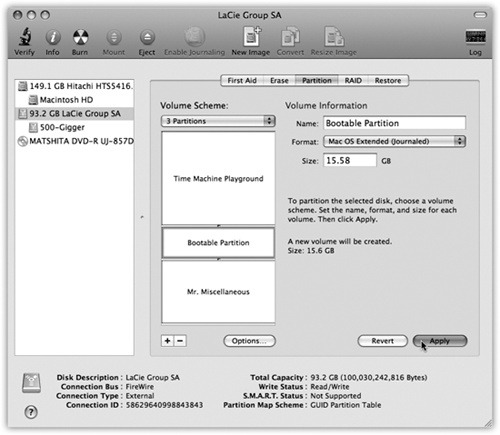
Figure 16-33.Partition. With the Partition tools, you can erase a hard drive in such a way that you subdivide its surface. Each chunk is represented on your screen by another hard drive icon (Figure 16-33).
Figure 16-33. Partitioning your drive with Disk Utility no longer involves erasing it completely. Select the drive you want to partition from the list on the left, and then click the Partition tab. Click the
button for each new partition you
want. Now drag the horizontal dividers in the Volumes
map to specify the relative sizes of the partitions you want
to create. Assign a name and a format for each partition in
the Volume Information area, and then click Apply.There are some very good reasons not to partition a drive these days: A partitioned hard drive is more difficult to resurrect after a serious crash, requires more navigation when you want to open a particular file, and offers no speed or safety benefits.
On the other hand, there’s one very good reason to do it: Partitioning is the only way to use Boot Camp, described in Chapter 8. When you’re using Boot Camp, your Mac is a Mac when running off of one partition, and a Windows PC when starting up from another one. (But you don’t use Disk Utility in that case; use Boot Camp Assistant.)
RAID. RAID stands for Redundant Array of Independent Disks and refers to a special formatting scheme in which a group of separate disks are configured to work together as one very large, very fast drive. In a RAID array, multiple disks share the job of storing data—a setup that can improve speed and reliability.
Most Mac owners don’t use or set up RAID arrays, probably because most Mac owners have only one hard drive (and Disk Utility can’t make your startup disk part of a RAID array).
But if you’re using multiple hard disks—in a Mac Pro, for example—you can use Apple RAID to merge them into one giant disk. Just drag the icons of the relevant disks (or disk partitions) from the left-side list of disks into the main list (where it says, “Drag disks or volumes here to add to set”). Use the RAID Type pop-up menu to specify the RAID format you want to use. (Stripe is a popular choice for maximizing disk speed; Mirror RAID is extra safe, because it creates a perfect backup clone of your main drive.) Name your new mega-disk, and then click Create. The result is a single “disk” icon on your desktop that actually represents the combined capacity of all the RAID disks.
Restore. This tab lets you make a perfect copy of a disk or a disk image, much like the popular shareware programs Carbon Copy Cloner and SuperDuper. You might find this useful when, for example, you want to make an exact copy of your old Mac’s drive on your new one. You can’t do that just by copying your old files and folders manually. If you try, you won’t get the thousands of invisible files that make up OS X. If you use the Restore function, though, they’ll come along for the ride.
Start by dragging the disk or disk image you want to copy from into the Source box. Then drag the icon of the disk you want to copy to into the Destination box.
Tip
If you want to copy an online disk image onto one of your disks, you don’t have to download it first. Just type its Web address into the Source field.
If you turn on Erase Destination, then Disk Utility obliterates all the data on your target disk before copying the data. If you leave this checkbox off, however, Disk Utility simply copies everything onto your destination, preserving all your old data in the process (although it replaces files that have the same names and locations as the ones you’re copying).
Finally, click the Restore button. (You might need to type in an administrator password.) Restoring can take a long time for big disks, so go ahead and make yourself a cup of coffee while you’re waiting.
Disk images are very cool. Each one is a single icon that behaves precisely like an actual disk—a flash drive or hard drive, for example—but can be distributed electronically. For example, a lot of OS X apps arrive from your Web download in disk-image form, as shown below.
Disk images are popular for software distribution for a simple reason: Each image file precisely duplicates the original master disk, complete with all the necessary files in all the right places. When a software company sends you a disk image, it ensures that you’ll install the software from a disk that exactly matches the master disk.
As a handy bonus, you can password-protect a disk image, which is the closest OS X comes to offering the ability to password-protect an individual folder.
It’s important to understand the difference between a disk-image file and the mounted disk (the one that appears when you double-click the disk image). If you flip back to Disk images (.dmg files) and consult Figure 4-2, this distinction should be clear.
Tip
After you double-click a disk image, click Skip in the verification box that appears. If something truly got scrambled during the download, you’ll know about it right away—your file won’t decompress correctly, or it’ll display the wrong icon, for example.
In fact, you can make Disk Utility always skip that verification business, which is a relic from the days of floppy disks. To do so, choose Disk Utility→Preferences, and turn off “Check images on locked media.”
GEM IN THE ROUGH: The Sparse Image
One of the coolest Disk Utility features is also one of the most buried.
Turns out you can make a nice, hermetically sealed, password-protected disk image that starts out small but magically increases as you stuff more files into it. If the usual disk image is like a steel bucket—a fixed size forever—a sparse image is like an accordion file folder.
Choose File→New→Blank Disk Image. In the resulting dialog box, name the file you’re creating (which you’ll double-click to make the virtual disk appear), as well as the virtual disk itself.
From the Volume Size pop-up menu, choose the maximum size this disk image will ever be. The beautiful part is that it will probably never occupy that much disk space; it starts out small and slowly expands only as necessary. But you’re setting the maximum here.

From the Encryption pop-up menu, choose one of the two scrambling methods that will password-protect your disk image. Finally, from the Image Format pop-up menu—this is the key step—choose “sparse bundle disk image.”
Click Create. Make up a password (type it twice); store in your Keychain, if you like (meaning you won’t need to enter the password whenever you are logged into your Mac). Then click Create.
Now, on your desktop, there’s a disk image file with the suffix “.sparseimage.” It occupies only 26 MB on your hard drive to start with.
Double-click it and enter your password to bring the actual virtual disk icon to your desktop. You can now start filling the disk image up with private stuff. The .sparseimage file will grow automatically to accommodate it—but only as necessary.
You can create disk images, too. Doing so can be very handy in situations like these:
You want to create a backup of an important CD. By turning it into a disk-image file on your hard drive, you’ll always have a safety copy, ready to burn back onto a new CD. (This is an essential practice for educational CDs that kids will be handling soon after eating peanut butter and jelly.)
You want to replicate your entire hard drive— complete with all its files, programs, folder setups, and so on—onto a new, bigger hard drive (or a new, better Mac), using the Restore feature described earlier.
You want to back up your entire hard drive, or maybe just a certain chunk of it, onto an iPod or another disk. (Again, you can later use the Restore function.)
You want to send somebody else a copy of a disk via the Internet. You simply create a disk image, and then send that— preferably in compressed form.
Here’s how to make a disk image.
To image-ize a disk or partition. Click the name of the disk in the list, where you see your currently available disks. (The topmost item is the name of your drive, like “484.0 MB MATSHITA DVD-R” for a DVD drive or “74.5 GB Hitachi” for a hard drive. Beneath that entry, you generally see the name of the actual partition, like “Macintosh HD,” or the CD’s name as it appears on the screen.)
Then choose File→New→Disk Image from [the disk or partition’s name].
To image-ize a folder. Choose File→New→Disk Image from Folder. In the Open dialog box, click the folder you want, and then click Image. Either way, the next dialog box (Figure 16-34) offers some fascinating options.
Image Format. If you choose “read/write,” your disk image file, when double-clicked, turns into a superb imitation of a hard drive. You can drag files and folders onto it, drag them off of it, change icons’ names on it, and so on.
If you choose “read-only,” however, the result behaves more like a CD. You can copy things off of it but not make any changes to it.
The “compressed” option is best if you intend to send the resulting file by email, post it for Web download, or preserve the disk image on some backup disk for a rainy day. It takes a little longer to create a simulated disk when you double-click the disk image file, but it takes up a lot less disk space than an uncompressed version.
Finally, choose “DVD/CD master” if you’re copying a CD or a DVD. The resulting file is a perfect mirror of the original disc, ready for copying onto a blank CD or DVD when the time comes.
Encryption. Here’s an easy way to lock private files away into a vault that nobody else can open. If you choose one of these two AES encryption options (choose AES-128, if you value your time), you’ll be asked to assign a password to your new image file. Nobody can open it without the password—not even you. On the other hand, if you save it into your Keychain (The Keychain), it’s not such a disaster if you forget the password.
Save As. Choose a name and location for your new image file. The name you choose here doesn’t need to match the original disk or folder name.

When you click Save (or press Return), if you opted to create an encrypted image, you’re asked to make up a password at this point.
Otherwise, Disk Utility now creates the image and then mounts it—that is, turns the image file into a simulated, yet fully functional, disk icon on your desktop.
When you’re finished working with the disk, eject it as you would any disk (right-click it and choose Eject, for example). Hang on to the .dmg disk image file itself, however. This is the file you’ll need to double-click if you ever want to recreate your “simulated disk.”
One of the other most common disk-image tasks is turning a disk image back into a CD or DVD—provided that your Mac has a CD or DVD burner, of course.
All you have to do is drag the .dmg file into the Disk Utility window, select it, and click the Burn icon on the toolbar (or, alternatively, right-click the .dmg icon and choose Burn from the shortcut menu). Insert a blank CD or DVD, and then click Burn.
Grab takes pictures of your Mac’s screen, for use when you’re writing up instructions, illustrating a computer book, or collecting proof of some secret screen you found buried in a game. You can take pictures of the entire screen (press ⌘-Z, which for once in its life does not mean Undo) or capture only the contents of a rectangular selection (press Shift-⌘-A). When you’re finished, Grab displays your snapshot in a new window, which you can print, close without saving, or save as a TIFF file, ready for emailing or inserting into a manuscript.
Now, as experienced Mac enthusiasts already know, the Mac operating system has long had its own built-in shortcuts for capturing screenshots: Press Shift-⌘-3 to take a picture of the whole screen, and Shift-⌘-4 to capture a rectangular selection. (See SnagIt (Screenshots) for all the details.)
Tip
Don’t forget that you can choose different, easier-to-remember keyboard shortcuts for these functions, if you like. Just open System Preferences→Keyboard→Keyboard Shortcuts, click Screen Shots, click where it now says Shift-⌘-3 (or whatever), and then press the new key combo.
So why use Grab instead? In many cases, you shouldn’t. The Shift-⌘-3 and Shift-⌘-4 shortcuts work like a dream. But there are some cases when it might make more sense to opt for Grab. Here are three:
Grab can make a timed screen capture (choose Capture→Timed Screen, or press Shift-⌘-Z), which lets you enjoy a 10-second delay before the screenshot is actually taken. After you click the Start Timer button, you have an opportunity to activate windows, pull down menus, drag items around, and otherwise set up the shot before Grab shoots the picture.
With Grab, you have the option of including the cursor in the picture, which is extremely useful when you’re showing a menu being pulled down or a button being clicked. (OS X’s screenshot keystrokes, by contrast, always eliminate the pointer.) Use the technique described in Figure 16-35 to add the pointer style of your choice to a Grab screenshot.
Tip
If you’re really going to write a book or manual about OS X, the program you need is Snapz Pro X; a trial version is available from this book’s “Missing CD” at www.missingmanuals.com. It offers far more flexibility.

This little unsung app is an amazing piece of work. It lets you create 2-D or 3-D graphs of staggering beauty and complexity.
When you first open Grapher, you’re asked to choose what kind of virtual “graph paper” you want: two-dimensional (standard, polar, logarithmic) or three-dimensional (cubic, spherical, cylindrical). Click a name to see a preview; when you’re happy with the selection, click Open.

Figure 16-36. In general, you type equations into Grapher just as you would on paper (like z=2xy). If in doubt, check the online help, which offers enough hints on functions, constants, differential equations, series, and periodic equations to keep the A Beautiful Mind guy busy for days.
Now the main Grapher window appears (Figure 16-36). Do yourself a favor. Spend a few wow-inducing minutes choosing canned equations from the Examples menu, and watching how Grapher whips up gorgeous, colorful, sometimes animated graphs on the fly.
When you’re ready to plug in an equation of your own, type it into the text box at the top of the window. If you’re not such a math hotshot, or you’re not sure of the equation format, work from the canned equations and mathematical building blocks that appear when you choose Equation→New Equation from Template or Window→Show Equation Palette (a floating window containing a huge selection of math symbols and constants).
Tip
If you don’t know the keystroke that produces a mathematical symbol like π or θ, you can just type pi or theta. Grapher replaces it with the correct symbol automatically.
Once the graph is up on the screen, you can tailor it like this:
To move a 2-D graph in the window, choose View→Move Tool and then drag; to move a 3-D graph, ⌘-drag it.
To rotate a 3-D graph, drag in any direction. If you add the Option key, you flip the graph around on one axis.
To change the colors, line thicknesses, 3-D “walls,” and other graphic elements, click the
 button (or choose Window→Show Inspector)
to open the formatting palette. The controls you find here vary
by graph type, but rest assured that Grapher can accommodate
your every visual whim.
button (or choose Window→Show Inspector)
to open the formatting palette. The controls you find here vary
by graph type, but rest assured that Grapher can accommodate
your every visual whim.To change the fonts and sizes, choose Grapher→Preferences. On the Equations panel, the four sliders let you specify the relative sizes of the text elements. If you click the sample equation, the Font panel appears, so you can go to town fiddling with the type.
Add your own captions, arrows, ovals, or rectangles using the Object menu.
When it’s all over, you can preserve your masterpiece using any of these techniques:
Export a graphic by choosing File→Export.
Copy an equation to the Clipboard by right-clicking it and choosing Copy As→TIFF (or EPS, or whatever) from the shortcut menu. Now you can paste it into another program.
Export an animated graph by choosing Equation→Create Animation. The resulting dialog box lets you specify how long you want the movie to last (and a lot of other parameters).
Finally, click Create Animation. After a moment, the finished movie appears. If you like it, choose File→Save As to preserve it on your hard drive for future generations.
Java is a programming language used by a lot of corporate programs. These apps can run on any kind of computer (Mac, Windows, Linux).
To run a Java program, you need a Java runtime (sort of a playback engine)—and Mountain Lion doesn’t come with one. So the first time you open Java Preferences, or any Java program, the Mac offers to download and install one.
In any case, Java Preferences contains a bunch of advanced settings that geeks can use to modify how Java runs on their Macs.
Keychain Access memorizes and stores all your secret information—passwords for network access, file servers, FTP sites, Web pages, and other secure items. For instructions on using Keychain Access, see The Keychain.
This little cutie automates the transfer of all your stuff from your old PC, or another Mac, to your current Mac: your Home folder, network settings, programs, and more. This comes in extremely handy when you buy a newer, better Mac—or when you need Time Machine to recover an entire dead Mac’s worth of data. (It can also copy everything over from a secondary hard drive or partition.) The instructions on the screen guide you through the process (see Appendix A).
Network Utility gathers information about Web sites and network citizens. It offers a suite of standard Internet tools like netstat, ping, traceroute, DNS lookup, and whois—advanced tools, to be sure, but ones that even Mac novices may be asked to fire up when calling a technician for Internet help.
System Information (formerly called System Profiler) is a great tool for learning exactly what’s installed on your Mac and what’s not—in terms of both hardware and software. The people who answer the phones on Apple’s tech-support line are particularly fond of System Profiler, since the detailed information it reports can be very useful for troubleshooting nasty problems.
There are three ways to open System Information. Two of them involve a preliminary visit to the new dialog box shown in Figure 16-37, which is a faster, better-designed, more consolidated view of the system information you might care most about.
Anyway, here are the three ways:
Slow. Choose
 →About This Mac. You get a bare-bones info screen
that reveals your OS X version, your Mac’s memory amount, and
what processor it has inside.
→About This Mac. You get a bare-bones info screen
that reveals your OS X version, your Mac’s memory amount, and
what processor it has inside.Tip
If you click your OS X version number twice in the About box, you get to see your Mac’s serial number!
If you then click More Info, you get the About This Mac details screen, shown in Figure 16-37. If that information isn’t all you need, then click System Report to open the actual System Information program.
Figure 16-37. This dialog box gives you a plain-English display of the Mac details you probably care the most about: memory, screen, storage, serial number, OS X version, and so on. (Click the tabs across the top for more details.) To proceed from here to the full System Information program, click System Report.
Medium. Burrow into your Applications→Utilities folder; double-click System Information.
Fast. Hold down the Option key, which makes the
→About This Mac command
change to say System Information. Choose
it, then proceed as shown in Figure 16-37.

When System Information opens, it reports information about your Mac in a list down the left side (Figure 16-38).
The details fall into these categories:
Hardware. Click this word to see precisely which model Mac you have, what kind of chip is inside (and how many), how much memory it has, and its serial number.
If you expand the flippy triangle, you get to see details about which Memory slots are filled and the size of the memory module in each slot; what kind of Disc Burning your Mac can do (DVD-R, DVD+R, and so on); what PCI Cards are installed in your expansion slots; what Graphics/Displays circuitry you have (graphics card and monitor); what’s attached to your SATA bus (internal drives, like your hard drive); what’s connected to your Thunderbolt, USB, and FireWire chains, if anything; and much more.
Network details what WiFi components you have, what Internet connection Locations you’ve established, and so on.
Software shows which version of OS X you have and what your computer’s name is, as far as the network is concerned (“Chris’s Computer,” for example).
The Applications list documents every program on your system, with version information. It’s useful for spotting duplicate copies of programs.
Tip
The right-hand column of the Applications list identifies each program as being PowerPC, Intel, or Universal. An Intel app runs only on Macs with Intel processors (that is, all of them since about 2006). A PowerPC program runs at full speed on pre-Intel Macs, but not at all in Mountain Lion. A Universal program can run natively—at full speed—on either Intel-based Macs or earlier models. This list is a handy summary of which programs have been updated for the Intel generation.

Figure 16-38. Does your MacBook’s chip run at 2 GHz or 2.6? What percentage of your external hard drive is filled up? What are the version numbers of every program installed on your Mac? Can your DVD burner burn dual-layer discs? Does your laptop have any open slots for extra RAM?
Similar information shows up in the Extensions panel. Extensions are the drivers for the Mac’s various components, which sit in the System→Library→Extensions folder. Whatever is in that folder is what you see listed in this panel. Other categories include self-explanatory lists like Fonts, Preference Panes, and Startup Items.
Finally, the Logs panel reveals your Mac’s secret diary: a record of the traumatic events that it experiences from day to day.
Tip
If any of these screens is showing you more technical information than you’d like, use the File→Show Less Information command to pare down the overload to just the human-recognizable items.
To create a handsomely formatted report that you can print or save, choose File→Export as Text, and then choose Rich Text Format from the File Format pop-up menu. Note, however, that the resulting report can be well over 500 pages long. In many cases, you’re better off simply making a screenshot of the relevant Profiler screen, as described on SnagIt (Screenshots), or saving the thing as a PDF file.
Underneath its shiny skin, OS X is actually Unix, one of the oldest and most respected operating systems in use today. But you’d never know it by looking; Unix is a world without icons, menus, or dialog boxes. You operate it by typing out memorized commands at a special prompt, called the command line. The mouse is almost useless here.
Wait a minute—Apple’s ultramodern operating system, with a command line?! What’s going on? Actually, the command line never went away. At universities and corporations worldwide, professional computer nerds still value the efficiency of pounding away at the little C: or $ prompts.
You never have to use OS X’s command line. In fact, Apple has swept it pretty far under the rug. There are, however, some tasks you can perform only at the command line.
Terminal is your keyhole into OS X’s Unix innards. There’s a whole chapter on it waiting for you on this book’s “Missing CD” page at www.missingmanuals.com.
For details on this screen-reader software, see VoiceOver.