
Once we know who we're creating the User Story Map for, the next step is to create our first User Journey.
For this step, we'll begin with some silent brainstorming. Each team member should have a sharpie and post-it notes. Depending on the size of our overall group, we'll either work in small groups or as individuals.
We will focus on our Primary Actor group to begin with. The first journey will be our Primary Actor's most traveled, that is, the one they will likely use the most.
The aim is to keep it simple. We sometimes call this particular user journey the Happy Path because it goes without hiccups from start to end.
We explain to the group that this activity will be focused on a particular outcome that our user wants to achieve. In this instance, the result our user wants is to purchase some new shoes.
We start by describing this outcome to the group and write it as a statement on the whiteboard or similar so that everyone in the room can see it. Next, we ask the group to think about the individual steps that our user will need to take to achieve this outcome. Each task should be written down on its own post-it note. The steps should be ordered from left to right as a timeline.
For example, the following shows a simple User Journey for the customer outcome purchase shoes via our online retail store:

The list of User Tasks represents a customers complete end-to-end User Journey. It begins with our customer opening a web browser and navigating to our website. It ends when their order is confirmed:
- Set the outcome with our group, for example: purchase shoes via our online store.
- Set a timebox of 15 minutes.
- Ask our team to work silently (unless in pairs or sub-groups) to create the User Journey task by task.
Once the timebox is up, ask everyone to stop working. We will then ask each person, pair, or sub-group to present their User Journey one at a time. Ideally, this will be by posting the User Journey onto a wall in the meeting room, or onto a large whiteboard. If neither of these is available, use the center of the table to lay out the timeline. Ask each person to place their timeline task by task from left to right.
When the first User Journey has been presented, ask the rest of our group to take turns to talk through theirs. Where a task is the same as, or very similar to, a task in the User Journey already presented, overlay the existing task. If the task completes a similar function but is an alternative way of accomplishing the task, place it on the timeline under the original task.
For example, the following diagram shows our User Journey example with two alternative flow tasks placed below the timeline of the main flow:
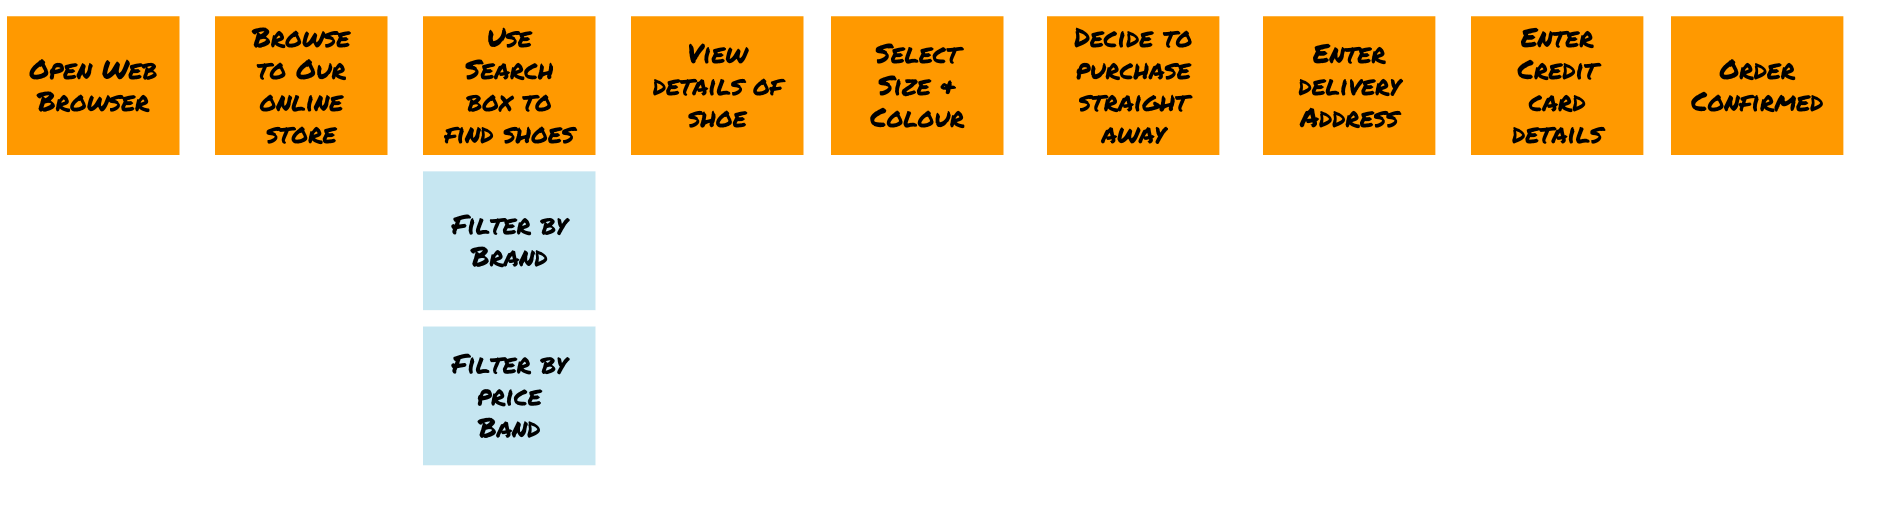
Filtering by brand or by price band are two alternative ways of finding shoes on our website, so we place both below the original to show they are variations of using the search facility.