Screen blending mode
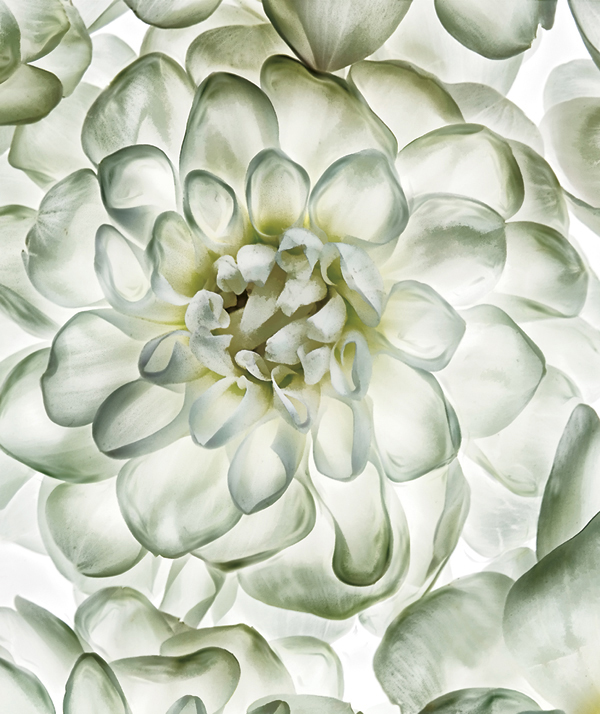
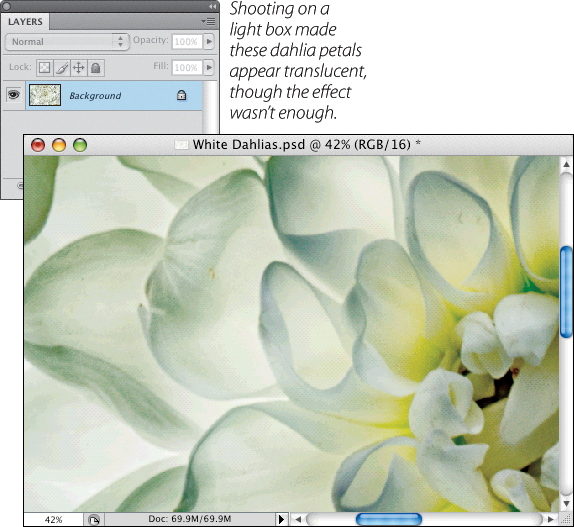
Finding some beautiful white dahlias blooming in my garden, I brought them into my studio and placed them on a light box. The back lighting heightened the transparent quality of the dahlias’ petals and made the flowers almost glow. I shot several sets of dahlia images, working with the exposures to make sure that I got a full dynamic range of lights and darks.
As I worked in Photoshop, in the post-production phase of my workflow, I kept the translucent aspect of the flower petals in mind. To add a sense of lightness to the petals of the dahlias, I used Screen blending mode and painstakingly painted in each petal on a layer mask, lightening the petals one by one. As I painted, I left the edges of the petals untouched. I liked the way the darker contrast looked, and the contrast at the edges also worked to make the petals appear more translucent.
200mm macro lens, two exposures (one at 3/5 of a second and one at 1/8 of a second), both exposures at f/16 and ISO 200, tripod mounted; exposures combined in Photoshop.
A group of blending modes can be used to lighten an image, either overall or selectively using a layer mask and painting. My favorite of the blending modes is Screen.
Technically speaking, in Screen blending mode Photoshop multiplies the opposite of each pixel of the layer being blended with the pixels beneath it. (Brain twister!) This kind of formula can be hard to comprehend until you see it visually. But all you really need to know is that Screen blending mode lightens everything, most often in a pleasing way.
I often use Screen blending mode in my photos to make large areas lighter and also to bring out selective details. One kind of situation in which this works well is when the foreground is too dark. You’ll often find that this occurs in landscapes just before sunset, or even after dark, when there is light in the sky but the landscape itself is quite dark.
While there is still color in the sky but the foreground landscape is very dark, I like to shoot a lighter exposure of the foreground if I can. Then I take my photos back to my studio with the plan of blending this foreground shot into the dark sky background using Screen blending mode, a layer mask, and the Brush and/or Gradient Tools.
If there is motion in the scene then this combination may not be easily possible, and I may have to settle for combining a layer with itself using Screen blending mode to selectively lighten the foreground area (or any other area in the photo that needs lightening).
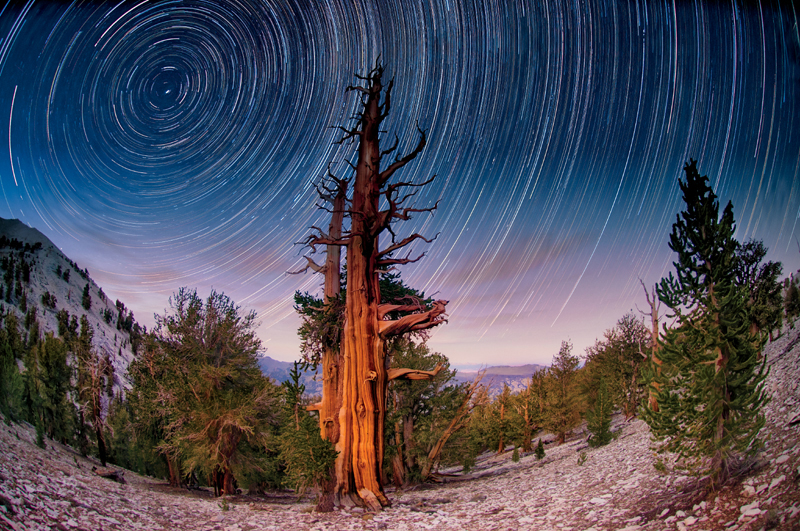
Shooting in the Patriarch Grove of ancient bristlecone pines in the White Mountains of eastern California, I came upon a tree standing tall in the landscape.
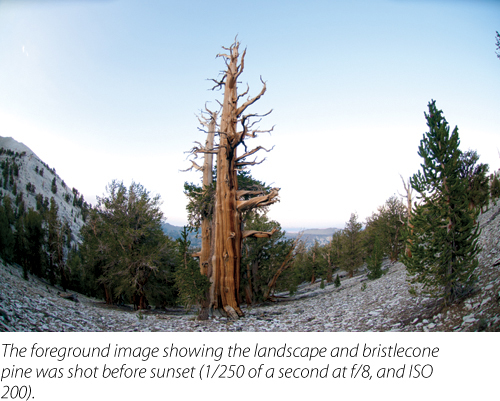
As I pre-visualized the photograph that I wanted to create, I decided to wait until after sunset to capture star trails whirling in the sky behind the pine tree.
Thinking further, I knew that the star trails would make the foreground—and tree—completely black, so I decided to shoot a lighter foreground image before sunset (top right).
My knowledge of post-processing with layers and masks—and the idea that I could combine these photographs later in Photoshop—informed my photography.
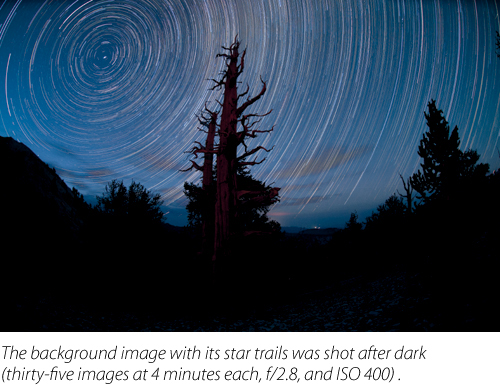
After the sun had set, I created the star circle composition (middle right) by shooting thirty-five 4-minute exposures. Back at my studio a few days later, I combined the thirty-five photos in a layer stack in Photoshop. The stacking program that I used to combine the photos essentially used the Lighten blending mode to find the lightest pixel in each point of the thirty-five photographs.
Once I had the star trail image, it was time to combine it with the photo I had shot for the foreground.
I combined the two images in a layer stack by copying the foreground photo into the image window containing the star trails image (bottom right). I named the newly copied, upper layer “Foreground.” (For details on copying a layer and making a layer stack, turn to page 44–45, steps 1‘7.)
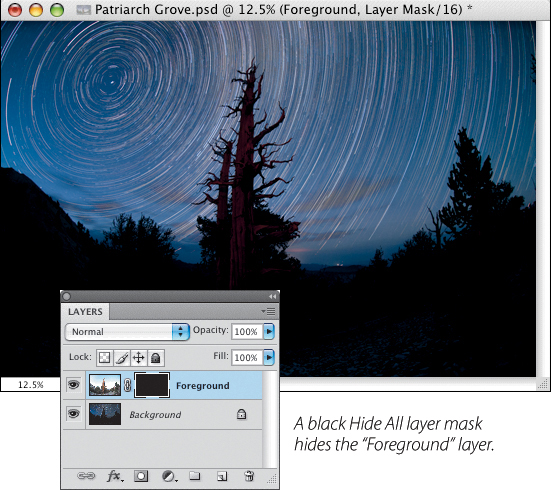
My next step was to select the “Foreground” layer in the Layers panel and add a black Hide All layer mask (page 45, step 2). This hid the “Foreground” layer and made the “Background” layer visible.
With the layer mask selected in the Layers panel, I selected the Gradient Tool, selected the Foreground to Background gradient from the Gradient Picker, and then dragged a white-to-black gradient from the bottom to the top on the layer mask (middle right). (For more about this technique, turn to page 61, steps 6‘9).
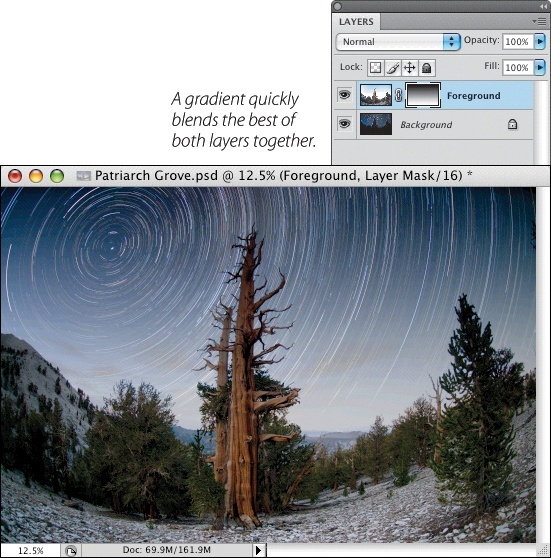
This seamlessly blended the two images, leaving the star trails from the “Background” layer visible and the trees and landscape from the “Foreground” layer visible.
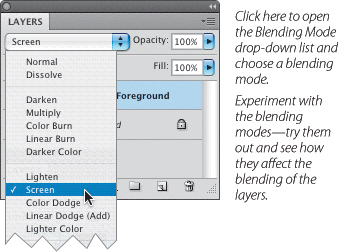
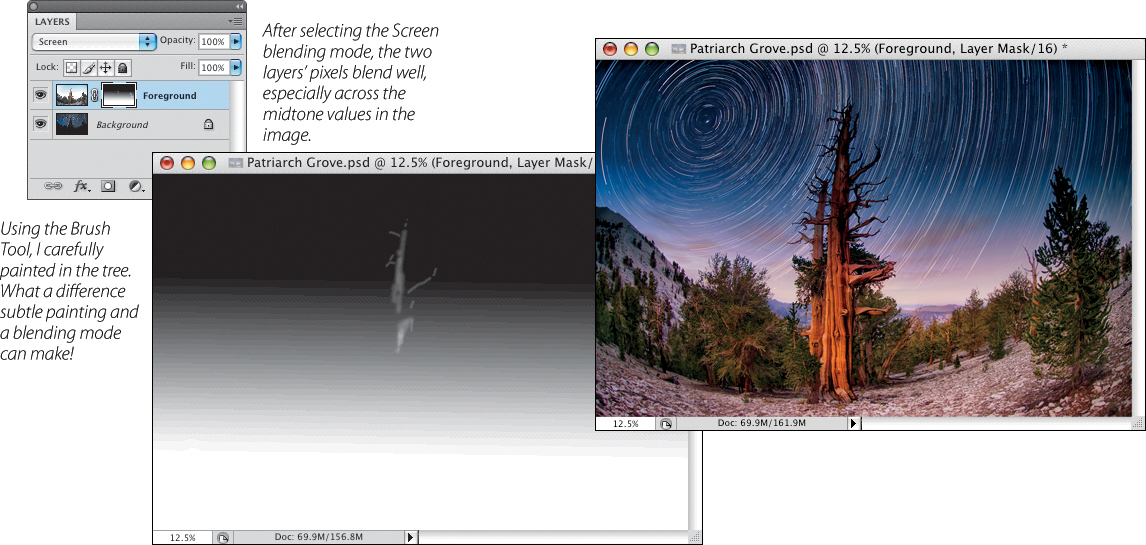
My next step was to change the “Foreground” layer’s blending mode to Screen by selecting it from the Blending Mode drop-down list (middle right).
The final step was to select the Brush Tool from the Tool panel, select a fairly hard brush tip (pages 51–52), and set the Foreground color in the Tool panel to white by pressing D, and then X. Making sure the layer mask on the “Foreground” layer was selected, I carefully painted in the upper part of the tall bristlecone pine in the center of the image (below right).
The final image is shown on pages 76–77.
I used Screen blending mode to make the foreground lighter when I blended a shot made before it was completely dark (for the foreground) with the starry night sky.
10.5mm digital fisheye lens; Background: thirty-five images at 4 minutes each, f/2.8, and ISO 400 to capture the stars; Foreground (shot before it was fully dark): 1/250 of a second, f/8, and ISO 200, tripod mounted; exposures combined in Photoshop.
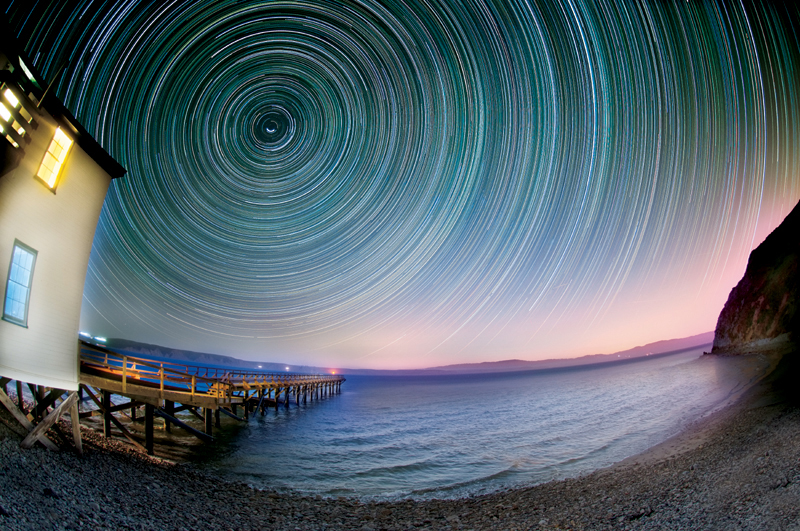
Pages 78–79: To make this image, I put the camera on a timer and used an external power source. I programmed the time to shoot exposures all night, then blended in the foreground from the first light of dawn.
10.5mm digital fisheye lens; Background: 139 images at 4 minutes each, f/2.8, and ISO 400 (total exposure time about 10 hours); Foreground (shot after sunrise): 1/250 of a second, f/8, and ISO 200, tripod mounted; exposures combined in Photoshop.
Using Screen for selective lightening
Sometimes you need to very selectively lighten an image—rather than lightening a large contiguous area of an image (such as the foreground in the bristlecone pine image shown on pages 76–77). For instance, consider the image of white dahlias, shot on a light box, and shown in finished form to the right.
Looking at the petals, my idea was to leave the lines at the edges of the petals hard, but to make the internal parts of the petal soft. This gives a feeling of translucency.
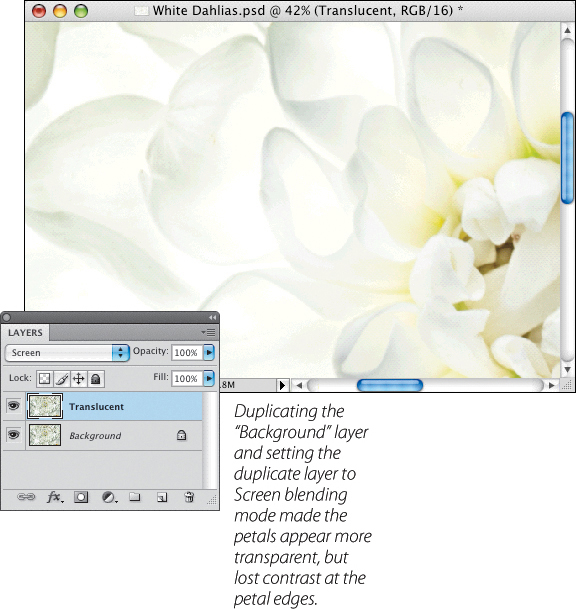
To achieve this result, I opened the dahlia image in Photoshop (upper left), and duplicated the dahlia layer. I named the duplicate layer “Translucent.” In the Layers panel, I set the “Translucent” layer’s blending mode to Screen. This lightened the duplicate layer considerably, making the petals appear quite translucent. At the same time, however, it lowered the contrast at the edges of the dahlia petals, losing definition (middle left).
The way to fix this was to hide the petal edges on the “Translucent” layer, letting the darker petal edges show through from the original layer at the bottom of the layer stack.
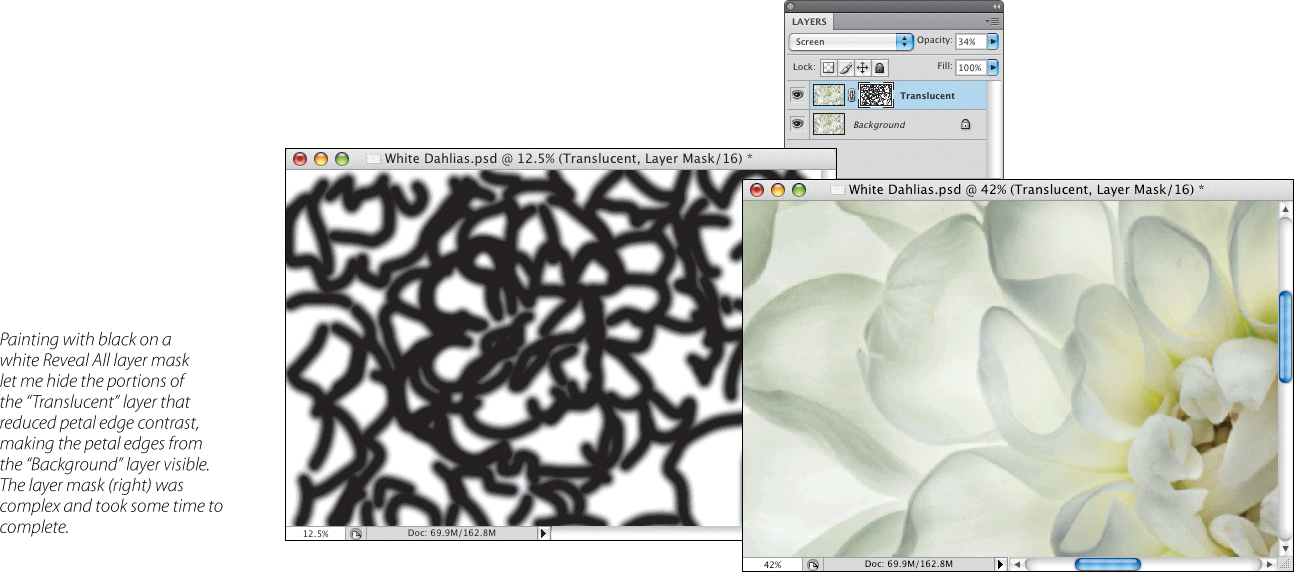
To do this, I added a white Reveal All layer mask to the “Transparent” layer (page 47). Using the Brush Tool set with a fairly hard, round tip with black as the Foreground color, I painted freehand, creating a fairly complex layer mask that added the petal edge contrast back in (page 80, bottom). Finally, using the Layers panel and the Opacity slider, I reduced the opacity setting of the duplicate layer until it looked right, at about 34%.
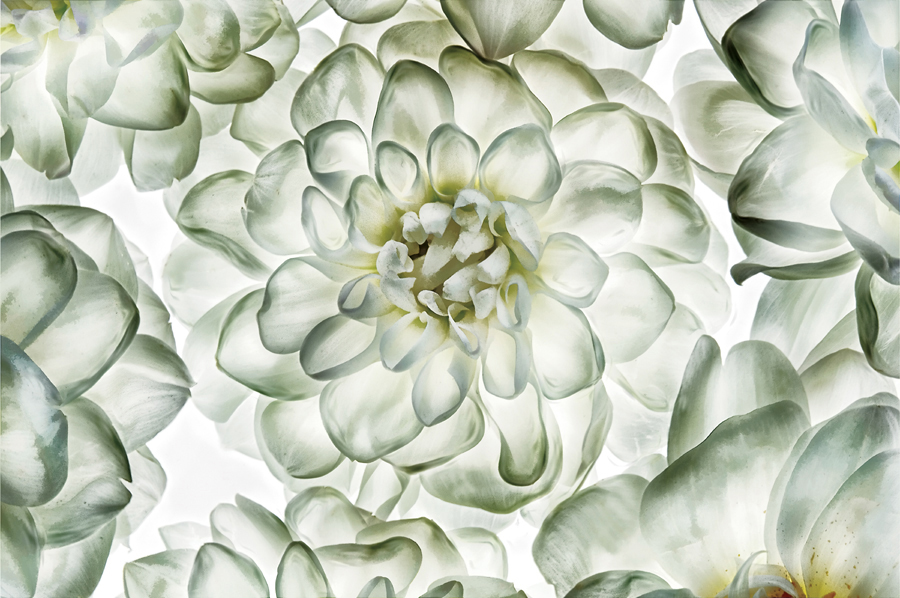
In my studio, I arranged some white dahlias on a light box and I shot several series of photos, grouping the flowers in different ways.
As I worked at my computer on one of the dahlia photos that pleased me most, I realized that I wanted to add a sense of lightness to the petals of the dahlias. To do this, I duplicated the image layer and applied Screen blending mode to make the petals appear more transparent.
200mm macro lens, 2 exposures (one at 3/5 of a second and one at 1/8 of a second), both exposures at f/16 and ISO 200, tripod mounted.